Update Music Library
| Steps to create your Music Library |
|---|
 |
| 1. Guide Main Page |
| 2. Music Settings |
| 3. Music File Tagging |
| 4. Scanning Music Into Library |
| 5. Artist information folder |
| 6. Scraping Additional Music data
|
| 7. Update Music Library |
8. NFO Files
|
9. Artwork
|
10. Import-export library
|
| 11. Backup & Recover |
 |
Introduction
This page will provide information to enable you to add new music, modify existing music and remove music from your existing music library.
If you use File View or File Manger, this page does not apply.
Depending upon your settings (explained further on) the addition of new music could take upto three steps:
- Scan files
- Scrape Artist
- Scrape Album
Scan Library
The Update Library function specifically relates to scanning music files and populating the database with the music file tag metadata, as well as the Basic artwork. It runs through the music source(s) looking for new, or changed, folders and files. It does this by checking through all your music, looking at timestamp and file size. But it only actually scans the tags from those files that are new or changed.
If you have a small library, this is not a problem as the scan is relatively quick. For those that have libraries in the order of tens of thousands of songs, this can be a very time consuming process. For this reason there are three ways to perform the Update Library. All achieve the same result, but their differences may suit different libraries or different user requirements.
In v18, you now have the option to rescan all tags even if they are existing in your library and unchanged, without losing scraped and other user data. You will be prompted to rescan all tags when manually running the Scan Item to Library process.
Remember, this procedure only conducts the scanning of the tags. It is possible to have Kodi scrape the additional music data at the same time by using the setting Fetch additional info on update as follows:
- If Fetch additional info on update is set to Disabled then you will need to follow one of the procedures in the Scrape Library section below to scrape the additional music information
- If Fetch additional info on update is set to Enabled then Kodi will complete the scan and then conduct the scrape automatically
Update Library- Automatic
-
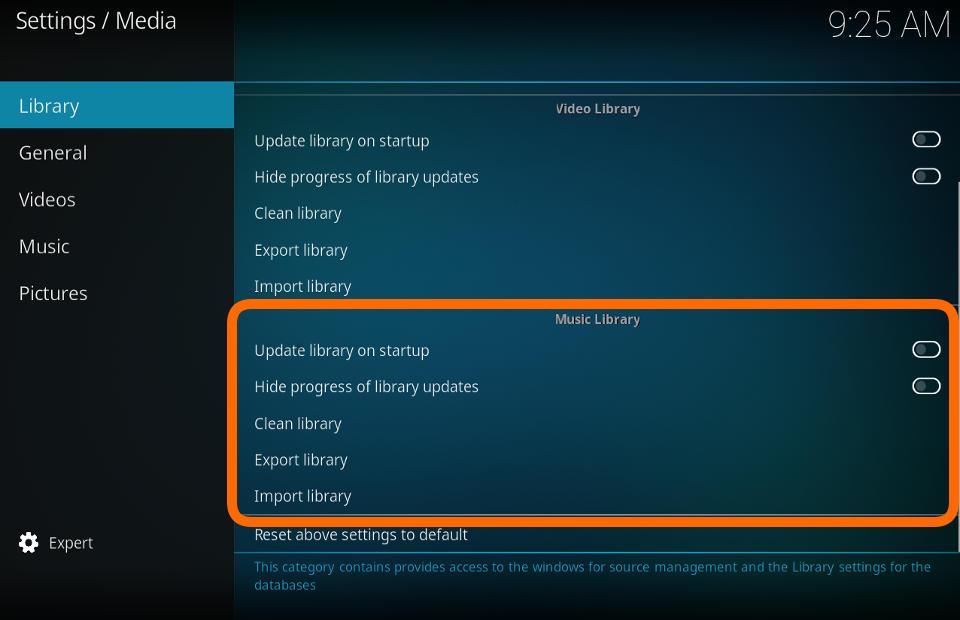 Image 1

By enabling the setting 'Update library on startup' all your Sources will be scanned for new content each time Kodi is started. If you have a large library, this could take some time.
If you do not add new titles to your library very often, you should disable this setting and use one of the other methods when new titles are added.
Update Library- Manual
This method is a global music library update. Kodi will search all music sources and all music folders and files looking for new, or changed, folders and files. It is the most commonly used process to scan music.

-
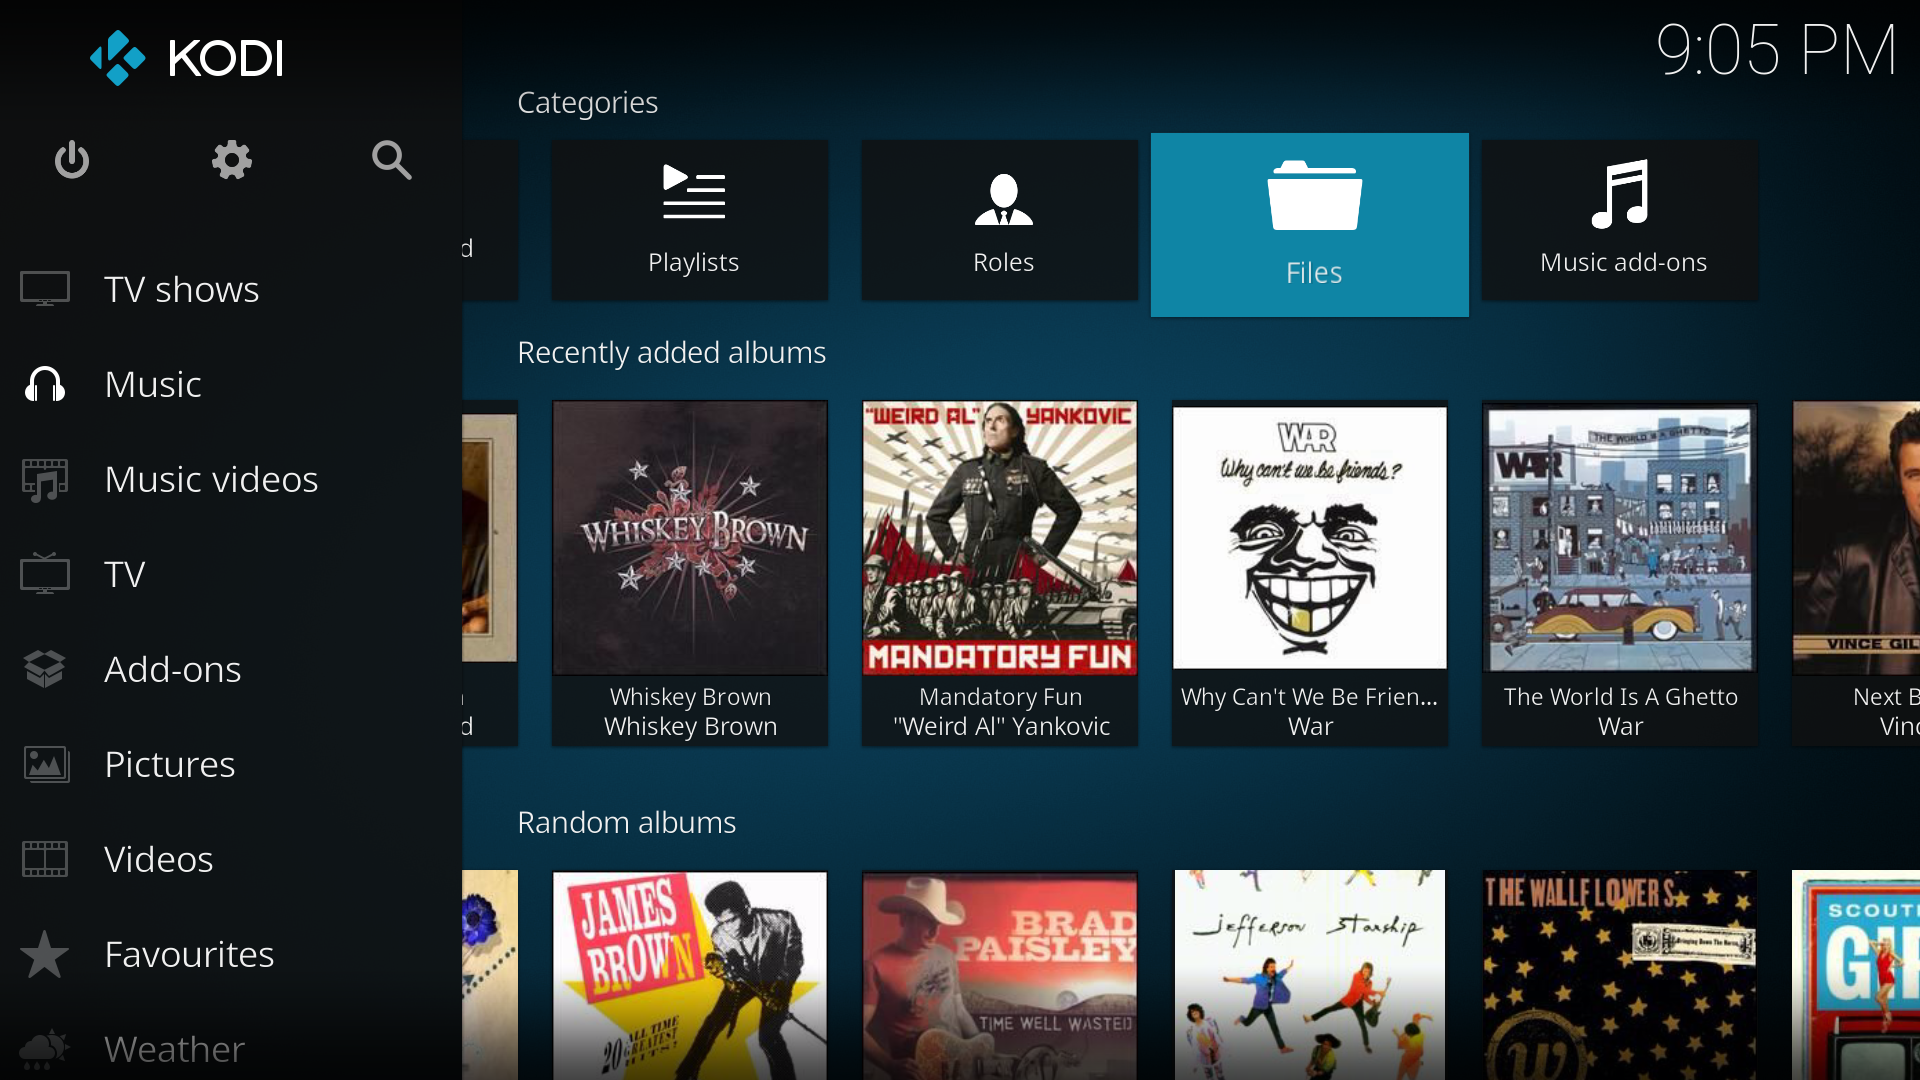 Image 1
 -
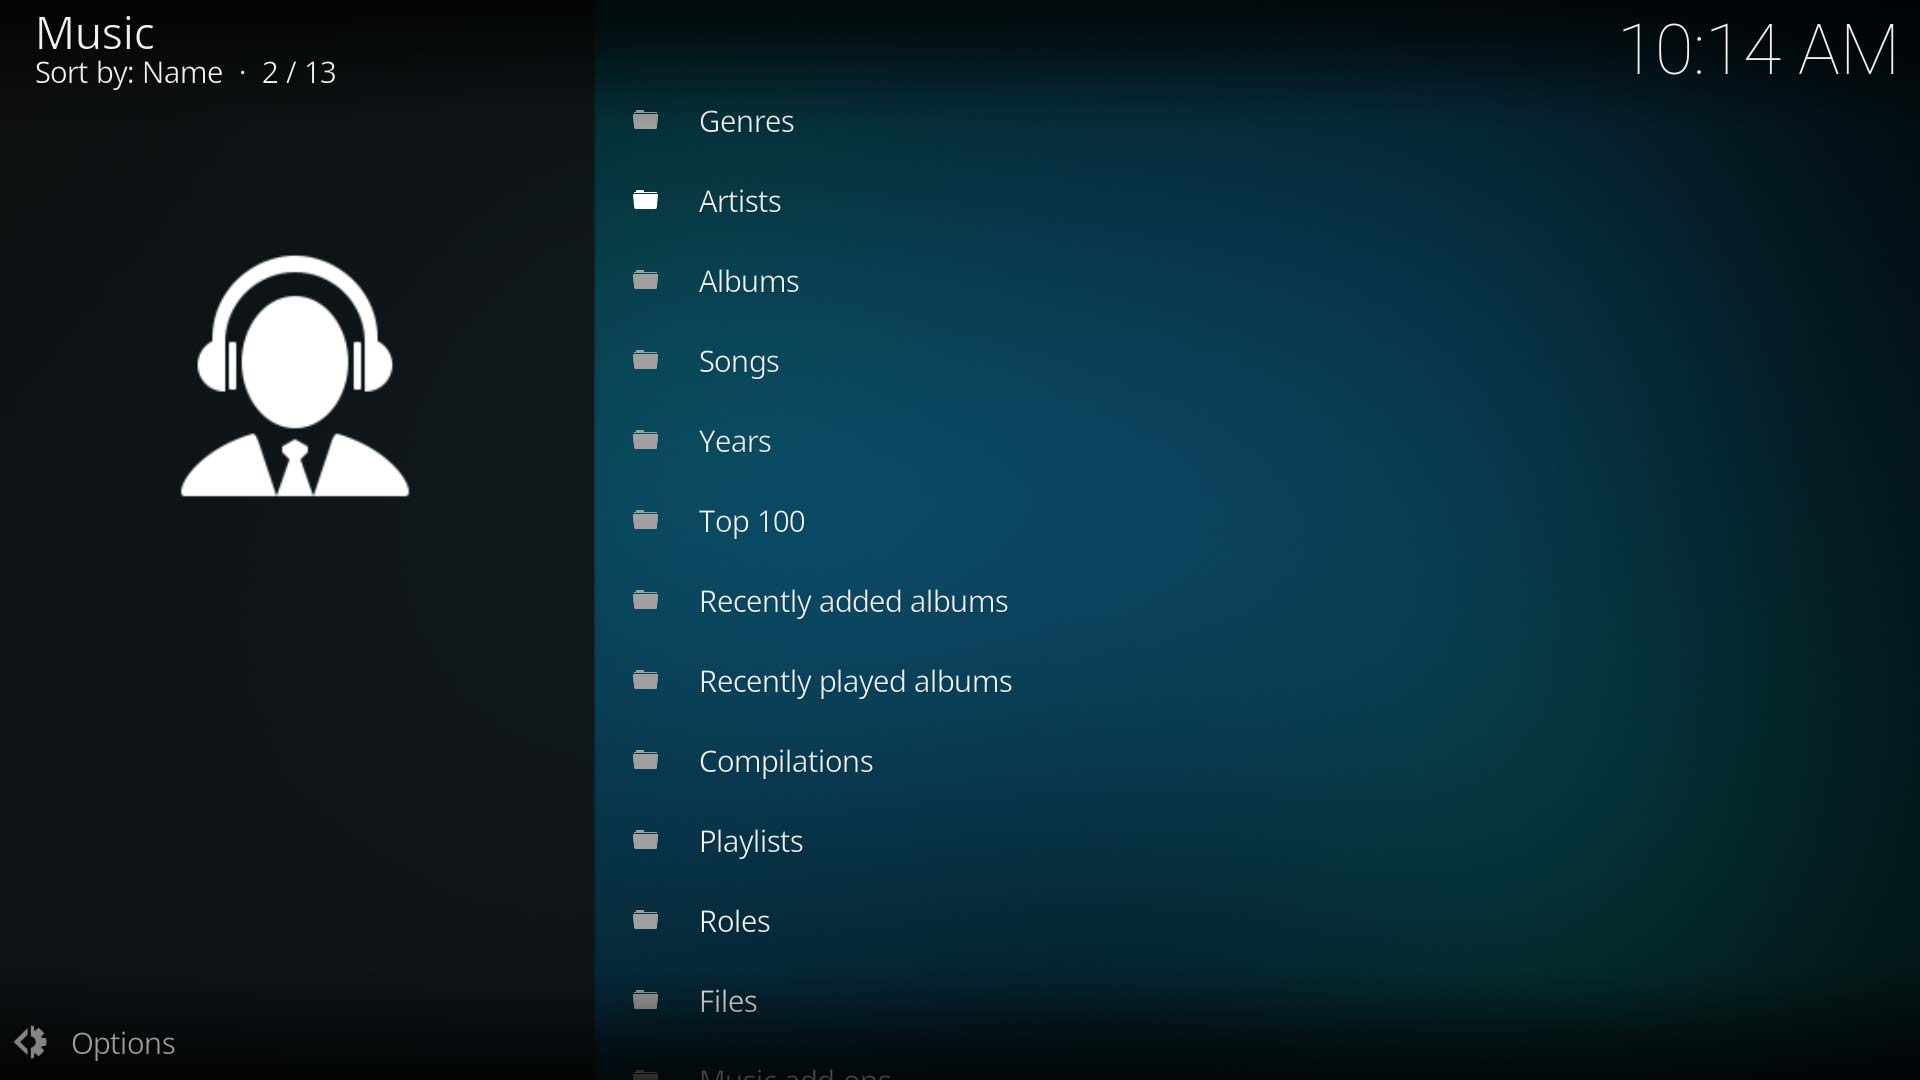 Image 2


To scan all sources for new and changed items, follow these steps:
- Select Music from the main menu (Image 1)
- From the Category Screen (Image 2) or from within any category list (Genre, Artist, Album, Songs etc)...
- Call up the Left Sidebar Menu which is normally left-arrow (Image 3)
- Select Update library (Image 3)
Update Library- via Add-ons
- Add-on:XBMC Library Auto Update can be used to schedule automatic updates to the library.
Scan Source to Library
The following allows you to scan one source for new items. Good if you have added new music files to a single music source.
-
Image 1
-
Image 2
-
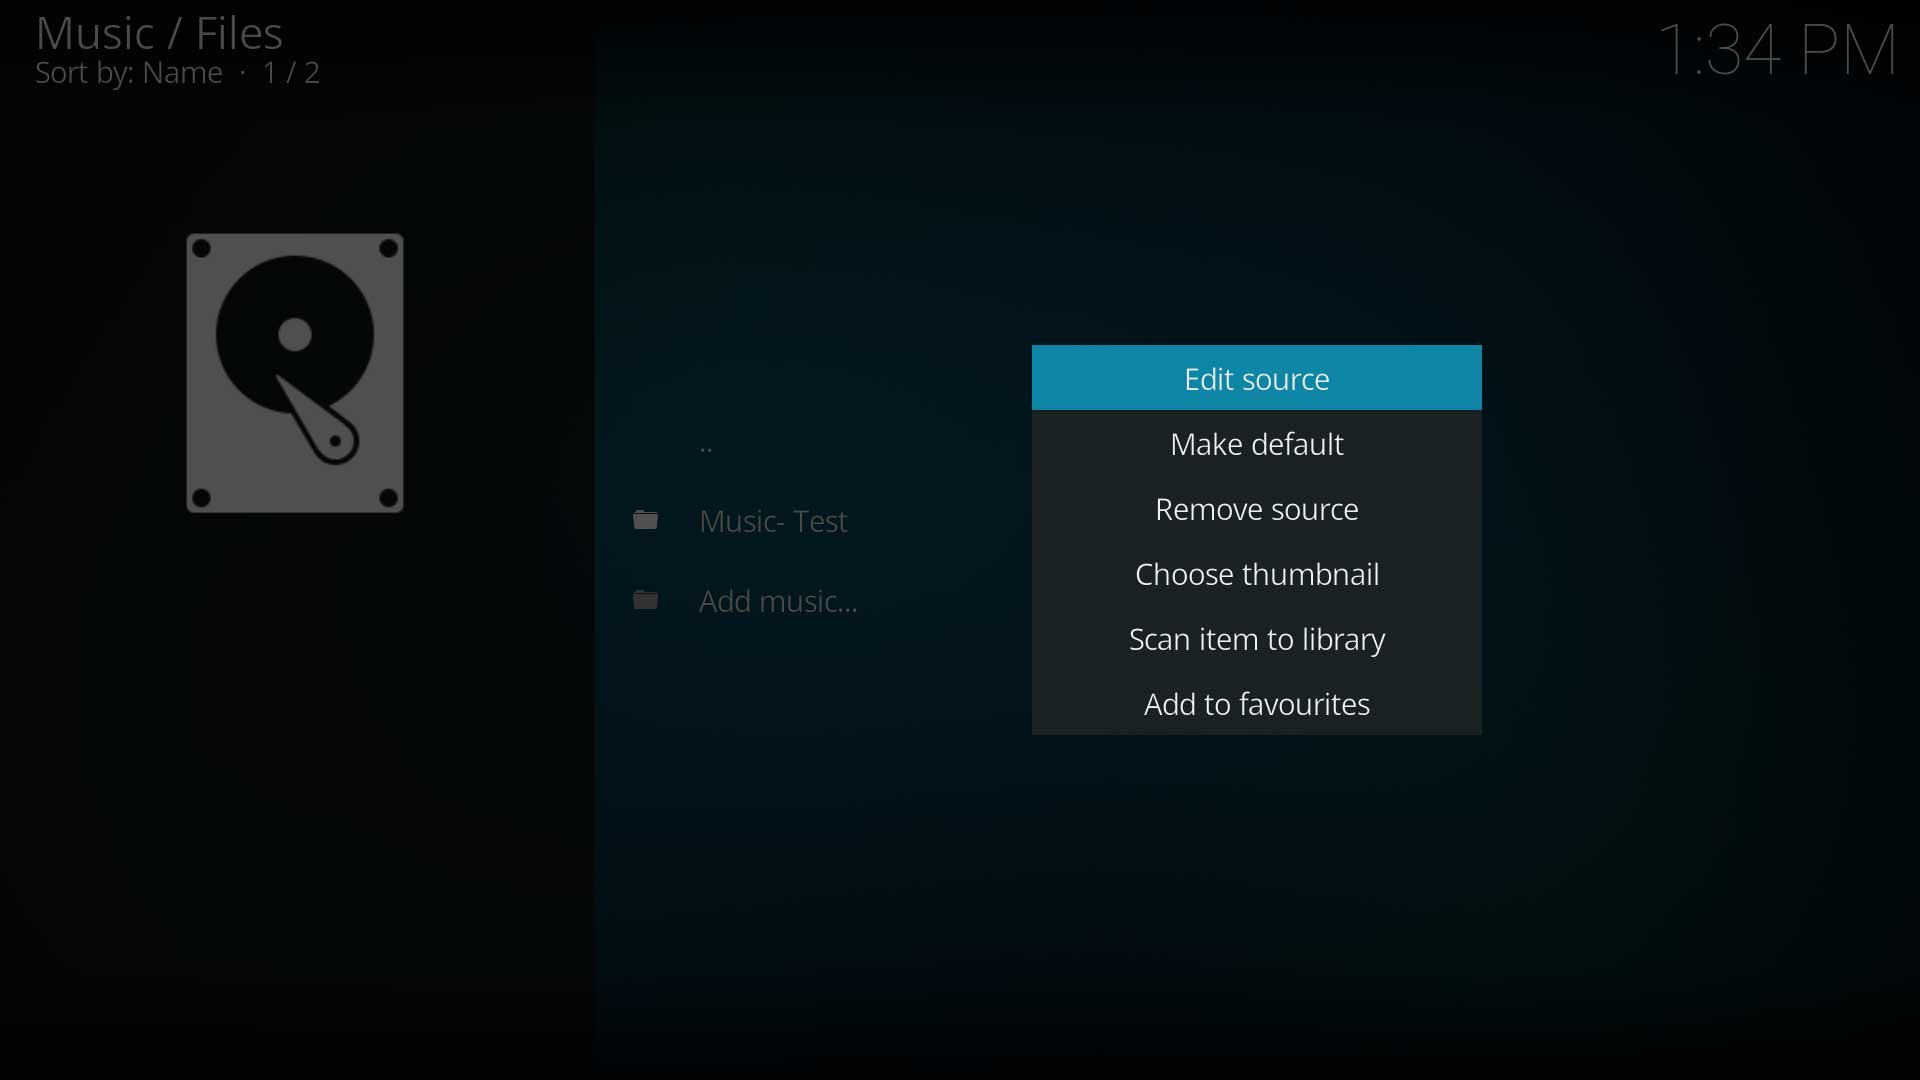 Image 3
 -
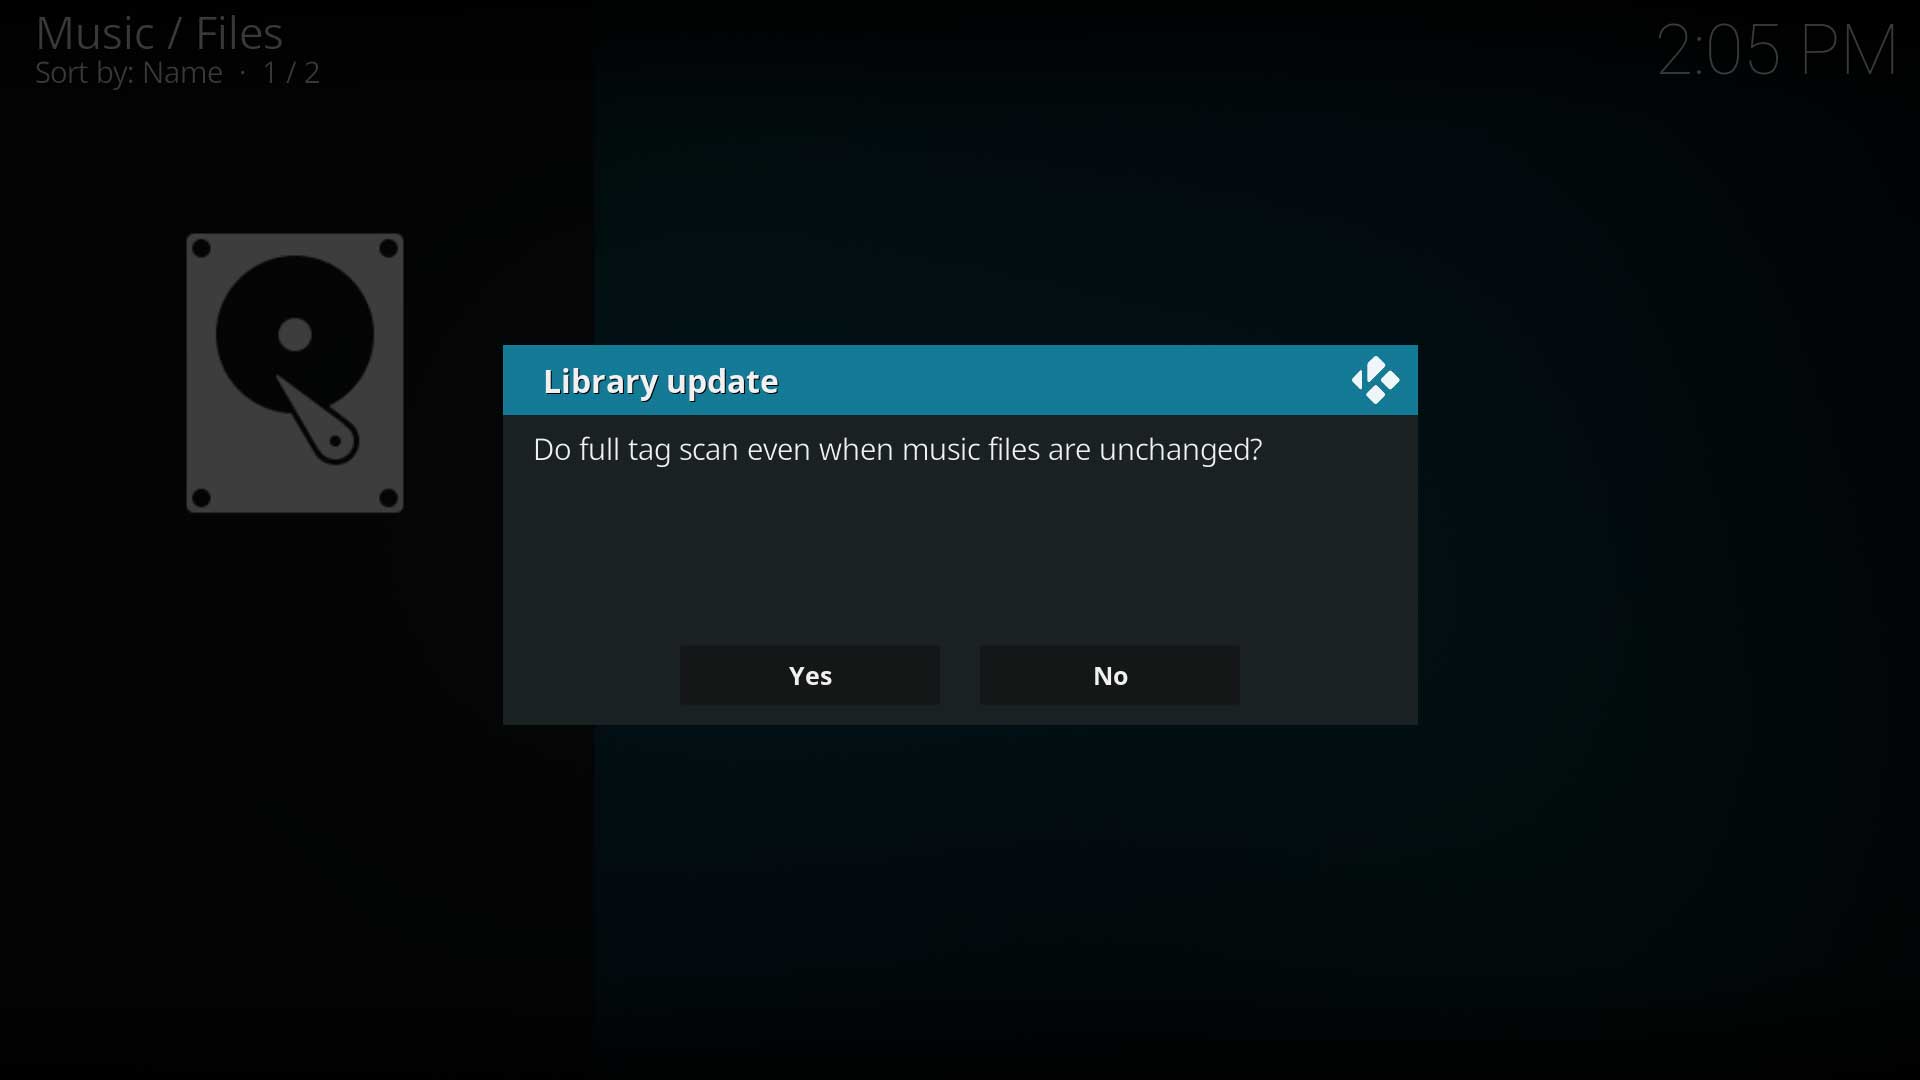 Image 4


To scan an entire source, follow these steps:
- Select Music from the main menu (Image 1)
- Select Files from the category list (Image 2)
- Highlight the source to be scanned
- Call up the Context Menu (Image 3)
- Select Scan item to library (Image 3)
- You will be asked if you would like to Do full tag scan even when music files are unchanged? (Image 4)
- Yes- Will scan the tags of all music files, even if they are unchanged
- No- Will scan the tags of new files only
Scan Item to Library
This method will update individual Album or Artist only. A good option for large libraries with only a few new files.
-
Image 1
-
Image 2
-
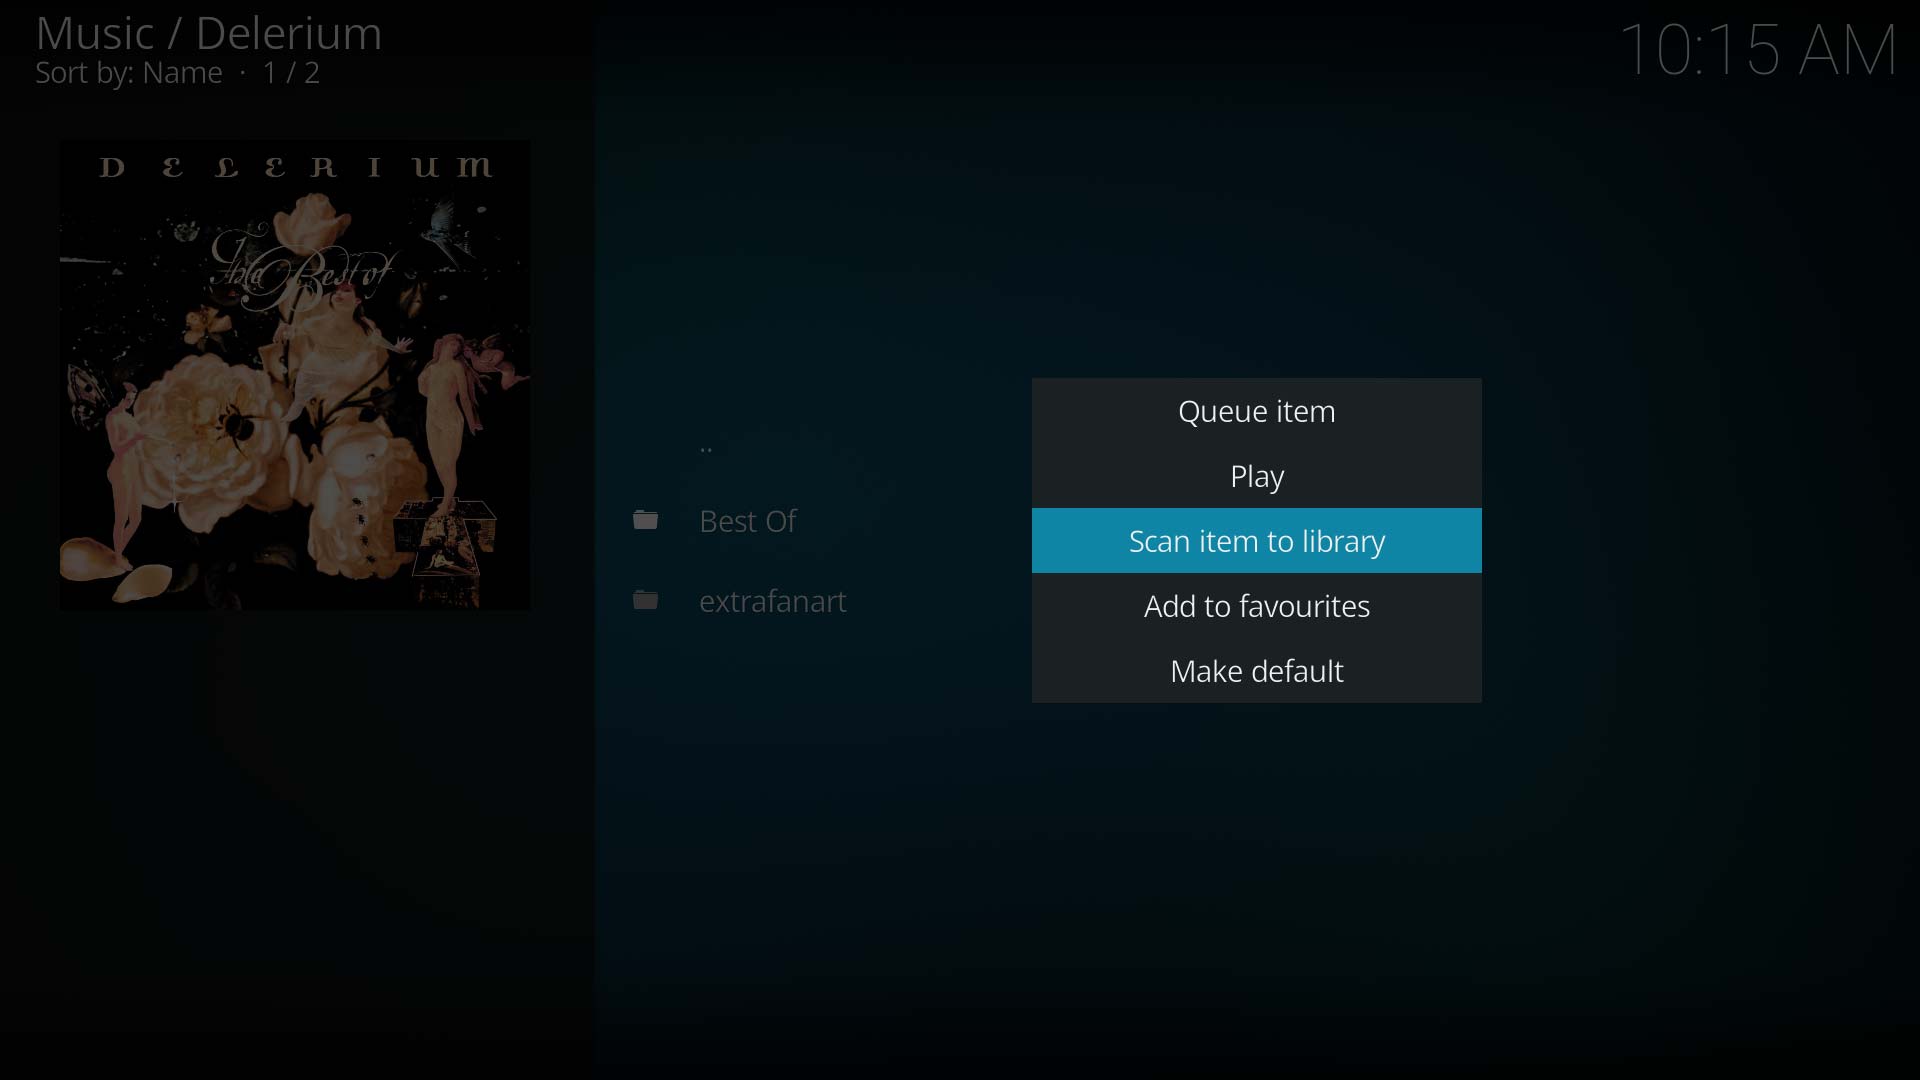 Image 3
 -
Image 4

To scan a new album or artist into your library, follow these steps:
- Select Music from the main menu (Image 1)
- Select Files from the category list (Image 2)
- Select the Source where the album or artist is saved
- Select either the Artist or Album category
- Highlight the Album or Artist to be scanned into the library (Image 3)
- Call up the Context Menu (Image 3)
- Select Scan item to library (Image 3)
- You will be asked if you would like to Do full tag scan even when music files are unchanged? (Image 4)
- Yes- Will scan the tags of all music files, even if they are unchanged
- No- Will scan the tags of new files only
- Repeat as necessary
Notes:
- Scanning an individual song will scan all songs in the album
- If you added multiple albums from the same Artist, then conduct the above procedure at the Artist level
Scrape Library
This section is specifically related to Scraping additional music information. This can be from an online source or a nfo file. To use this function, files must already be scanned into the library.
The two methods available to Scrape additional information are:
- Refresh - Used on individual artists and albums
- Query info for all artists/albums - Two separate functions that performs a global query, but only downloads the additional data for those items not previously scraped. ie new items only.
If you have an item already scraped into the library but there is new information available online, or you have added new data to a nfo file, you will need to perform a Refresh to scape the data into the library. A Query for all artists/albums only looks for entries not previously scraped.
Query Info for all Artists
-
Image 1
-
Image 2
-
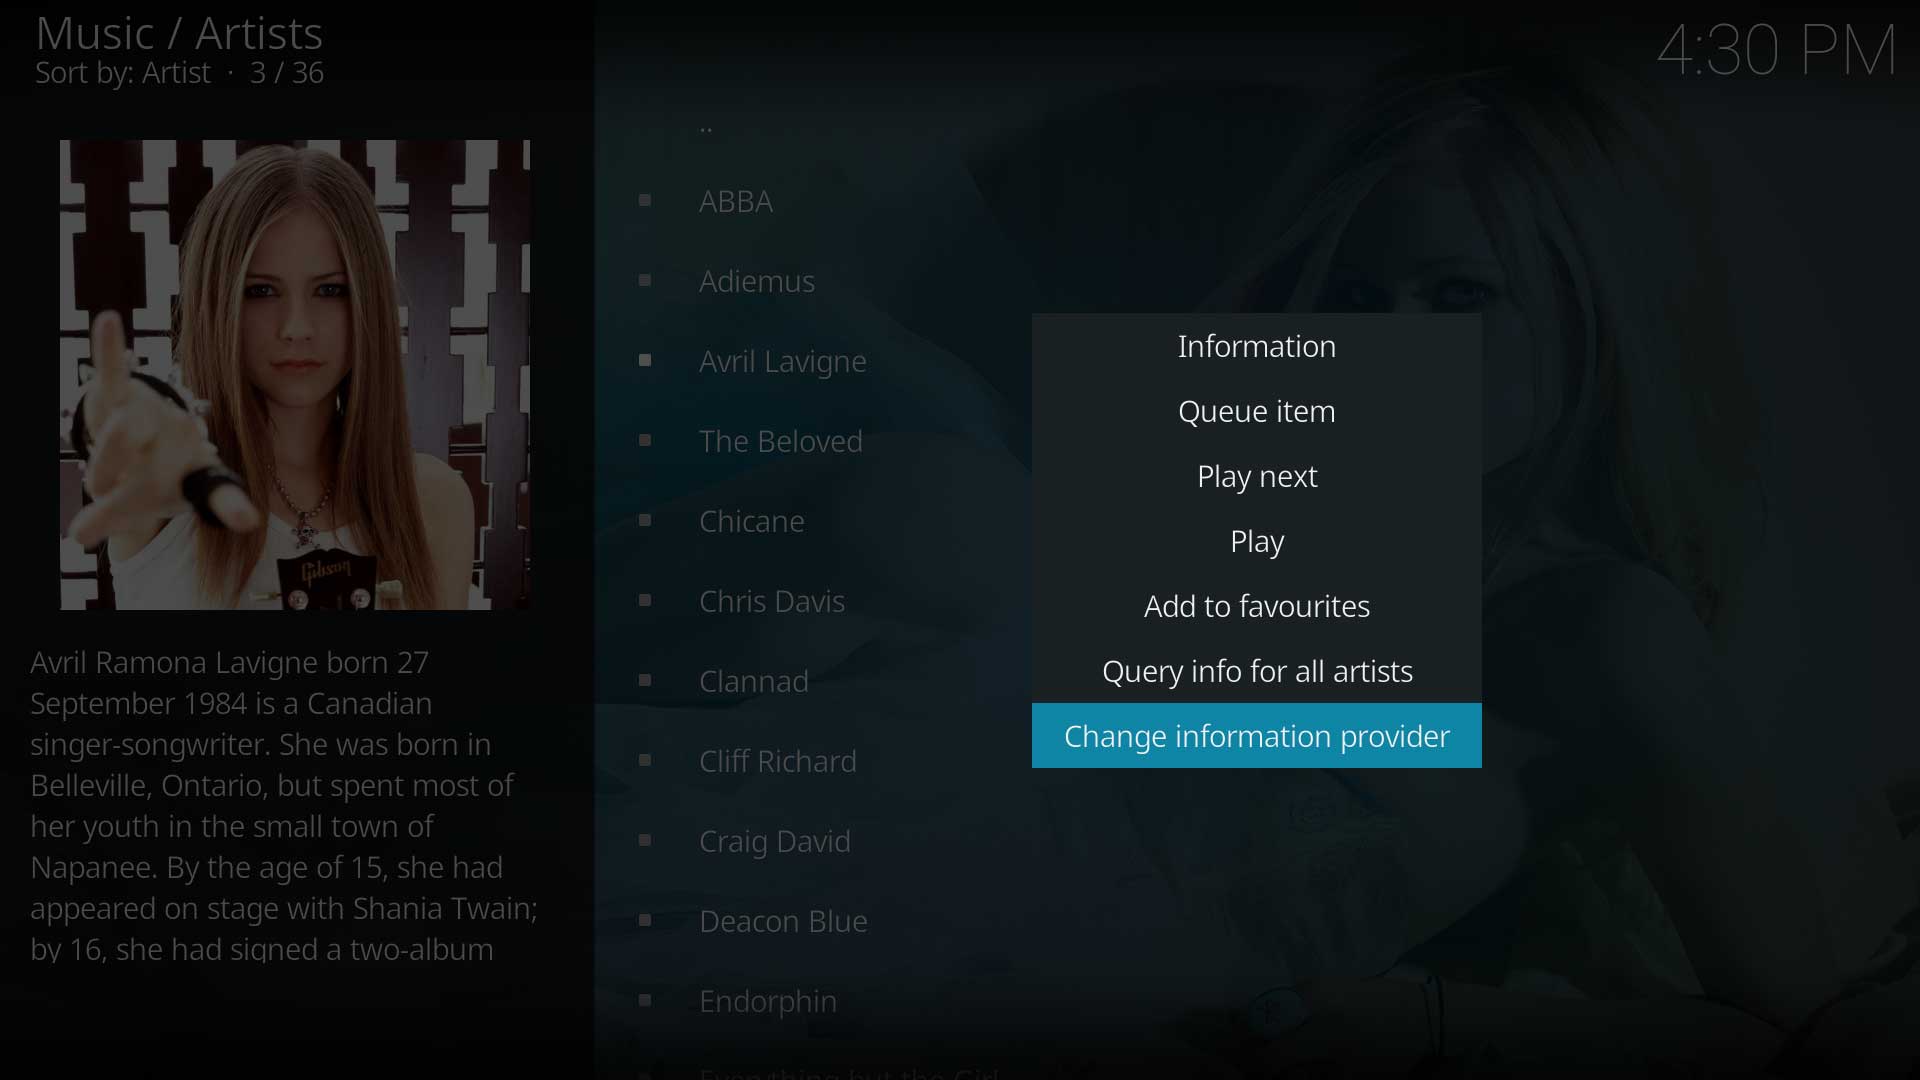 Image 3

To scrape additional information for Artists, follow these steps:
- Select Music from the main menu (Image 1)
- Select Artists from the category list (Image 2)
- Highlight any Artist (Image 3)
- Call up the Context Menu for the selected Artist (Image 3)
- Select Query info for all artists (Image 3)
If you do not go to the Artist category but perform this action through another music category, say Years or Roles, only that particular Artist you selected will be scraped.
Query Info for all Albums
-
Image 1
-
Image 2
-
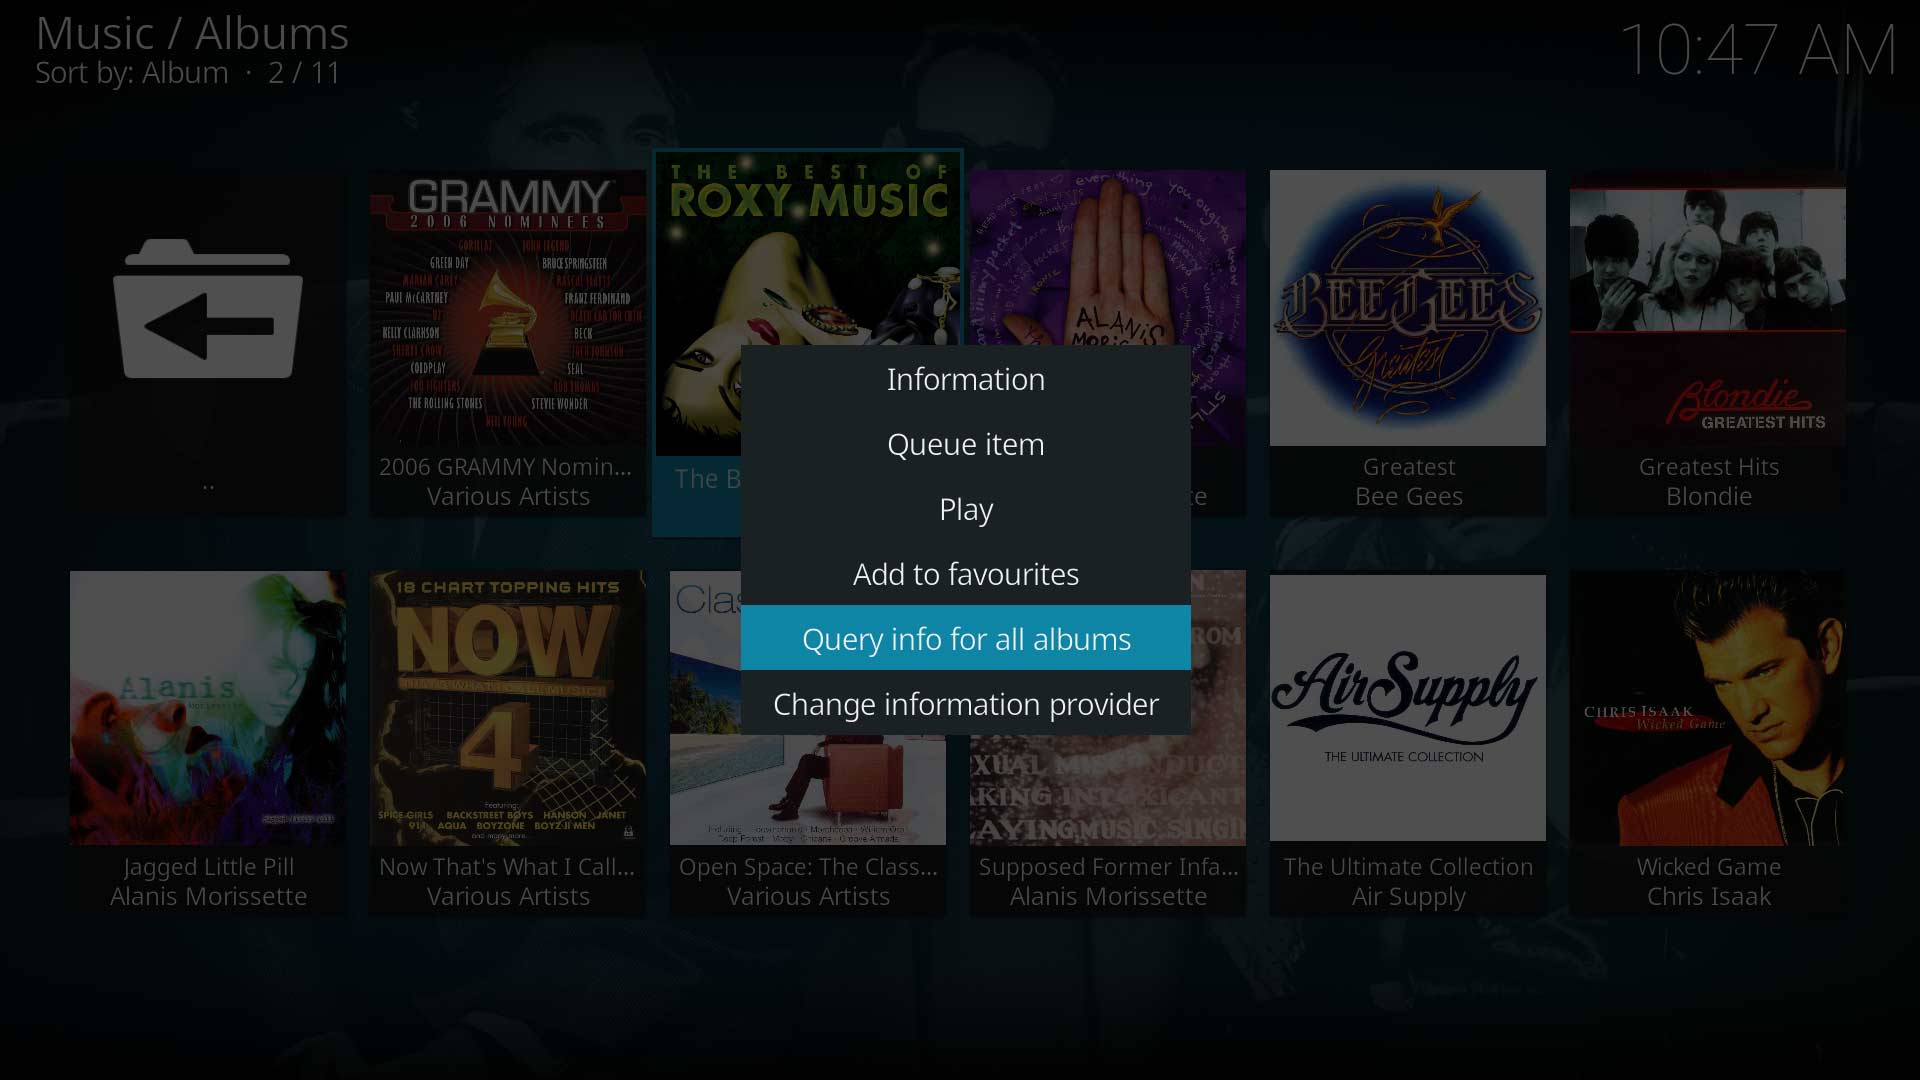 Image 3

To scrape additional information for Albums, follow these steps:
- Select Music from the main menu (Image 1)
- Select Albums from the category list (Image 2)
- Highlight any Album (Image 3)
- Call up the Context Menu for the selected Album (Image 3)
- Select Query info for all albums (Image 3)
If you do not go to the Album category but perform this action through another music category, say Years or Roles, only that particular Album you selected will be scraped.
Refresh Artist
-
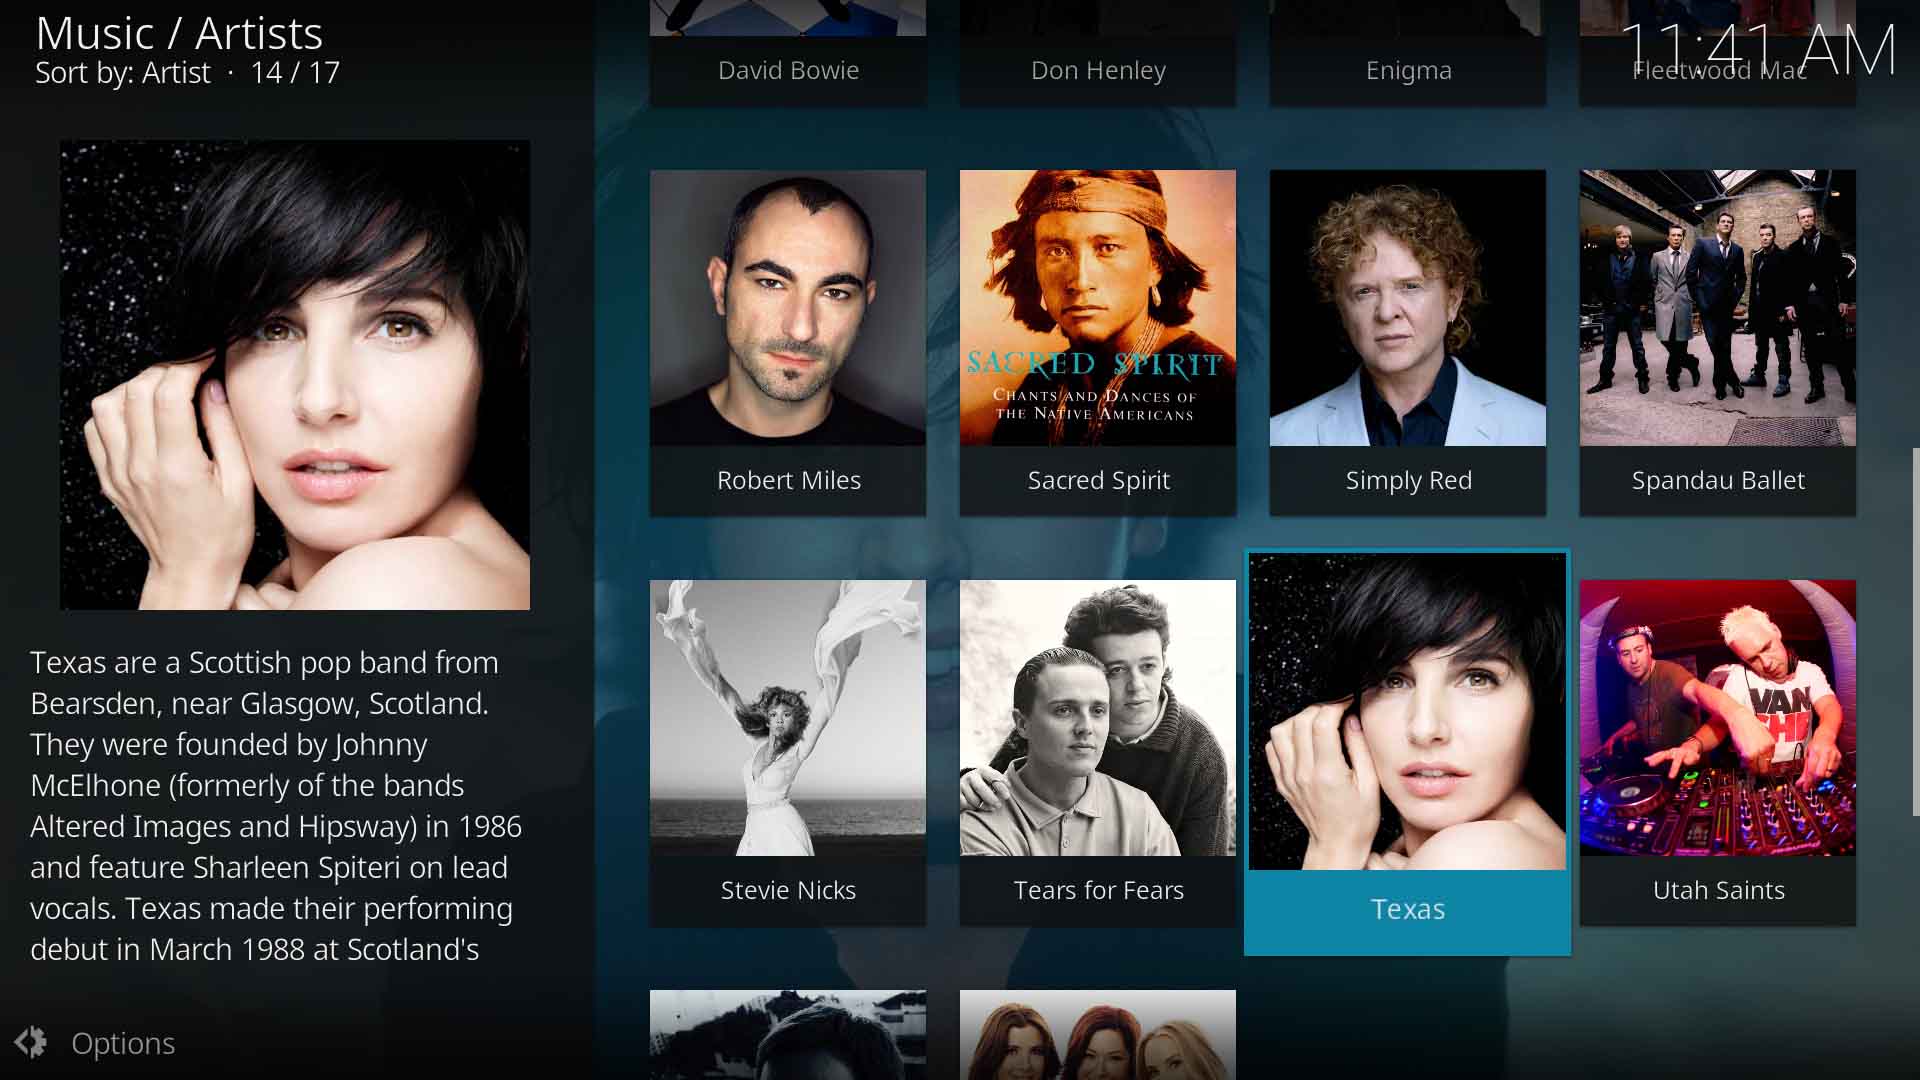 Image 1
 -
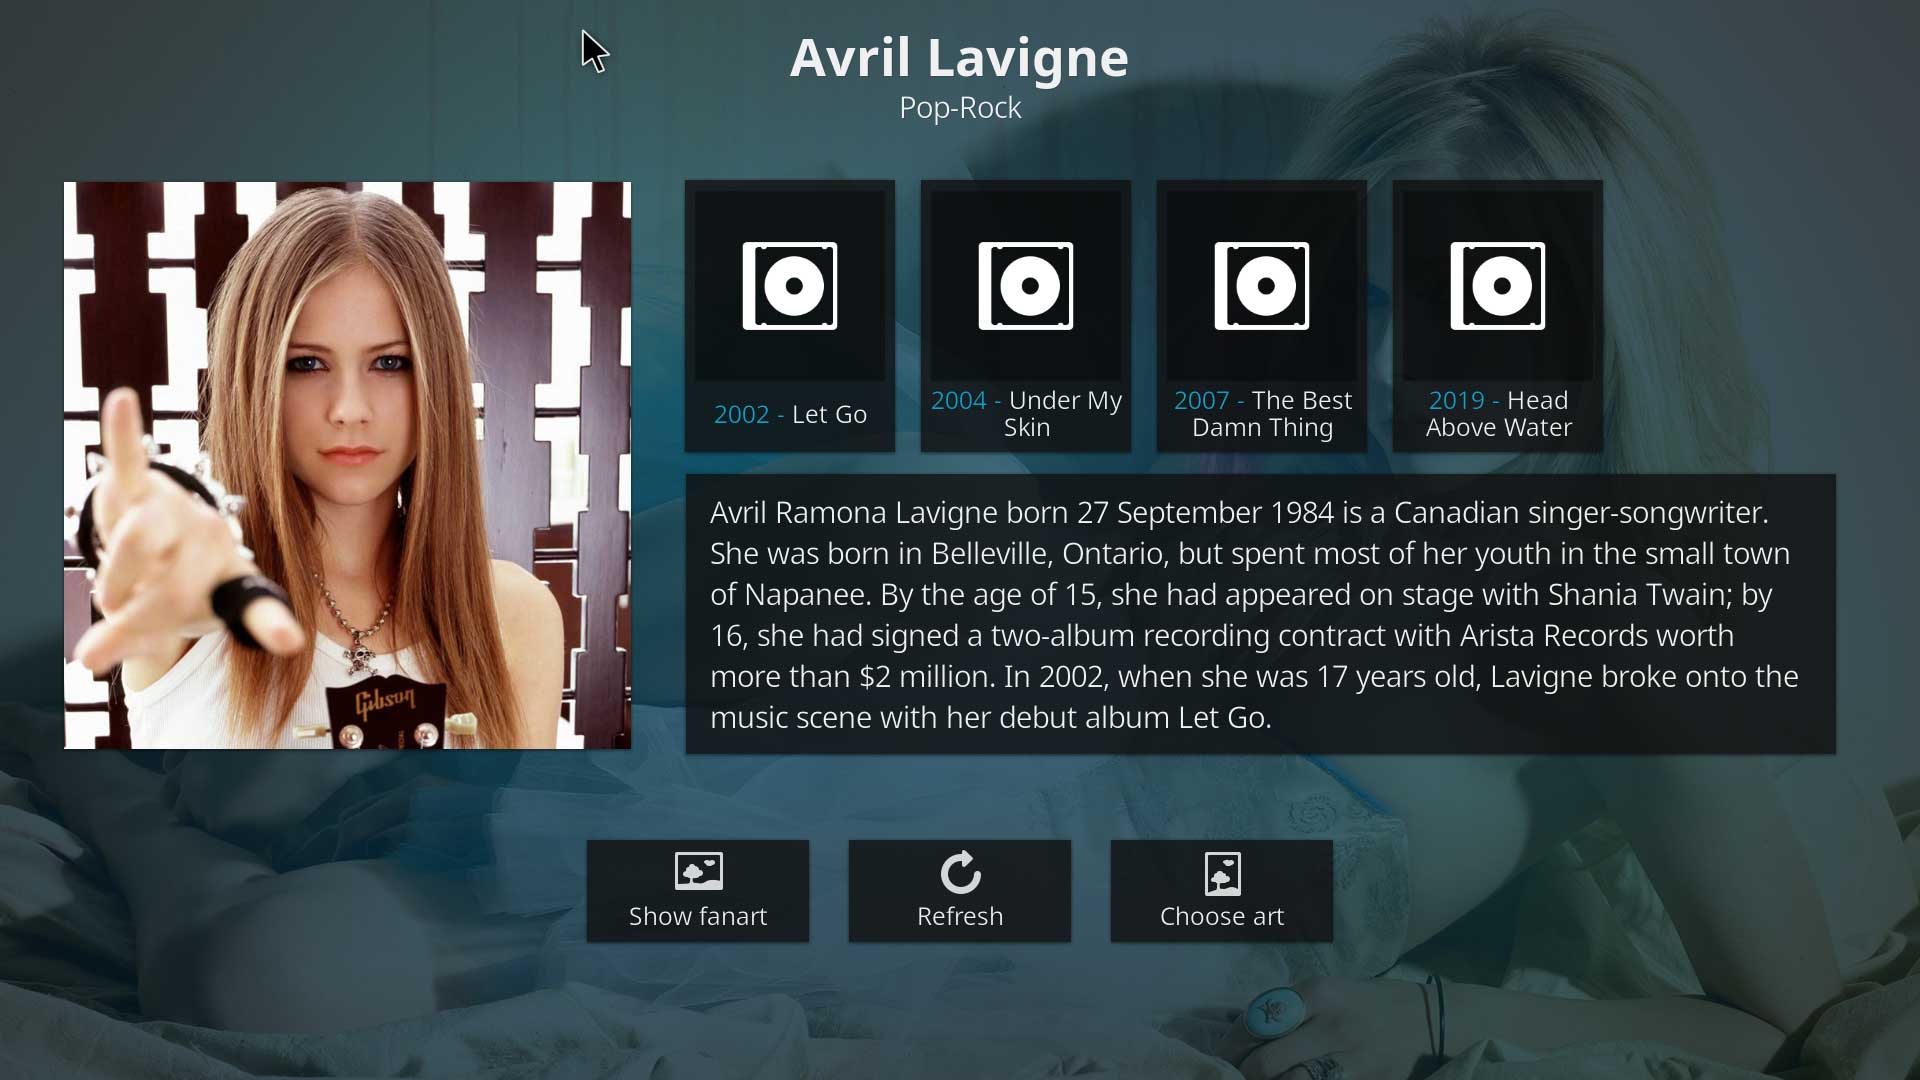 Image 2
 -
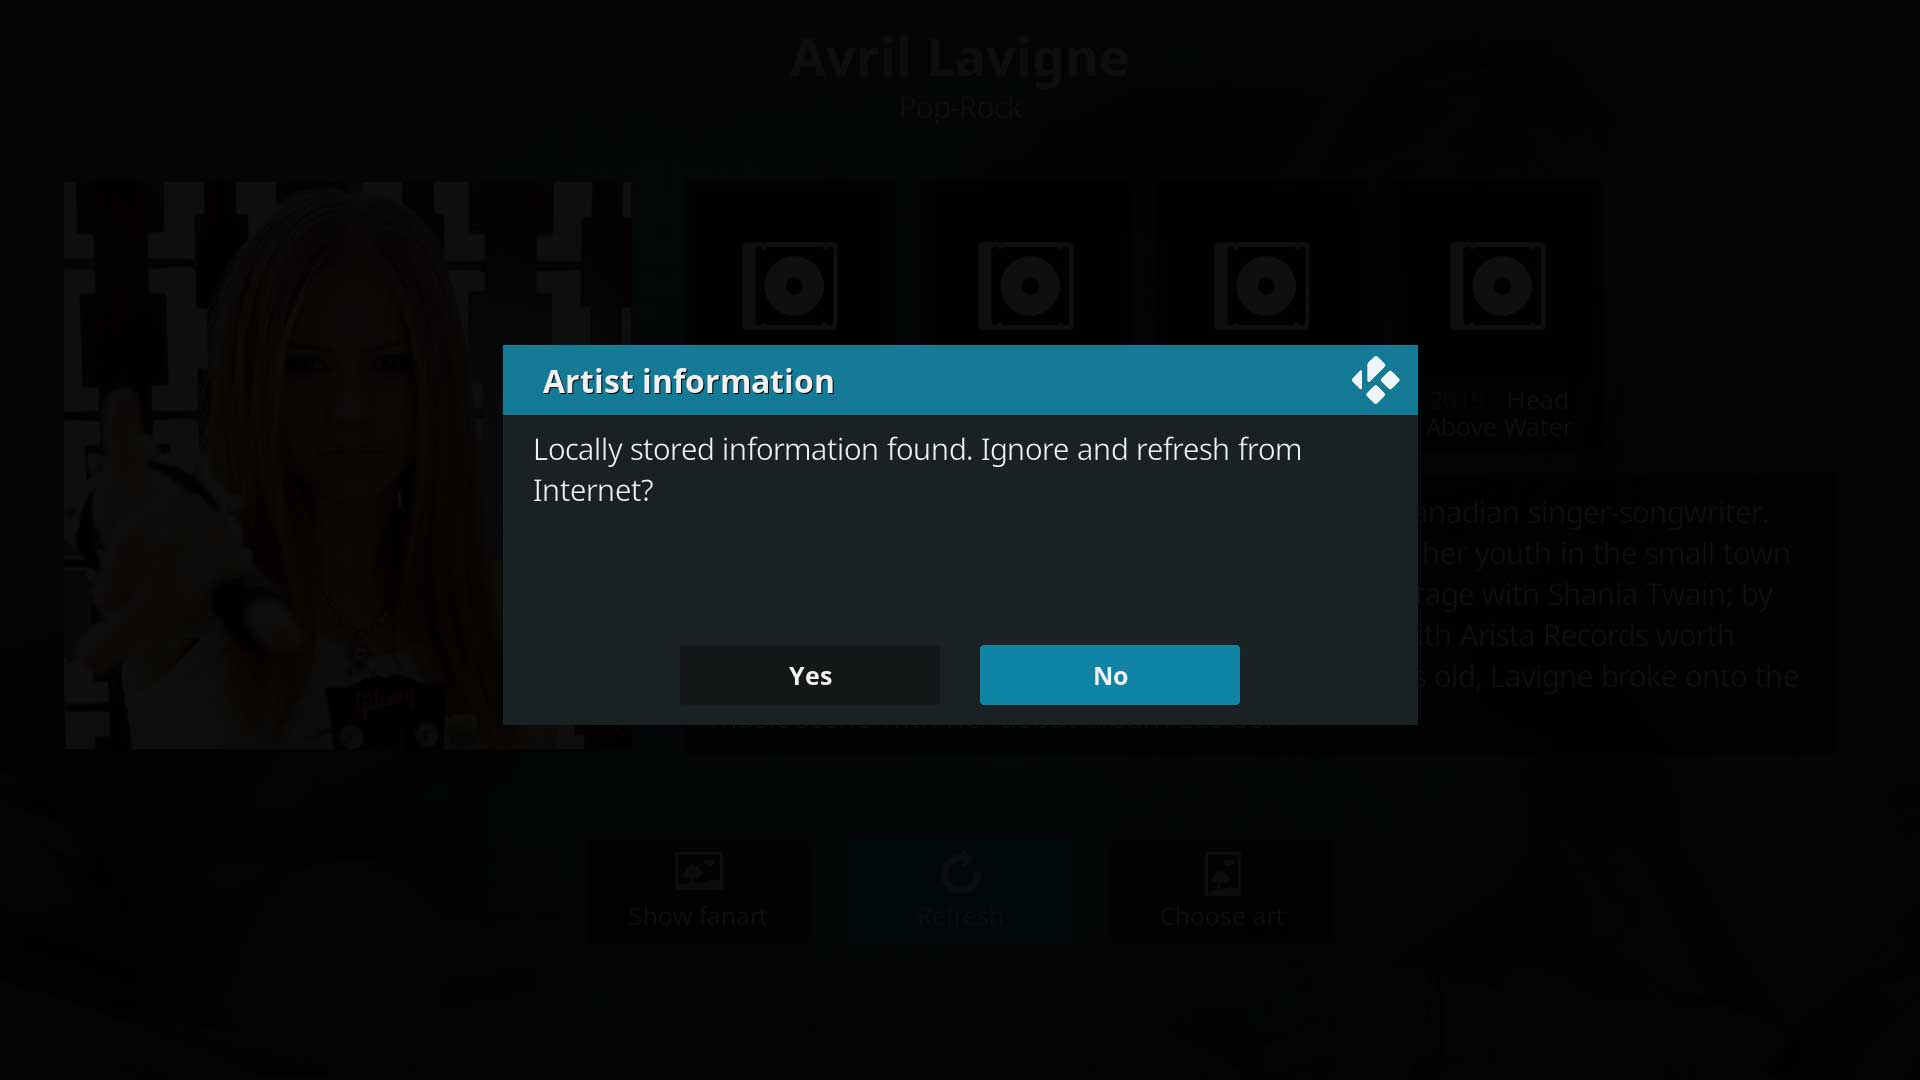 Image 3


To Refresh the data for an individual Artist, or to Scrape data for a newly added Artist, follow these steps:
- From the Artist list highlight the Artist to be modified (Image 1)
- Call up the Artist Information page. (Image 2)
- Select Refresh (Image 2)
- If you have NFO Files in the Artist folder, you will be asked Locally stored information found. Ignore and refresh from Internet? (Image 3)
- No- The data in the NFO File will be used to populate the library
- Yes- The NFO File will be ignored and the scraper will download data from the online service. Local artwork is still used. Use Choose Art to change artwork
Refresh Album
-
 Image 1
 -
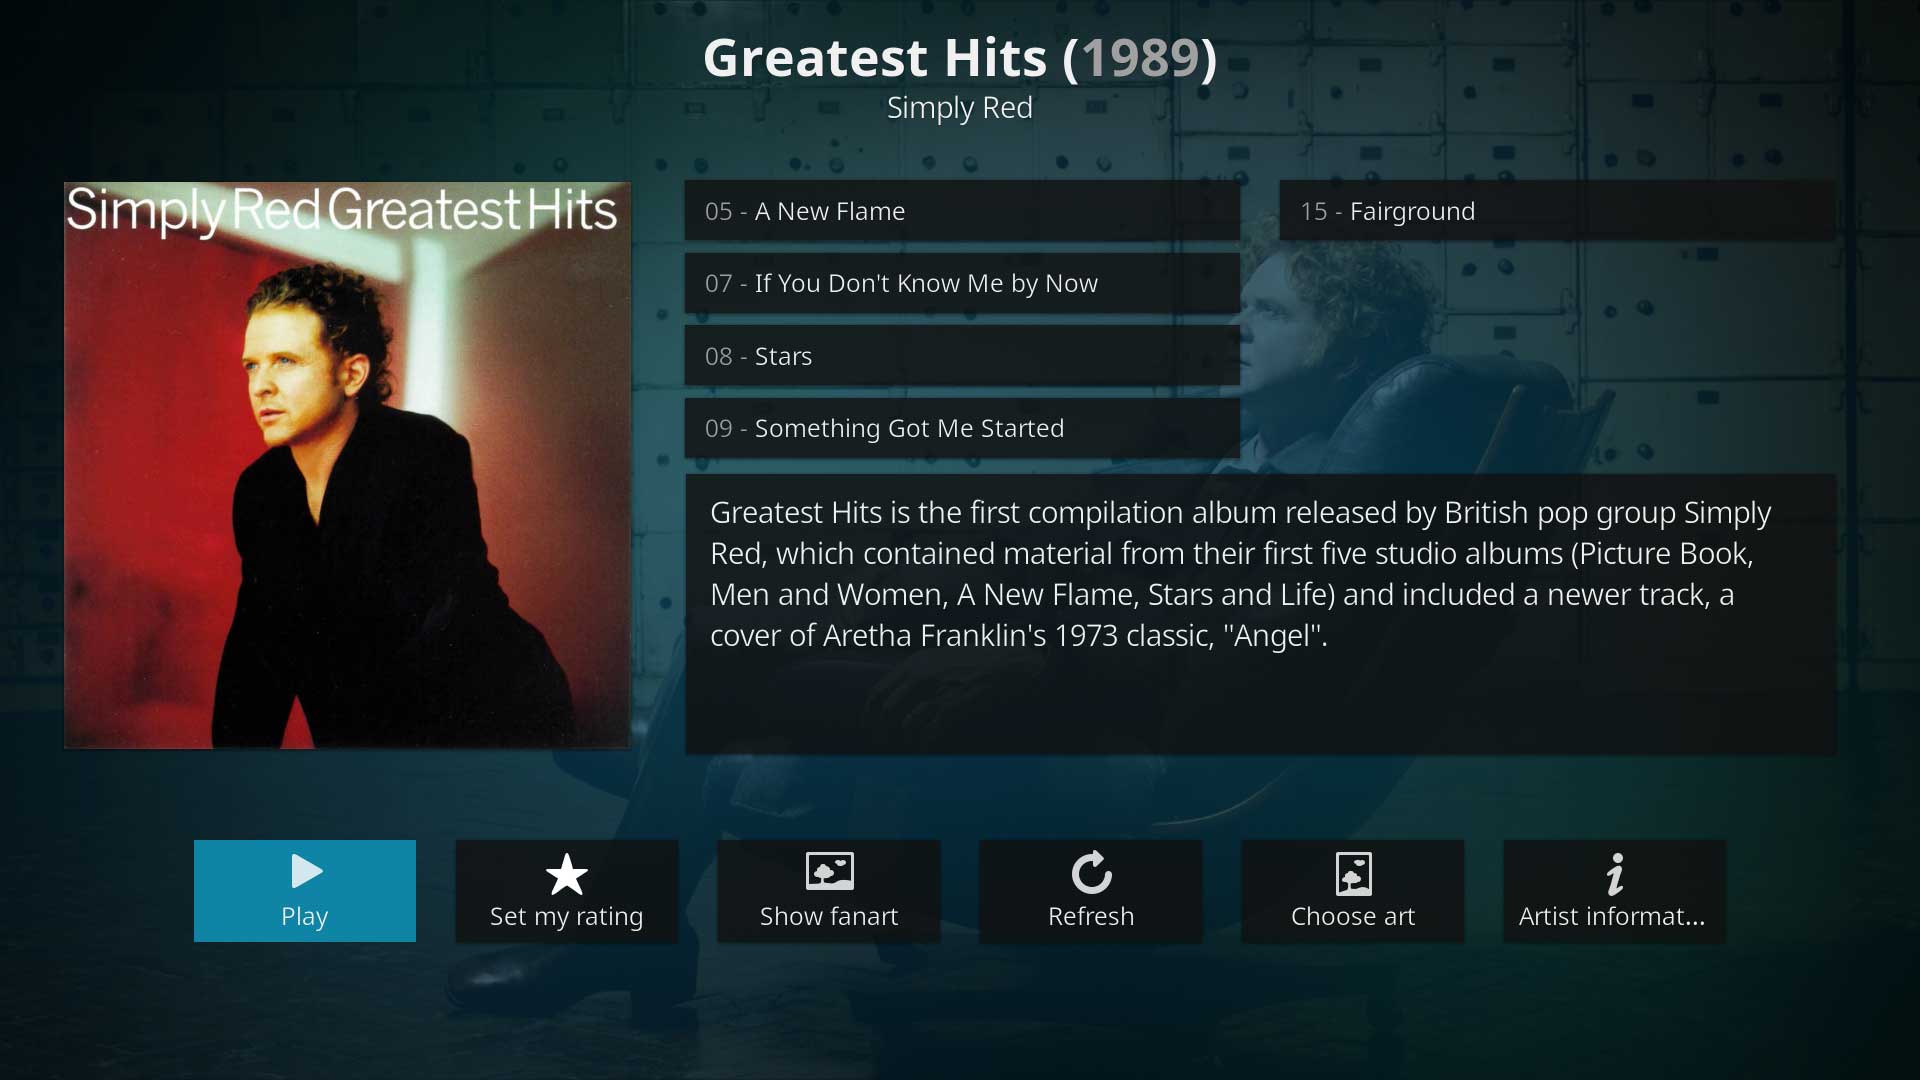 Image 2
 -
Image 3


To Refresh the data for an individual Album, or to Scrape data for a newly added Album, follow these steps:
- From the Album list highlight the Album to be modified (Image 1)
- Call up the Album Information page. (Image 2)
- Select Refresh (image 2)
- If you have NFO Files in the Album folder, you will be asked Locally stored information found. Ignore and refresh from Internet? (Image 3)
- No- The data in the NFO File will be used to populate the library
- Yes- The NFO File will be ignored and the scraper will download data from the online service. Local artwork is still used. Use Choose Art to change artwork
Remove Music
Removing music from the Kodi library works differently to removing a movie from the Video Library. Due to the virtual links between Artist-Album-Songs, it is not possible to remove items directly from the library. The following two methods are available.
Remove Source
The following allows you to remove one or more Sources. This will remove from the library all music contained in that source.
-
Image 1
-
Image 2
-
Image 3
To remove a source, follow these steps:
- Select Music from the main menu
- Navigate to and enter Files as illustrated in Image 2
- Highlight the source to be removed
- Call up the Context Menu (Image 2)
- Select Remove source (Image 2)
- A confirmation prompt will display- Are you sure? Yes / No
- Select Yes to remove the source
- Select No to cancel the procedure
- If you selected Yes you will then be asked Do you want to remove all items within this path from your library?...
- Yes- Will remove all songs from the library that were located in that source, and the associated Artists and Albums if they do not appear on any other source
- No- Will keep the library listing of all music that was in that source.
- Note: If you answered No but would now like to remove the items from the library...
- Re-add the Source following the directions above.
- Answer No when asked Do you want to add the media from this source to your library
- Follow these instructions to again remove the Source ensuring you select Yes to remove items from the library
- Note: If you answered No but would now like to remove the items from the library...
Remove Individual Item
It is not possible to remove music from the library in the same way as you remove movies from the movie library of Kodi. If you need to remove a particular song, album or artist your options are as follows:
- Using the File Browser of your operating system, remove the music by either deleting it or moving it out of the Kodi Source folder. Then, within Kodi, run a Clean Library, or
- From within Kodi
- Enable the setting Allow file renaming and deletion
- Using Music>Files, locate and highlight the item to be deleted- either an individual song, Album or Artist
- From the context menu, select Delete. Be aware- This will delete the item(s) from your hard disk
- Run a Clean Library
Exclude
It is possible to exclude a particular song type (eg. mp3) or a folder from the Music Scan and Scraping process.
Exclude Song Types
With the use of the advancedsettings.xml file, you can limit the types of music files displayed.
Default extensions for MUSIC:
.aac .ac3 .aif .aiff .ape .cmc .cmr .cue .dmc .dff .dsf .dsp .dts .dtshd .flac .gcm .gdm .idsp .imf
.m15 .m3u .m4a .m4b .mac .mka .mp+ .mp2 .mp3 .mpa .mpc .mpd .mpdsp .mpp .mpt .mss .nsv .oga .ogg .opus
.pls .pxml .rm .rma .rmt .rsd .rss .sap .sfx .shn .spt .strm .tak .tm2 .tm8 .tmc .tta .uni .url
.waa .wam .wav .wma .wpl .wtv .wv .wvs .xsp .xspf .xwav .zip
It is possible to add or remove extensions for Music, using the following XML tags. Useful if you keep, say, FLAC and mp3 versions of music in the same folder. The <remove> tag can be used to remove mp3 from being listed in the library, leaving only the higher quality FLAC being displayed.
<musicextensions>
  <add>.ex1|.ex2</add>
  <remove>.ex3|.ex4</remove>
</musicextensions>
- See also: Advancedsettings.xml
Exclude Folder
It is possible to exclude certain folders, and the contents of those folders, from the scanning and scraping process as follows:
- Using the file browser of your operating system locate the folder to be excluded
- Inside the folder to be excluded, place an empty text file and name it as follows (including the preceding period): .nomedia
Kodi will read the filename and ignore the folder and its contents.
On Windows systems, ensure file extensions are enabled and visible. There should be no file extension for this file.
| Return to top |
|---|
| Next step: | NFO Files |