Add-on:Tvheadend HTSP Client
| Tvheadend HTSP Client | ||||||||||||||
| ||||||||||||||
| Need help with this add-on? See here. |
Tvheadend frontend; supporting streaming of Live TV & Recordings, EPG, Timers
Installing
This add-on is installed from the Add-on browser located in Kodi as follows:
- Settings
- Add-ons
- Install from repository
- PVR clients
- Tvheadend HTSP Client
- Install
For Linux, see... Ubuntu PVR add-ons
| Live TV, PVR & Radio Contents |
|---|
|
|
| Related Pages: |
What is TVheadend
Tvheadend is a popular open source TV streaming PVR recording software (TV tuner and DVR recording server) software application for Linux supporting DVB-S(2), DVB-C(2), DVB-T(2), ATSC, IPTV (UDP/HTTP), and Analog video (V4L) as input sources. Tvheadend it can be used as a PVR recording software of Kodi. Version 3.4 and later of Tvheadend include support for timeshifting (pausing of Live TV).
Tvheadend, formerly named "HTS Tvheadend", was previously part of the HTS (Home Theater System) software suite before it spun of into its own project for it as a dedicated PVR backend software product.
By levering existing third-party PVR recording software applications such as Tvheadend that specialize in receiving television signals and support a client–server model which Kodi can access via a PVR client addon, these PVR features allows you to watch Live TV, listen to radio, view a EPG TV-Guide, schedule recordings and enables many other TV related features, all using Kodi as your primary interface once the initial pairing connection to Tvheadend have been done and and configuration of the PVR client addon for it is complete.
Preinstalled options
The following Kodi/OS distributions come with Tvheadend already installed, or easily installed as an option. These are great one-stop solutions that can greatly simplify the installation of the backend, as well as various other benefits unique to those distros.
- LibreELEC - LibreELEC is a JeOS implementations for Kodi that comes packaged with the Tvheadend backend software and a Tvheadend Kodi PVR add-on.
Installing Tvheadend
- Basic
- Most Debian and Ubuntu installations can take advantage of the standard APT installation methods for getting Tvheadend installed, either using a GUI package manager, or from the command line using "
apt-get install tvheadend". The install procedure normally creates a user named "hts", which is the user Tvheadend will run as. You should check that the "hts" user has sufficient permissions to your tuner (usually /dev/dvb/adapter0/frontend0). Running the command "sudo adduser hts video" should be sufficient.
- For more info, see: https://tvheadend.org/projects/tvheadend/wiki/Download
- Raspberry Pi
- The easiest way to get Tvheadend on the Raspberry Pi series is to use LibreELEC, or a other JeOS implementations for Kodi. You can also use the Arch Linux ARM instructions below if you are using Arch Linux ARM on a Raspberry Pi.
- Synology NAS
- You can install Tvheadend from the Syno Community repo through the DiskStation Manager: http://www.synocommunity.com/repository
Tvheadend quick start guide
| This section is probably outdated. Please use an alternative guide such as this for now. |
- Note: This is just the most basic steps needed to get a signal from your PVR backend to Kodi. This guide probably doesn't include everything you will want to do, like name channels, get the electronic programming guide (EPG/TV guide) set up, remove channels, etc.
-
- For help with those features see #Additional guides and links.
| 1. | Make sure Tvheadend is up and running (see here for details: https://tvheadend.org/projects/tvheadend/wiki/Install_and_initial_setup ) |
| 2. | All configuration is done in a web browser. If you are on the same machine that Tvheadend is installed then point your browser to http://localhost:9981 . If you are on a different machine than Tvheadend, then point your browser to http://IP.ADDRESS.GOES.HERE:9981 , where IP.ADDRESS.GOES.HERE = the IP address of the machine that Tvheadend is installed on. For example: http://192.168.0.3:9981 |
| 3. |
If your tuner hardware is not detected or is having issues, check http://linuxtv.org for driver support. This example is for a DVB Tuner: Terrestrial TV Standard Definition. It is worth checking the hardware you purchase is supported using the LinuxTV.org link above. Also the low cost Satellite units have very poor hardware support. However DVB and DVB2 units are easy to purchase, low cost and reliable, even on modest hardware running Kodi such as Raspberry Pi. For Freeview a Free to Air (FTA) service in the UK you need a DVB2 adaptor.(See here for details: https://en.wikipedia.org/wiki/DVB-T2)
|
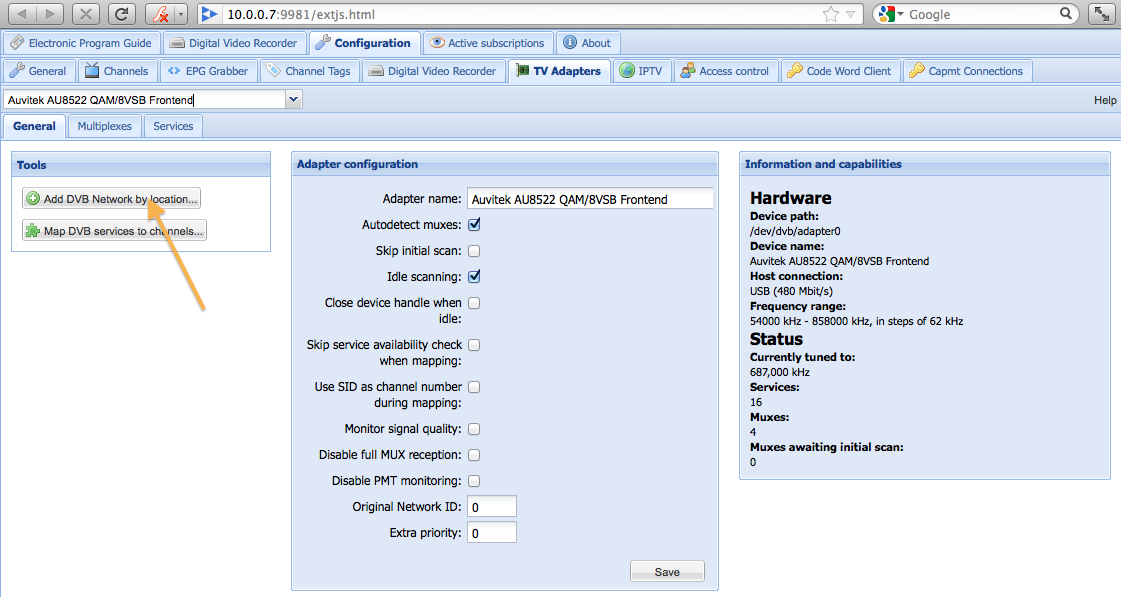
| 4. | You will see a window like this. Now you will want to click on "Add DVB Network by location". |
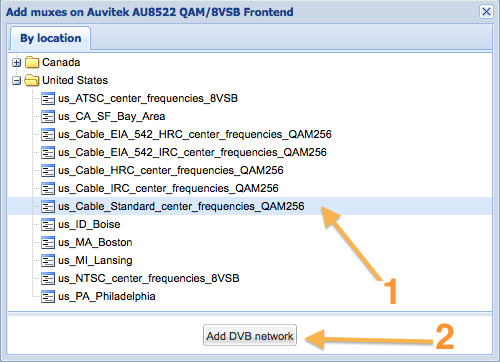
| 5. |
|
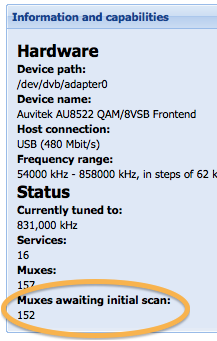
| 6. | Wait for the number under "Muxes awaiting initial scan" to reach zero. If the number under "Services" is also zero, then that means Tvheadend has not picked up any channels. You may need to check your hardware or if you've selected the right signal type (step 5), or even your tuner driver (see http://linuxtv.org for driver support).
It might be possible that the firmware can't be found. Check [ 3931.964710] xc5000: waiting for firmware upload (dvb-fe-xc5000c-4.1.30.7.fw)... [ 3931.970217] xc5000: Upload failed. (file not found?) In this case, the Hauppauge WinTV-HVR-950Q tuner can't locate the firmware. You should download the desired firmware (the 950Q firmware can be found at http://www.kernellabs.com/firmware/xc5000/) and place in the correct directory (for Ubuntu this is [ 4791.147048] xc5000: firmware read 16497 bytes. [ 4791.147049] xc5000: firmware uploading... [ 4794.976020] xc5000: firmware upload complete... |
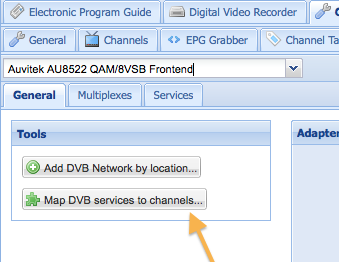
| 7. | Click on "Map DVB services to channels". You should now be able to pick up TV channels in Kodi once you configure the Tvheadend add-on configuration in the next section, "#Connecting Kodi to Tvheadend". |
Connecting Kodi to Tvheadend
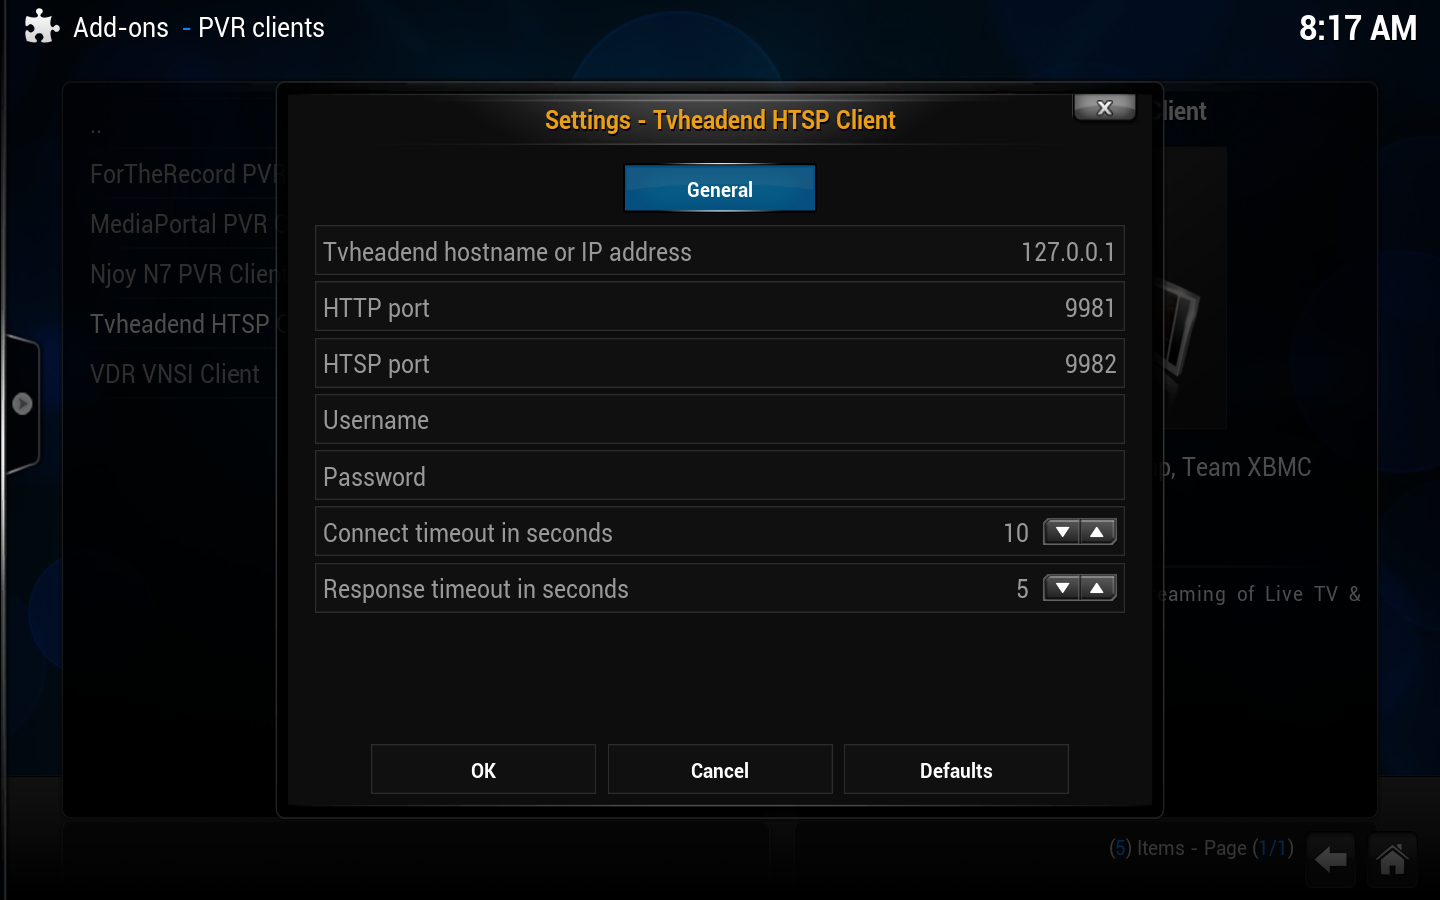
- Go to Settings -> Add-ons -> Install from repository -> PVR Clients and select the Tvheadend add-on
- Select "Configure"
- By default, you should only need to fill in Tvheadend hostname or IP address.
- For Linux installation see... Ubuntu PVR add-ons
|
External links
- Tvheadend website - https://tvheadend.org/projects/tvheadend
- Tvheadend backend for Kodi support forum - http://forum.kodi.tv/forumdisplay.php?fid=168
- Using HDHomeRun products with Tvheadend - https://tvheadend.org/boards/14/topics/3368
- Helper scripts for importing channels of Austrian IPTV A1 TV into Tvheadend - https://github.com/Bronkoknorb/a1tv-helpers

