ServerWMC is a server interface for Windows which communicates with Windows Media Center (WMC) allowing it to be used as a Personal Video Recorder (PVR) backend providing Live TV, PVR functions and Electronic Program Guide (EPG) data. These services are provided to Kodi though the PVR WMC Client add-on.
ServerWMC was developed and is maintained by krustyreturns.
A fantastic guide detailing the setup of Kodi , WMC, ServerWMC, pvr.wmc and everything else you need to know from beginning to end can be found here: http://forum.kodi.tv/showthread.php?tid=193310
Configuring Windows Media Center
Windows Media Center must first be fully configured (tuners configured, EPG configured, channels setup, etc) on the PC to be used as the TV Server prior to using ServerWMC. This setup will vary slightly based on the tuner you are using. There is a generic WMC setup guide here that may be of assistance to those new to WMC: http://www.howtogeek.com/howto/9166/learning-windows-7-setup-live-tv-in-windows-media-center/
The following is setup information specific to some popular devices:
Note: Though Windows Media Center must be configured, it is not necessary for WMC to be running to provide the connection to ServerWMC.
If you have previously disabled WMC services, please re-enable them at this time. Though WMC does not need to be running, if the services are disabled and WMC is unable to automatically update EPG data, Kodi will either display a blank EPG or CRASH when selecting 'Live TV'.
Please ensure you can view live TV from within WMC before continuing!
Downloading & Installing ServerWMC
The latest version of ServerWMC can be found here: http://bit.ly/serverwmc
ServerWMC includes an installer package so simply download, unzip and run Installer_ServerWMC.msi as administrator. It is not necessary to uninstall the previous version before installing an updated version.
Note: ServerWMC must be installed on the same PC that was configured for Windows Media Center above.
ServerWMC Configuration (Quick)
Launch ServerWMC from the Start Menu. An entry was created during installation at Start/ServerWMC/ServerWMC.
Note: On first run, you should be prompted to allow ServerWMC.exe through your firewall. Make sure to select allow.
Ensure that Windows Media Center (WMC) is configured with particular attention to the following:
- Directory for recorded TV is specified
- TV tuners are installed and detected
- TV channels are scanned
- You are able to watch live TV within WMC
Ensure that the Windows Media Center "Recorded TV" folder is Shared from the server PC (as clients will need to access it via smb://). If the share is protected or if accessing with non-windows based clients, the username and password for the share should be entered on the 'folders' tab within ServerWMC.
Run ServerWMC application and check/configure the settings. Additional info on each setting can be found below.
Note: ServerWMC supports most of the WMC configuration including enable/disable channels, set custom channel orders/numbers and custom channel icons. These settings should be configured within WMC and not Kodi .
ServerWMC Configuration (Detailed)
|
Status
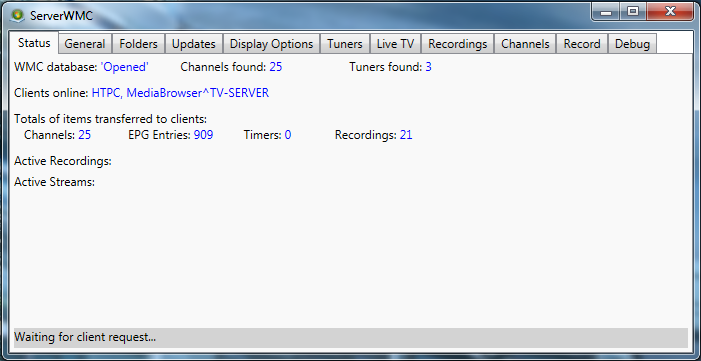
- WMC database - Displays the status of the connection between ServerWMC and the Windows Media Center database
- 'Opened' - Indicates the server has successfully connected
- Channels found - Displays the number of channels being reported as available from WMC
- Tuners found - Displays the number of tuners available and ready to use
- Clients online - Displays the names of clients connected to ServerWMC
- Totals of items transferred to clients:
- Channels - Displays the number of channels being made available to clients
- EPG Entries - Displays the number of Electronic Program Guide entries being provided to clients
- Timers - Displays the number of future recording tasks in queue
- Recordings - Displays the number of recorded programs available in the /Recorded TV/ folder (specified on the 'Folders' tab)
- Active Recordings - Displays status of programs currently being recorded
- Active Streams - Displays the status of streams being used by clients
|
|
General
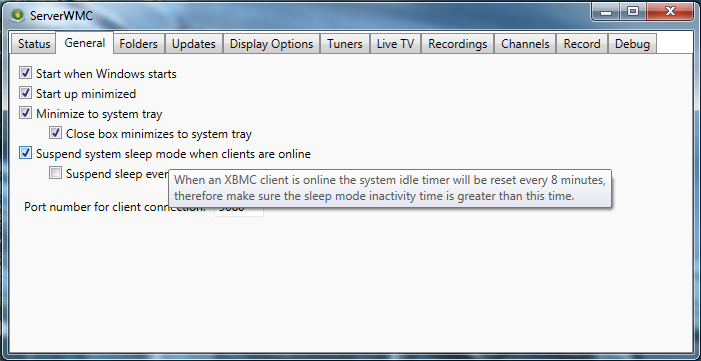
- Start when Windows starts - Starts ServerWMC when the user logs on to Windows. Unless you have a need to start the server manually at login, this option should be enabled.
- Startup minimized - Minimizes ServerWMC to the Task Bar upon startup.
- Minimize to system tray - Sends ServerWMC to the System Tray when minimized instead of the Task Bar.
- Close box minimizes to system tray - Causes ServerWMC to minimize to the system tray when the red 'X' is clicked instead of closing the program.
- Suspend system sleep mode when clients are online - Prevents PC running ServerWMC from entering sleep mode (if enabled) if any clients are connected.
- Suspend sleep even if only client online is MediaBrowser-Server - Prevents PC running ServerWMC from entering sleep mode (if enabled) if MB3Server is running on the host PC regardless of other client status.
- Port number for client connection - Specifies the port on which the pvr.wmc plug-in will communicate with ServerWMC. The default port is 9080. Unless you have another program communicating on this port, there is no reason to change from default. Again, if you were not prompted when launching ServerWMC or you chose to decline, make sure this port is open in your firewall software before continuing.
|
|
Folders
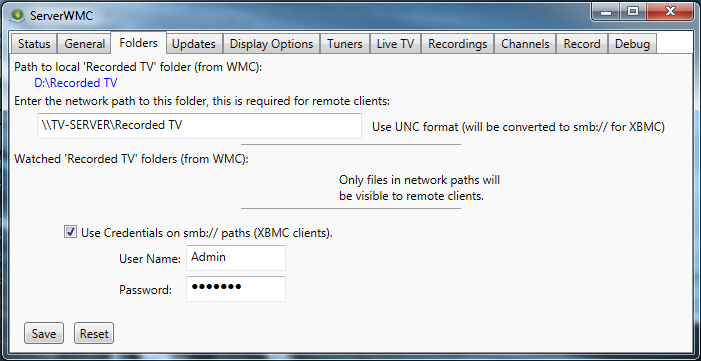
- Path to local 'RecordedTV' folder (from WMC) - Displays the path of the folder where recordings will be stored. This path is specified in WMC under Tasks/Settings/TV/Recorder/Recorder Storage and is not editable from ServerWMC. If you have other clients on the network, this folder should be shared and specified below.
- Enter the network share path to this folder, this is required for remote clients: The smb address of the folder specified above. It is advised to test this address from another machine to make sure it is accessible remotely before continuing.
- Watched 'Recorded TV' folders (from WMC): If additional folders are specified as 'watch folders' within WMC, their paths will be displayed here.
- Use Credentials for non-windows clients - If the folder specified above requires a user name and password for access, please enter the credentials here.
- User Name - SMB user name for the shared folder
- Password - SMB password for the shared folder
Note: With non-Windows based clients, user:pass credentials are typically needed even when the Windows share is shared with "Everyone".
|
|
Updates
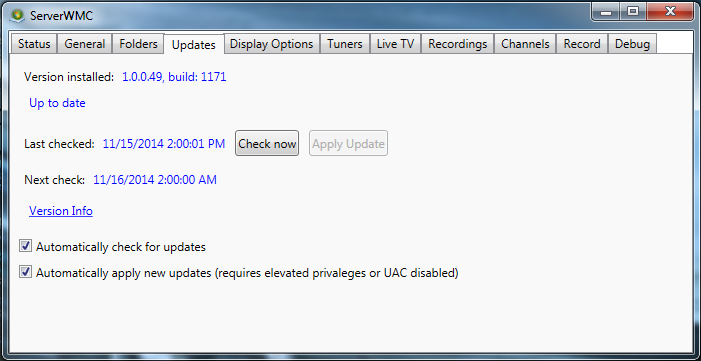
- Version Installed - Displays information about the currently installed version of ServerWMC.
- Version Status - Indicates if version installed is up to date or if a newer version is available.
- Last Checked - Displays date ServerWMC last checked for an available update.
- Check Now - Manually initiate check for newer version.
- Apply Update - If a newer version is available, initiates installation of ServerWMC update.
- Next Check - Displays date and time of next scheduled check for update.
- Version Info - Click to view change log for currently installed version.
- Automatically check for updates - When enabled, ServerWMC will automatically check for new updates. Disable if you wish to check for updates manually.
- Automatically apply new updates (requires elevated privileges or UAC disabled) - When enabled, ServerWMC will automatically install the newest version when found. For this feature to work, ServerWMC must either be "Run as Administrator" or "User Account Control" must be disabled.
|
|
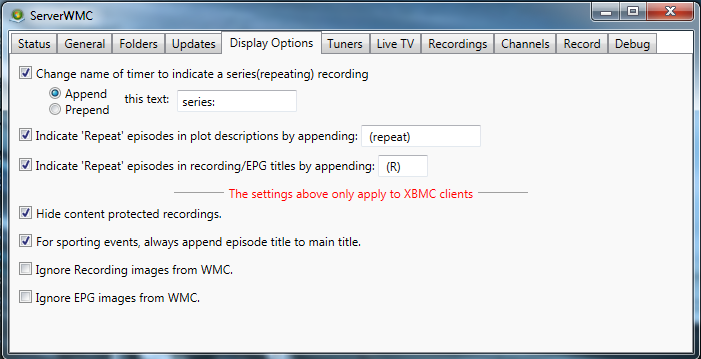
Display Options
- Change name of timer to indicate series (repeating) recording
- Append - Places "this text" after the recording's title.
- Prepend - Places "this text" before the recording's title.
- this text - Text to place before or after the recording's title
- Indicate 'Repeat' episodes in plot descriptions by appending - Places the specified text at the end of the plot description in the Kodi EPG episode info screen if the episode was marked as a repeat in the WMC EPG data.
- Indicate 'Repeat' episodes in recording/EPG titles by appending - Places the specified text following the recording title and in the Kodi EPG if the episode was marked as a repeat in the WMC EPG data.
- Hide content protected recordings. - Hides content marked as protected by the service provider from Kodi. (Protected content is only viewable from within WMC).
- For sporting events, always append episode title to main title. - Appends the title of the episode to main title. For example, "Monday Night Football" becomes "Monday Night Football - New England vs. Miami"
- Ignore Recording images from wmc url - Prevents WMC from sending recording image thumbnail url to Kodi (if found).
- Ignore Epg images from wmc url - Prevents WMC from sending EPG thumbnail image url to Kodi (if found).
|
|
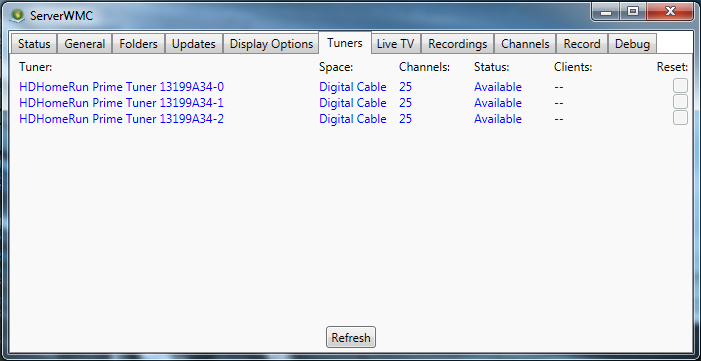
Tuners
- Tuner - Displays information about the tuners available to ServerWMC through WMC.
- Space - Indicates the signal band of the respective tuner.
- Channels - Displays number of channels available on the respective tuner.
- Status - Displays availability of the respective tuner.
- Clients - Displays client connected to the respective tuner (if any).
- Reset - Check this box to manually reset the respective tuner.
- Refresh - Click to refresh the info displayed on the "Tuners" tab.
|
|
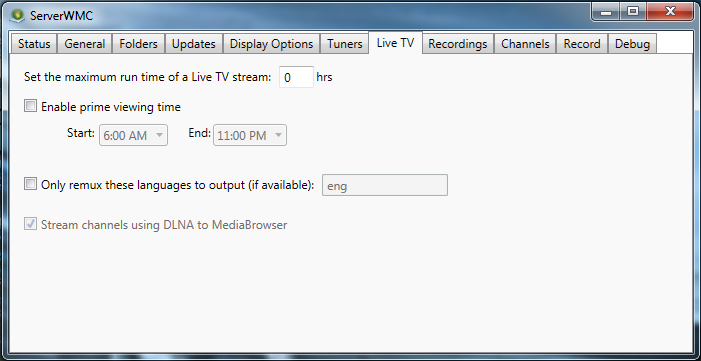
Live TV
- Set the maximum run time of a Live TV stream
- Enable prime viewing time
- Only remux this language to output (if available) - Instructs ServerWMC to only include the specified audio language in the stream sent to Kodi. For information on locating the codes available in your stream, please see Locating audio stream codes. We have reason to believe (though not confirmed) these codes follow the ISO 639-2 standards. Confirmed valid codes for this field are as follows:
- eng = English
- ger = German
- spa = Spanish
- dut = Dutch
- Tuners found: Displays information about the tuners accessible for streaming to clients
- Space - Type of signal being provided for streaming
- Count - Number of tuners available for streaming
- Channels - Number of channels available for streaming
- Hardware Name - The name of the tuner providing the stream
|
|
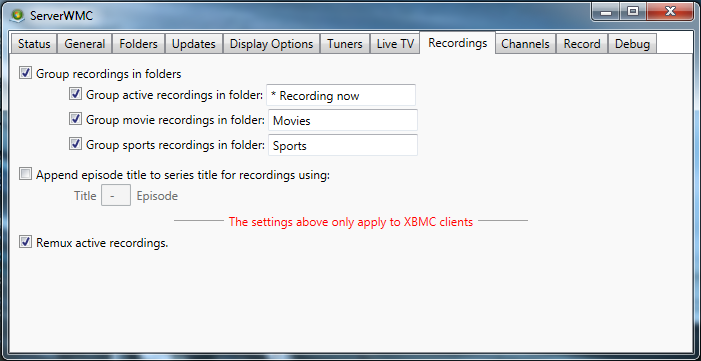
Recordings
- Group recordings in folders - Groups recordings into folders within the Kodi 'Recordings' list. This does not effect the physical location of the files. As well as the individual options below, this will also cause series recordings to be grouped into folders with the series name as the folder title and places individual episodes contained within. With this option disabled, a flat list of all recordings will be displayed on the 'Recordings' list.
- Group active recordings in folder - Groups active recordings into a folder with the name specified
- Group movie recordings in folder - Groups completed recordings of programs marked as a movie in the EPG data in the folder specified
- Group sports recordings in folder - Groups completed recordings of programs marked as a sporting event in the EPG data in the folder specified
- Append episode title to series title for recordings using - Places the episode title following the series title using the delimiter entered in the box.
- Remux active recordings - This remuxes the active recording to a TS file before being streamed to Kodi. Files can be played right away but may encounter issues when attempting to timeshift. Disabling this option will stream the WTV file directly to the Kodi player. This will allow for smoother timeshifting but will cause the recording to stop prematurely as Kodi does not monitor the size of WTV files. Premature stopping of playback can easily be resumed by pressing play again which effectively communicates the new file size (and in turn new end point) to the Kodi player. This setting will be used more in the Gotham release affecting the ability of clients to resume playback. The default setting is enabled.
|
|
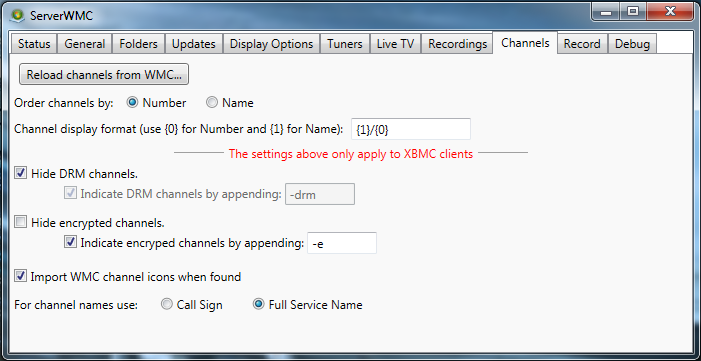
Channels
- Reload channels from WMC - Used to reload channel info from WMC if it has been updated without requiring ServerWMC to be restarted.
- Order channels by: Designates the manner in which the channels will be arranged in the EPG within Kodi
- Number - Arranges the channel lineup by number
- Name - Arranges the channel lineup by name (or call sign).
- Channel display format: - Specifies now the channel name and number will be displayed within Kodi . For example, if settings were set as displayed in the screenshot, 'The WB' would displayed as 'KWGN/656'.
- Hide DRM channels - Hides channels marked with DRM by the service provider from the EPG.
- Indicate DRM channels by appending: - If a channel is marked by the provider as being protected with DRM, the text entered in the box will be appended in the EPG.
- Hide encrypted channels - Hides channels marked as encrypted by the service provider from the EPG.
- Indicate encrypted channels by appending: - If a channel is marked by the provider as being encrypted, the text entered in the box will be appended in the EPG.
- Import WMC channel icons when found - Imports channel icons from WMC if available. Please see Adding Icons to WMC for additional information.
- For channel name use: - Specifies how the name of the channel will be displayed within Kodi.
- Call Sign - Displays the channel name as it's call sign reported by WMC. Example: 'KWGN'
- Full Service Name - Displays the channel name as the service name reported by WMC. Example: 'The WB'
|
|
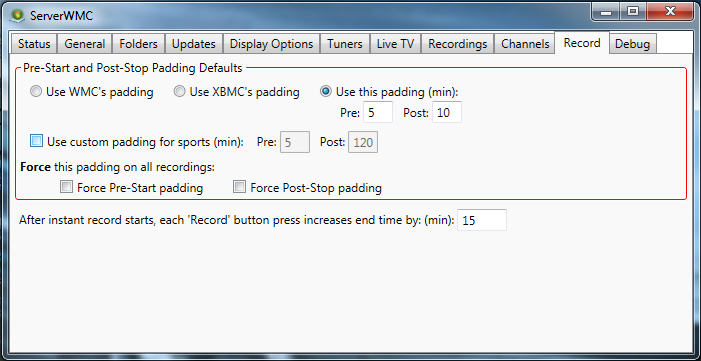
Record
- Pre-Start and Post-Stop Padding Defaults - This tab allows the user to specify default padding for recordings. Padding is the amount of time to record before and after the scheduled start and finish time of a program as specified by the EPG.
- Use WMC's padding - Uses padding settings specified in WMC. Settings can be found in the WMC interface under Tasks / Settings / TV / Recorder / Recording Defaults. The settings are specified as "Start when possible" and "Stop when possible".
- Use Kodi's padding - Use padding specified in Kodi.
- Use this padding (min) - Allows the user to specify the desired amount of padding directly from the ServerWMC interface.
- Pre - Amount of time (in minutes) to start recording before the EPG scheduled start time.
- Post - Amount of time (in minutes) to record after the EPG scheduled end time.
- Use custom padding for sports (min) - Allows the user to specify settings different from those above for programs marked as sporting events in the EPG.
- Pre - Amount of time (in minutes) to start recording before the EPG scheduled start time.
- Post - Amount of time (in minutes) to record after the EPG scheduled end time.
- Force this padding on all recordings - Forces specified options even if they will interfere with other scheduled recordings.
- Force Pre-Start padding - Forces the pre-start padding rules specified above.
- Force Post-Stop padding - Forces the post-stop padding rules specified above.
- After instant recording starts, each Record button press increases end time by: (min) - When an instant recording is in progress, each press of the record button will extend the recording time beyond the EPG scheduled end time + padding by xx minutes. Please see Recording with pvr.wmc for additional information.
|
|
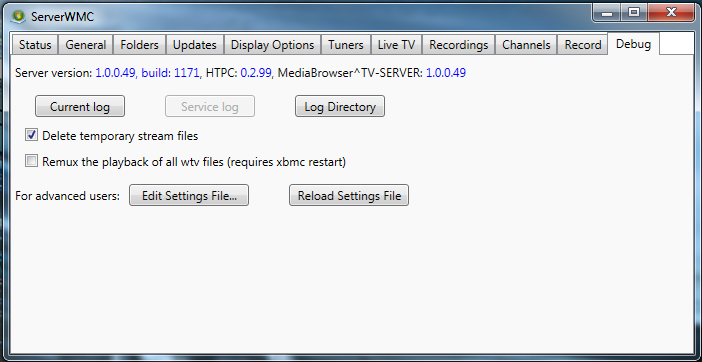
Debug
- Server Version: - Displays the version of ServerWMC installed followed by the names of clients connected and the version(s) of pvr.wmc respectively.
- Keep a log file - Checking this box will cause ServerWMC to output important troubleshooting information to a log file. It is highly recommended this box be checked.
- Current log - Opens the log file for the current ServerWMC session in Notepad.
- Last run's log - Opens the log file for the previous ServerWMC session in Notepad.
- Service log - Opens log file for ServerWMC if it is being run as a service.
- Delete temporary stream files - When switching to a channel, it automatically starts recording. This information is stored in a temporary file to allow for time shifting. When checked, these files will be deleted when changing channels.
- Remux the playback of all WTV files - By default, only live streams are remuxed to TS before being sent to the client. This option enables remuxing of pre-recorded files as well. Raspberry Pi users have reported issues with playing large pre-recorded WTV files. If you are experiencing issues with viewing recorded TV, please try enabling this option.
- For advanced users
- Edit Settings File... - Opens the settings file for manual editing
- Reload Settings File - Reloads the settings file after being manually edited causing the changes to take effect without restarting ServerWMC.
Note: If you are having issues and need to request assistance in the Kodi forums, it is mandatory to provide a copy of the log files!!! They contain important information that is instrumental in diagnosing issues and recommending solutions. Please copy the contents of the file to pastebin and include the link in your post. Posting of log files directly to forum threads is strictly prohibited per the rules of the Kodi Forums.
|
Connecting ServerWMC to Kodi
Please install and configure the pvr.wmc add-on to access live TV from within Kodi using ServerWMC.
Please see the pvr.wmc Wiki page for additional information here: PVR WMC Client
Troubleshooting / FAQ
- Can I record to a network share, NAS drive, etc.? - Unfortunately no. This is not supported by WMC. Recordings must be saved to a drive connected directly to the PC running WMC. This is done because if there is a glitch in the network connection while recording, it will corrupt the entire recording rendering it unwatchable.
Note: Advanced users can attempt to "trick" WMC into thinking a local drive is being used, using methods such as linking the recorded TV folder to a network location with a NTFS directory junction (aka symlink) or presenting a drive from their NAS using ISCSI. In both cases WMC believes it is recording to a local drive, however the drive/files actually are located on a network device.
Known Issues
- Upgrading from Windows 8 to 8.1 - When upgrading from 8 -> 8.1, it is necessary to re-install ServerWMC.
Additional Guides and Links
Advanced Topics
|
Locating audio stream codes
Start a live TV stream in Kodi. Open the ServerWMC log file and locate the audio descriptors. In the following example excerpt of the log file, there are two available audio streams. The codes are highlighted. These are the codes that can be used to specify the desired audio stream sent to Kodi under Live TV / Remux Language. We have reason to believe (though not confirmed) these codes follow the ISO 639-2 standards.
If you identify and confirm a code that is not already contained in the list above, please add it or drop a comment in the wiki thread. Thanks!
- 2013/10/23 18:37:35.515 Remux::FindDescriptors> wtv scanned (0.15 sec), Streams found:
- 2013/10/23 18:37:35.517 > Other: ID:1 MPEG2 Sections and Tables
- 2013/10/23 18:37:35.518 > Other: ID:2 MPEG2 PES
- 2013/10/23 18:37:35.519 > Audio: ID:3 (eng) AC3 2.0 48000 Hz 192 kb/s
- 2013/10/23 18:37:35.520 > Video: ID:4 AVC High-4.0 1920x1080i fps: 25
- 2013/10/23 18:37:35.522 > Audio: ID:5 (nar) MPEG Audio V1L2 Stereo 48000 Hz 256 kb/s
- 2013/10/23 18:37:35.524 > Other: ID:6 MS TV Caption
Adding icons to WMC
|
Automatically
Channel icons are extracted from WMC and provided to all PVR.WMC clients. Unfortunately, WMC does not populate channel icons on it own. You must add them using third-party software. MyChannelLogos is a quick and easy way to add these logos to WMC and in turn to PVR.WMC clients. There is a small donation required for the program. It's worth it, the program works flawlessly. (As of this writing, the minimum donation is $5).
Manually
- Set your Channel display format to {1}-{0} instead of {1}/{0} on the 'Channels' tab of the ServerWMC GUI.
- Rename your logos to call sign-number.extension. Example KDKADT2-2.1.jpg.
- Set your default folder for PVR thumbnails to where your logos are stored under System → Live TV → Menu/OSD → 'Default folder for PVR thumbnails' within Kodi.
- If you add new logos, you will need to restart XMBC or scan for missing channels under System → Live TV → Menu/OSD → 'Scan for missing icons' within Kodi.
|
Running ServerWMC as a service
Note: This is an experimental feature and recommended only for advanced users at this time.
- Limitations
- Service must be manually installed
- Service must be restarted if any settings are changed
- Standalone app must be configured to not clash with the service
- Standalone app is not aware of what the service is doing (you don't see current streams, channels transferred/loaded, etc)
- Installation
- Stop ServerWMC app from the system tray if it is running.
- Install ServerWMC_Service by running InstallService.bat (in the installed program directory) as administrator.
- Edit the ServerWMC config file (%ProgramData%\VDSoftware\ServerWMC\config.xml) and change RunAsService=false to RunAsService=true
- Start/Stop the ServerWMC service from the Windows Services admin interface.
- Use the ServerWMC app (now aware that you are running the service) to maintain settings.
- Restart the service whenever you make a change to settings via the UI or editing the config.xml manually
- The port specified in the service must be manually opened in he firewall
- Further Information
- Service Info - The service is called "ServerWMC Kodi PVR Backend" (the shortname for the service is ServerWMC_Service). Currently, the service is not automatically installed by the program installer, instead there is a batch file in the install directory to do this. This only needs to be done once and wont need to be done again for future releases. The service is installed as manual startup by default. If users want the service to start automatically when windows starts, then they should choose Automatic or possibly Automatic (Delayed Start) if there are problems with it accessing the WMC services if it starts too early.
- Settings - The service shares the settings with the standalone app, which are stored in config.xml in the ProgramData directory. NOTE that any changes to these settings are not picked up by the service automatically. You must RESTART the service after making any settings changes to this file directly or via the ServerWMC UI.
- Standalone ServerWMC App - You must set the standalone ServerWMC app to know that you are running the service, otherwise they will both try and bind to the listen port and accept client requests (causing one or both to fail). This is done by setting the RunAsService parameter in the config.xml file to true while the app is not running. The app no longer needs to be running, it is only used for editing settings. The app does not show information about current streams, current connected clients etc. It has no knowledge of what the service is doing, it is purely used to maintain the settings file.
- Log - The service has it's own log file, called ServerWMC_Service.log in the same directory as the normal log (%ProgramData%\VDSoftware\ServerWMC). If you are posting for help/support and are running in service mode, you will need to provide this log instead of the ServerWMC.log
Sharing the TV and EPG databases using MySQL
Note: Though it is possible to share these databases using MySQL, preliminary testing has shown absolutely no benefit and is known to actually cause issues. This method is completely unsupported by the devs. Consider yourself warned.
Assuming you are already using MySQL with Kodi, add the following to advancedsettings.xml:
<epgdatabase>
<type>mysql</type>
<host>10.0.1.100</host>
<port>3306</port>
<user>Kodi</user>
<pass>Kodi</pass>
</epgdatabase>
<tvdatabase>
<type>mysql</type>
<host>10.0.1.100</host>
<port>3306</port>
<user>Kodi</user>
<pass>Kodi</pass>
</tvdatabase>
Please replace the 'host' IP addresses, 'user' names and 'pass'words accordingly.
If you have not setup MySQL and wish to, please see the guide here: HOW-TO:Update_Paths_In_MySQL
|
