Archive:Settings legacy/System v16: Difference between revisions
No edit summary |
No edit summary |
||
| Line 8: | Line 8: | ||
{{-}} | {{-}} | ||
== Video output == | == Video output == | ||
[[File:Settings.system.video output.png|800px|center]] | [[File:Settings.system.video output.png|800px|center]] | ||
{| class="prettytable" | {| class="prettytable" | ||
| Line 61: | Line 60: | ||
==== Video calibration... ==== | ==== Video calibration... ==== | ||
{{Note|Always adjust your TV display settings before Kodi's settings (such as overscan, etc). In most cases, you can get a "just scan/just fit/PC mode/something" mode turned on that will not require any adjustments in Kodi, and will allow for the best screen quality.}} | {{Note|Always adjust your TV display settings before Kodi's settings (such as overscan, etc). In most cases, you can get a "just scan/just fit/PC mode/something" mode turned on that will not require any adjustments in Kodi, and will allow for the best screen quality.}} | ||
This screen allows you to calibrate the User Interface by adjusting the overscan. Use this tool if the image being displayed is too large or small for your display.<br /> | This screen allows you to calibrate the User Interface by adjusting the overscan. Use this tool if the image being displayed is too large or small for your display.<br /> | ||
| Line 255: | Line 253: | ||
|- | |- | ||
| Enable mouse and touch screen support | | Enable mouse and touch screen support | ||
| {{see also|Touch | | {{see also|Touch controls}} | ||
If deactivated, Kodi will ignore all mouse movements and clicks. | If deactivated, Kodi will ignore all mouse movements and clicks. | ||
| | | | ||
| Line 312: | Line 310: | ||
== Power saving == | == Power saving == | ||
{{note|Some options might not be available on all hardware or OSes. For example, Kodi cannot control shutdown or sleep on [[Android]].}} | {{note|Some options might not be available on all hardware or OSes. For example, Kodi cannot control shutdown or sleep on [[Android]].}} | ||
[[File:Settings.system.power saving.png|800px|center]] | [[File:Settings.system.power saving.png|800px|center]] | ||
| Line 350: | Line 347: | ||
|- | |- | ||
| Enable debug logging | | Enable debug logging | ||
| Toggles [[debug log]] on / off. Useful for troubleshooting. | | Toggles [[Log_file|debug log]] on / off. Useful for troubleshooting. | ||
| | | | ||
|- | |- | ||
| Line 370: | Line 367: | ||
=== Component-specific logging === | === Component-specific logging === | ||
[[File:Verbose logging options.png|right|400px|thumb|The component-specific logging selection window, with multiple options selected.]] | [[File:Verbose logging options.png|right|400px|thumb|The component-specific logging selection window, with multiple options selected.]] | ||
| Line 406: | Line 402: | ||
== Master lock == | == Master lock == | ||
{{see also|Profiles}} | {{see also|Profiles}} | ||
{{note|''The Master lock options are ONLY available while using the default user [[ | {{note|''The Master lock options are ONLY available while using the default user [[Profiles]].''}} | ||
[[File:Settings.system.master lock.png|800px|center]] | [[File:Settings.system.master lock.png|800px|center]] | ||
{| class="prettytable" | {| class="prettytable" | ||
| Line 466: | Line 462: | ||
=== Advanced settings === | === Advanced settings === | ||
{{note|It's generally not recommended to manually edit guisettings.xml at all. If you're unsure about this, don't touch it. Strange things might happen (maybe?). Spooooky.}} | {{note|It's generally not recommended to manually edit guisettings.xml at all. If you're unsure about this, don't touch it. Strange things might happen (maybe?). Spooooky.}} | ||
The number of tries before being "locked out" can be tweaked by manually editing the guisettings.xml file in the [[userdata folder]]. | The number of tries before being "locked out" can be tweaked by manually editing the guisettings.xml file in the [[Userdata|userdata folder]]. | ||
<syntaxhighlight lang=xml enclose="div"> | <syntaxhighlight lang=xml enclose="div"> | ||
Revision as of 20:22, 15 July 2020
|
THIS PAGE IS OUTDATED:
This page refers to settings that were available in v16 and prior using the Confluence skin. Settings pages for v17 and later can be accessed from the main Settings page here... Settings |
System settings are found here. Set up and calibrate displays/video output, configure audio output, set up remote controls, set power saving options, enable debugging, set up master lock.
Video output

| Setting | Description | Setting level |
|---|---|---|
| Display Mode | Display Kodi in a window, or fullscreen on the selected screen. | |
|
Changes the resolution that the User Interface is displayed in. | |
|
...when active (Windows only). Does not use the DirectX fullscreen mode. The main benefit is for multi-screen configurations, where Kodi can be used at the same time as other applications without automatically minimizing. Uses a bit more resources and playback may be slightly less smooth. | |
|
In a multi-screen configuration, the screens where Kodi is not displayed are blacked out. | |
| Stereoscopic mode (current) | Main page: 3D
|
|
|
||
| Vertical blank sync | Compensation for horizontal tearing. | |
| Video calibration... | See #Video calibration... | |
| Test patterns... | See #Test patterns... | |
| Use limited color range (16-235) | Use limited color range instead of full color range (0-255). Limited range should be used if your display is a regular HDMI TV, while full color range should be used if your display is a PC monitor. |
Video calibration...
Note: Always adjust your TV display settings before Kodi's settings (such as overscan, etc). In most cases, you can get a "just scan/just fit/PC mode/something" mode turned on that will not require any adjustments in Kodi, and will allow for the best screen quality.
This screen allows you to calibrate the User Interface by adjusting the overscan. Use this tool if the image being displayed is too large or small for your display.
Simply adjust the screen so that the arrows are in the top left and bottom right corners and that the entire frame is visible on screen.
It offers the ability to adjust:
- The overscan of the video - How close to the edges of the screen that the image is displayed.
- The position where subtitles are displayed (default 1042 for 1080p, 694 for 720p and 463 for 480p).
- The pixel ratio allows you calibrate the aspect ratio at which videos are played back.
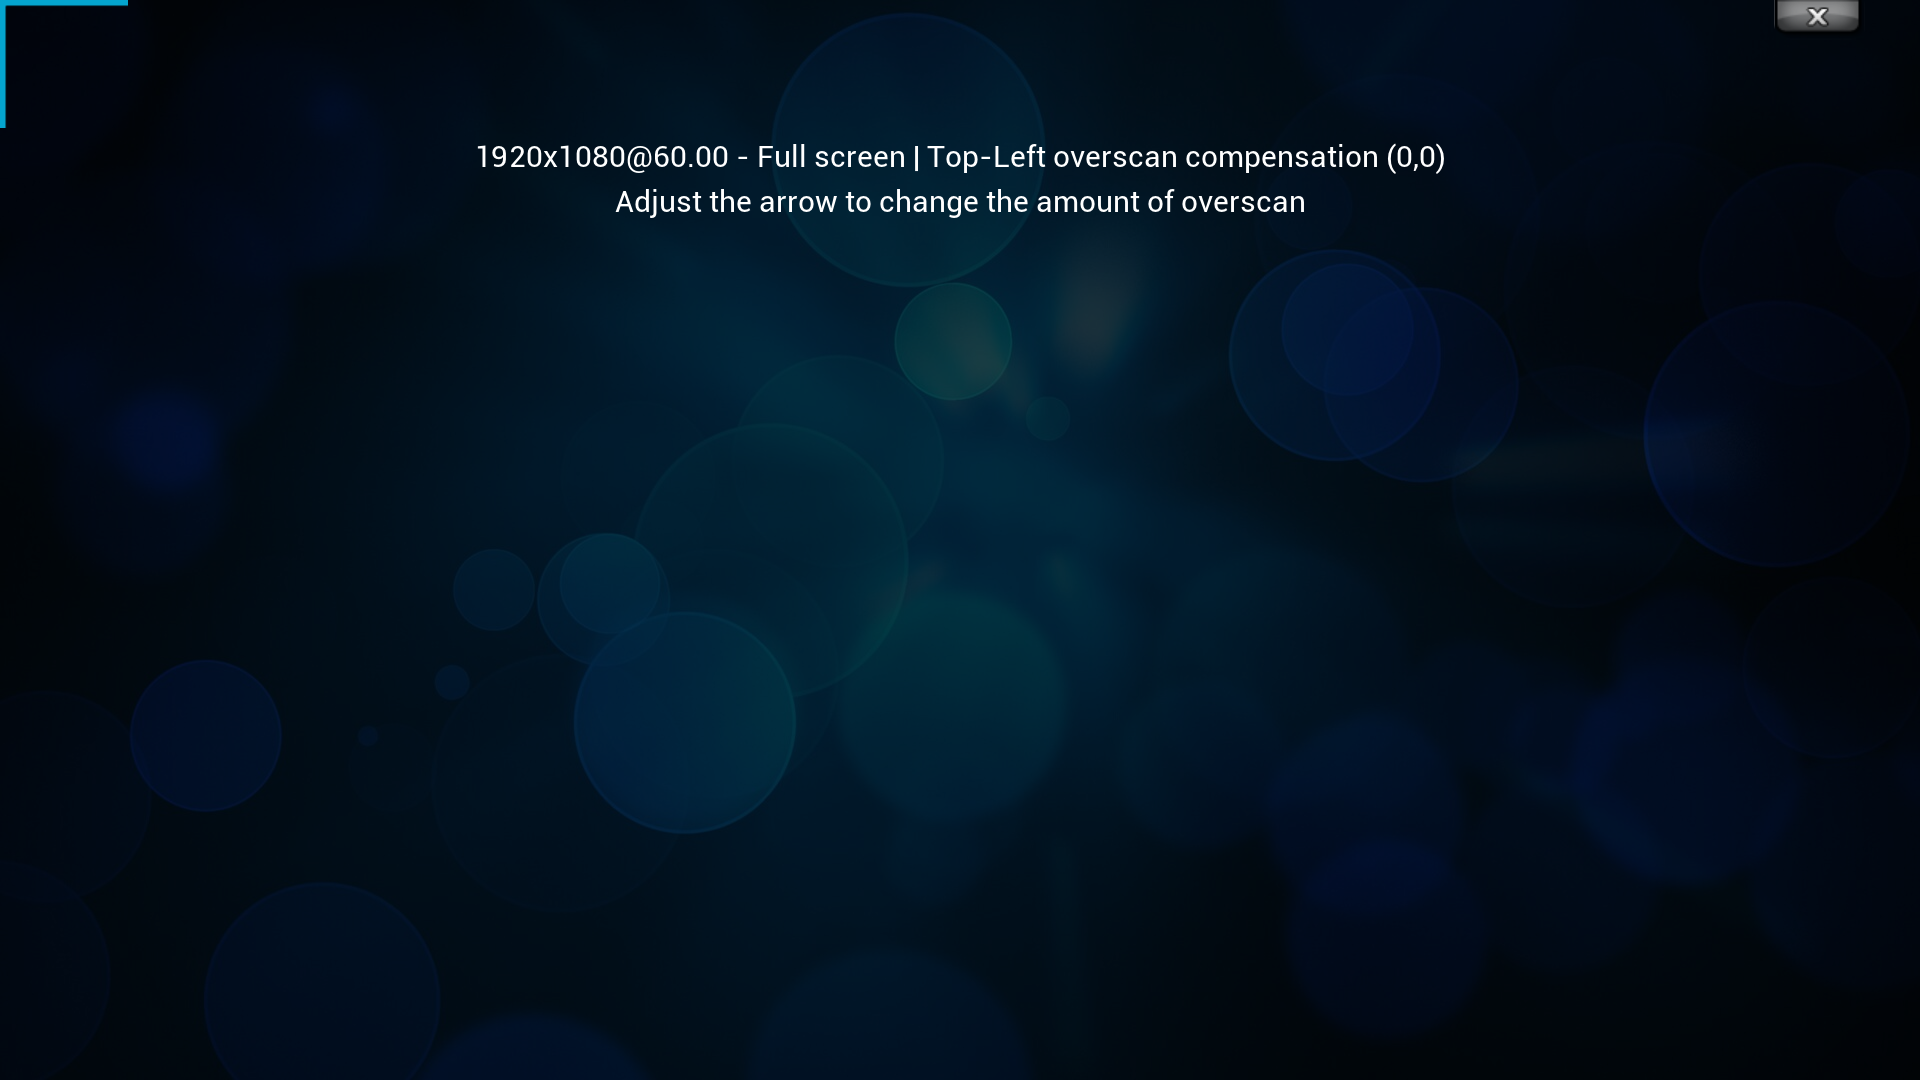
Upper left corner
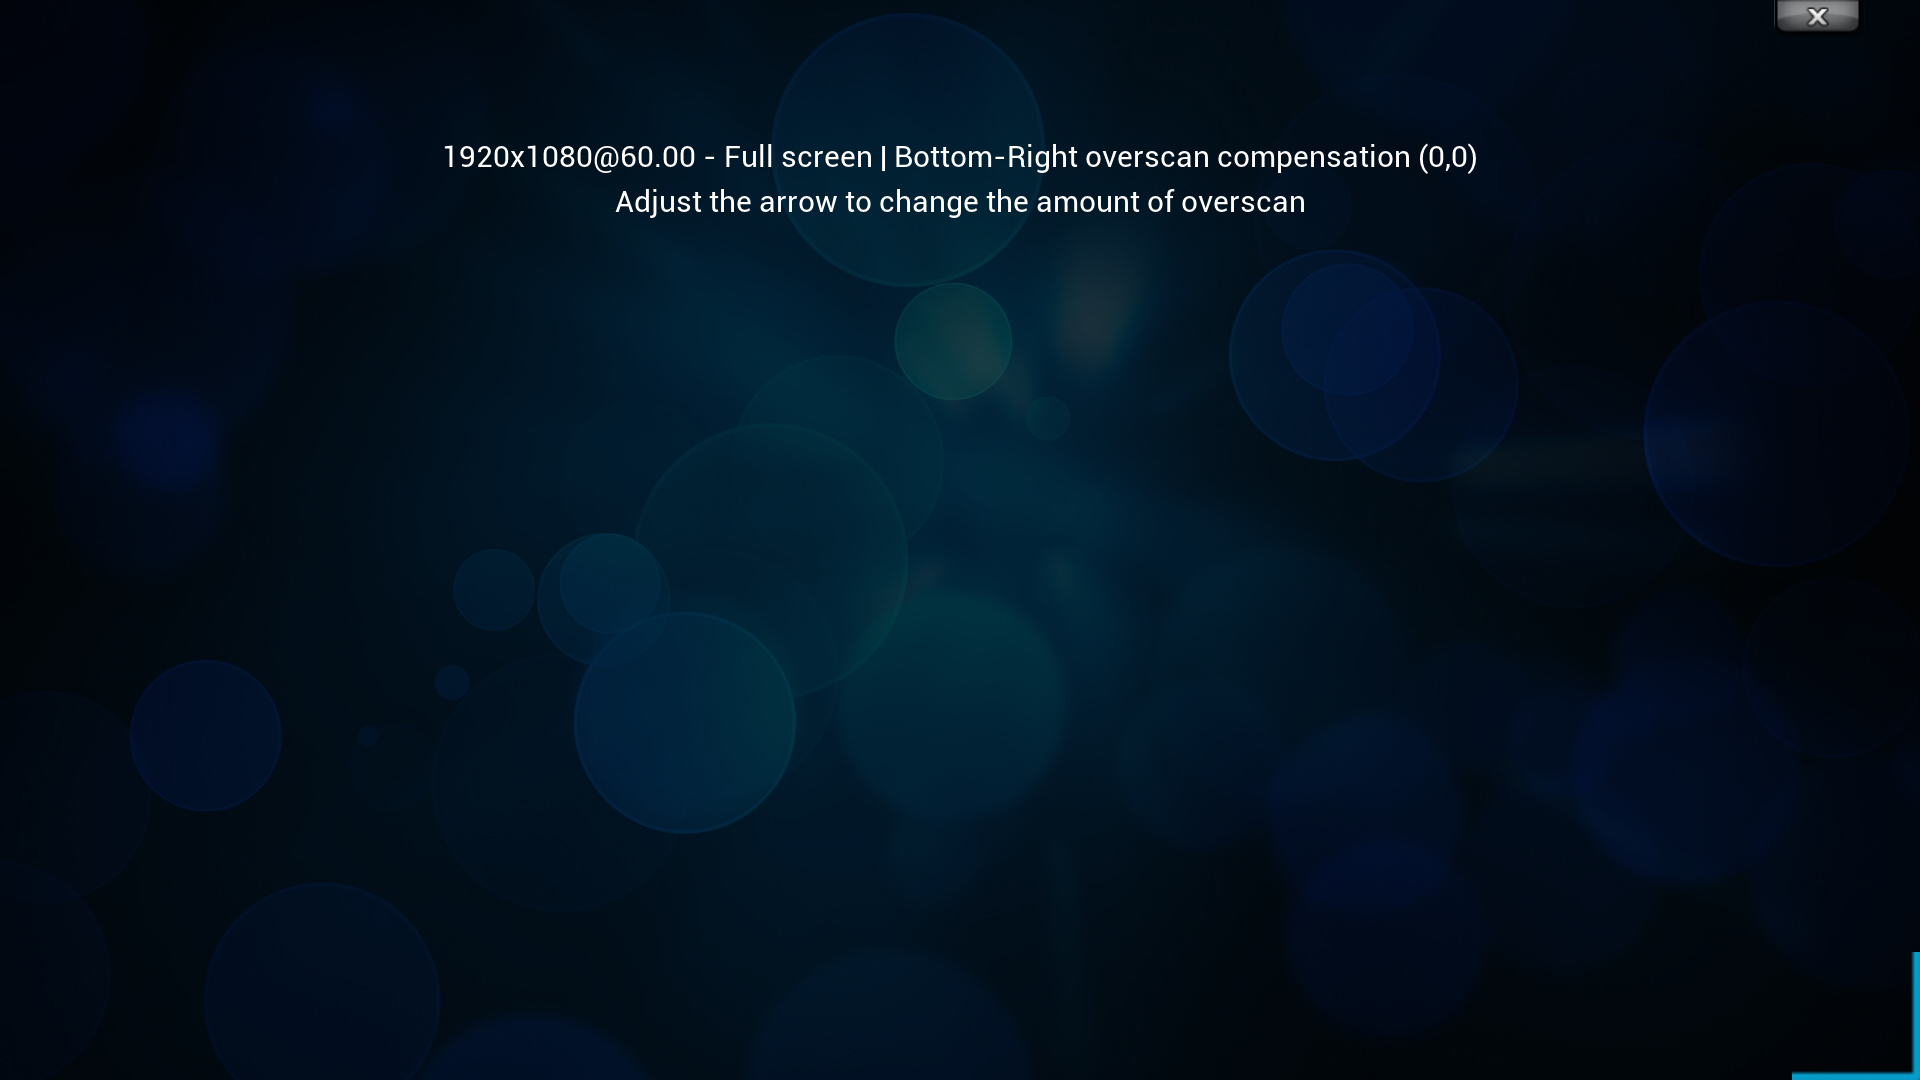
Lower right corner
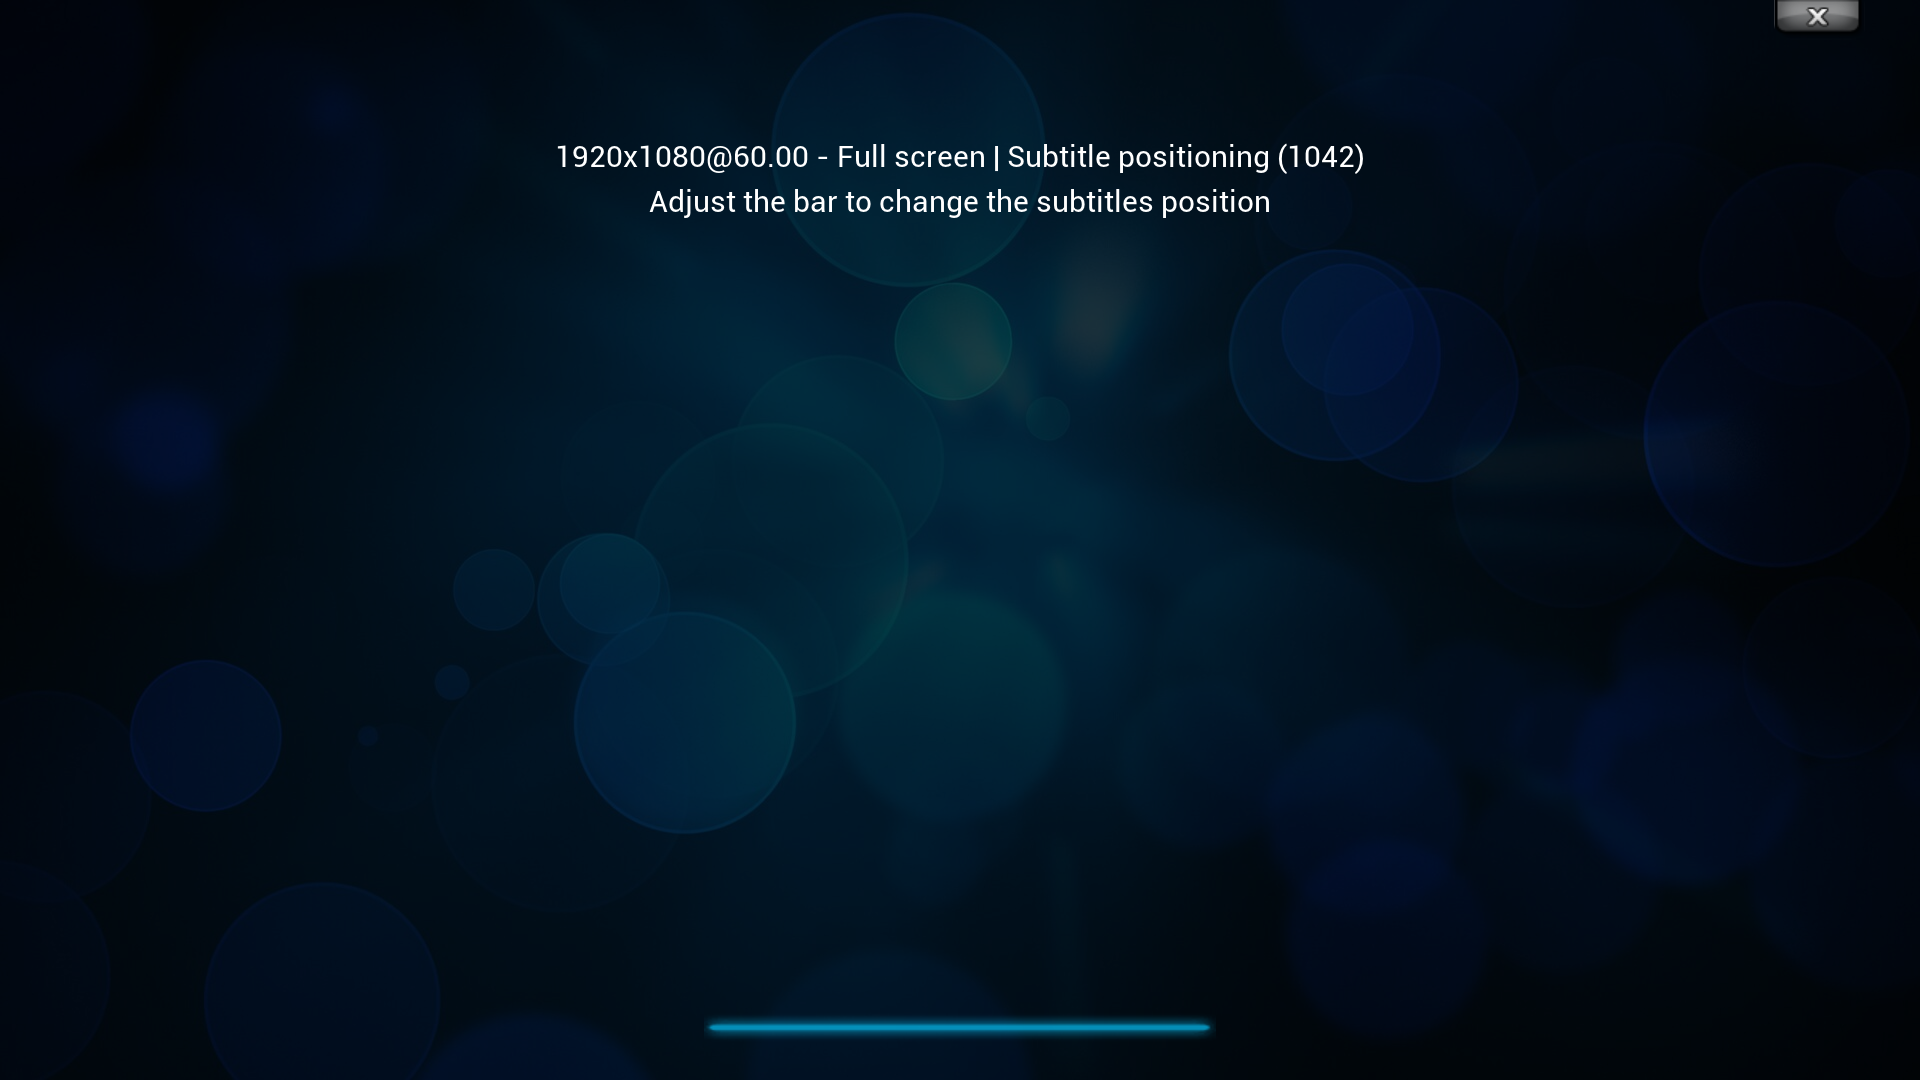
Subtitles position
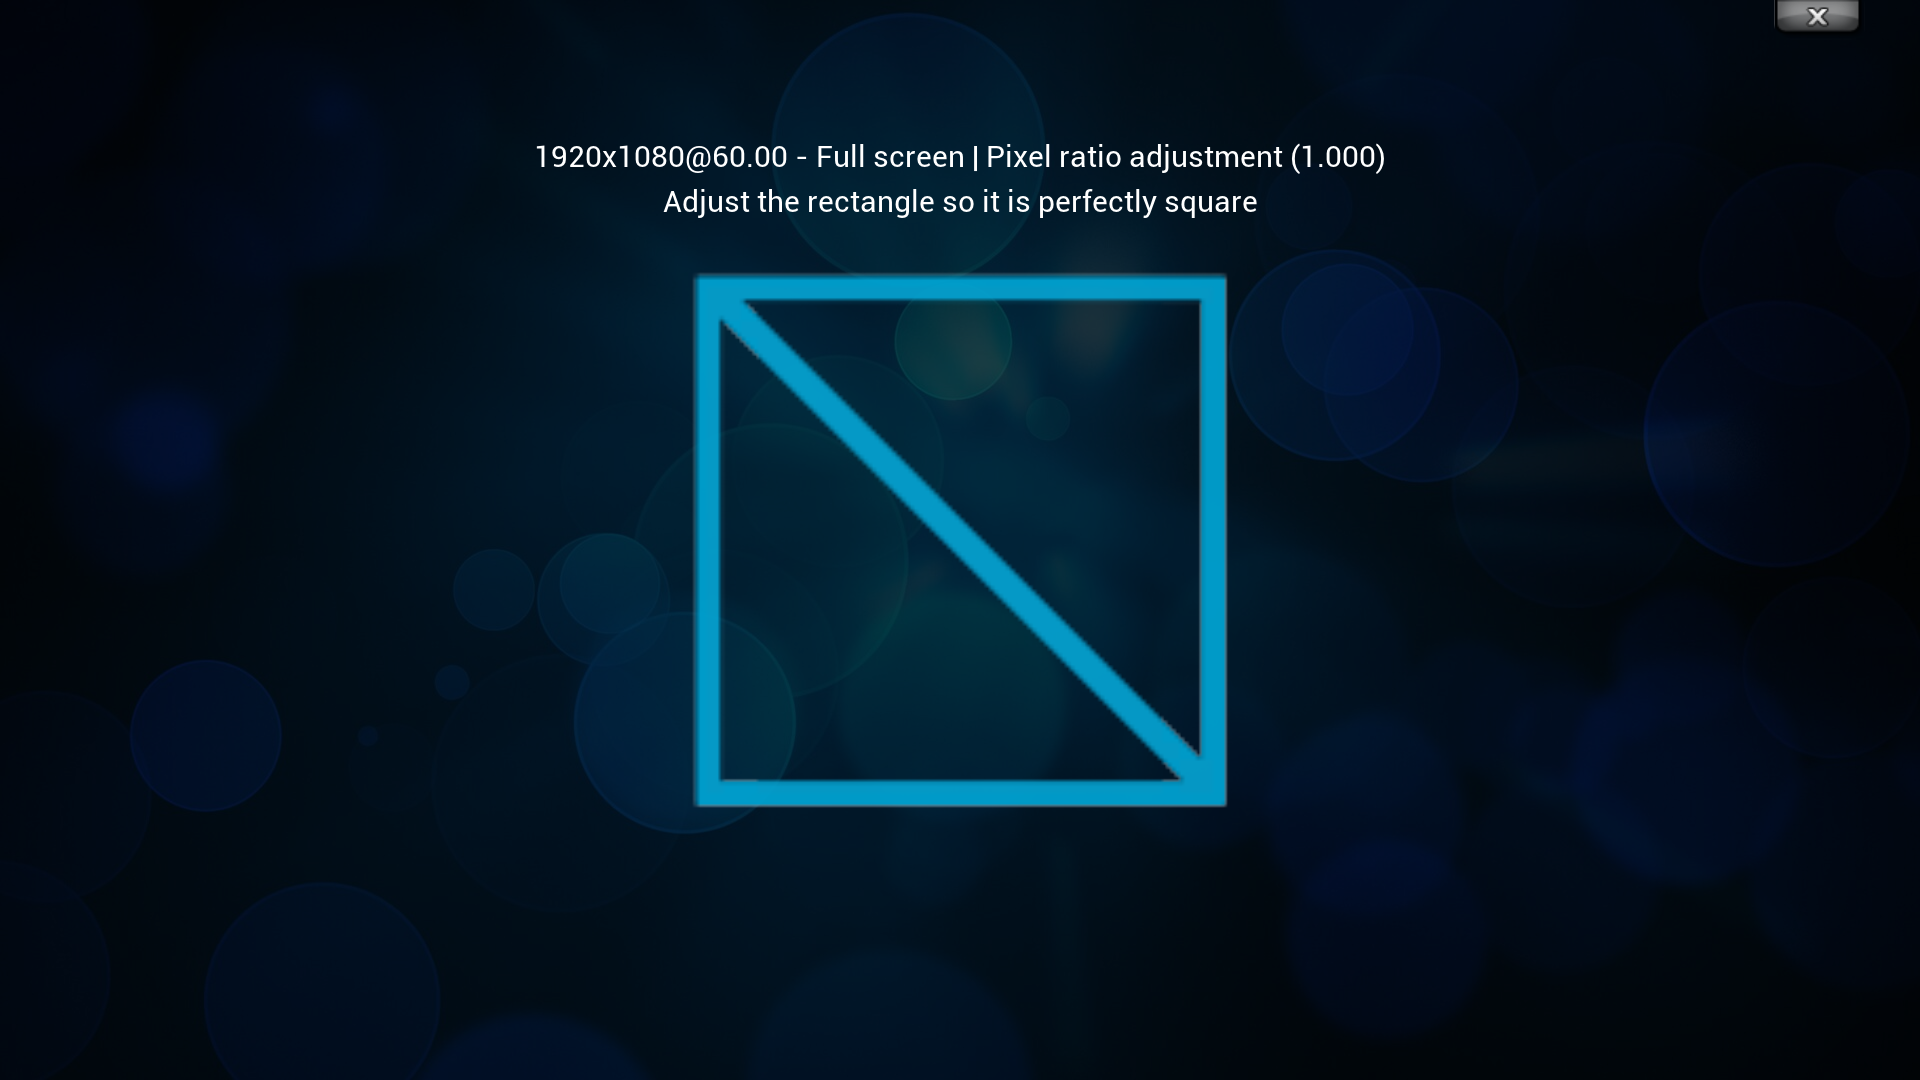
Aspect ratio


Test patterns...
This is a variation of a pluge pattern, with both white and black. It is only accurate if you have "Use limited color range (16-235)" active.
Top left and bottom right quadrants: This is used to set the brightest part of the video. It consists of a black (0,0,0 - see note below) area with a white (235,235,235) block in the center and a blinking circle in the very center. The circle blinks alternately between 255,255,255 and 222,222,222. On a properly calibrated display you should be able to see the 222,222,222 circle as dimmer than the surrounding rectangle. But the 255,255,255 circle should look the same as the 235,235,235 surround. Some say that having a bit of headroom isn't a bad thing so seeing 255,255,255 as slightly brighter than the surrounding rectangle is okay. It's your call.
NOTE: This is incorrect! It should be (16,16,16)! No broadcast video signal should ever go below that! (0,0,0) black is illegal for broadcast video! ONLY VALUES 16-235 ARE LEGAL!!!
Top right and bottom left quadrants: This is used to set the darkest part of the video. It consists of a white (235,235,235) area with a black (16,16,16) block in the center and a blinking circle in the very center. The circle blinks alternately between 0,0,0 and 28,28,28. On a properly calibrated display you should be able to see the 28,28,28 circle as brighter than the surrounding rectangle. But the 0,0,0 circle should look the same as the 16,16,16 surround.
The thin frame line denotes a 10% overscan area.

Audio output

| Setting | Description | Setting level | Device type | |
|---|---|---|---|---|
| Audio output device | Select the device to be used for audio output. | Standard | All | |
| Number of channels | Select the number of channels supported by the audio connection.
Note: This setting might not be exposed depending on what is set for Audio output device. |
Basic | HDMI/Analog-Speakers | |
| Output configuration | Fixed | Select how the properties of the audio output are set: [Fixed] - output properties are set to the specified sampling rate & speaker configuration at all times |
Advanced | All |
| Optimized | ||||
| Best Match | ||||
| Limit sampling rate (kHz) | Maximum sampling rate for spdif or sampling rate for fixed output configuration | Advanced | SPDIF | |
| Stereo upmix | Select to enable upmixing of 2 channel audio to the number of audio channels specified by the channel configuration | Advanced | All | |
| Normalize levels on downmix | Template:String | Advanced | All | |
| Resample quality | Low | Select the quality of resampling for cases where the audio output needs to be at a different sampling rate from that used by the source [Low] is fast and will have minimal impact on system resources such as the use of the CPU |
Advanced | All |
| Medium | ||||
| High | ||||
| Keep audio device alive | Select the behaviour when no sound is required for either playback or GUI sounds: [Always] - continuous inaudible signal is output, this keeps the receiving audio device alive for any new sounds, however this might also block sound from other applications |
Standard | All | |
| Play GUI sounds | Configure how interface sounds are handled, such as menu navigation and important notifications | Basic | All | |
| Enable passthrough | Select to enable the passthrough audio options for playback of encoded audio such as Dolby Digital | Advanced | HDMI/SPDIF | |
| Passthrough output device | Select the device to be used for playback of encoded formats, these are any of the formats below in the 'capable receiver' options | Advanced | HDMI/SPDIF | |
| Dolby Digital (AC3) capable receiver | Select this option if your receiver is capable of decoding AC3 streams | Advanced | HDMI/SPDIF | |
| - Enable Dolby Digital transcoding | Select this if the audio out connection only supports multichannel audio as Dolby Digital 5.1, such as an SPDIF connection. If your system supports LPCM multichannel sound via HDMI then leave this disabled. This option is only available where the number of channels is 2.0, for SPDIF this is set automatically so this option is always available, if using HDMI then you may need to change the Number of Channels setting to 2.0. | Advanced | HDMI/SPDIF | |
| Dolby Digital Plus (E-AC3) capable receiver | Select this option if your receiver is capable of decoding E-AC3 streams | Advanced | HDMI | |
| DTS capable receiver | Select this option if your receiver is capable of decoding DTS streams | Advanced | HDMI/SPDIF | |
| TrueHD capable receiver | Select this option if your receiver is capable of decoding TrueHD streams | Advanced | HDMI | |
| DTS-HD capable receiver | Select this option if your receiver is capable of decoding DTS-HD streams | Advanced | HDMI | |
The "capable receiver" options relate only to the passthrough of audio to another device such as an AVR, where that device must support decoding of the format. Before leaving any "capable receiver" option enabled check to make sure that both the playback device running Kodi (e.g. HTPC) and the connected device (e.g. AVR) both support that format.
If you have a "capable receiver" option enabled that your device does not support then this will result in poor playback of video typically with a very low frames-per-second and no audio, so for example if the TrueHD capable receiver option were enabled then make sure that the playback device can passthrough TrueHD and that the connected device can decode TrueHD, if either of the devices do not support TrueHD then the TrueHD capable receiver option MUST be left disabled.
For any format where the "capable receiver" option is not selected, Kodi will still playback any content containing those audio types, however instead of the audio being passed through, Kodi will decode audio and then send the audio in a compatible format.
If connected directly to a TV be aware that TV are not compatible with DTS, TrueHD or DTS-HD, typically the only encoded format a TV will be compatible with is AC3.
Input devices
Note: The content of this screen largely depends on the input devices that Kodi detects and the OS being used.

| Setting | Description | Setting level |
|---|---|---|
| Peripherals | See #Peripherals. | |
| Apple remote (OS X only) | ||
| Allow start of Kodi using the remote (OS X only) | ||
| Sequence delay time | ||
| Enable mouse and touch screen support | See also: Touch controls
If deactivated, Kodi will ignore all mouse movements and clicks. |
|
| Enable joystick and gamepad support | ||
| Enable system keys in fullscreen (Linux only) |
Peripherals
Internet access

| Setting | Description | Setting level |
|---|---|---|
| Use an HTTP proxy server to access the internet | If your internet connection uses a proxy, configure it here. | |
|
||
|
Proxy server address. | |
|
Defines the port of the proxy server | |
|
Defines the username used for the proxy server | |
|
Defines the password used for the proxy server | |
| Internet connection bandwidth limitation | If you have limited bandwidth available, select a suitable value here and Kodi will try to keep to these limits. ? |
Power saving
Note: Some options might not be available on all hardware or OSes. For example, Kodi cannot control shutdown or sleep on Android.

| Setting | Description | Setting level |
|---|---|---|
| Put display to sleep when idle | Turns off display when idle. Useful for TVs that turn off when there is no display signal detected, but you don't want to suspend/shutdown the whole computer. Selectable from 5 minutes to 120 minutes. | |
| Shutdown function timer | Sleeps the computer when idle. Selectable from 5 minutes to 120 minutes. | |
| Shutdown function | Defines what "Shutdown" will do by default. Can be set to actually shutdown, suspend, minimize, or quit. | |
| Try to wake remote servers on access | Main page: Wake on lan
|
Note: Kodi also has a "Custom shutdown timer" selectable from the power icon on the home screen, or from the shutdown menu (press S on a keyboard or Power on a remote).
Debugging

| Setting | Description | Setting level |
|---|---|---|
| Enable debug logging | Toggles debug log on / off. Useful for troubleshooting. | |
| Enable component-specific logging | Enables extra logging for specific areas of Kodi. | |
|
See also: #Component-specific logging
Select which additional components to include in the debug log. |
|
| Screenshot folder | Folder used to save screenshots taken within Kodi. (see Keyboard controls for the screenshot key for your OS) |
Component-specific logging

Component-specific logging options enables extra logging for specific areas of Kodi. This allows the debug logs to be easier to read as they can exclude information that is not important for a specific bug or issue, while still allowing that extra information to be turned on as-needed. Multiple components can be enabled if needed.
Setting Description SMB library CURL library CMYTH library FFMPEG libraries AUDIO component VIDEO component RTMP library JSON-RPC requests AirTunes library UPnP components CEC library
Master lock
Note: The Master lock options are ONLY available while using the default user Profiles.

| Setting | Description | Setting level |
|---|---|---|
| Master lock code and settings | Opens the Master lock settings window, where you can configure your Master Lock options. See #Master lock settings. | |
|
If enabled, the master lock code is required to unlock Kodi on startup |
Master lock settings

| Setting | Description |
|---|---|
| Master Lock | Allows you to set the master lock password. Can be one of three types:
|
| Lock music window | |
| Lock video window | |
| Lock pictures window | |
| Lock programs and scripts windows | |
| Lock file manager | |
| Lock settings | |
| Lock Add-on manager |
Locking media sources
Locked out?
Kodi will give you three tries when you need to enter a lock/password to access something that is locked. If you max out these three tries then just quit Kodi and re-open it to get three more tries. The Master Lock code is stored in the "profiles.xml" file in the userdata folder. Should you get locked out, you can delete or edit the "profiles.xml" file.
Advanced settings
Note: It's generally not recommended to manually edit guisettings.xml at all. If you're unsure about this, don't touch it. Strange things might happen (maybe?). Spooooky. The number of tries before being "locked out" can be tweaked by manually editing the guisettings.xml file in the userdata folder.
<masterlock>
   <maxretries>3</maxretries> <!-- enter the max number of retries to input code, 3 is default. This setting isn't exposed in the actual GUI and can only be changed by manually editing this XML file -->
   <startuplock>false</startuplock>  <!-- true prompts user for code upon startup -->
</masterlock>