Basic controls: Difference between revisions
No edit summary |
(Fix Context Menu) |
||
| Line 194: | Line 194: | ||
The '''Context Menu''' allows a quick access to a limited set of functions relevant for the currently selected item. Like the Sideblade Menu, you should remember this menu to save yourself frustrations when searching for a setting or function. | The '''Context Menu''' allows a quick access to a limited set of functions relevant for the currently selected item. Like the Sideblade Menu, you should remember this menu to save yourself frustrations when searching for a setting or function. | ||
After highlighting an item (eg a movie) the Context Menu can be invoked by: | |||
* long press the {{keypress|OK}} key | * long press the {{keypress|OK}} key | ||
* right-clicking with the mouse | * Press letter {{keypress|C}} on a keyboard | ||
* right-clicking with the mouse | |||
References to Context Menus are scattered throughout the wiki on relevant pages and can be found easily enough in Kodi. As there are many, many types of context menus, it would be uneconomical to list them all here. | References to Context Menus are scattered throughout the wiki on relevant pages and can be found easily enough in Kodi. As there are many, many types of context menus, it would be uneconomical to list them all here. | ||
Revision as of 05:02, 19 January 2018
Introduction
Welcome new user!! You have finally installed Kodi on your equipment, launched it, and then probably sat there for a few minutes scratching your head thinking what is this?? This page will describe the commonly used screens and basic navigation around Kodi. Its aim is to allow you to become familiar with Kodi and prepare you for the upcoming setup pages.
This page will not describe how to load your media. That task is covered in the following pages. As with most pages of the wiki, this page assumes you are using the default skin Estuary. If you are using another skin, then you have run before learning to walk, so you should change back until you have at least set up Kodi.
Kodi has been designed around the 10 foot interface principle. This means that Kodi is best used with a remote control while sitting on your couch looking at your TV. It was not designed for use on a computer sitting at a desk with keyboard and mouse. If you choose to use it this way, then be aware that the navigatione experience won't be as smooth as a remote control.
Although this guide applies to all parts of Kodi, some portions have been based on the Video/Movies/TV Shows section of Kodi. To see the specific Basic Controls for Music, see Music Navigation & Playback
The following image is a screenshot of the Home Screen when Kodi launches. In this case there is media in the library, but you may not have media in your library yet.

Power Options

Pressing S on the keyboard, or by selecting the Power icon in the top left corner of the home screen calls up the Power Options menu. Depending on your hardware, your Power Options may have more or less options to that shown in the image.
The options on this menu are from top to bottom:
- Exit
- Exits Kodi to your operating system.
- Power off system
- Powers down your computer
- Custom Shutdown Timer
- Kodi will shutdown your computer after you enter the countdown time. Enter the time interval in minutes.
- Suspend
- Suspends your computer.
- Hibernate
- Hibernates your computer.
- Reboot
- Restarts your computer.
Settings
The Settings Icon in the top left of the screen provides access to the Kodi Settings pages. Most general use settings are contained in these pages. During your travels with Kodi, you will come across mention of the advancedsettings.xml file. This holds advanced Settings for Kodi and can be modified by the user.
For more information on the Settings pages,
- See: Settings
For more information on the advancedsettings.xml file,
- See: AdvancedSettings.xml
Search

The Global Search function allows you to search your library, add-ons or some on-line sources for information.
Some of the pictured options will require installation of an add-on. Simply confirm the installation of the add-on when prompted.
- See: Add-on:Global_Search
- See: Add-on:YouTube
- See: Add-on:ExtendedInfo_Script
- See: Advanced_library_filtering
There are also Search functions inside each of the Main Menu options which are accessible from the Sideblade Menu. These are called Filters. The function "filters" the currently displayed list to match your query. When using the Filter function, be aware of the following:
- The Filter will only filter that class of media, so performing the Filter in Movies will only return Movie results.
- The Filter only works when you have a listing of media displayed. If you do not have a listing of the media to Filter, then the filter will return a Not Found result.
Main Menu
All classes of media are separated into their own menu options. The default classes are listed below. Other skins allow you to add additional menu items for, say, Home Movies, Cartoons, Disney etc.
It is possible to remove unwanted menu options and to re-add them at a later date. Very useful for those options that remain unused in your setup such as Live TV, Radio etc. See: Hiding Menu items
As each Main Menu option is selected, the Home Page will dynamically update with information relevant for the selected menu option. The full list of available menu options are as follows:
- Movies - This is a short cut to the "All movies, by title" node in the video library.
- TV shows - This is a short cut to the "All TV shows, by title" node in the video library.
- Music - This is a shortcut to a file manager view, which when viewed, can show your music files either by genre, Artist, Album, Song, or by year.
- Music Videos - This is a shortcut to a file manager view, which when viewed can show your music video files either by Genre, Title, Artist, Albums, Directors, Studio or Tags
- Live TV - With a PVR add-on, this can give you Free To Air Television channels with an EPG (Electronic Program Guide) with Pause/Rewind/Fast Forward and Record facilities
- Radio - With a PVR add-on, this can give you Free To Air Radio Channels with an EPG (Electronic Program Guide)
- Add-ons - This shortcut takes you to a secondary menu that lists your installed add-ons by type, such as 'Video-addons', Music add-ons, Program add-ons. In this menu you can install add-ons from the official Kodi repository. See: Add-ons
- Pictures - Shows a basic file-based image viewer, as well as picture-related add-ons.
- Videos - Shows the top level of all video areas, including file views, movie library, TV show library, music video library, playlists, and video related add-ons. Users can also use this to navigate to more nodes in the library, showing movies or TV shows by year, genre, actor, or even custom created nodes for specific people, moods, etc.
- Favourites - Show all your meda that has been tagged as a 'Favourite'
- Weather - Once set up, this will show the weather forecast in your local area
Home Screen
The term Home Screen can be used to mean the entire screen as depicted in the image in Section 1 above. If it is prefixed by a menu item, say Movies Home Screen or TV Show Home Screen, then it refers to the section to the right of the Main Menu. The following information refers to the latter.
The Home Screen contains a dynamic list of media relevant for the selected main menu item. If you select Movies, then the Movie Home Screen will display a number of items as follows:
- Categories- along the top row
- A quick link to the available movie nodes. It allows you to navigate your Movie library via Genres, Title, Year, Country Actors, Directors, Studios, Sets, Tags and Recently added
- Poster views
- Displays movie titles that fit into the following criteria:
- In-progress
- Recently added
- Unwatched movies
- Random selection
- Movie Sets
- Genres
- Quck icon selection of available Genre's in the library.
- Studios
- Quick icon selection of available Studios in the library.
The other classes in the main menu have a similar selection but designed and named to be most relevant for their type of media.
Sideblade Menu


Locating the Sideblade Menu
The Sideblade Menu is accessible from most screens in Kodi. Remembering the existence of this menu will save you a lot of frustration when searching for particular settings and functions.
The menu options shown below are for the Movies section. The options will vary for the other media classes
You can invoke the sideblade using one of the following methods:
- pressing the ← key on your remote control
- pressing the ← key on a keyboard
- bringing the mouse cursor to the left border of the screen.
Available Options
- ViewType
- Change current library view.
- Sort by
- Select how the list of Movies/TV Shows/Episodes are sorted- eg Title, PlayCount etc
- Order
- Once the Sort by is selected, do you want the order Ascending or Descending
- Filter
- Allows you to filter your list on certain criteria- eg Director, Actor, Ratings, Tags etc See: Search
- All Videos / Watched / Unwatched
- Global toggle that allows you to select what is shown in the list - All Videos, Watched or Unwatched videos only
- Update library
- Scans the library for newly added Movies/TV Shows and Episodes
- Go to playlists
- Will open the currently playing Party Mode playlist
- Bottom Icons- From Left to right
- Pause
- Stop
- Skip to next Songs
- Open Play Mode screen. Displays Fanart and song information. aka Now Playing screen.
To see the Sidebar Menu for Music see Music Sideblade Menu
Now Playing Controls
From the Now Playing screen, the controls as shown in the image are available. They can be accessed by Enter on a keyboard or the appropriate button on your remote control.
The controls along the bottom of the screen for Video from Left to Right are:
- Previous Track
- Pause
- Stop
- Next Track
- Exit Now Playing Controls
- Media Play Time / Media Duration
- Information- Overlays the media metadata
- Bookmarks- Allows you to save a bookmark at the current location for quick access later
- Subtitles- On/Off and selection of language
- Settings
- Audio and subtitle settings
- Video Settings
- Toggle audio stream- allows you to select audio in another language if available
To see the Now Playing Controls for Music see Music Now Playing Controls
Context Menu
The Context Menu allows a quick access to a limited set of functions relevant for the currently selected item. Like the Sideblade Menu, you should remember this menu to save yourself frustrations when searching for a setting or function.
After highlighting an item (eg a movie) the Context Menu can be invoked by:
- long press the OK key
- Press letter C on a keyboard
- right-clicking with the mouse
References to Context Menus are scattered throughout the wiki on relevant pages and can be found easily enough in Kodi. As there are many, many types of context menus, it would be uneconomical to list them all here.
The following are a few examples of the context menu.
- EstuaryContextmenu1.png
The context menu in the Movie library.
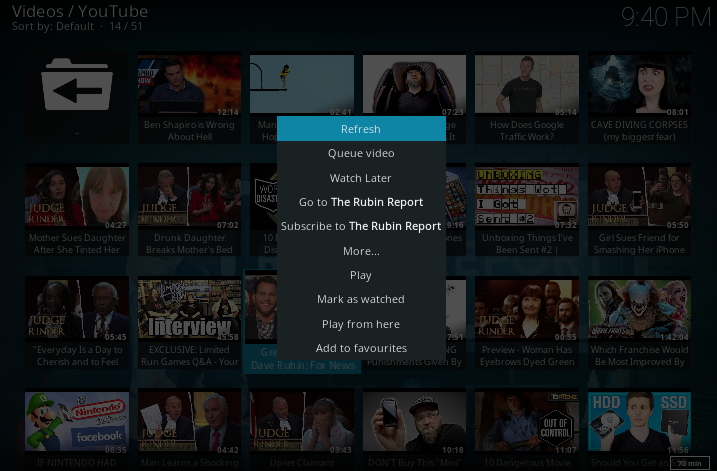
The context menu in the YouTube add-on.
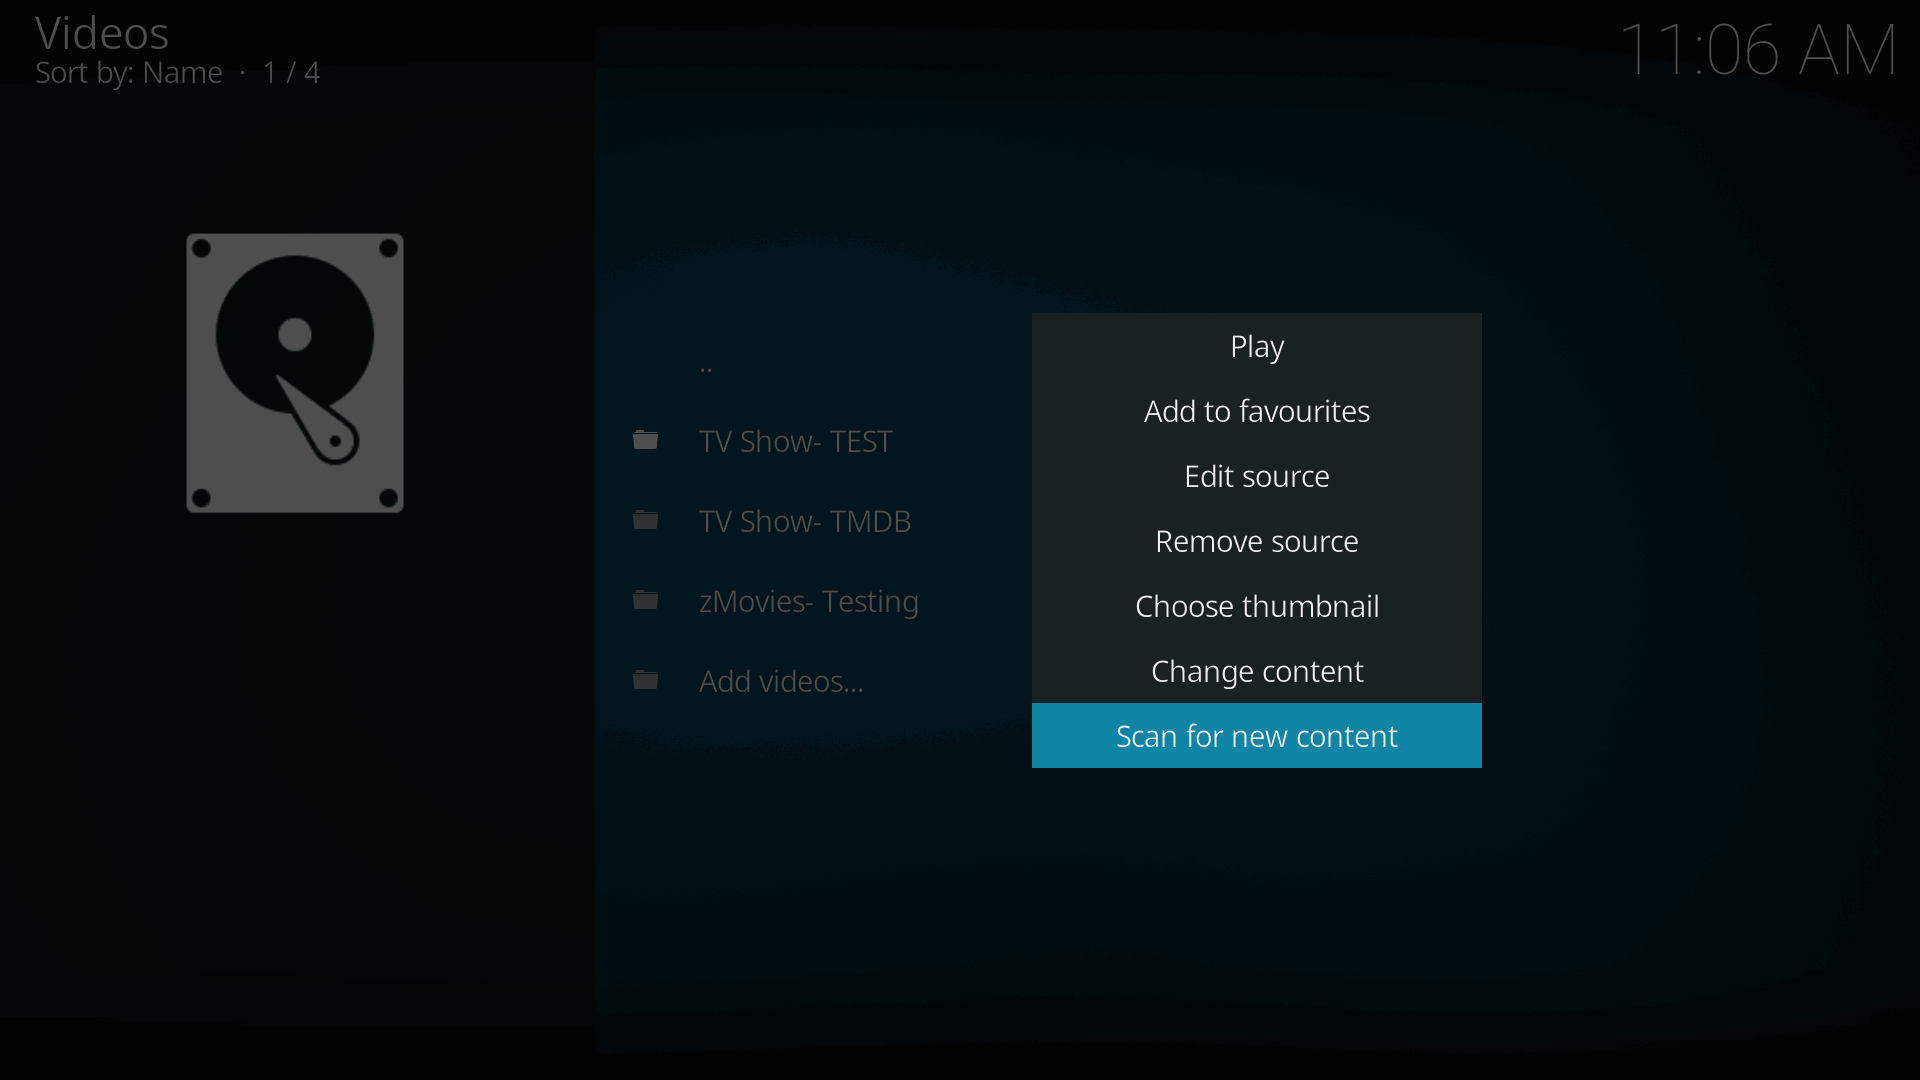
The context menu in the Video file browser.
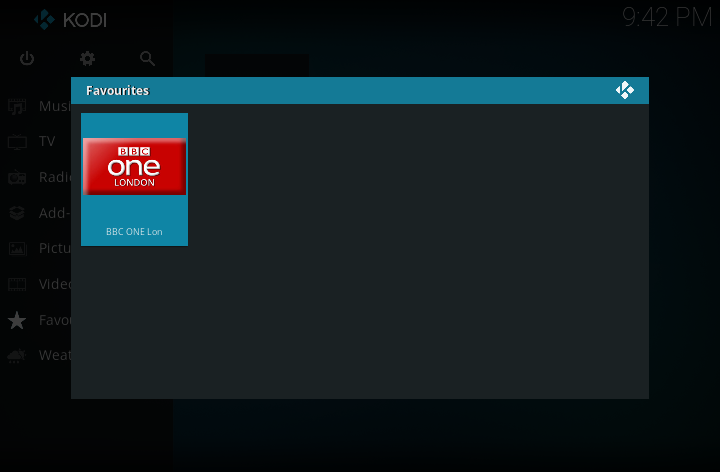
The context menu in the Favourites menu.


On Screen Keyboard

When required, Kodi will display an on-screen keyboard to facilitate data entry. No special selection is required by the user as the keyboard will appear where required.
The on-screen keyboard can be used in the following ways:
- Remote control
- Mouse presses
- Using a physical keyboard.
Remote Controls
Kodi is best used with a Remote Control. Many types of Remote Controls can be used as listed on the following page.
- See: Remote_controls
Keyboard Controls
If you are using a physical keyboard, the following page lists available keystrokes to control Kodi.
- See: Keyboard_controls
See also
Favourites
Favourites is a simple but useful feature that allows you to gather a selection of different items into one easily accessible location on the Main Menu. It allows quick access to commonly used items.
File Manager
The File Manager allows the maintenace of files from within Kodi on platforms that have no underlying and easily accessible operating system. It will allow you to perform functions such as Move, Copy and Delete to name a few.
Profiles
Profiles allow users to save all of settings as a profile and change them at the touch of a button. It also allows you to grant access to specific folders and network shares based on the profile being used. This is ideal for systems that have multiple users. It works much the same as setting up individual users on your home computer.
| Return to top |
|---|
| Next step: | Video Library Main Menu |
| Next step: | Music Library Main Menu |