UI sounds add-ons
You can add, change or modify sounds for Kodi by creating a UI sounds resource add-on. Anyone can create one, only some basic XML understanding is necessary (no programming skills required).
You can create as many UI sound packs as you feel like, and change between them anytime from the settings.
An example of a sounds addon can be found here: https://github.com/xbmc/xbmc/tree/master/addons/resource.uisounds.kodi
What Kodi requires for your add-on
Creating the working folder
To get started, you need to create a working folder for your add-on. This is where all the files for your UI sounds add-on will go.
You can name your add-on whatever you like. However, you might need to modify the name when naming your add-on's folder
The naming convention is resource.uisounds.<your-addon-name>. E.g. resource.uisounds.kodi
When naming the folder, consider the following:
- Only use lowercase letters and numbers (the name is treated as case sensitive)
- Underscores are not allowed, use dashes instead
- Any other character is not permitted
Addon.xml
For Kodi to know what to do with your add-on, a file named addon.xml is required. See Addon.xml for a detailed explanation on this file. However, very little lines are actually necessary for a basic UI sounds add-on.
The layout for the addon.xml file is as follows:
Example resource.uisounds.dumpsterremix2-0:
<?xml version="1.0" encoding="UTF-8"?>
<addon id="resource.uisounds.dumpsterremix2-0" version="2.0.0" name="Dumpster Remix! 2.0" provider-name="Funky Philip">
    <requires>
        <import addon="kodi.resource" version="1.0.0"/>
    </requires>
    <extension point="kodi.resource.uisounds"/>
    <extension point="kodi.addon.metadata">
        <summary lang="en">Dumpsters chilling Kodi</summary>
        <description lang="en">A cool-sounding remix of dumpster sounds!</description>
        <platform>all</platform>
        <assets>
            <icon>icon.png</icon>
        </assets>
    </extension>
</addon>
Overview:
- Addon
- id: Name of your working folder
E.g. resource.uisounds.dumpsterremix2-0 - version: The version of your add-on. This should be in the format x.x.x where x is always a number. Increment the version number every time there's a change
E.g, 2.0.0 - name: Name of your add-on
E.g, Dumpster Remix! 2.0 - provider-name: Author of the add-on/sounds
E.g. Funky Philip
- id: Name of your working folder
- Extension "kodi.addon.metadata"
- summary: A short description of the sound pack
E.g. Dumpsters chilling Kodi- lang="<lang_code>": See Addon.xml
- description: An extended description of the sound pack
E.g. A cool-sounding remix of dumpster sounds!- lang="<lang_code>": See Addon.xml
- platform: The platform for which your add-on is targeted. You should always set this to 'all'
- assets
- icon: The path to the icon of you add-on.
It's highly recommended to always set this to 'icon.png', but you can change this, just make sure that this matches the icon file.
- icon: The path to the icon of you add-on.
- summary: A short description of the sound pack
File structure
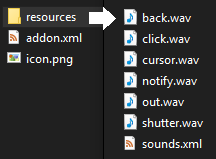
The file structure should be as follows
- addon.xml in the root directory
- icon.png in the root directory
- LICENSE (optional) in the root directory
- sounds.xml in the resources directory
- Sound files (*.wav) in the resources directory
Example:
addon.xml
icon.png
resources/
    back.wav (can be named however you like)
    click.wav (can be named however you like)
    notify.wav (can be named however you like)
    [...]
    sounds.xml
Creating the sound pack
The sounds.xml file
This file was first introduced in Kodi 15.0 Isengard, as part of the UI sounds add-on. It contains the mapping of actions to sounds, that is, moving left, right, up, down, and opening & closing windows.
<actions>
The <actions> section contains global mapping, i.e., actions that are not specifically tied to a window, like moving, selecting, getting inside a directory or returning to a parent directory.
A list of valid actions can be found in Action IDs
To map a sound to a specific action, add a block like this to <actions>:
<action>
    <name>left</name>
    <file>cursor.wav</file>
</action>
Where <name> specifies the action to map a sound to and <file> the wav file to play when the action occurs.
<actions> example
<actions>
    <action>
        <name>left</name>
        <file>glass.wav</file>
    </action>
    <action>
        <name>right</name>
        <file>glass.wav</file>
    </action>
    <action>
        <name>up</name>
        <file>steel.wav</file>
    </action>
    <action>
        <name>down</name>
        <file>steel.wav</file>
    </action>
    <action>
        <name>select</name>
        <file>dump.wav</file>
    </action>
    <action>
        <name>parentdir</name>
        <file>garbagetruck.wav</file>
    </action>
    <action>
        <name>previousmenu</name>
        <file>truckreverse.wav</file>
    </action>
    <action>
        <name>screenshot</name>
        <file>garbagecompress.wav</file>
    </action>
	<action>
        <name>error</name>
        <file>truckreverse.wav</file>
    </action>
</actions>
<windows>
This refers to window specific sounds, like opening or closing the home menu, games menu, etc.
To add a new sound, add a block like this to <windows>:
<window>
    <name>infodialog</name>
    <activate>notify.wav</activate>
    <deactivate>out.wav</deactivate>
</window>
Where <name> specifies the window to map a sound to, and <activate> and <deactivate> are the events a sound can be mapped to (i.e., when the window is showing or hiding).
Valid entries for <name> can be found at Window IDs
Note: Custom skin files may be used, use window IDs if this is the case
<windows> example
<windows>
    <window>
        <name>notification</name>
        <activate>garbagecompress.wav</activate>
        <deactivate>garbagecompressdone.wav</deactivate>
    </window>
    <window>
        <name>home</name>
        <activate>home.wav</activate>
        <deactivate>-</deactivate>
    </window>
    <window>
        <name>startup</name>
        <activate>truckstarts.wav</activate>
        <deactivate>-</deactivate>
    </window>
</windows>
Final result
If you followed this guide step-by-step, you should have an add-on structure similar to this
Now place the folder containing these files in your Kodi addons folder, or pack the folder in a ZIP and install it from within Kodi itself.
Submit your add-on!
If you feel like, it's encouraged that you submit you addon to the official Kodi repository, just make sure to follow the guidelines and to not use any copyrighted work without permission.
Happy sampling!
