NFS
Network File System, or NFS, is a way to share folders over a network, and was added to XBMC in v11 (Eden). The main benefits of using NFS instead of SMB are its low protocol overhead (which allows it to send data across a network more quickly) and its use of simple UID's to authenticate users rather than username/password combinations. This part bears repeating, as many people are confused on this point and try to create usernames and passwords to get Kodi to work with NFS.
| NFS does not use usernames or passwords as logins; it uses a UNIX-based "userID" (UID) alone. |
NFS's main disadvantage in comparison to SMB (a commonly-encountered protocol in Windows environments) is that it can be more complicated to set up in some cases, since many non-technical users are unfamiliar with configuring UNIX-based protocols.
NFS is commonly found on all Linux/UNIX distributions, as well as on OS X and Solaris, and offers several features:
- It is already incorporated in UNIX-like operating systems (such as OS X), eliminating the need for additional software and services to be installed on your computer.
- Once properly configured, NFS will allow your network shares to be seen and accessed by not only Kodi, but also any other machine on your network.
- It allows for authentication by UID, thus eliminating the need to save usernames and passwords in XBMC source XML files.
| Please note that this simple authentication also makes it more vulnerable to attacks. NFS should be only used inside a private LAN. |
- Note: If you already have a working NFS server check that the export options required by Kodi have been set (as described in the relevant section below).
When configuring NFS shares to use as network sources for Kodi's music/video libraries, use the following format: nfs://1.2.3.4/path/to/folder (where "1.2.3.4" should be replaced with the IP of your NFS server, and "/path/to/folder" should be replaced with the path to the folder you want to share; a double slash between the server and the path is wrong, you should not use nfs://1.2.3.4//path/to/folder). See the sections below for help configuring NFS shares on various devices' operating systems.
For more info on network sources for your music and video in Kodi, see Types of Media Sources.
Settings
Check Settings ► Services ► NFS Client page for SMB related settings in Kodi.
NFS sharing from Windows
Windows does not have any built-in native ability to share folders via NFS; and only a limited selection of Windows operating systems have the native ability to access NFS shares as a client. However, several third-party solutions attempt to provide NFS functionality, on both the server side and the client side.
For serving (sharing) files from Windows using NFS, there seem to be three choices:
- Windows Server 2003 R2, Windows Server 2008 and Windows Server 2012 have built-in NFS Server and Client through Subsystem for UNIX-based Applications (SUA). With 64-bit support, this solution supports files up to 4TB in size
- Microsoft Windows Services for UNIX (SFU) available herefor Windows 2000, Windows XP Professional (NOT Home edition, without a hexedit hack), Windows 2003 Server, and Windows Home Server (based on 2003 Server). SFU is 32-bit only, which may mean it only supports files up to 2GB in size, according to some sources (this is unconfirmed). A good installation guide can be found here. Windows SFU will not install on Windows Vista or Windows 7, so there is no way to serve NFS from Windows Vista or Windows 7 with the possible exception of the haneWIN solution below, but it is unconfirmed if that works with Windows Vista/7.
- haneWIN NFS Server for Windows - a shareware program that costs 19EUR for non-commercial use. Claims to work for "Windows 2000 and above."
NFS sharing from OS X
NFS is built into Mac OS X (OS 10.5 and later), and thus no additional software is required to set up NFS shares on a Mac OS X device.
- Note: The following assumes some basic knowledge of the UNIX/BSD operating system interface and environment, and assumes you are familiar with using a Mac's Terminal command-line utility. It also assumes you have a beginner's understanding of UNIX text editors such as nano or vi.
1. To allow regular (non-root) users to connect to your NFS shared folders, you'll need to edit the "/System/Library/LaunchDaemons/com.apple.nfsd.plist" file. Open it and add the option "-N" to the startup parameters as follows:
 <array>
   <string>/sbin/nfsd</string>
   <string>-N</string>
 </array>
If you don't do this step, Kodi will only be able to access the Mac's shared NFS folders if Kodi is running as root (normally, Kodi does not run as root, so you will almost certainly want to do this first step and add the -N parameter).
2. The NFS server and its shared folders are set up in a config file named "exports", located in the /etc directory. Technically speaking, with NFS you "export a path" rather than "share a folder" (which is why the file is named "exports"), but we'll use the latter phrasing for simplicity's sake.
The /etc/exports file may not yet exist; if not, you'll need to create it. The file is edited either manually (in Terminal, using a UNIX text editor such as nano or vi) or via a GUI utility, the most well-known of which is NFS Manager. The following guide assumes you are using Terminal (if using NFS Manager, consult that software's documentation for help).
To view the current contents of /etc/exports, if any, execute the following command in a Terminal window:
cat /etc/exports
Any folders to be shared via NFS should be listed on separate lines, along with any configuration parameters governing connections to those folders. The lines should follow this general format:
/path/to/folder_name_to_share [-parameter1 -parameter2 ...] <IP address restriction (optional)>
Examples
In this sample /etc/exports file, we've set up four folders to be shared via NFS, using various parameters and options. The folders are all contained in a folder called "nfs_shares", and are named to indicate some things about how we've set them up; obviously, on your system, the folder names would be things like "video", "music", and so on.
 /nfs_shares/allread                -ro -mapall=nobody -alldirs
 /nfs_shares/allwrite               -mapall=nobody -alldirs -network 192.168.1.0 -mask 255.255.255.0
 /nfs_shares/writeAs501             -mapall=501 -alldirs 192.168.1.5
 /nfs_shares/Kodiuser
Let's look at what each of these shared folder configurations means.
- The folder "/nfs_shares/allread" can be accessed from all computers (because no IP address is given), is read-only ("-ro"), and all incoming connections are assigned the same permissions as the UNIX user "nobody", who has anonymous access ("-mapall=nobody"). This last parameter ensures that anyone can access the folder, but they will not have any rights on your NFS server other than those belonging to the "nobody" user. Also, the "-alldirs" parameter is used to indicate that incoming connections can mount either the /allread folder OR any subfolder underneath /allread.
- The folder "/nfs_shares/allwrite" can be accessed from all computers on the subnet 192.168.1.0/255.255.255.0, has read and write permissions (we've omitted "-ro"), and again access rights for user "nobody" are assigned ("-mapall=nobody"). The "-alldirs" parameter is once again used to allow subfolders to be mounted directly.
- The folder "/nfs_shares/writeAs501" can be accessed from the computer with an IP of 192.168.1.5, has read and write permissions (again we've omitted "-ro"), and access rights belonging to users on your system with a UID of 501 (see note below) will be inherited by all incoming connections (-mapall=501). The "-alldirs" parameter is once again used to allow subfolders to be mounted directly.
- Note: As already mentioned, authentication to the NFS server is done by checking UIDs. For Kodi, this means that the UID which the Kodi process is running under is given to the NFS server to be authenticated. To find out your current UID, just type "id" into a console:
Mac:~ [your_user_name]$ id
- You should see something that begins like this:
uid=501(your_user_name)
- In this example, my UID is 501. If you are going to be connecting to your NFS shared folder from Kodi on iOS, keep in mind that on iOS Kodi runs as the user "mobile", which should have UID 501 also.
- The folder "/nfs_shares/Kodiuser" can be accessed from all computers (no ip given), readwrite (no "-ro") and the access rights belonging to the UID which is connecting to the NFS server are used ("-mapall" removed).
- Note: The important effect of the absence of the -mapall parameter in this case: if someone connects to your NFS server as root, they will be running on your system as root! Also note that because "-alldirs" is not specified, incoming connections will only be able to connect to the /Kodiuser folder, NOT any folders underneath it.
Bear in mind that any UID's that are used to connect to the NFS server, or that are specified with "-mapall", have to exist on your NFS server (i.e. on your Mac).
Each change on the exports config file needs a restart of the nfs server! Just issue "sudo nfsd restart" for this.
3. Once you've configured and saved your /etc/exports file, the NFS server can be started either by rebooting or by executing the following command:
$ sudo nfsd start
Troubleshooting NFS on OS X
Sometimes there are issues with NFS shares on OS X. Most of them result in the -N flag not being set, but they result in different error messages or issues. One of the root issues is the flag being set in the Property List file, but not read by launchd which controls the process. The following observations are pretty common in this case and if you see one of these points, it won’t hurt to either inspect the nfsd process on your Mac or restart the whole computer.
- You have successfully shared the volume and you can mount it from other Macs in your network (via ⌘K in the Finder), but not from Kodi.
- You can add the computer share (e.g.
nfs://192.168.1.5/), but not the share that contains a path (e.g.nfs://192.168.1.5/nfs_shares/allread). - When you add the computer share, you can enter it in Kodi’s browser, but then clicking on one of the mount points does nothing.
- You see either "Server responded: Procedure not available" or "RPC Packet not accepted by the server" in the error logs.
In most cases it’s sufficient to restart nfsd via launchd, just killing the process with kill -9 or killall nfsd after applying changes to the Property List file has no effects. To restart nfsd via launchd you have to type the following command in the Terminal:
   sudo launchctl unload /System/Library/LaunchDaemons/com.apple.nfsd.plist && \
   sudo launchctl load /System/Library/LaunchDaemons/com.apple.nfsd.plist
When you use ps to inspect the process, -N should be visible at the end of the line. If it’s not, then launchd didn’t apply the changes and just (re-)started nfsd with the old configuration. A proper output looks like this:
   ~  ps aux | grep nfsd
   root        55828   0,0  0,0  2500812   2332   ??  Ss    3:54pm   0:08.96 /sbin/nfsd -N
   chiefsucker 58788   0,0  0,0  2435268    496 s000  U+    7:22pm   0:00.00 grep nfsd
Pay attention to the -N flag being visible in the ps output. If the -N flag is visible, but your shares don’t work, then it’s probably another issue.
If your share stopped working after you upgraded your OS (e.g. from Lion to Mountain Lion) then it usually means that the installer did overwrite the Property List file and you have to add -N again. See immediately below for Mac OS X 10.11 El Capitan upgrade instructions.
Fresh Installs or Upgrading to Mac OS X 10.11 El Capitan through High Sierra
Mac OS X 10.11 changed the way the user is allowed to interact with certain system files, including anything in /System/Library/LaunchDaemons/ This is due to SIP (System Integrity Protection). Follow these steps to disable SIP, set the -N option in com.apple.nfsd.plist, and re-enable SIP.
- Power up or restart the Mac. At the chime, hold down Command-R to boot into the Recovery Partition.
- Once booted in the Recovery Partition, go to the menu bar and click on Utilities, then select Terminal.
- Type this into Terminal to disable SIP:
/usr/bin/csrutil disable - Quit Terminal and restart the Mac.
- Follow the intructions from above to insert the
-Noption. - Restart the Mac. At the chime, hold down Command-R to boot into the Recovery Partition.
- Again, go to the menu bar and click on Utilities and select Terminal.
- Type this into Terminal to re-enable SIP:
/usr/bin/csrutil enable - Quit Terminal and restart the Mac.
OS X 10.8 Mountain Lion introduced some changes that result in very aggressive sleep behaviour. Because NFS shares aren’t handled and treated like shares set from within the Sharing panel in System Preferences, OS X will ignore clients that access your NFS shares and just put it to sleep. Fortunately there are some workarounds:
- Set Computer sleep in the Energy Saver pane of System Preferences to Never. Unfortunately this will affect the whole machine and you’ll have to put your Mac manually to sleep from now on.
- Get the free Caffeine app from the Mac App Store. The app will reside in your menu bar and you can prevent your Mac from sleeping with just one mouse-click. If you disable Caffeine (again with one click), your Mac will go to sleep as set in the System Preferences. This has the benefit of adjustable sleep behavior, i.e. you turn Caffeine on when you watch movies and you turn it off otherwise to preserve energy and save the planet.
- You can reach the same goal with the Terminal app
caffeinatethat gets shipped with the OS since OS X 10.8 Mountain Lion.
NFS sharing from Linux
NFS sharing has been built into linux kernel for a long time.
- Note: This article assumes some basic knowledge of the Linux/UNIX/BSD operating-system interface and environment.
The configuration of the NFS server takes place in the config file "/etc/exports". As already mentioned, the authentication to the NFS server is done through UIDs. For Kodi, this means the UID that the Kodi process is running under is used to authenticate on the NFS server. To find out what UID Kodi is using, just type "id" into a console:
 penix:~ [your_user_name]$ id
 uid=501(your_user_name)
In this example, my UID is 501. For iOS devices, keep in mind that Kodi is running as the user "mobile", whose UID should also be 501.
A basic configuration for exporting a path with NFS looks like this:
/nfs/export <ip or iprange which is allowed to connect>(rw,all_squash,insecure)
The important options here for use with Kodi are the "ip or iprange" and the "insecure" options. The "insecure" option is needed because we want to be able to run Kodi without root privileges. If the insecure option is not enabled, only the root user (uid 0) will have access to the nfs share. The "ip or iprange" specifies which hosts on the network will be allowed to access the exported NFS share.
By changing some of the options of that line, we can use any of three different approaches for getting the access rights configured as we want:
1. The option all_squash (most insecure) - all UIDs connected to the NFS server are mapped to UID 65534 (user nobody)
- In this case all files which shall be accessed on the NFS exported path should have the correct rights for the user "nobody".
2. Using the option "all_squash" in conjunction with the option "anonuid" and "anongid"
- By adding the options "anonuid=501" and "anongid=501" all accesses would be mapped to the user with UID 501 (user "mobile" on iOS or user "memphis" in my example above)
3. Removing the "all_squash" option the accesses will be done with the UID given from the user which is running Kodi
- So if Kodi is started with username foobar (which has UID 1000) all accesses to the NFS export path will be made with UID 1000.
Examples for exported paths:
 ### access from all computers ("*"), readonly ("ro"), access for user nobody ("all_squash")
 /nfs/allread   *(ro,all_squash,insecure)

 ### access from the subnet 192.168.1.0/255.255.255.0, read/write ("rw"), access for user nobody
 ### ("all_squash").  Remember that "rw" doesn't automatically allow writes; the user "nobody" must
 ### have write access to the path on the filesystem.
 /nfs/allwrite   192.168.1.0/24(rw,all_squash,insecure)

 ### access from 192.168.1.5, read/write ("rw"), access for user with UID 501 (i.e. memphis, for me)
 ### ("all_squash,anonuid=501,anongid=501")
 /nfs/writeAsMemphis   192.168.1.5(rw,all_squash,insecure,anonuid=501,anongid=501)

 ### access from all computers ("*"), read/write ("rw"), access for the UID connecting to the
 ### NFS server ("all_squash" removed)
 /nfs/Kodiuser   *(rw,insecure)

 ### NTFS export  *SECURITY Warning: this gives the user ROOT access*
 ### access from the subnet 192.168.1.0/255.255.255.0, read/write ("rw"),  nfs client connects
 ### as root ("no_root_squash"). Otherwise, permission is for nfsnobody, (uid 65534).
 ### NTFS is non-POSIX permissions compliant, so you must access the share as root
 /nfs/NTFS_share   192.168.1.0/24(rw,no_root_squash,insecure)
The UIDs which are used to connect to the NFS server or which are specified with "anonuid" and "anongid" have to exist on the NFS server. Otherwise the filesystem permission can't be set.
Remember - access rights are these you give in the filesystem. After each change to the exports config file issue "sudo exportfs -ra"!
Notes on serving NFS from Ubuntu 20.04 and other distributions with more modern NFS
Ubuntu 20.04 LTS has an updated version of NFS vs. the older version in 16.04 and 18.04.
Combined with the relatively old version of libnfs included with most Kodi distributions at time of writing, this can make NFS set up a little more difficult than with older versions of Ubuntu. (i.e. when using Ubuntu as the server).
The main issue is that server discovery is broken - that is, when you click on the 'nfs' option when adding a source, you will not see your Ubuntu 20.04 NFS IP appearing in the list of available servers.
In most Kodi locations, you can just explicitly manually enter the full share details (as above, e.g. nfs://192.168.1.5/SomeExport) and you will then be able to use the share that way.
Unfortunately, though, this does not work in all Kodi file browsers (e.g. when adding a folder for the Kodi Music Information in the Settings -> Media -> Music area). A better solution, then, is to add an explicit entry to your mediasources.xml file. Note, you don't need to add all the individual NFS exports - once you have the entry for the server working, you will then be able to browse the exported shares from that server as normal.
Example mediasources.xml - this one contains both an SMB (with a user/password) and nfs share - both of which will then come up as sources in all Kodi file browsers.
 <mediasources>
     <network>
         <location id="0">smb://user:[email protected]/</location>
         <location id="1">nfs://192.168.1.5/</location>
      </network>
 </mediasources>
Note, also, that the standard Ubuntu UFW firewall, if enabled, will block incoming NFS connection by default. With NFSv4 clients, where only one standard port (2049) is used, you can add a simple rule to allow NFS through:
sudo ufw allow from 192.168.1.0/24 to any port nfs comment "NFS"
However, Kodi generally mounts using NFSv3, and this is therefore not sufficient. So you'll need to to do two more things - one, force NFS to use a specific port, and then open that port, plus port 111, on UFW as well. The accepted answer to this question on the Ask Ubuntu Stack Exchange is the solution.
Once all this is done, it is then easy to both find your exports, and you will be able to connect to them.
NFS sharing from FreeBSD
This will get you going with NFSv3. Edit rc.conf:
nfs_server_enable="YES"
rpcbind_enable="YES"
rpc_lockd_enable="YES"
rpc_statd_enable="YES"
weak_mountd_authentication="yes"
Edit /etc/exports (change to network as required):
/path/to/share -alldirs -maproot=root -network=192.168.1.0/24
After that you can reboot or start the daemons:
service rpcbind start
service nfsd start
service mountd start
For more information refer to the FreeBSD handbook entry on NFS
NFS sharing from NAS4Free 9.x (successor to legacy FreeNAS 7.x)
The information in the Linux section above also applies for *BSD based systems (such as FreeBSD). This section addresses some specific issues to bear in mind if you are using NAS4Free 9.x or FreeNAS 7.x (aka. legacy) installations.
- Note: FREENAS 8.3.0-RELEASE or later does not require modifying the rc.conf file for Kodi to access NFS shares. You must however enable "allow non-root mount" which can be found under the SERVICES - NFS section in the Freenas 8.3.0 web GUI.
Setup your NFS shares as normal. Remember: don't create shares inside other shares. The following would be illegal...
 /mnt/disk                   -alldirs,quiet -mapall=root -network 192.168.1.0 -mask 255.255.255.0
 /mnt/disk/folder            -alldirs,quiet -mapall=root -network 192.168.1.0 -mask 255.255.255.0
...because the "/mnt/disk/folder" directory is already shared by "/mnt/disk". If you remember to set the setting "All dirs" when creating your NFS shares, the flag "-alldirs" will be set. This flag allows you to mount any subdirectory of your share just as if it was a share itself. Said another way: It's not necessary to share "/mnt/disk/folder" because you can mount it through the "/mnt/disk" share.
After having set up a standard NFS share on your NAS4Free box, you need to add a few variables to rc.conf on NAS4Free. This is done by going into System > Advanced > rc.conf . Here you need to add the following:
 Variable                     Value              Comment
 mountd_flags                 -n                 Allow non-root mount requests to be served.
 nfs_reserved_port_only       NO                 Allow for insecure ports to be used by NFS.
 nfs_server_flags             -u -t -n 4         Serve UDP and TCP with 4 servers.
After this, apply your changes and reboot NAS4Free. You should now be able to mount your NFS shares, as well as any subdirectory of those shares.
NFS sharing from ZFSGuru
Very similar to FreeNAS solution. mountd needs the -n flag. In ZFSGuru you can achieve this by adding
weak_mountd_authentication="YES"
to /etc/rc.conf
NFS sharing from commercial NAS systems such as Synology or QNAP
Each NAS manufacturer, if it allows you to share folders via NFS on its NAS systems, does so in its own way. Often this will involve setup via the NAS's control panel or administrator interface. You can also connect to many NAS systems via ssh and manually edit files in order to set up and configure NFS (consult your NAS manual to see if this is possible/desirable/necessary). Since most NAS systems are based on Linux/UNIX, if you need to manually edit files, you should be able to make use of the Linux instructions above to create/edit your NFS shares.
Troubleshooting NFS on a commercial NAS with Kodi
Your NFS server on your NAS needs to be able to allow connections on so-called unprivileged ports, which are port numbers higher than 1023. However, most NAS's are set up by default to deny incoming NFS connections on these unprivileged ports. This is one of the most common reasons why Kodi users experience problems when trying to connect to an NFS shared folder on a NAS.
If you are having trouble connecting to your NFS shares on your NAS from Kodi, make sure your NFS shares have the "insecure" option enabled, which will allow connections on unprivileged ports. To check, connect to your NAS via ssh and issue the cat /etc/exports command. Your shared folders will each have several parameters listed separated by commas. If the "insecure" parameter is not listed, you will need to add that parameter to the list. This will usually involve directly editing the /etc/exports file with a UNIX text editor and adding the "insecure" option manually, although some NAS's may offer the ability to add the option via an admin interface. Check your NAS manual for details, or explore the section below if your brand of NAS is listed.
Commercial NAS NFS setup instructions
Kodi users have contributed the following NFS setup instructions for various brands of NAS devices. If your NAS is listed below, feel free to follow the accompanying instructions to set up NFS on your system.
Synology
![]()
- Note: You do not need to create a special user account on your Synology NAS in order to make use of NFS for Kodi. The following guide assumes you are comfortable with using the simplest (least secure) internal setup on your NAS, which will normally be the case for the vast majority of Kodi users.
-
 Step 1: Log in to your Synology admin control panel.
 -
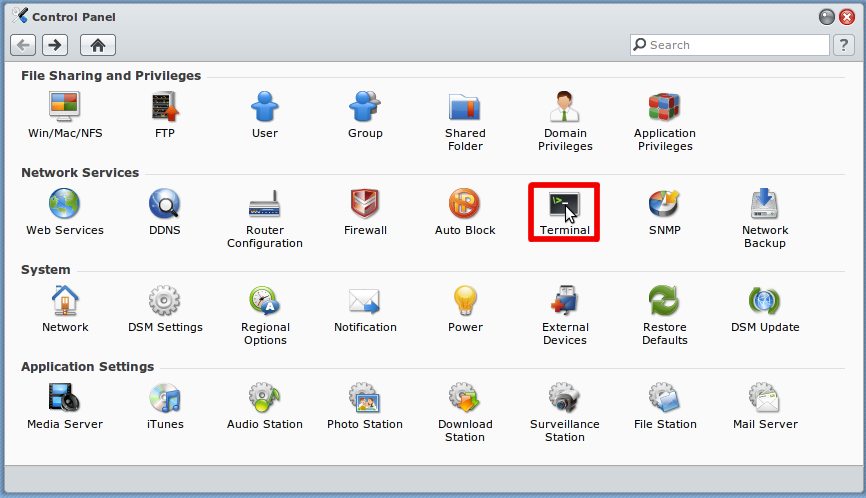
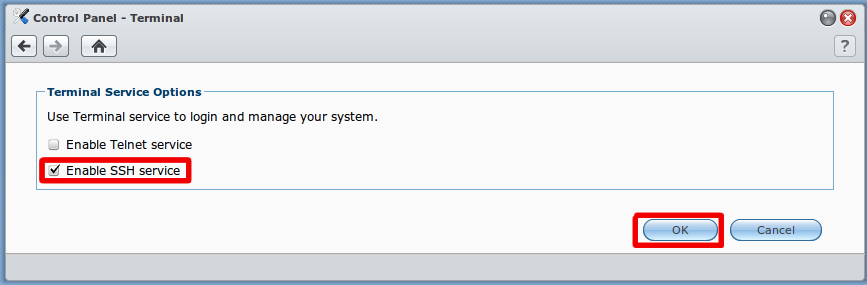 Step 2: Enable SSH (if not enabled already): Control Panel --> Terminal --> Enable SSH service --> OK
 -
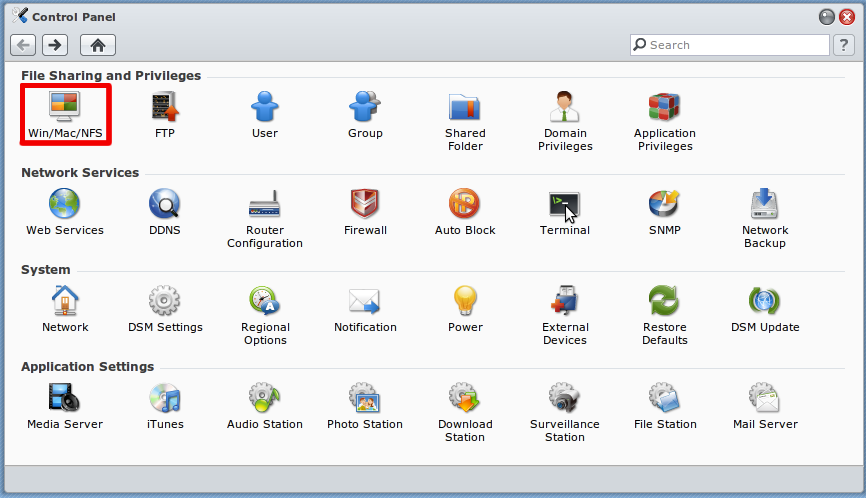 Step 3: Enable NFS under Control Panel --> Win/MAC/NFS
 -
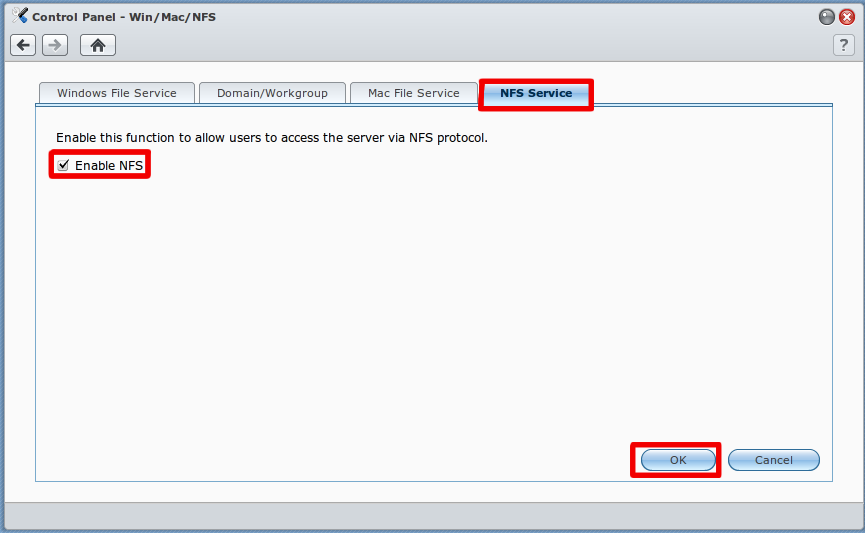 Step 4: NFS Services --> Enable NFS --> OK
 -
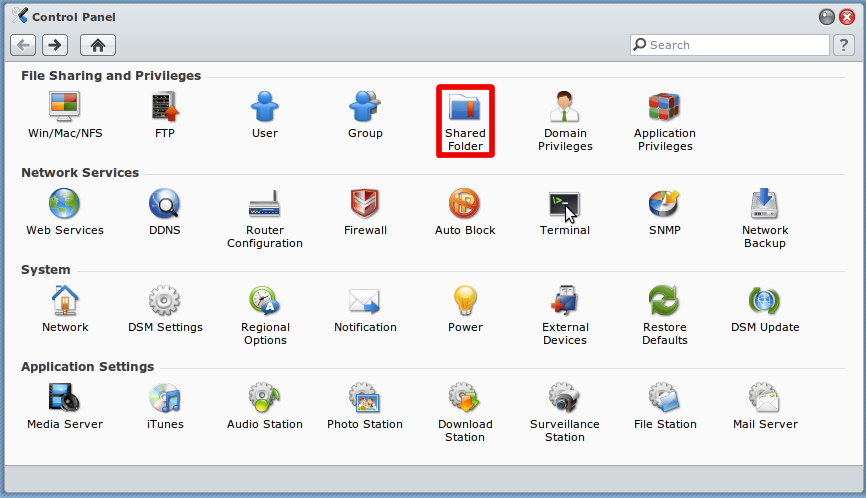 Step 4: Under Control Panel --> Shared Folder
 -
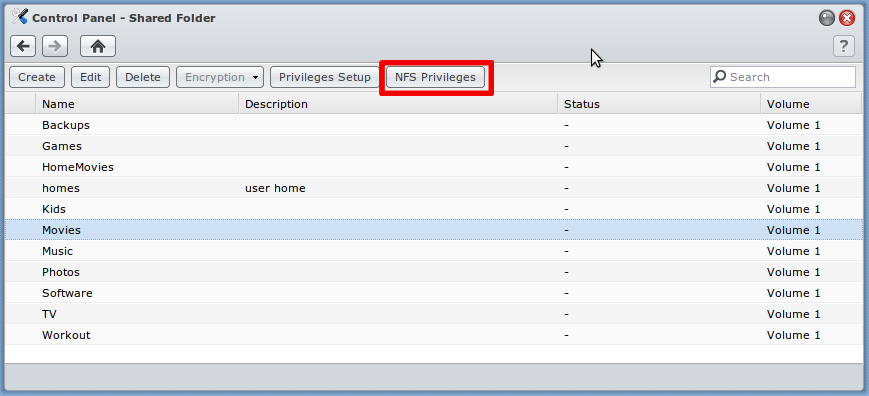 Step 6: On NFS Privileges tab select entry for the folders you want to share e.g. Movies
 -
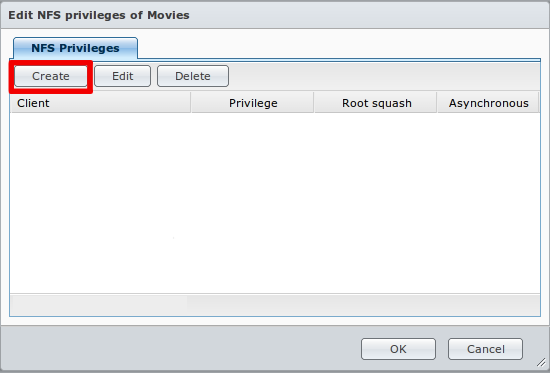 Step 7: Create privileges for the selected share
 -
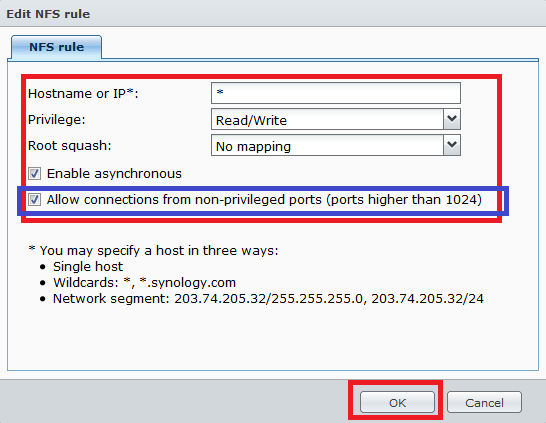 Step 8: As per example allow all IPs (or the desired IP for your HTPC) with read/write permissions with no mapping and enable asynchronous. The option to allow connections from non-priviledged hosts is new in DSM version 4.3-3776. Using DSM 5.0-4482 I had to use the "Squash" option and "Map all users to admin".
 -
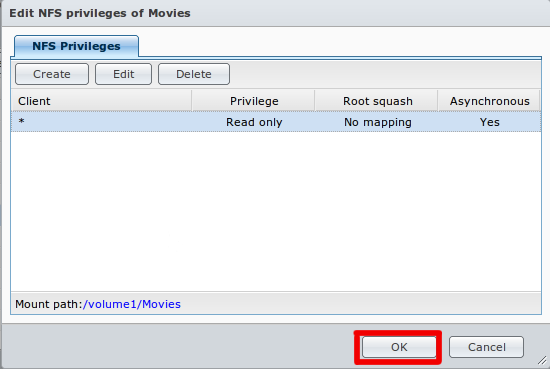 Step 9: Press OK


- Note: The below steps are necessary only if you are using a Synology DSM version less than 4.3-3776.
Step 10: On your computer, in a command line window (Terminal on a Mac, CMD on a Windows PC, etc), ssh into your Synology:
ssh root@<<YOUR.SYNOLOGY.IP.ADDRESS>>
Step 11: Type in cat /etc/exports to make sure your previous steps have created exported NFS directories. If no entries are found, go back to the previous steps and make sure you've followed them correctly. You should be seeing something like this:

Step 12: Type vi /etc/exports to edit the /etc/exports file, and change all the "insecure_locks" entries to simply read "insecure". If you don't know vi: press the INS[SERT] key, use arrows to go to the line to edit, and delete/edit the line. Then press the ESC key, and type :x to 'Save & Exit'.
13. Type cat /etc/exports again, and you should now see something like this (make sure it says "insecure" rather than "insecure_locks"):

Step 14: Type exportfs -ra to initialize your newly exported directories, or reboot the NAS.
Step 15: You should now be able to browse NFS and get to your exported Synology subfolders in Kodi.
Synology DSM 5.1
-
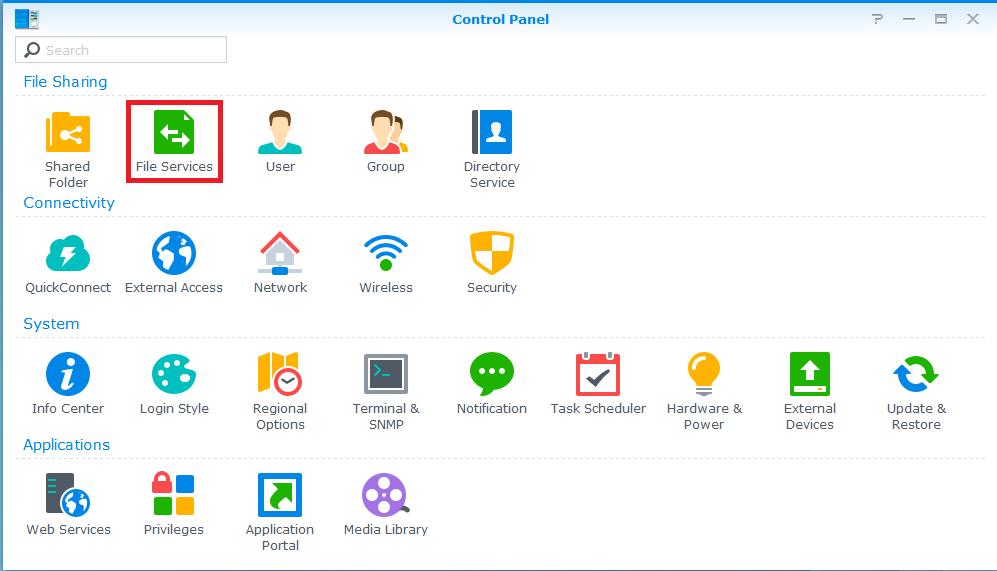 Step 1: Enable NFS under Control Panel --> File Services
 -
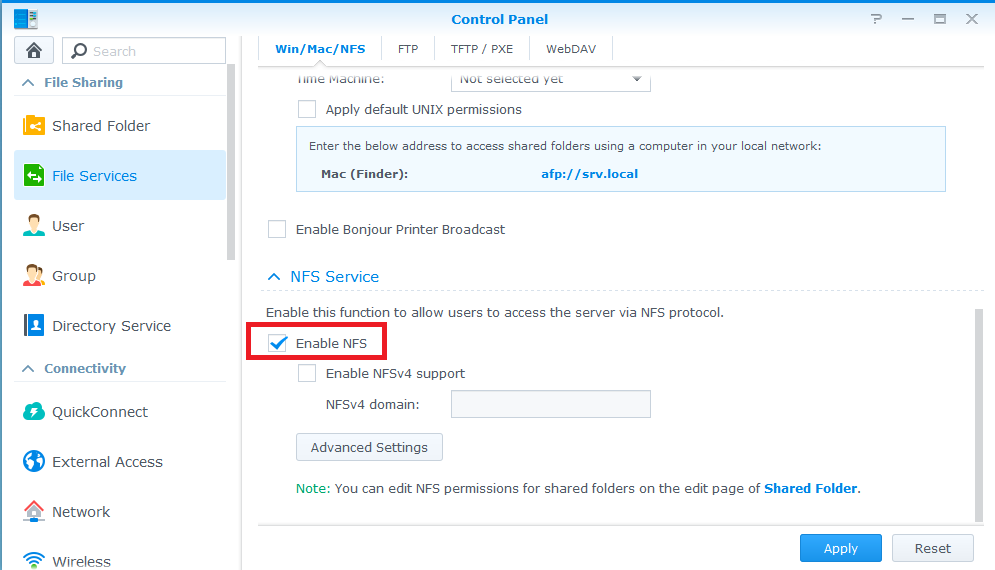 Step 2: NFS Services --> Enable NFS --> Press Apply
 -
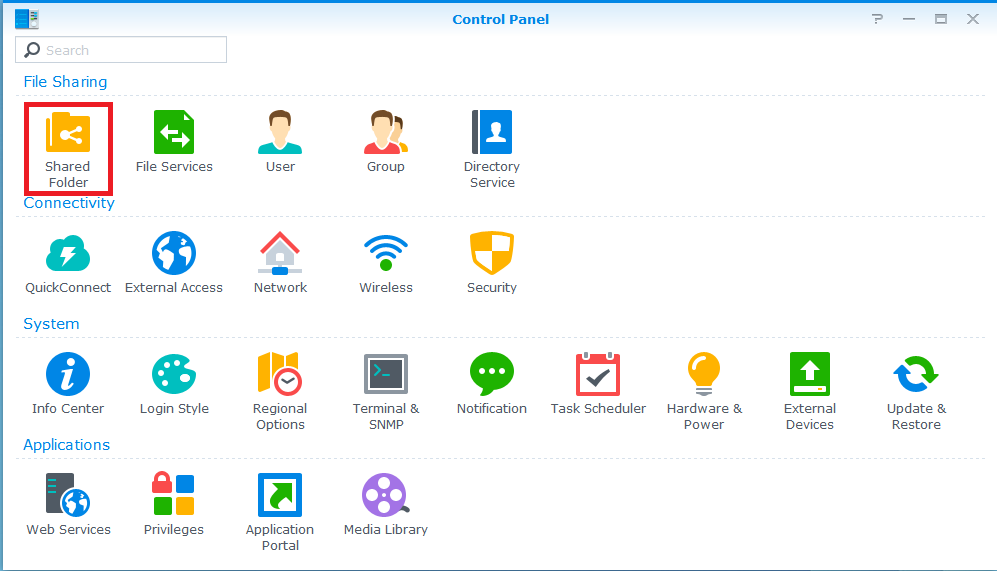 Step 3: Under Control Panel --> Shared Folder
 -
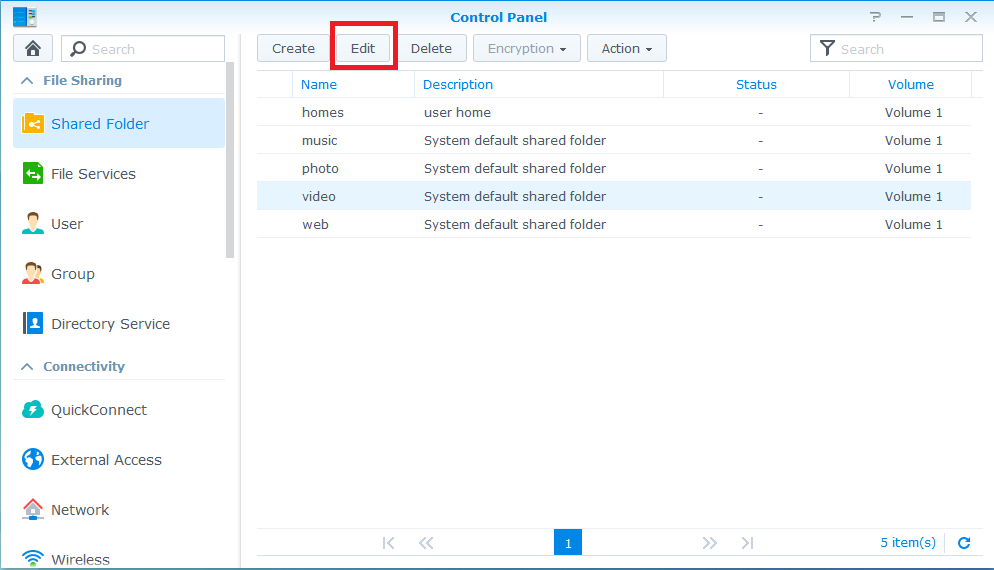 Step 4: Select entry for the folders you want to share e.g. video and click Edit
 -
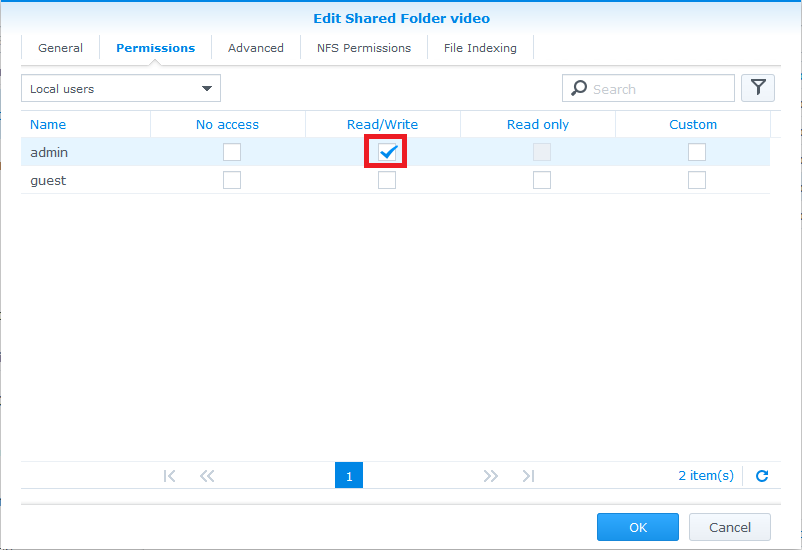 Step 5: Under permissions tab add permission read/write for user admin
 -
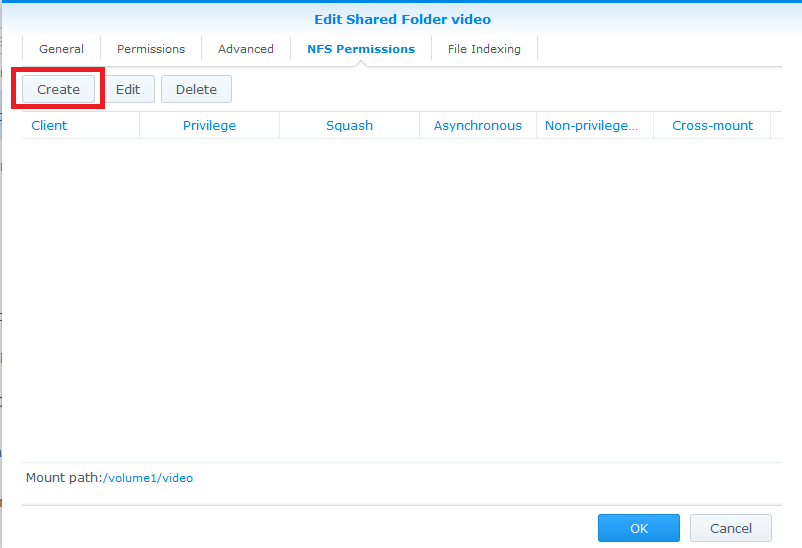 Step 6: Under NFS Permissions tab add permission click Create to create NFS permissions
 -
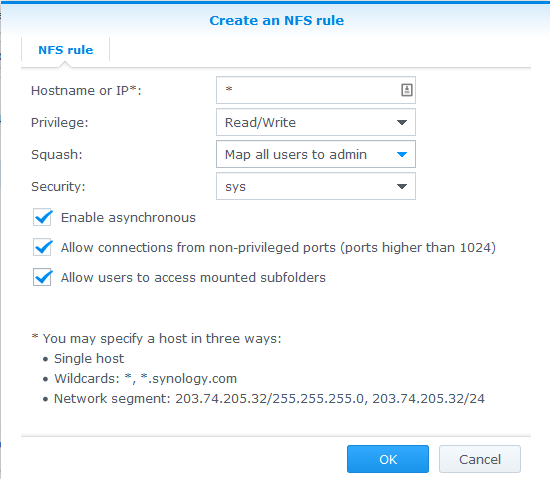 Step 7: As per example allow all IPs (or the desired IP for your HTPC) with read/write permissions, Squash Map all users to admin, Security sys, and enable asynchronous. The option allow connections from non-priviledged ports selected. Allow users to access mounted subfolders also selected.


Step 8: Click OK to save changes. And now you should be able to access video folder via NFS protocol
QNAP
![]()
- Note: You do not need to create a special user account on your QNAP NAS in order to make use of NFS for Kodi. The following guide assumes you are comfortable with using the simplest (least secure) internal setup on your NAS, which will normally be the case for the vast majority of Kodi users.
This guide requires you to SSH into your QNAP, and also to use the terminal editor Vi to edit files.
Here's a couple of guides if you wish to learn more, but feel free to google for further reading:
1. Log into your QNAP admin control panel. (Web browser = IP-ADDRESS:8080).
-
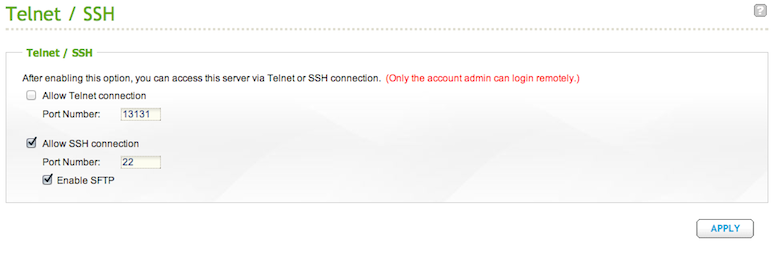 Step 2: Enable SSH (if not already): Network Services -> Telnet / SSH -> 'tick' Allow SSH connection, Press Apply
 -
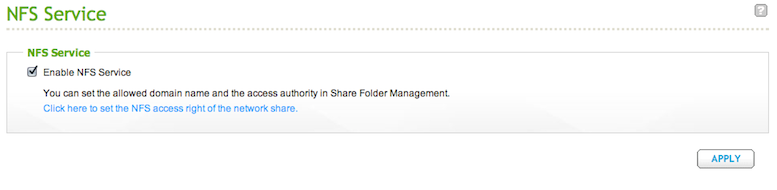 Step 3: Enable NFS: Network Services -> NFS Service -> 'tick' Enable NFS Service, Press Apply


-
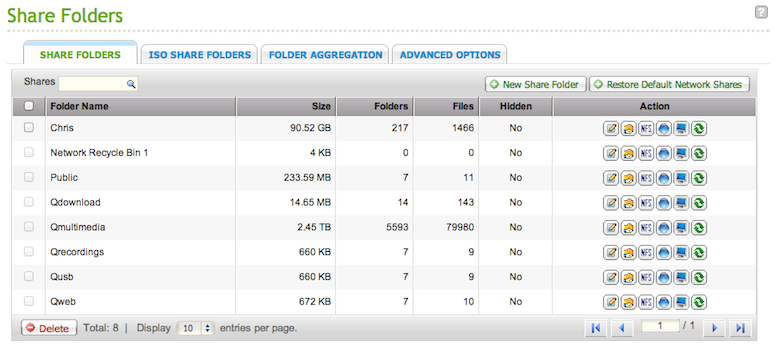 Step 3: Set NFS Access Rights: Under "Enable NFS Service" Click on "Click here to set the NFS access right of the network share"
 -
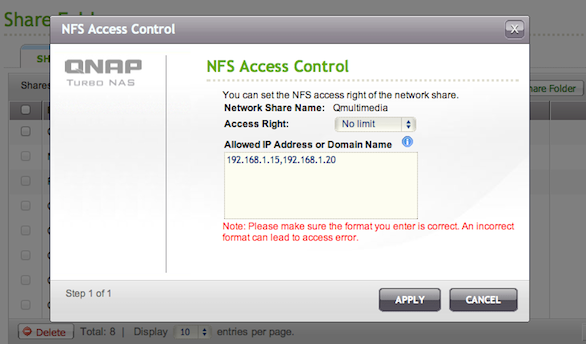 Step 4: Click on the NFS icon next to Qmultimedia (or whatever the name of your media share on the QNAP) and set Access Right to No Limit and put in the IP Address of each individual device that requires NFS connection (ATV2, Desktop, Laptop, etc.), Press Apply


6. On your computer, in a command line window (Terminal on a Mac, CMD on a Windows PC, etc), ssh into your QNAP:
ssh admin@<<YOUR QNAP IP ADDRESS>>
7. Type in cat /etc/exports to make sure your previous steps have created exported NFS directories. If no entries are found, go back to the previous steps and make sure you've followed them correctly. You should be seeing something like this:
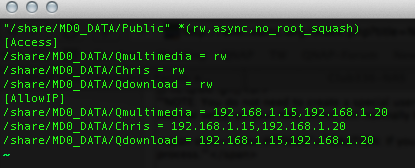
 "/share/MD0_DATA/Qmultimedia" 192.168.1.15(rw,async,no_root_squash) 192.168.1.20(rw,async,no_root_squash)
 "/share/NFS/Qmultimedia" 192.168.1.15(rw,nohide,async,no_root_squash) 192.168.1.20(rw,nohide,async,no_root_squash)
8. Type vi /etc/exports to edit the /etc/exports file, and add "insecure" entries inside the brackets in front "rw"(separated with a comma ","). If you don't know vi: press the "i" key, use arrows to go to the line to edit, and add the entries. Then press the ESC key, and type :wq to 'Save & Exit'. Your exports file should now look something like this:
 "/share/MD0_DATA/Qmultimedia" 192.168.1.15(insecure,rw,async,no_root_squash) 192.168.1.20(insecure,rw,async,no_root_squash)
 "/share/NFS/Qmultimedia" 192.168.1.15(insecure,rw,nohide,async,no_root_squash) 192.168.1.20(insecure,rw,nohide,async,no_root_squash)
9. Type exportfs -ra to initialize your newly exported directories, DO NOT reboot the QNAP or restart NFS via the QNAP Admin page - If you do the QNAP will overwrite the changes you just made.
-
 Step 10: Now type vi /etc/config/nfssetting. You'll see something like this:
 -
 Step 11:Move your cursor to after the rw in the line /share/*****/Qmultimedia = rw (***** interchangeable with whatever yours says). Press i and add insecure separated by a , (comma). When you're done editing press esc and then :wq to save the changes and close the file. It will look something like this when finished:


CAUTION: If you reboot your QNAP NAS at any time after completing the steps above, but before completing the steps below, the changes you've made will be wiped out and you will need to redo the process.
12. That should be it for getting it working.. You should now be able to browse NFS and get to your exported QNAP folders in Kodi. Now there's just a few more steps to ensure all your hard work survives a reboot/firmware upgrade.
- We're going to edit/create an autorun script that overwrites two files from backups we're going to make.
13. Okay, you need to make a folder to store the backup files. You need to use the absolute path in the Autorun script. Type mkdir /share/MD0_DATA/backups and press enter. (The MD0_DATA part could be different on your model, I'm running a TS-509).
14. Now type cp /etc/exports /share/MD0_DATA/backups/exports and press enter.
15. Type cp /etc/config/nfssetting /share/MD0_DATA/backups/nfssetting and press enter.
16. Now for the fun part. To mount the ramblock follow the procedure below. This is based on the guide here (Method 1): QNAP Autorun Wikiguide
17. Pick the method that is applicable to your QNAP model.
- Model TS-201: Mount the config ramblock /dev/mtdblock4:
# mount -t ext2 /dev/mtdblock4 /tmp/config
- Models TS-109, TS-109P, TS-110, TS-119, TS-209, TS-209P, TS-219, TS-409 (Marvell ARM), TS-419P: Mount the config ramblock /dev/mtdblock5:
# mount -t ext2 /dev/mtdblock5 /tmp/config
- Models TS-439, TS-509, TS-639, TS-809, TS-809U (x86): Mount the config ramblock /dev/sdx6:
# mount -t ext2 /dev/sdx6 /tmp/config
- Model TS-201: Mount the config ramblock /dev/mtdblock4:
- Create/Edit /tmp/config/autorun.sh .
- either using vi:
# vi /tmp/config/autorun.sh
- Get vi editor into edit mode: press i
- Add these lines to the autorun.sh script:
- cp /share/MD0_DATA/backups/exports /etc/exports
- cp /share/MD0_DATA/backups/nfssetting /etc/config/nfssetting
- Exit edit mode: press ESC
- Save and exit: :wq
- or editing it using a desktop PC and e.g. SFTP
- either using vi:
- Ensure that /tmp/config/autorun.sh is executable:
# chmod +x /tmp/config/autorun.sh
- IMPORTANT: Unmount the mounted flash partition:
# cd /
# umount /tmp/config
18. Finish the linked guide, making sure to unmount the ramblock. (You will need to cd away from the /tmp/config directory to umount it.
19. Should be done!
Thecus
![]()
-
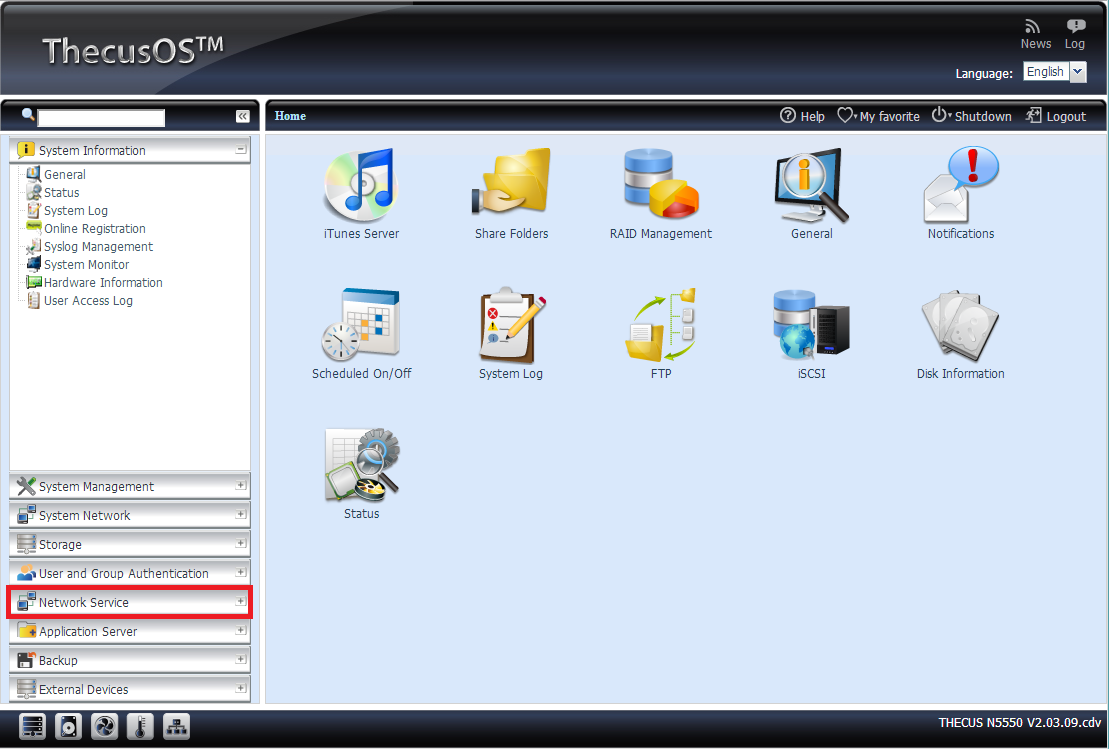 Step 1: Log in to your ThecusOS interface and select Network Service.
 -
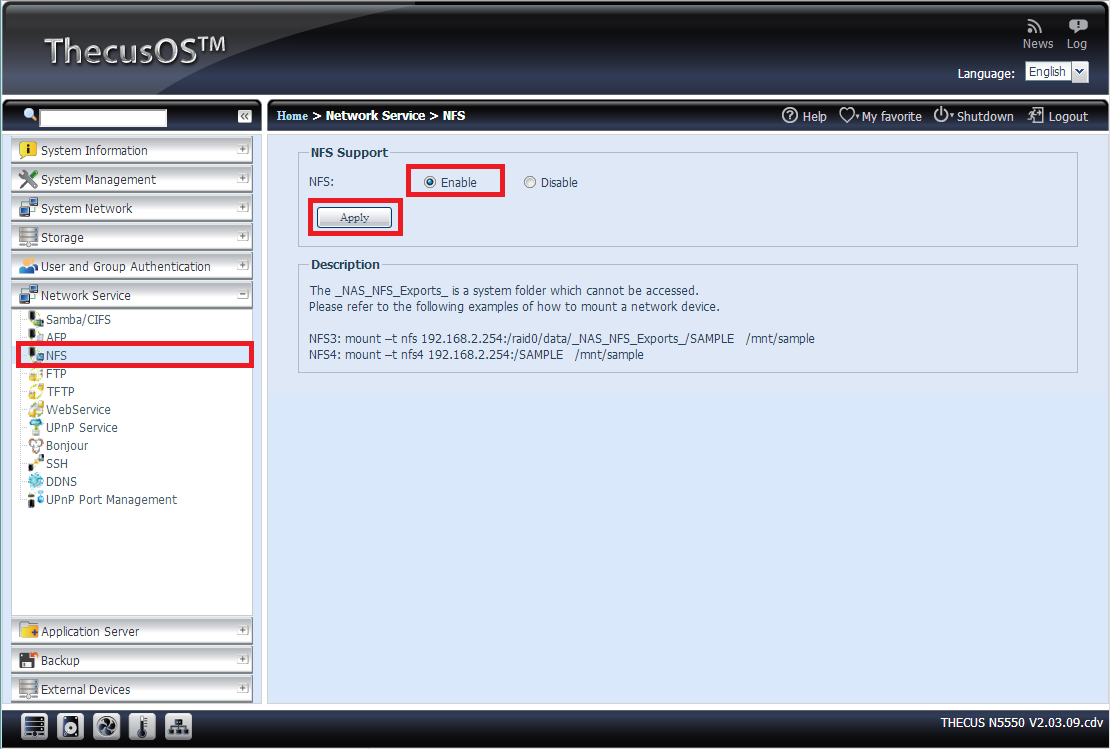 Step 2: Enable NFS and click Apply
 -
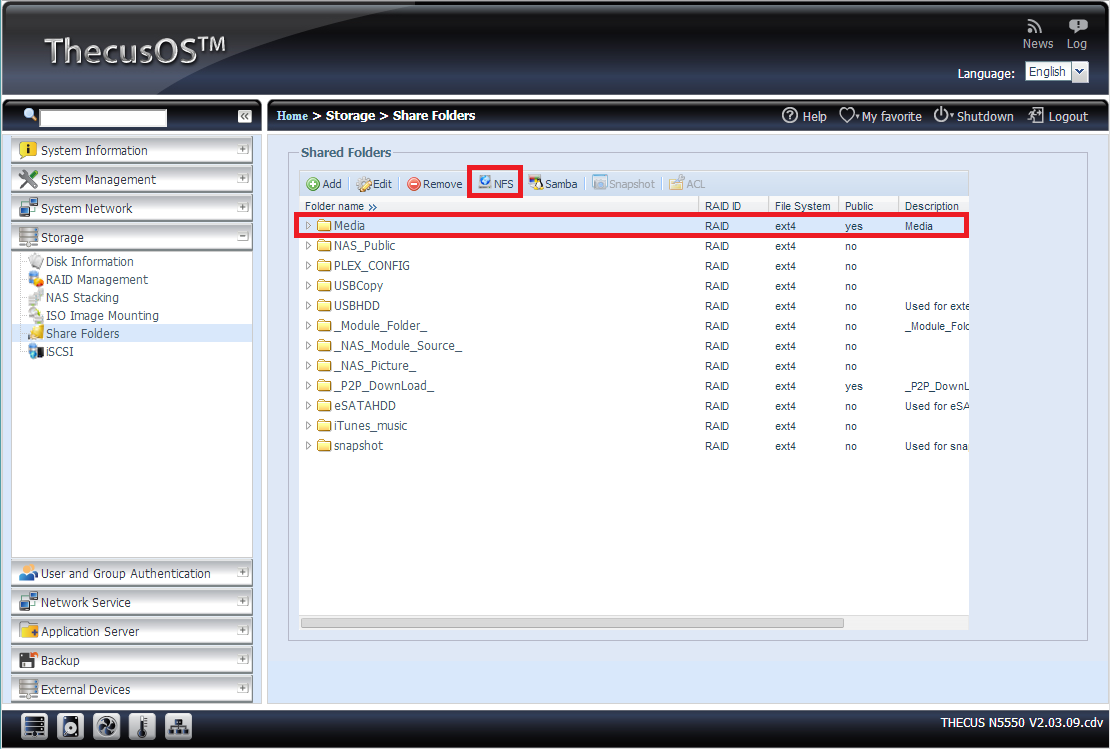 Step 3: Go to the Share Folders entry in the Storage-section. Select the folder, you want to share via NFS and click on NFS.
 -
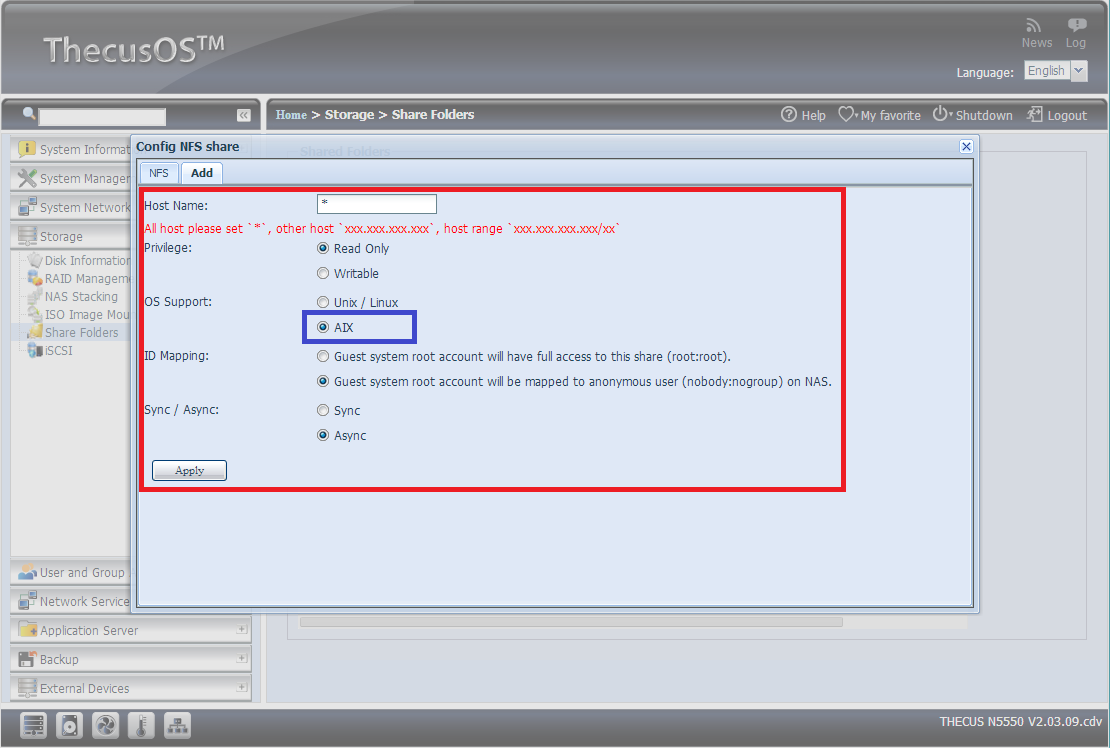 Step 4: You can now define specific hosts and access rights. !!!IMPORTANT!!! Activate AIX as OS support, otherwise Android Kodi won't be supported. Apply


