MySQL/Backup and restore databases

|
Incomplete: This page/section is under construction |
Rationale
Although a SQL database server is typically quite stable in day-to-day operation and not prone to random data loss, it usually manages information carefully gathered over a longer period of time, data which users wish to safeguard from damage and prevent from being compromised in any way. One of the most effective forms of protection against these and other adverse eventualities is having a backup of your database data. There are several ways to make such backups. This page will focus on MySQL server backups, with any deviations for MariaDB mentioned separately.
Files from a MySQL server cannot simply be copied like normal computer files. The combination of files and contents makes it necessary to retrieve the data via specialized tools such as:
- PHPMyAdmin
- MySQL Workbench
- HeidiSQL (MariaDB)
Connecting to the database server
You can use the same database user kodi which was initially set up with the Kodi video and music libraries. By default, the user kodi was granted full access to the database server to make the creation of new Kodi databases seamless during upgrades.
If you want to create Kodi databases on a new MySQL/MariaDB server, make sure you create the user 'kodi' first, and grant the user full credentials as per Kodi instructions.
GUI applications
PHPMyAdmin
PHPMyAdmin is a web interface that runs on an Apache web server and PHP instance that connects directly to your database server by way of your web browser, locally or outside your own network. It can be installed on Windows, Linux and Mac OS computers, as well as most NAS devices.
- phpMyAdmin screenshots
-
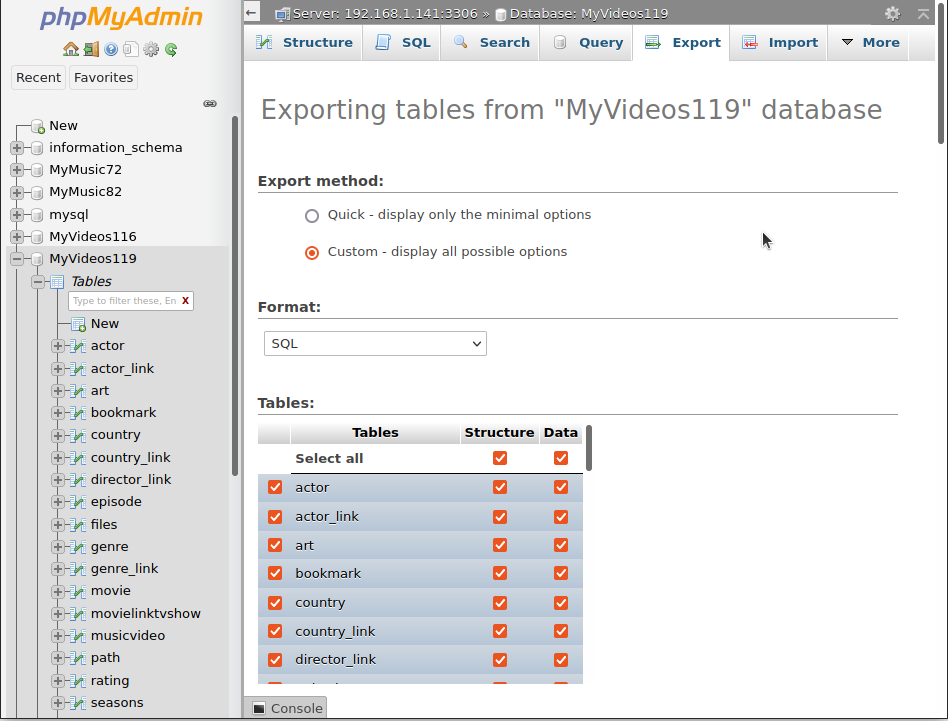 Export ▶ Selection
 -
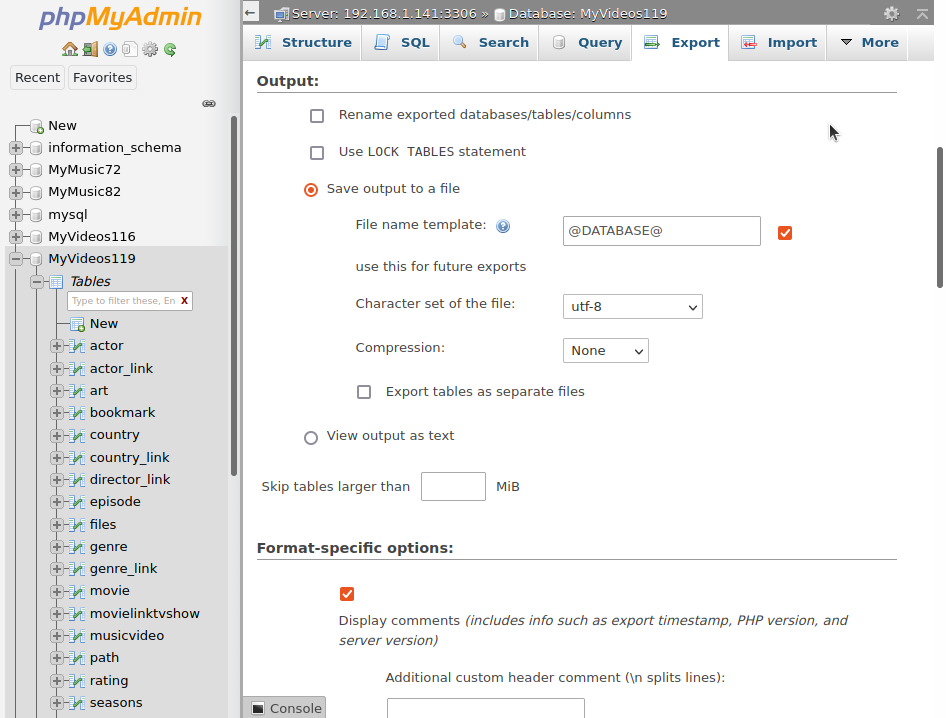 Export ▶ Output
 -
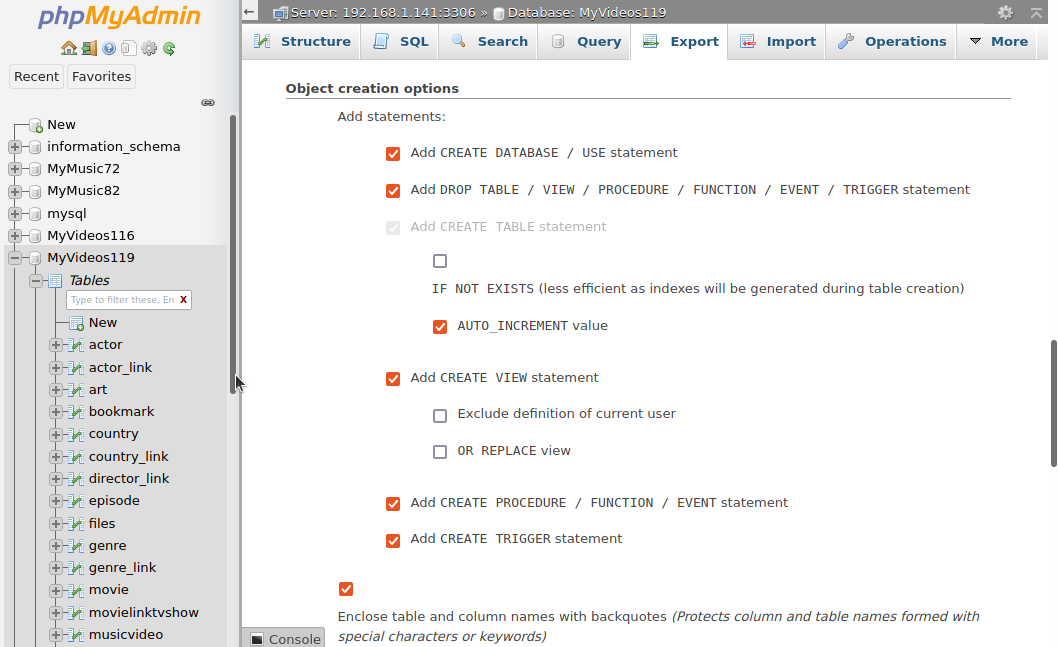 Export ▶ Object creation


Open the PHPMyAdmin application and log in with a user with full credentials. The kodi user should have those credentials.
- Selection:
- Click on the Export tab, then select Custom - display all possible options, making sure to have the correct database(s) selected.
- Output:
- Create your output filename in case you do not want to use the auto-generated default.
- Object creation:
- Include the DROP DATABASE IF EXISTS and
- DROP TABLE / VIEW / PROCEDURE / FUNCTION / EVENT / TRIGGER statements
To begin the backup, click the Go button in the bottom left corner. A download link of the export file will be presented to you when the process has completed.
MySQL Workbench

MySQL Workbench is a standalone database maintenance application which is available for Windows, Linux and macOS.
- From the main menu, select Server, then the submenu item Export data….
Note: To make a database the default selected database in MySQL Workbench for current and future sessions, double-click on the MyVideos119 schema in the left side bar. The entry will then be displayed in boldface. - Administration – Data Export:
- Tables to export: Select the schema(s) or database(s) you want to export, their respective data tables will be selected automatically.
- Export options:
- Select Export to Self-Contained File, and browse/create to the preferred folder and file name.
- Include Create Dump in a Single Transaction as well as Include Create Schema.
Finally, press the Start Export button in the bottom right corner to start the database export. Exit the application if no errors were found.
HeidiSQL (MariaDB)
HeidiSQL is an overall database server tool, able to handle multiple types of database servers, but was primarily intended for MariaDB. It is available for a Windows OS only.
Command-line interface
MySQLdump
MySQLdump script for Windows OSes MySQLdump script for Windows OSes using MySQLdump is possible, and the tool is typically provided along with the mysql/mariadb-server installation. This is a script that can be used either manually or be hung into a time-repetitive scheduler. Log files are created with filenames that have a timestamp built-in, so older backups will not be overwritten. Copy the script below into your favorite text-editor and save it as a .bat (batch) file into the location+filename of your choosing. You can export database contents for the Kodi video library, music library, and the database user for the Kodi application.
cls
@echo off

echo " "
echo "MYSQLDUMP databases Kodi v19+ video & music"
echo "-------------------------------------------"

REM UNTESTED SCRIPT !!
REM TO BE TESTED ON WINDOWS 11 Pro with MYSQL SERVER 5.7.36 ON UBUNTU SERVER 18.04

REM SET FORMATTED TIMESTAMP
SET A/ timestamp=%date:~0,2%_%time:~0,2%_%time:~3,2%_%time:~6,2%

REM EXPORT PATH, ADJUST TO YOUR OWN CONVENIENCE
SET A/ path="/home/user/Dropbox/MySQL/kodidtbs_v19_""%timestamp%""_"

REM FILENAMES
SET A/ video_export=%path% + "video.sql"
SET A/ music_export=%path% + "music.sql"
SET A/ user_export =%path% + "user.sql"

REM USER PARAMETERS TO EDIT ACCORDING TO YOUR DATABASE SERVER, CREDENTIALS AND PORT SITUATION
SET A/ user=" --user=kodi --password=kodi"
SET A/ srvr=" --host=srvr1 "
SET A/ port=" --port=3306 "

REM FIXED PARAMETERS FOR KODI DATABASES
SET A/ params=" --add-drop-database --add-drop-table --add-drop-trigger --routines --triggers "

REM VARIABLE PARAMETERS FOR KODI DATABASES
SET A/ video=" --databases MyVideos119 "
SET A/ music=" --databases MyMusic82 "

REM ---------------------------------------------------------------------------------------

REM CHECK IF USER-GIVEN ARGUMENTS ARE PRESENT
for %%x in (%*) do (
	REM CHECK FOR VIDEO
	if (%%x == "v") OR (%%x == "video") echo "Exporting video to : %video_export%"; mysqldump %user% %srvr% %params% %video% > %video_export%
	if (%%x == "m") OR (%%x == "music") echo "Exporting music to : %music_export%"; mysqldump %user% %srvr% %params% %music% > %music_export%
	if (%%x == "u") OR (%%x == "user")  echo "Exporting user to : "%$user_export%;  mysqldump %user% %srvr% %params% --where="User='kodi'" > %user_export%
)

if (%%x ='')
	echo "EXAMPLE: dtbs-export.bat video ";
	echo " ";
	echo "Possible user parameters:";
	echo "  v or video";
	echo "  m or music";
	echo "  u or user";
	echo "  all";
	echo " ";
	echo "Note: for importing full Kodi database exports, you need SQL database root user access";
	echo "";
	echo "For a complete guide, type: 'mysqldump --help' or 'man mysqldump' ";
	echo " ";
fi

REM EXIT
MySQLdump script for Linux OSes
Using MySQLdump in Linux is also possible, and is typically provided along with the mysql/mariadb-server installation. This is a script that can be used either manually or be hung into time-repetitive cron jobs. Log files are created with filenames that have a timestamp built-in, so older backups will not be overwritten.
Copy the script below into your favorite text-editor and save it as a .sh (bash) file into the location+filename of your chosing, and make the file executable with chmod +x yourfilename.sh. You can export database contents for the Kodi video library, music library, and the database user for the Kodi application. You can do so separately or combined with all three parameters at the same time.
#!/usr/bin/env bash
#set -x  # enable in case of trouble

echo ' '
echo 'MYSQLDUMP databases Kodi v19+ video & music'
echo '-------------------------------------------'

# TESTED ON UBUNTU DESKTOP 21.10 with MYSQL SERVER 5.7.36 ON UBUNTU SERVER 18.04
# TESTED ON UBUNTU SERVER 22.04 with MYSQL SERVER 8.0.31 LOCALLY

timestamp=$(date +"%Y%m%d_%H%M");

# EXPORT PATH, ADJUST TO YOUR OWN CONVENIENCE
path="/home/user/Dropbox/MySQL/kodidtbs_v19_""$timestamp""_"

# FILENAMES
video_export="$path""video.sql"
music_export="$path""music.sql"
user_export="$path""user.sql"

# USER PARAMETERS TO EDIT ACCORDING TO YOUR DATABASE SERVER, CREDENTIALS AND PORT SITUATION
user=" --user=kodi --password=kodi"
srvr=" --host=srvr1 "
port=" --port=3306 "

# FIXED PARAMETERS FOR KODI DATABASES
params=" --add-drop-database --add-drop-table --add-drop-trigger --routines --triggers "

# VARIABLE PARAMETERS FOR KODI DATABASES
video=" --databases MyVideos119 "
music=" --databases MyMusic82 "

# ---------------------------------------------------------------------------------------

# CHECK IF USER-GIVEN PARAMETERS ARE PRESENT
if [ $# -gt 0 ]; then
	echo ' ';
	# LOOP THROUGH PARAMETERS GIVEN
	while test $# -gt 0
	do
		 case "$1" in
			  v|video|all)
				echo "Exporting video to : ""$video_export";
				mysqldump $user $srvr $params $video > $video_export
				;;
			  m|music|all)
				echo "Exporting music to : ""$music_export";
				mysqldump $user $srvr $params $music > $music_export
			  	;;
			  u|user|all)
				params="--databases mysql --tables user --skip-add-drop-table --no-create-info"
				echo "Exporting user to : ""$user_export";
				mysqldump $user $srvr $params --where="User='kodi'" > $user_export
				;;
		 esac
		 # NEXT VARIABLE
		 shift
	done
	echo ' ';
else
	echo 'EXAMPLE: ./dtbs-export video ';
	echo ' ';
	echo 'Possible user parameters:';
	echo '  v or video';
	echo '  m or music';
	echo '  u or user';
	echo '  all';
	echo ' ';
	echo 'Note: for importing full Kodi database exports, you need SQL database root user access.'
	echo ' '
	echo 'For a complete guide, type: "mysqldump --help" or "man mysqldump" ';
	echo ' ';
fi

# EXIT
GUI applications
All the tools mentioned on this wiki page for exporting data, are also capable (of courses) of importing those exported databases. The positive thing about of importing/restoring the databases and their contents, is that there are not specific settings to set beforehand. All details are in the previously exported .sql files.
Thus, choose the GUI tool you wish to use, select import function and the .sql file you want to import, and let the tool do its job.
Command line
The MySQLdump tool is part of the MySQL Workbench installation. When installed, you can find the application in the following location:
c:\Program Files\MySQL\MySQL Workbench 8.0\mysqldump.exe
We recommend that you create a shortcut to this application and place the shortcut in a Windows' path folder, so it can be used during a command prompt session "from anywhere".
From the command line in a terminal session, things are just as easy. Enter the following:
mysqldump -u kodi -p MyVideos119 < /path/to/your/videoexportfile.sql
mysqldump -u kodi -p MyVideos82  < /path/to/your/musicexportfile.sql
Enter the database user and the appropriate password when asked for, and the import will commence. Depending on the size of the import, it can take a couple of minutes. Should there be errors during the import process, then those will be displayed promptly.
The easy way: Windows batch scripts for multi profiles
Here are simple batch script examples that will allow you to export the entire Kodi database from your MySQL or MariaDB database and import it back into the same, or another server database. For example as backup or when changing your NAS system.
The examples assume that you have two profiles, one for the parents and one for your kids, to show how it works with multiple profiles. If you have only one profile, just remove the second database in the examples. If you use more than two profiles, you can of course simply specify these databases additionally.
Replace as follows as an example and without the two apostrophes:
''Your NAS Hostname or IP'' -> 192.168.178.5
''Your Password'' -> My-Super-Secret-DB-Password (for user "kodi")
Note: The current databases do not allow a simple password like "kodi" without further modifications, as stated in many other older instructions.
advancedsettings.xml
To start, this is roughly how your two advancedsettings.xml should look if you are using two profiles with an SQL database on your NAS.
advancedsettings.xml for your parent / master profile
<advancedsettings version="1.0">
	<videolibrary>
		<exportautothumbs>true</exportautothumbs>
		<importresumepoint>true</importresumepoint>
		<importwatchedstate>true</importwatchedstate>
	</videolibrary>
	<videodatabase>
		<type>mysql</type>
		<name>Parent_Video</name>
		<host>''Your NAS Hostname or IP''</host>
		<port>3306</port>
		<user>kodi</user>
		<pass>''Your Password''</pass>
	</videodatabase>
	<musicdatabase>
		<type>mysql</type>
		<name>Shared_Music</name>
		<host>''Your NAS Hostname or IP''</host>
		<port>3306</port>
		<user>kodi</user>
		<pass>''Your Password''</pass>
	</musicdatabase>
</advancedsettings>
advancedsettings.xml for your kids profile
<advancedsettings version="1.0">
	<videolibrary>
		<exportautothumbs>true</exportautothumbs>
		<importresumepoint>true</importresumepoint>
		<importwatchedstate>true</importwatchedstate>
	</videolibrary>
	<videodatabase>
		<type>mysql</type>
		<name>Kids_Video</name>
		<host>''Your NAS Hostname or IP''</host>
		<port>3306</port>
		<user>kodi</user>
		<pass>''Your Password''</pass>
	</videodatabase>
	<musicdatabase>
		<type>mysql</type>
		<name>Shared_Music</name>
		<host>''Your NAS Hostname or IP''</host>
		<port>3306</port>
		<user>kodi</user>
		<pass>''Your Password''</pass>
	</musicdatabase>
</advancedsettings>
Batch files
To run these batch files, load the latest Maria DB or MySQL beforehand and install it (MSI file) or unzip the ZIP and use the executables in the BIN folder. These are static builds and do not need any additional DLLs. You can copy them e.g. directly to C:\Windows\ or any folder in your path. It is also irrelevant whether the database is running on your Windows, Mac or Linux computer or on a NAS.
Current MariaDB: mariadb-10.8.3-winx64.zip
kodi_db_export
@echo off

echo Backing up Kodi DB to: Kodi_Backup.sql...

mysqldump -h ''Your NAS Hostname or IP'' -u kodi -p''Your Password'' --databases Parent_Video119 Kids_Video119 Shared_Music82 --add-drop-database --add-drop-table --add-drop-trigger --routines --triggers >Kodi_Backup.sql
kodi_db_import
@echo off

echo Importing Kodi DB from: Kodi_Backup.sql...

mysql -h ''Your NAS Hostname or IP'' -u kodi -p''Your Password'' <Kodi_Backup.sql
kodi_db_drop (just for testing purpose)
@echo off

mysql -h ''Your NAS Hostname or IP'' -u kodi -p''Your Password'' -e "SHOW DATABASES"

mysql -h ''Your NAS Hostname or IP'' -u kodi -p''Your Password'' -e "DROP DATABASE `Parent_Video119`"
mysql -h ''Your NAS Hostname or IP'' -u kodi -p''Your Password'' -e "DROP DATABASE `Kids_Video119`"
mysql -h ''Your NAS Hostname or IP'' -u kodi -p''Your Password'' -e "DROP DATABASE `Shared_Music82`"

mysql -h ''Your NAS Hostname or IP'' -u kodi -p''Your Password'' -e "SHOW DATABASES"
Synced favorites
Although off topic, but since the frequently occurring question is not answered exactly here on the wiki, a brief explanation.
With Kodi unfortunately no sync of the favorites via DB is possible. Therefore you have to store the favorites.xml centrally on your (NAS) server and then address them via path substitution.
advancedsettings.xml for your parent profile
<advancedsettings version="1.0">
	...
	<pathsubstitution>
		<substitute>
			<from>special://profile/favourites.xml</from>
			<to>smb://''Your NAS Hostname or IP''/Kodi/Parent-Favourites.xml</to>
		</substitute>
	</pathsubstitution>
	...
</advancedsettings>
advancedsettings.xml for your kids profile
<advancedsettings version="1.0">
	...
	<pathsubstitution>
		<substitute>
			<from>special://profile/favourites.xml</from>
			<to>smb://''Your NAS Hostname or IP''/Kodi/Kids-Favourites.xml</to>
		</substitute>
	</pathsubstitution>
	...
</advancedsettings>