Archive:Install XBMC on Asus S1-AT5NM10E
This is a little collection of hints and tricks to get XBMC (Live) running on the nice and cheap S1-AT5NM10E.
IR Remote
Power On via IR
The S1-AT5NM10E supports power-on via IR from off or suspend/hibernate state out of the box using the integrated IR receiver. Just use any MCE remote and make sure you have the lates BIOS version (401) and "Power On Remote Control" is set.
LIRC
The IR chipset is the same as the chipset used on the ION330. Unfortunately the ASRock Drivers won't really work well. Here's a method to get this working (at least one time for a rebooot) under Live (Ubuntu 10.04) (thanks to kozzie):
wget http://ppa.launchpad.net/yavdr/stable-vdr/ubuntu/pool/main/n/nct677x-dkms/lirc-nct677x-src_1.0.4-1yavdr1_all.deb
wget http://ppa.launchpad.net/yavdr/stable-vdr/ubuntu/pool/main/n/nct677x-dkms/nct677x-dkms_1.0.4-1yavdr1_all.deb
wget http://dl.dropbox.com/u/4325533/lirc-nct677x-1.0.4-ubuntu10.04_kernel2.6.32-25.deb

sudo dpkg -i nct677x-dkms_1.0.4-1yavdr1_all.deb
sudo dpkg -i lirc-nct677x-src_1.0.4-1yavdr1_all.deb
sudo dpkg -i lirc-nct677x-1.0.4-ubuntu10.04_kernel2.6.32-25.deb
select Nuvoton Transceivers/Remotes and None for the second page.
sudo reboot
You have to do a
sudo dpkg-reconfigure lirc
every time after rebooting the machine.
To automate this reconfiguration do the following.
1. Edit the rc.local file located under /etc
sudo nano rc.local
2. Add the following lines before the EXIT statement.
sed -e 's/^FORCE_NONINTERACTIVE_RECONFIGURATION="false"$/FORCE_NONINTERACTIVE_RECONFIGURATION="true"/' /etc/lirc/hardware.conf > /tmp/h.conf
chmod +x /tmp/h.conf
mv /tmp/h.conf /etc/lirc/hardware.conf
dpkg-reconfigure lirc
Audio
Preferences
You can use Audio over HDMI and/or Analog audio output.
Using Ubuntu you first have to install ALSA, there are several tutorials out there. I just would like to focus on the S1 specific settings. Make sure you have unmuted the volume of your output channels by using alsamixer and/or using these commands:
sudo /usr/bin/amixer -q -c 0 sset 'Master',0 unmute && /usr/bin/amixer -q -c 0 sset 'Master',0 100
sudo /usr/bin/amixer -q -c 0 sset 'IEC958 Default PCM',0 unmute
sudo /usr/bin/amixer -q -c 0 sset 'IEC958',0 unmute && /usr/bin/amixer -q -c 0 sset 'IEC958',1 unmute
sudo alsactl store 0
The most interesting config file is /home/xbmc/.asoundrc which could look like this:
pcm.!default {
        type plug
        slave {
                pcm "both_digital"
        }
}

pcm.both_digital {
        type route
        slave {
                pcm multi
                channels 4
        }
        ttable.0.0 1.0
        ttable.1.1 1.0
        ttable.0.2 1.0
        ttable.1.3 1.0
}

# Analog output
pcm.digital_1 {
        type hw
        card 0
        device 0
        channels 2
}

# HDMI output
pcm.digital_2 {
        type hw
        card 1
        device 3
        channels 2
}

pcm.multi {
        type multi
        slaves.a {
                pcm "digital_1"
                channels 2
        }

        slaves.b {
                pcm "digital_2"
                channels 2
        }

        bindings.0.slave a
        bindings.0.channel 0
        bindings.1.slave a
        bindings.1.channel 1
        bindings.2.slave b
        bindings.2.channel 0
        bindings.3.slave b
        bindings.3.channel 1
}
After saving the .asoundrc file, reboot your system.
Then you can test your configuration by using this command (make sure you are logged in as xbmc user):
# Test Audio over HDMI:
speaker-test -D digital_2 -c2 -FS32_LE
# Test analog audio:
speaker-test -D digital_1 -c2 -FS32_LE
# Test analog audio and audio oer HDMI:
speaker-test -D both_digital -c2 -FS32_LE
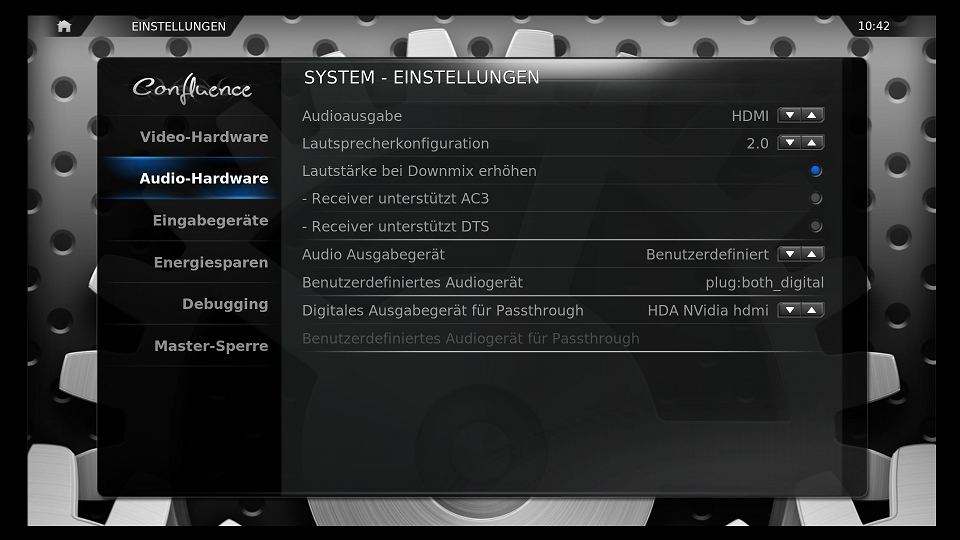
In XBMC you can reference the PCM you want to use (digital_1, digital_2, both_digital):
