|
|
| (67 intermediate revisions by 7 users not shown) |
| Line 1: |
Line 1: |
| {{mininav|[[General topics]]}} | | {{mininav}} |
| <section begin="intro" />This section covers XBMC's various settings and where to find them.<section end="intro" /> | | <section begin="intro" />{{big|This section details the settings in the various settings pages.}}<section end="intro" /> |
| __TOC__
| |
| == New changes in XBMC v13 Gotham ==
| |
| {{Gotham note|1=
| |
| [[File:Confluence - settings level.jpg|400px|right]]
| |
| XBMC v13 "Gotham" will have tiered settings levels. Each mode unlocks more settings, and is available by selecting the "Settings level" button, which will also display the currently used level.}}
| |
| |}
| |
|
| |
|
| ==System settings==
| | For information on where settings and other usage data are saved read '''''[[Kodi data folder]]''''' |
| [[File:System settings.png|400px|right]] | |
|
| |
|
| Most of XBMC's global settings can be configured via the GUI (Graphical User Interface) under Settings (labeled "System" under the default skin, Confluence).
| | __NOTOC__ |
|
| |
|
| Choosing Settings from the Home Screen opens the Settings Window. In this window, you are able to configure XBMC's options:
| | <section begin="settings access" /> |
| {| width="100%" cellpadding="5"
| | ==Accessing The System Settings Menu== |
| |- valign="top"
| | The System Settings icon is the middle icon and is located in the top left of the Home Screen when using the default skin Estuary. Other skins may use a different method to access the settings screen, such as a Home Menu item, or via the Shutdown menu. |
| | [[File:Crystal Clear app kcoloredit.png|link=Settings/Appearance|60x60px]]
| | <gallery mode="packed" widths="300px" heights="180px"> |
| | width="50%" | {{big|'''[[Settings/Appearance|Appearance]]'''}}<br />Settings for the GUI are found here. Change the current skin, set language and region, change file listing options, set up a screen saver, etc.
| | File:Estuary home settings icon.png |
| | [[File:Video.svg|link=Settings/Videos|60x60px]]
| | </gallery> |
| | width="50%" | {{big|'''[[Settings/Videos|Video]]'''}}<br />Settings for the video features are found here. Manage your video library, set video playback options, change video listing options, set subtitle fonts, etc. | | <section end="settings access" /> |
| |- valign="top"
| | |
| | [[File:Television.svg|link=Settings/Live TV|60x60px]]
| | |
| | {{big|'''[[Settings/Live TV|Live TV]]'''}}<br />Settings for [[PVR|Live TV and PRV features]] are found here. Change fullscreen info, manage EPG data settings, etc. Live TV settings also are set in the individual PVR add-on settings that you enabled during [[PVR|PVR setup]].
| | == Settings == |
| | [[File:IYY logo.png|link=Settings/Music|60x60px]]
| | The main Settings Window {{Kodi}} v18 and v19. |
| | {{big|'''[[Settings/Music|Music]]'''}}<br />Music and audio library settings are found here. Manage your music library, set music playback options, change music listing options, setup karaoke options, etc.
| | |
| |- valign="top"
| | Click on the relevant icon in the image to navigate to the wiki page. |
| | [[File:Gnome-emblem-photos.svg|link=Settings/Pictures|60x60px]]
| | |
| | {{big|'''[[Settings/Pictures|Pictures]]'''}}<br />Picture Settings are found here. Listing options, configure slideshows.
| | <section begin="Settings" /> |
| | [[File:Crystal Project kweather.png|link=Weather|60x60px]]
| | <imagemap> |
| | {{big|'''[[Weather]]'''}}<br />Select which weather add-on to use, and a short cut to that add-on's configuration. Weather display options are found under [[Settings/Appearance|Appearance]] and sometimes under the individual skin options, depending on the skin you use.
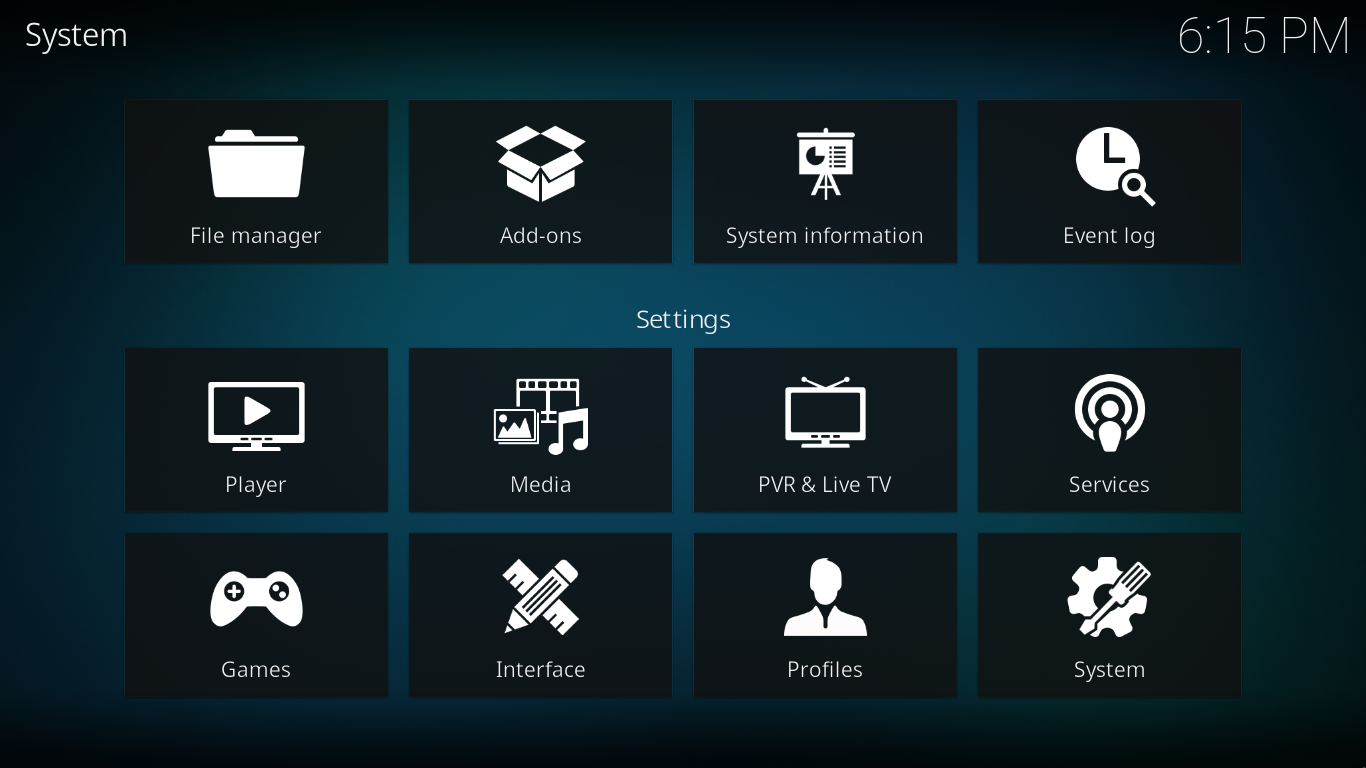
| | Image:SettingsOverview-leia.png|800px|center |
| |- valign="top"
| | rect 125 100 386 264 [[File_manager]] |
| | [[File:Nuvola apps kthememgr.png|link=Add-on manager|60x60px]]
| | rect 408 100 670 264 [[Add-on_manager]] |
| | {{big|'''[[Add-on manager]]'''}}<br />The add-on manager for XBMC. Manage your installed add-ons, browse for and install add-ons from xbmc.org and other locations, modify individual add-on settings, etc. Note that this is not where you go to run add-ons, but only to install and configure them.
| | rect 694 100 956 264 [[Settings/System_information]] |
| | [[File:Crystal Project Network Connection Manager.png|link=Settings/Services|60x60px]]
| | rect 977 100 1236 264 [[Event_Log]] |
| | {{big|'''[[Settings/Services|Services]]'''}}<br />Network services settings are found here. Setup control of XBMC via UPnP and HTTP, configure file sharing, enable zeroconf, configure AirPlay, etc.
| | rect 125 348 386 510 [[Settings/Player]] |
| |- valign="top"
| | rect 408 348 670 510 [[Settings/Media]] |
| | [[File:Gnome-system-run.svg|link=Settings/System|60x60px]]
| | rect 694 348 956 510 [[Settings/Live_TV]] |
| | {{big|'''[[Settings/System|System]]'''}}<br />System settings are found here. Setup and calibrate displays/video output, configure audio output, setup remote controls, set power saving options, enable debugging, setup master lock.
| | rect 977 348 1236 510 [[Settings/Services]] |
| |}
| | rect 125 534 385 698 [[Settings/Games]] |
| | rect 408 534 670 698 [[Settings/Interface]] |
| | rect 694 534 956 698 [[Settings/Profiles]] |
| | rect 977 534 1236 698 [[Settings/System]] |
| | </imagemap> |
| | <section end="Settings" /> |
| | |
| | |
| | == Settings Level == |
| | The "Settings level" will change the number of Settings options visible. The higher the level, the more options shown. |
| | |
| | There are four settings levels - Basic, Standard (default), Advanced, Expert. Scroll down to the setting level to change levels. |
| | |
| | This setting also affects the settings page of add-ons. |
| | <gallery mode="packed" widths="700px" heights="394px"> |
| | File:SettingsSettingsLevel-leia.png |
| | </gallery> |
|
| |
|
| ==Additional settings==
| |
| {| width="100%" cellpadding="5"
| |
| |- valign="top"
| |
| | {{Icon-video playback}}
| |
| | width="50%" | {{big|'''[[Video playback|Video OSD settings]]'''}}<br />Some video playback settings can (currently) only be accessed while playing a video back and accessing the on-screen-display. For more info see [[Video playback]]. These include subtitle and audio track selection, zoom (aspect ratio) options, and more.
| |
| | {{Icon-video management|Adding videos to the library/Setting content and scanning}}
| |
| | width="50%" | {{big|'''[[Adding videos to the library/Setting content and scanning|Setting content]]''' and '''[[Media sources]]'''}}<br/>For settings related to your file sources and library scanning.
| |
| |- valign="top"
| |
| | {{Icon-add-on settings}}
| |
| | {{big|'''Add-on settings'''}}<br/>Various [[add-ons]] also have settings that can be accessed by going to {{highlight|Settings -> [[Add-ons]] -> Enabled add-ons -> ''the add-on category'' -> ''the add-on title'' -> Configure}} You can also access add-on settings for some add-ons by bringing up the contextual menu '''press''' {{button|guide}} on remote or {{keypress|C}} or {{keypress|Win}} on a keyboard while using that add-on.
| |
| | [[File:Gdm.png|link=Profiles|60x60px]]
| |
| | {{big|'''[[Profiles]]'''}}<br />[[Profiles]] allows you to save all of your settings as a profile and change them at the touch of a button. It also allows you to grant access to specific folders and network shares based on the profile being used. This is ideal for systems that have multiple users.
| |
| |}
| |
|
| |
|
| == Advanced settings == | | == Advanced settings == |
| Line 58: |
Line 54: |
| {{#lst:advancedsettings.xml|intro}} | | {{#lst:advancedsettings.xml|intro}} |
|
| |
|
| == Resetting XBMC settings to default ==
| |
| {{see also|userdata}}
| |
| Delete your [[userdata]] folder to remove all XBMC settings and library databases. Deleting some individual files/folders in the [[userdata]] folder will also selectively reset those settings.
| |
|
| |
|
| == Other settings related pages ==
| | It is also possible to move GUI Settings into advancedsettings.xml which removes them from these Settings pages. |
| * [[Audio]]
| | |
| | See: '''[[Advancedsettings.xml#guisettings.xml_Setting_Conversion|Convert Settings]]''' |
| | |
| | |
|
| |
|
| [[Category:Settings|*]]
| | {{updated|20}} |
| [[Category:XBMC Manual]] | | [[Category:Settings]] |
| [[Category:General topics]]
| |
| [[Category:Index]]
| |
| {{frodo updated}}
| |

|
|
|
 Settings Settings
|
This section details the settings in the various settings pages.
For information on where settings and other usage data are saved read Kodi data folder
The System Settings icon is the middle icon and is located in the top left of the Home Screen when using the default skin Estuary. Other skins may use a different method to access the settings screen, such as a Home Menu item, or via the Shutdown menu.
Settings
The main Settings Window Kodi v18 and v19.
Click on the relevant icon in the image to navigate to the wiki page.
Settings Level
The "Settings level" will change the number of Settings options visible. The higher the level, the more options shown.
There are four settings levels - Basic, Standard (default), Advanced, Expert. Scroll down to the setting level to change levels.
This setting also affects the settings page of add-ons.
Advanced settings
The advancedsettings.xml file, which does not exist by default, can be created by a user in their userdata folder.
This file is used for advanced settings and options that do not have GUI controls inside of Kodi. Some settings are experimental or very rarely set, so they can only be used via the advancedsettings.xml file. The file is simply a plain text file and can be edited by various text editors, so long as the name is "advancedsettings.xml". These advanced settings can be used to tweak various things such as episode naming patterns, special network ports, special behaviors, and more.
It is also possible to move GUI Settings into advancedsettings.xml which removes them from these Settings pages.
See: Convert Settings