>UPnP4XBMC |
|
| (165 intermediate revisions by 40 users not shown) |
| Line 1: |
Line 1: |
| UPnP media sharing is an extremely easy method of sharing your media on your network, it features automatic-discovery and zero-configuration. | | Kodi can use UPnP as a media sources from any device that has a UPnP server. UPnP media servers are available for most operating systems and many hardware platforms. Kodi itself can be a UPnP server. |
|
| |
|
| ==UPnP introduction==
| | Currently, due to technical limitations (dynamic file paths) UPnP file sources can't be scanned into the local library. However, since many UPnP servers can provide metadata as well as the files themselves, then this may not be an issue. |
| UPnP (Universal Plug and Play) is a set of computer network protocols promulgated by the [http://www.upnp.org UPnP Forum]. The goals of UPnP are to allow devices to connect seamlessly and to simplify the implementation of networks in the home and corporate environments. UPnP achieves this by defining and publishing UPnP device control protocols built upon open, internet-based communication standards, (which means that any devloper/programmer can make a UPnP device for any operating-system/platform in any program-language and it will automaticly be compatible with all other UPnP devices).
| |
|
| |
|
| | == Setting up UPnP file sources in Kodi == |
| | UPnP file sources can be used in videos, music, and pictures. Configuring UPnP file sources in Kodi is as easy as setting up any other type of file source, such as SMB or NFS. |
|
| |
|
| ==UPnP in XBMC==
| | <b>Before you begin...</b> you need to enable UPnP support for your client. Go into Settings > Services > UPnP/DLNA and turn on the switch for "Enable UPnP Support". After that's done, follow the steps below to add each UPnP source. |
| XBMC has a built-in UPnP-client (a so called "UPnP MediaRenderer") which can auto-detect any UPnP-server (a so called "UPnP MediaServer") on your local-network as long as it isn't behind a firewall or you have opened the ports for UPnP in your firewall. You can simply add one or more UPnP shares via the '''Add Source''' function under the context-menu (white-button on your controller) in XBMC. XBMC UPnP MediaServers are available for most operating-systems, examples are; [http://www.microsoft.com/windows/windowsmedia/devices/wmconnect/default.aspx Microsoft's Windows Media Connect] (Win32), [http://www.allegrosoft.com/ams.html Allegro Media Server] (Mac/Win32).
| |
|
| |
|
| ==Installing and Configuring Windows Media Connect on your PC== | | <gallery widths=500px heights=313px> |
| This tutorial will walk you through the installation and setup of Windows Media Connect, a free UPnP MediaServer for Windows. In order to use this option, you need to have the following:
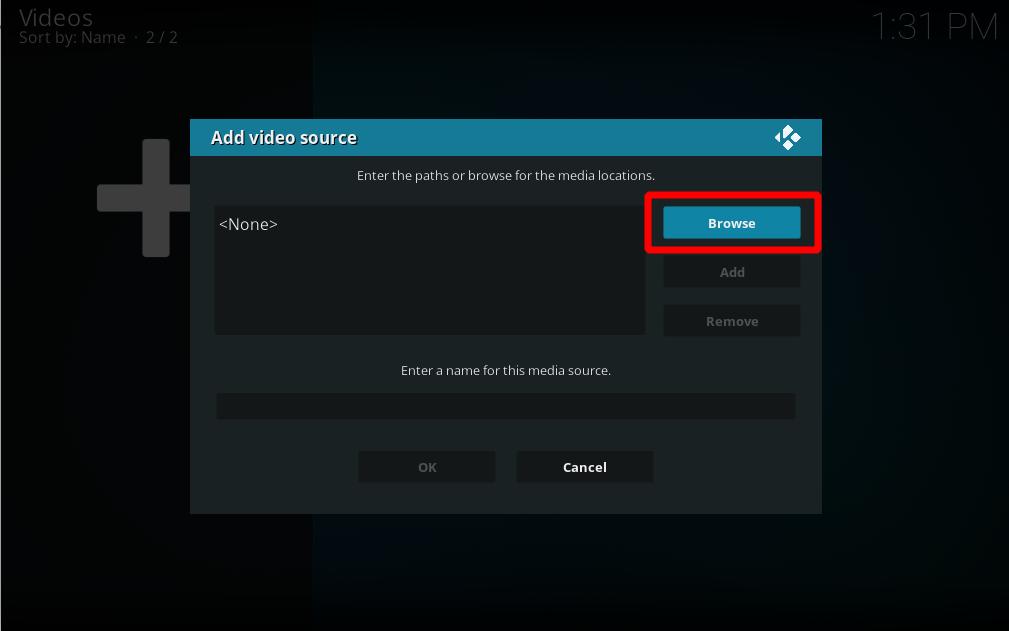
| | File:Share-upnp-library.jpg|'''Step 1:''' Go into ether Videos, Music, or Picture file views, depending on the content you want to add, and use the "Add" button to bring up this window.<br />'''Step 2:''' Then click on the "Browse" button on the right hand side. |
| *An XBMC build newer than 10 July 2006
| | File:Share-upnp-library2.png|'''Step 3:''' This new window will pop up. Scroll down and select "UPnP Devices" |
| *Windows Media Connect, available [http://www.microsoft.com/windows/windowsmedia/devices/wmconnect/default.aspx here] or [http://www.softpedia.com/get/Internet/File-Sharing/Windows-Media-Connect.shtml here].
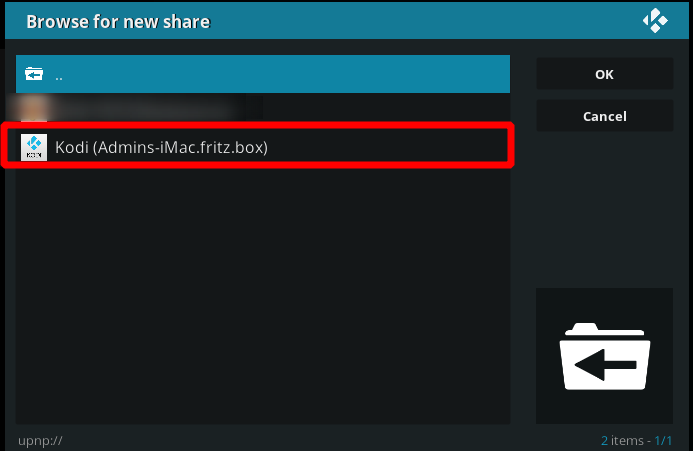
| | File:Share-upnp-library3.png|'''Step 4:''' All available UPnP servers on your network should show up here. If a source/server doesn't show up, it might be blocked by one of the other UPnP servers due to a misconfiguration. Select the source you wish to add. |
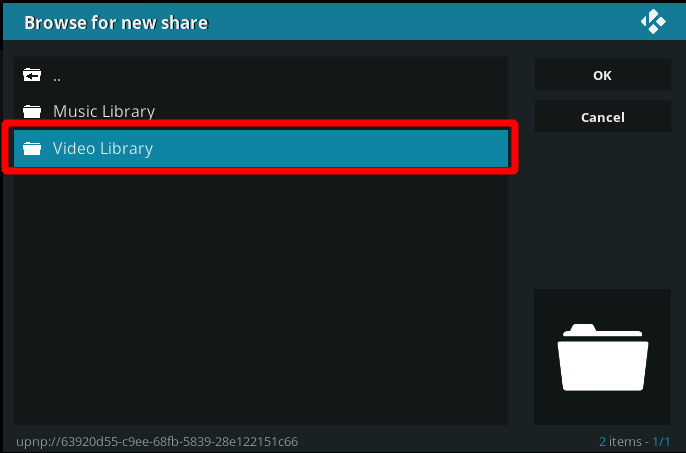
| | | File:Share-upnp-library4.png|'''Step 5:''' At this window please select the kind of content you want to add. In that case, we choose "Video Library". |
| The first step is to download and install Windows Media Connect on your computer. This easy-to-use software allows you to share media (pictures, videos, music/audio) on your PC using the UPnP protocol, which is also supported by many standalone network players.
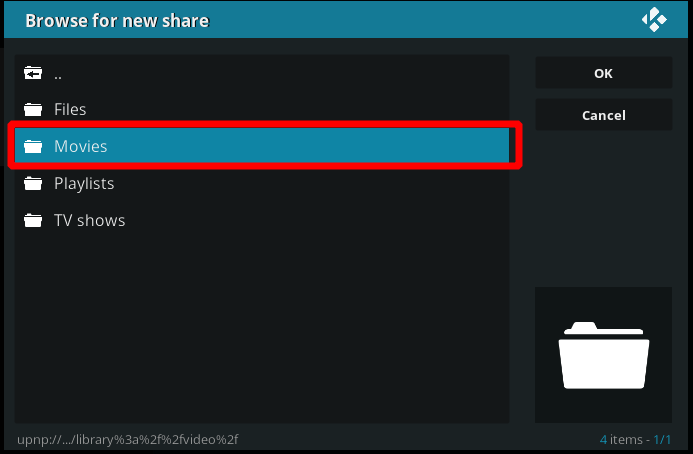
| | File:Share-upnp-library5.png|'''Step 6:''' This window will let you select if you would like to add "Files", "Movies", "Playlists" or "TV shows". Please choose what you want to add. In our case here, we select "Movies". |
| {|
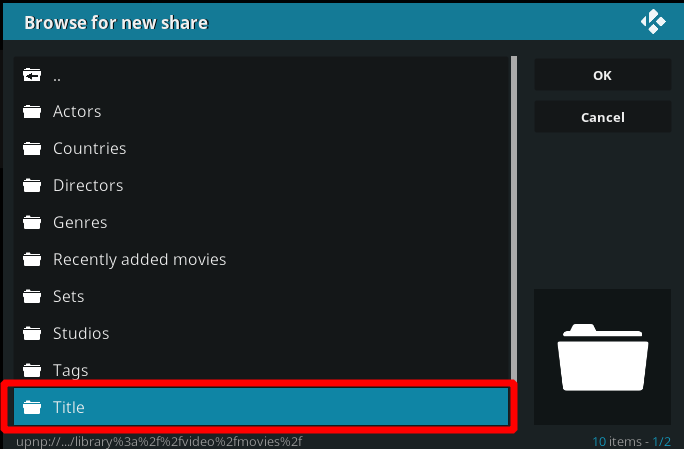
| | File:Share-upnp-library6.png|'''Step 7:''' Now please select "Title". You can of course select something else according to what you want to add. It's easily possible to only add a specific genre via UPnP in that way for example. |
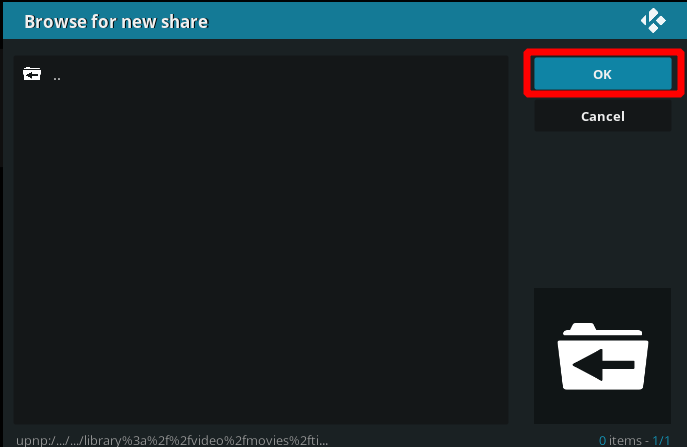
| | | | File:Share-upnp-library7.png|'''Step 8:''' The next window looks a bit confusing. Don't worry if you don't see any files. That's normal. Please select "OK" |
| After installing Windows Media Connect, simply run the included setup utility included with it. The first screen that appears should look something like the one to the right. For now, simply choose '''Next'''.
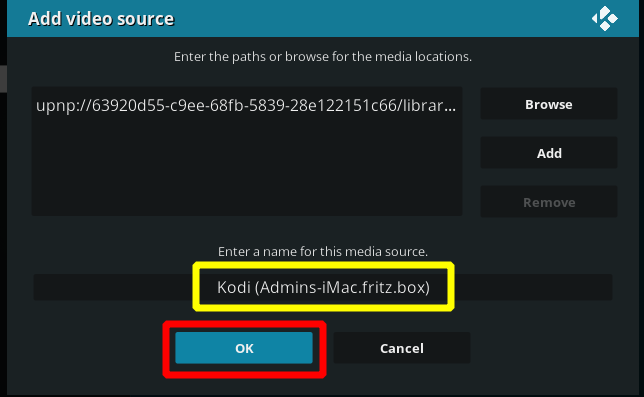
| | File:Share-upnp-library8.png|'''Step 9:''' At this window you are able to give the source a specific name if you want (yellow square). If you choose to do so, select "OK" after you are done. |
| |
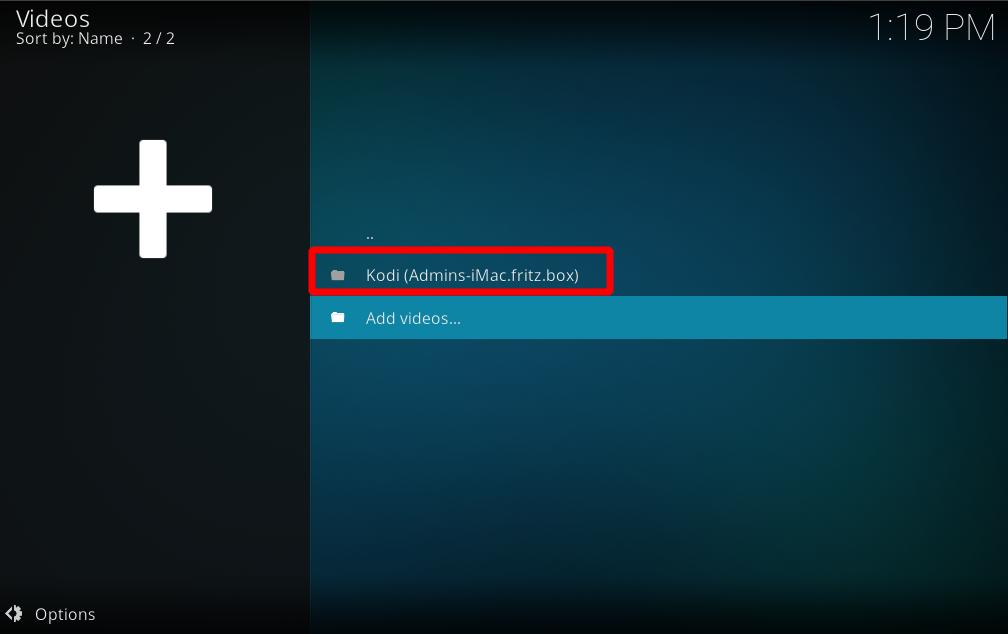
| | File:Share-upnp-library9.jpg|'''Step 10:''' Now, we're done and you will see the source added under the "Videos" location from the Kodi main menu. You should now be able to see the same video which are shown on the UPnP server. |
| [[image:wmc1.jpg|300px]]
| | </gallery> |
| |}
| |
| {|
| |
| |
| |
| [[image:wmc2.jpg|300px]]
| |
| |
| |
| The next step is to choose which folders are going to be shared with XBMC. It offers you the option of using the default folders. In this case, we are going to choose which folders to share.<br><br>Also, be sure to select ''Automatically start folder sharing when Windows starts.''
| |
| |} | |
| {|
| |
| |
| |
| Next, choose the folders that you would like to share, by selecting '''Add''' and choosing as many folders as you like. You can share entire drives or just individual folders. In this example, I have shared my Music folder.<br><br>After you are done, select '''Finish'''. You should now see a Windows Media Connect icon in your tray, indicating that the server is running.
| |
| |
| |
| [[image:wmc3.jpg|300px]]
| |
| |}
| |
| | |
| ==Setting up UPnP Shares in XBMC==
| |
| Configuring UPnP Shares in XBMC is as easy as setting up any other type of share. In this example, we are going to add the Music folder shared above to My Music, although you can use the exact same procedure to add a share to My Videos or My Pictures.
| |
| {|
| |
| |
| |
| First, open My Music. Your screen should look something like the one displayed to the right, although your shares may be different.
| |
| |
| |
| [[image:wmc4.jpg|300px]]
| |
| |}
| |
| {|
| |
| |
| |
| [[image:wmc5.jpg|300px]]
| |
| |
| |
| Then, open the context menu by pressing the White button on your controller and select '''Add Source'''.
| |
| |} | |
| {|
| |
| |
| |
| Then choose '''Browse''' and then '''Add Network Location'''. Choose Windows Media Connect as the Protocol and then Browse for the Server Address. Select the UPnP:// option and then you should see your computer's name. Select your computer and at this time, a help balloon should appear in the tray on your computer advising you that a new device has been connected.
| |
| |
| |
| [[image:wmc6.jpg|300px]]
| |
| |}
| |
| {|
| |
| |
| |
| [[image:wmc7.jpg|300px]]
| |
| |
| |
| You should see Unknown Device appear, as is displayed to the left. Select the device and choose '''Allow'''.<br><br>Back on your Xbox, you may have to press back (the B button) and reselect your computer name in order to make the shares appear. Then, select the share that appears and name it. At this point, the share whould appear in My Music.
| |
| |}
| |
| | |
| | |
| ==Developers notes on UPnP==
| |
| If you are a C/C++ programmer and like to create a UPnP MediaServer or improve on XBMC's UPnP MediaRenderer (or even add new UPnP features to XBMC) then we recommend you checkout the [http://sourceforge.net/projects/platinum Platinum UPnP SDK]. Platinum UPnP SDK is a free and open source software development kit, it also happens to be from this SDK that XBMC got its client code from, (XBMC's UPnP MediaRenderer was also firstly implemented into XBMC by the author of the Platinum UPnP SDK, [http://www.plutinosoft.com Sylvain a.k.a. c0diq])
| |
Kodi can use UPnP as a media sources from any device that has a UPnP server. UPnP media servers are available for most operating systems and many hardware platforms. Kodi itself can be a UPnP server.
Currently, due to technical limitations (dynamic file paths) UPnP file sources can't be scanned into the local library. However, since many UPnP servers can provide metadata as well as the files themselves, then this may not be an issue.
Setting up UPnP file sources in Kodi
UPnP file sources can be used in videos, music, and pictures. Configuring UPnP file sources in Kodi is as easy as setting up any other type of file source, such as SMB or NFS.
Before you begin... you need to enable UPnP support for your client. Go into Settings > Services > UPnP/DLNA and turn on the switch for "Enable UPnP Support". After that's done, follow the steps below to add each UPnP source.
Step 1: Go into ether Videos, Music, or Picture file views, depending on the content you want to add, and use the "Add" button to bring up this window.
Step 2: Then click on the "Browse" button on the right hand side.
Step 3: This new window will pop up. Scroll down and select "UPnP Devices"
Step 4: All available UPnP servers on your network should show up here. If a source/server doesn't show up, it might be blocked by one of the other UPnP servers due to a misconfiguration. Select the source you wish to add.
Step 5: At this window please select the kind of content you want to add. In that case, we choose "Video Library".
Step 6: This window will let you select if you would like to add "Files", "Movies", "Playlists" or "TV shows". Please choose what you want to add. In our case here, we select "Movies".
Step 7: Now please select "Title". You can of course select something else according to what you want to add. It's easily possible to only add a specific genre via UPnP in that way for example.
Step 8: The next window looks a bit confusing. Don't worry if you don't see any files. That's normal. Please select "OK"
Step 9: At this window you are able to give the source a specific name if you want (yellow square). If you choose to do so, select "OK" after you are done.
Step 10: Now, we're done and you will see the source added under the "Videos" location from the Kodi main menu. You should now be able to see the same video which are shown on the UPnP server.