Add-on:VBox TV Gateway PVR Client: Difference between revisions
No edit summary |
(→Settings: screen shots and step by step add-on setup) |
||
| Line 29: | Line 29: | ||
#Go to {{highlight|System -> Settings -> Add-ons -> My add-ons -> PVR Clients}} and select the VBox TV Gateway PVR add-on | #Go to {{highlight|System -> Settings -> Add-ons -> My add-ons -> PVR Clients}} and select the VBox TV Gateway PVR add-on | ||
#Select {{highlight|Configure}} | #Select {{highlight|Configure}} | ||
Be sure to select '''Okay''' when you are done changing settings in order to save those changes and to Enable the add-on | |||
[[file:Settings---Internal-IP.jpg|200px|right]] | |||
{{ | |||
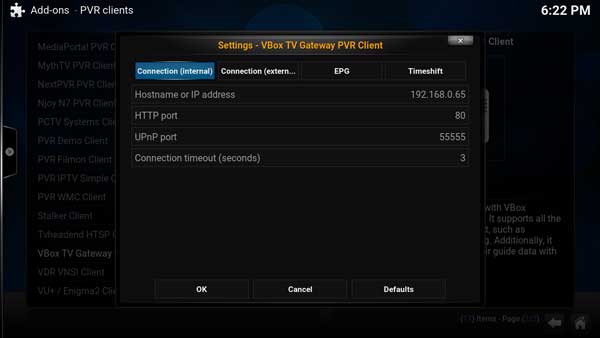
; Connection setting (Internal IP) | |||
: ''Mandatory input'' | |||
: Enter the TV Gateway's IP address (from within the home network) | |||
: HTTP port - ''default is 80'' - port address for web interface | |||
: UPnP port - ''default is 55555'' - streaming port | |||
: Connection timeout - ''default is 3 seconds'' - when connecting from outside the home network, the add-on attempts to connect to the internal IP address first, and after the set timeout, it attempts to connect using the external IP address | |||
[[file:Settings---External-IP.jpg|200px|right]] | |||
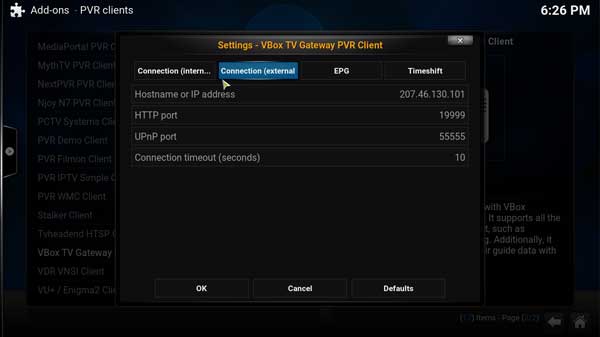
; Connection setting (External IP) | |||
: ''Optional input'' | |||
: Use this setting to connect to the TV Gateway from anywhere in the world and continue to watch and record Live and scheduled TV | |||
: Enter your network's external IP address or hostname - Enter the external IP address | |||
: HTTP port - ''default is 19999'' - External web interface port address, enter the same port address as configured in the Remote Access section of the TV Gateway web management | |||
: UPnP port - ''default is 55555'' - External Streaming port address, enter the same port address as configured in the Remote Access section of the TV Gateway web management | |||
: Connection timeout - ''default is 10 seconds'' - If the add-n cannot connect to the TV Gateway after set time is passed, the Add-on will report that it cannot connect to the TV Gateway. Please check your IP address in the Remote Access section. | |||
[[file:Settings---EPG.jpg|200px|right]] | |||
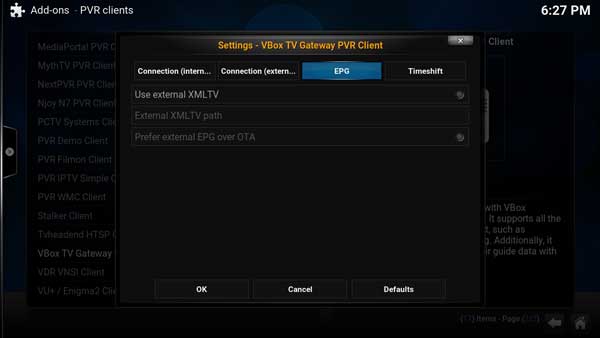
; EPG - TV Program Guide | |||
: ''default leave blank'' | |||
: The add-on will present the free EPG data collected by the VBox TV Gateway from the DVB-SI (System Information) EIT (Event Information Table) stream | |||
: Use External XMLTV - To set external program guide source, point to an XMLTV file, | |||
: The add-on will automatically match the channels with the XMLTV channels and will create a channel_mappings.xml file located at %UserData%\AppData\Roaming\Kodi\userdata\addon_data\pvr.vbox. to enable manual channel matching | |||
: Prefer external EPG over OTA - Use this setting to mix the EPG collected by the VBox TV Gateway with the XMLTV file and provide advantage to the external EPG source | |||
[[file:Settings---Timeshift.jpg|200px|right]] | |||
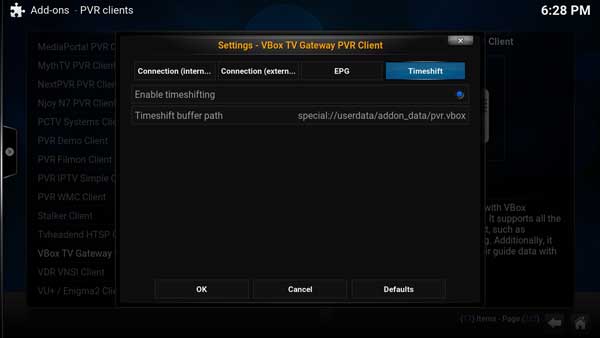
; TimeShift | |||
: ''default is disabled'' | |||
: Timeshift allows to pause or rewind an active Live TV channel | |||
: Enable Timeshift - will create a temp buffer file that stores the current active Live TV channel. The buffer file reset on channel switch | |||
: Timeshift path - Set the buffer file path location | |||
[[file:TV-settings.jpg|200px|right]] | |||
; Kodi Live TV | |||
: '' default is disabled'' | |||
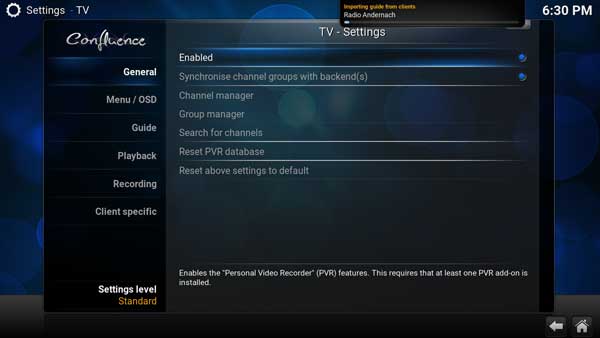
: After configuring the vbox.pvr PVR addon - Go to {{highlight|System -> Settings -> TV -> General}} and press Enabled to enable Kodi's Live TV support | |||
== QuickStart guide == | == QuickStart guide == | ||
Revision as of 14:38, 3 June 2015
| VBox TV Gateway PVR Client | ||||||||||||
| ||||||||||||
| Need help with this add-on? See here. |
VBox TV Gateway is the simplest way to bring live TV with PVR functionality to Kodi, the VBox PVR addon is compatible with any VBox Home TV Gateway, it automatically collects available channels, Program guide (EPG) and let you schedule recordings. The add on also supports Time Shift to pause and rewind live TV, remote access to watch live TV when you're on the road and external EPG sources.
Installing
This add-on is installed from the Add-on browser located in Kodi as follows:
- Settings
- Add-ons
- Install from repository
- Video Add-ons
- VBox TV Gateway PVR Client
- Install
VBox TV Gateway PVR Client, is a PVR Client Addon to connect VBox TV Gateway, VHome TV Gateway, and V@Home TV Gateway devices to Kodi.
Overview
This is a PVR addon for interfacing with VBox Communication's "XTi" based TV Gateways, which are network television tuners. It supports all the basic functionality you would expect, such as watching, recording and timeshifting. Additionally, it supports augmenting the over-the-air guide data with external XMLTV data.
Settings
This Addon is compatible with Kodi v15 (until the official release of Kodi v15, please download the latest nightly - Download Kodi 15)
The VBox TV Gateway PVR Addon comes preloaded with Kodi v15
- Go to System -> Settings -> Add-ons -> My add-ons -> PVR Clients and select the VBox TV Gateway PVR add-on
- Select Configure
Be sure to select Okay when you are done changing settings in order to save those changes and to Enable the add-on
- Connection setting (Internal IP)
- Mandatory input
- Enter the TV Gateway's IP address (from within the home network)
- HTTP port - default is 80 - port address for web interface
- UPnP port - default is 55555 - streaming port
- Connection timeout - default is 3 seconds - when connecting from outside the home network, the add-on attempts to connect to the internal IP address first, and after the set timeout, it attempts to connect using the external IP address
- Connection setting (External IP)
- Optional input
- Use this setting to connect to the TV Gateway from anywhere in the world and continue to watch and record Live and scheduled TV
- Enter your network's external IP address or hostname - Enter the external IP address
- HTTP port - default is 19999 - External web interface port address, enter the same port address as configured in the Remote Access section of the TV Gateway web management
- UPnP port - default is 55555 - External Streaming port address, enter the same port address as configured in the Remote Access section of the TV Gateway web management
- Connection timeout - default is 10 seconds - If the add-n cannot connect to the TV Gateway after set time is passed, the Add-on will report that it cannot connect to the TV Gateway. Please check your IP address in the Remote Access section.
- EPG - TV Program Guide
- default leave blank
- The add-on will present the free EPG data collected by the VBox TV Gateway from the DVB-SI (System Information) EIT (Event Information Table) stream
- Use External XMLTV - To set external program guide source, point to an XMLTV file,
- The add-on will automatically match the channels with the XMLTV channels and will create a channel_mappings.xml file located at %UserData%\AppData\Roaming\Kodi\userdata\addon_data\pvr.vbox. to enable manual channel matching
- Prefer external EPG over OTA - Use this setting to mix the EPG collected by the VBox TV Gateway with the XMLTV file and provide advantage to the external EPG source
- TimeShift
- default is disabled
- Timeshift allows to pause or rewind an active Live TV channel
- Enable Timeshift - will create a temp buffer file that stores the current active Live TV channel. The buffer file reset on channel switch
- Timeshift path - Set the buffer file path location
- Kodi Live TV
- default is disabled
- After configuring the vbox.pvr PVR addon - Go to System -> Settings -> TV -> General and press Enabled to enable Kodi's Live TV support
QuickStart guide
Keyboard shortcuts
- Number - press the channel number to jump to a channel
- "+-" - Volume - Use the "+" and "-" buttons to change volume
- "e" - Full EPG - Load the Full EPG screen
- "c" - Channel list window
- "b" - Timer list
- "i" - Channel info
- "r" - Rewind - When timeshift is enabled
- "f" - Fast forward
- "o" - PVR Stream information
- "h" - TV Channel preview mode
- "j" - Radio channel preview mode
- "k" - TV Recordings
- "a" - Audio offset
- "'" - Seeking
- "<" - Seek backward
- ">" - Seek forward
- "z" - Stream information
- "x" - Exit
- "v" - teletext
- "m" - Live TV control bar

|
INCOMPLETE: This page or section is incomplete. Please add information or correct uncertain data which is marked with a ? |
