HOW-TO:Install Kodi on Apple TV 4 and 5 (HD and 4K)
Install from Windows (only for Apple TV 4)
What about the Apple TV 4K?
| Unfortunately the Apple TV 4K does not have a USB-C. If you are not jailbroken the only official way to sideload Kodi on your device is to use Xcode on macOS with a wireless connection.
To get macOS on you computer you can use a virtual machine or check for building an hackintosh, but we will not discuss this here. |
Prerequisites
| Cydia Impactor is still a work-in-progress, There might be some bugs that you face while installing Kodi. It is not for the faint of heart.
This method also requires that Kodi be re-installed every 7 days if you are using a free Apple developer account. |
- Cydia Impactor
- Windows 7 or higher
- Latest version of iTunes is needed to be installed.
- Latest .deb file of Kodi for tvOS from Test builds
- A USB-C cable, without that, you can't connect your Apple TV with computer
Converting deb into ipa
Before beginning the installation, you have to convert .deb file of Kodi into .ipa. That is because Cydia Impactor only accepts .ipa files and not .deb files. If you already know how to convert .deb into .ipa, you can skip to the installation below.
- You will need to Download 7-zip and install it in your PC
Follow the steps given below and you will be able to convert .deb file into .ipa file.

Step 1: Right Click on .deb file of Kodi that you downloaded on your PC and Select 7-zip > Extract files. Click OK in the next Window.

Step 2: Open the resulting Folder and you will find data.tar file inside. Simply extract data.tar file with Right Click > 7-zip > Extract Files.
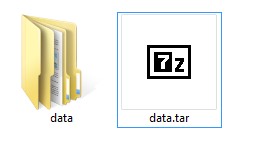
Step 3: Now you should have data folder and data.tar file in the folder.
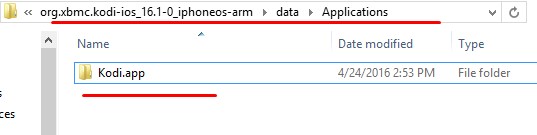
Step 4: Go inside the data folder and open Applications folder. Here you will find a folder named Kodi.app.
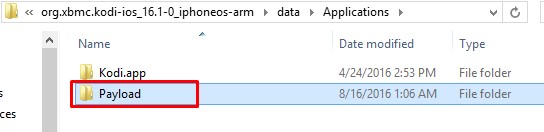
Step 5: Here create a new folder and name it “Payload” without quotes. Now you should have 2 folders. Payload and Kodi.app folder. Make sure that the P is capital in Payload.

Step 6: Now simply drag the Kodi.app folder and drop it on top of the Payload folder. In other words, copy kodi.app and paste it inside Payload folder.
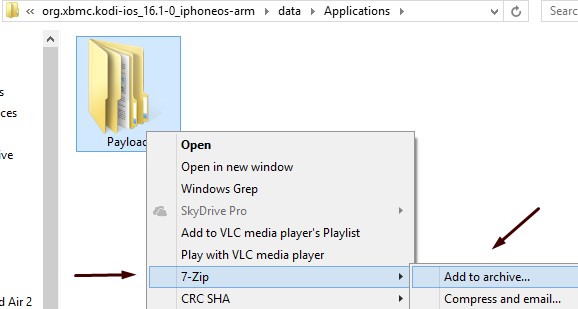
Step 7: Next you have to Right-click the Payload folder and Click 7-zip > Add to archive option.
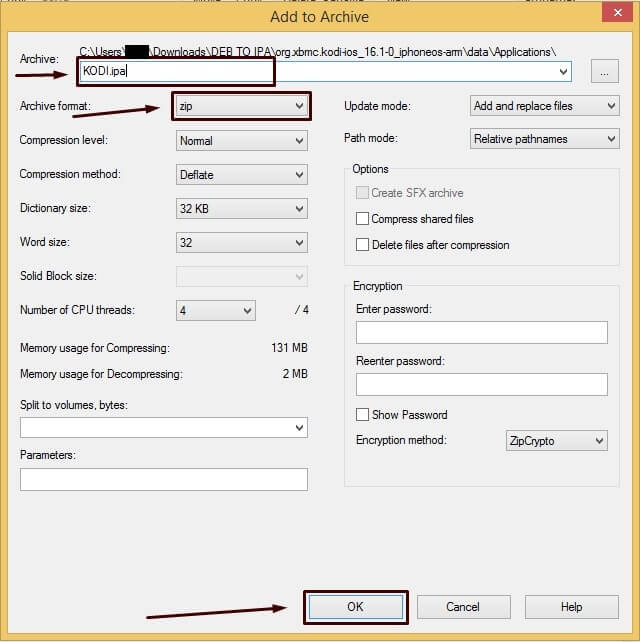
Step 8: A new window will pop up. Here you have to make sure that the Archive format is set to zip and name the archive ending with .ipa . Something like Kodi.ipa. After that click OK.
Now you should have your kodi.ipa file ready for installation.


Install Kodi on your Apple TV
Connect your Apple TV 4 with power and make sure that it is turned ON before proceeding.
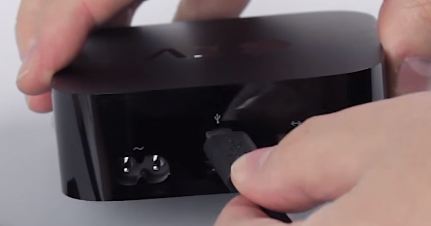
Step 1: Connect your Apple TV4 with your computer, and make sure that it is turned ON. If iTunes or some other program pops up then close that first.
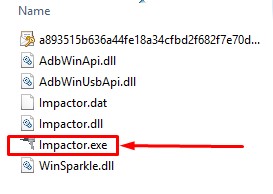
Step 2: Extract the Impactor zip file somewhere in your computer and Open Impactor.exe. Don’t select “Run as Administrator” for Cydia Impactor.
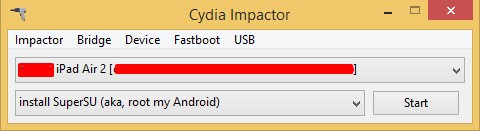
Step 3: Make sure that your Apple TV is detected by Cydia Impactor. After that Drag and drop the Kodi.ipa file in Cydia Impactor.
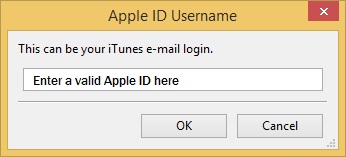
Step 4: Cydia Impactor will ask you to Enter your Apple ID. Enter a Valid Apple ID here and click OK Cydia Impactor will start installing Kodi on your Apple TV.
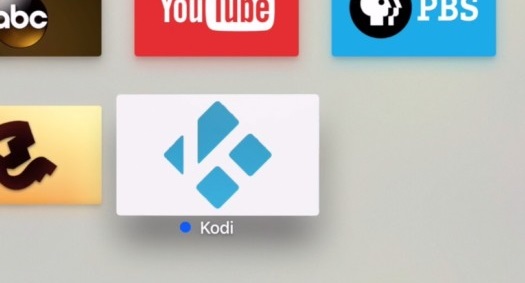
Step 5: Wait for the installation to complete. Once done, simply look for Kodi icon on your Apple TV 4 main screen and Now you can open it.


|
NOTICE: If you are using a free Apple developper account you will need to do this step every 7 days, so keep your IPA file on your computer |
Install from Mac
Prerequisites
- iOS App Signer
- An iCloud account (required to download Xcode and to obtain your signing certificate and the provisioning profile)
- Xcode (you can download it directly from your Mac App Store)
- Latest .deb file of Kodi for tvOS from Test builds
- (optional) A USB-C cable if you have the Apple TV 4 (but just like the Apple TV 4K, the Apple TV 4 can also communicates wirelessly)
Connect your device
If you have an Apple TV 4 and a USB-C cable you can power on your device and plug in with your Mac. Else if you have an Apple TV 4K or an Apple TV 4 without a USB-C cable you will need to pair your device wirelessly with Xcode. You can follow the step-by-step guide below.
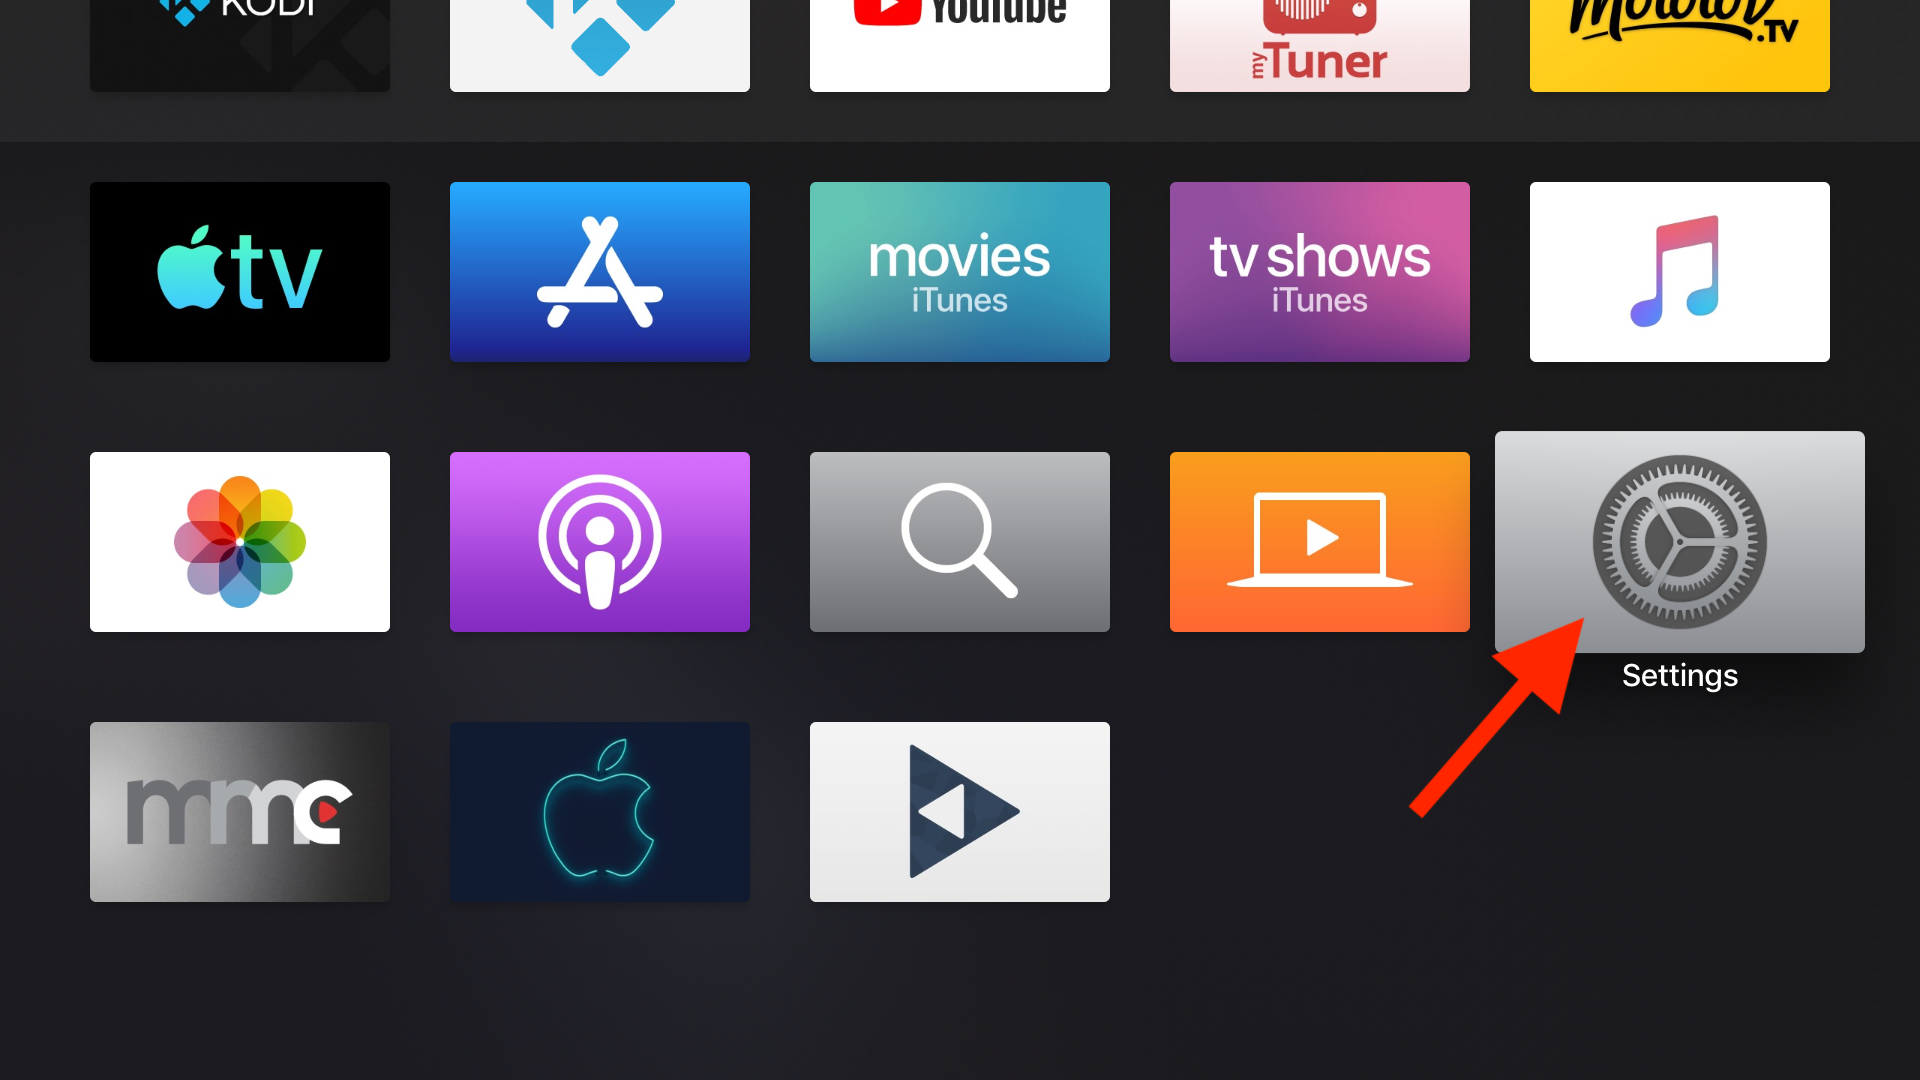
Step 1: On your Apple TV open "Settings".
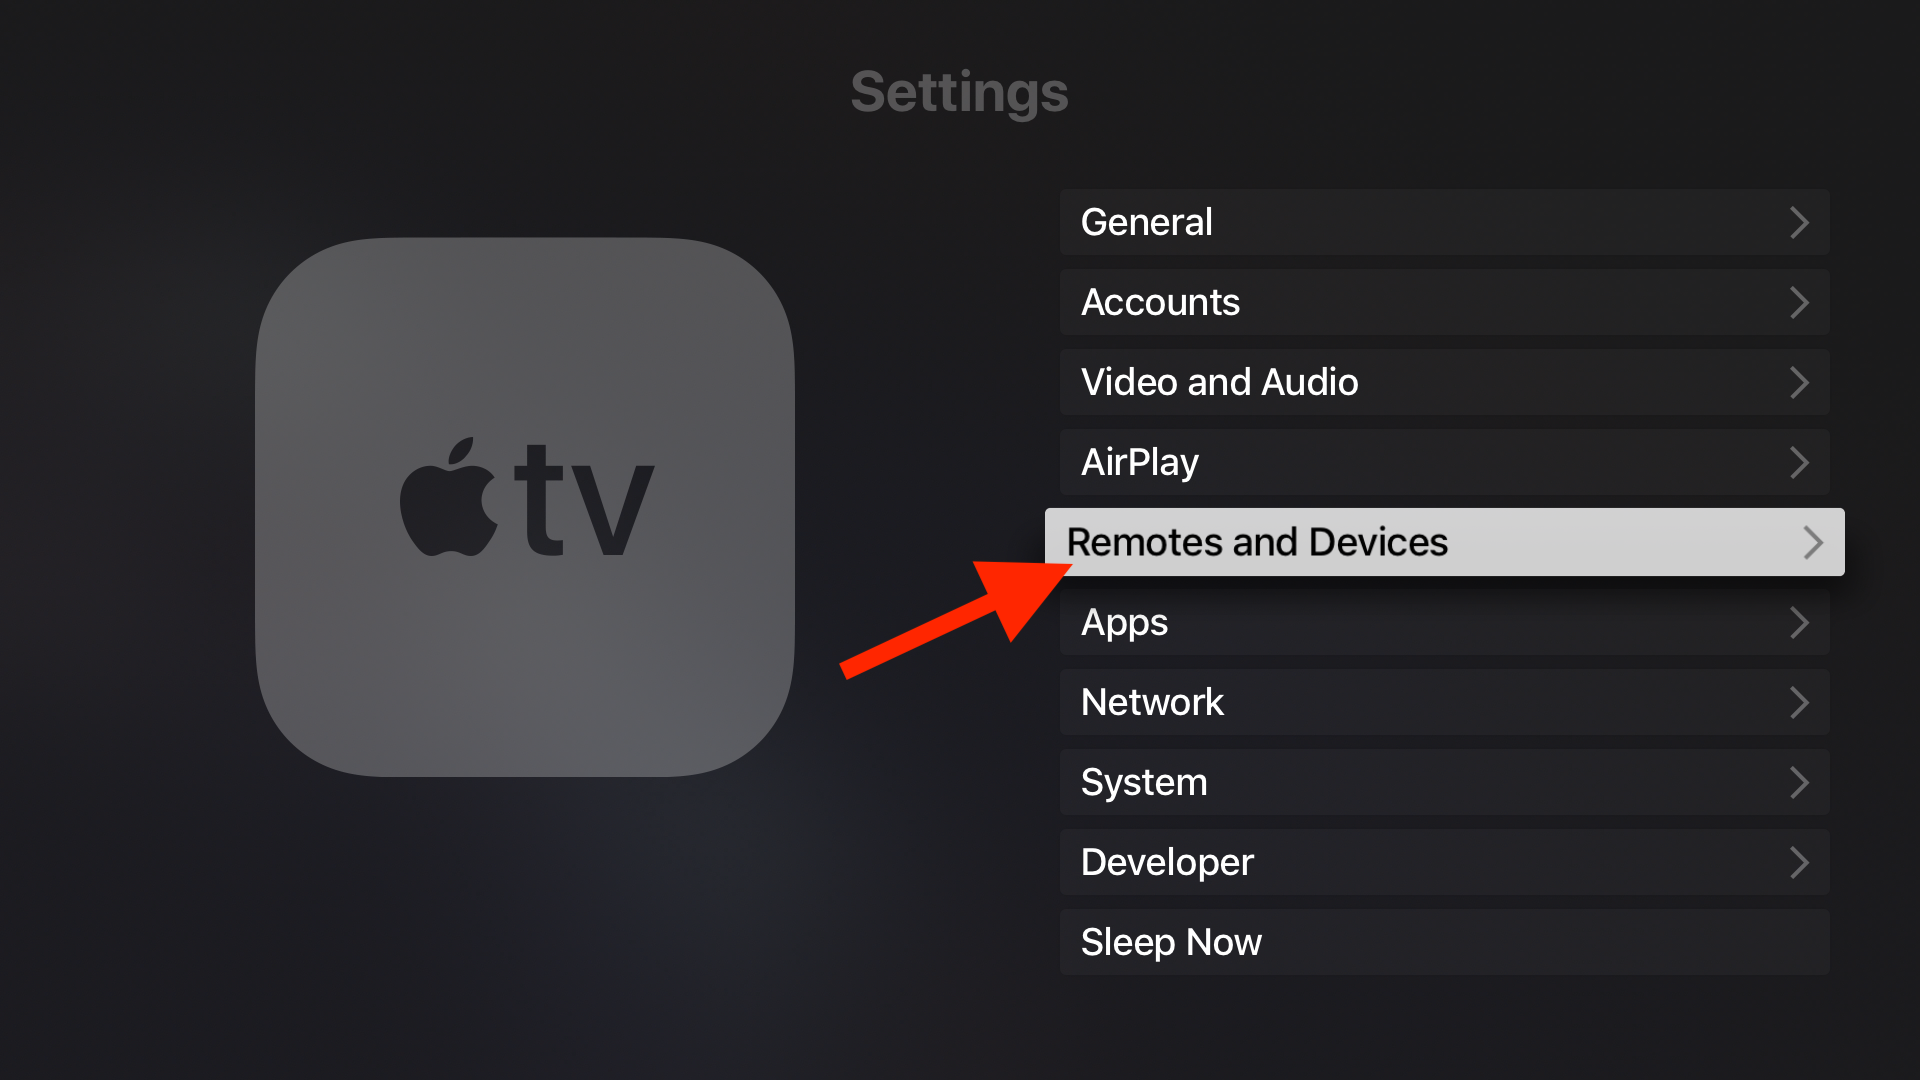
Step 2: Open "Remotes and Devices".

Step 3: Open "Remote App and Devices".
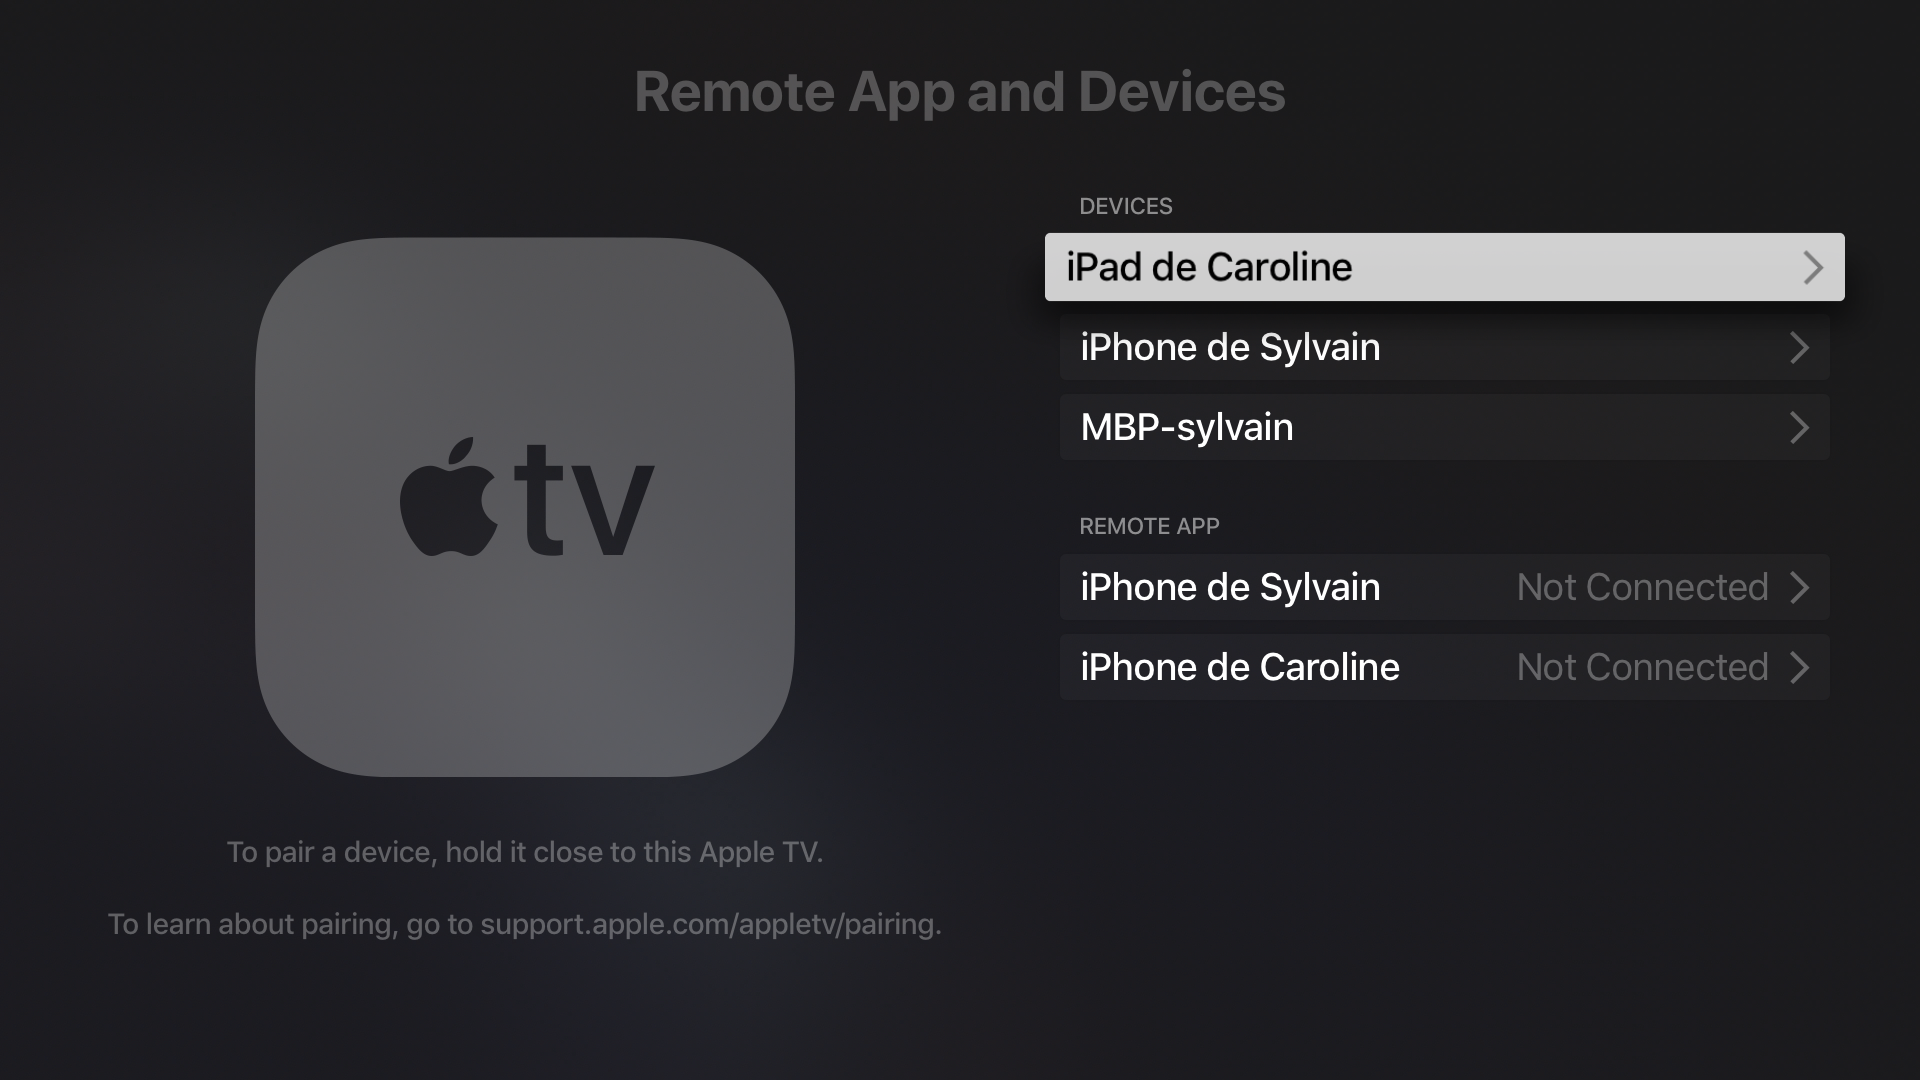
Step 4: Now keep your Apple TV at this screen and take your Mac.
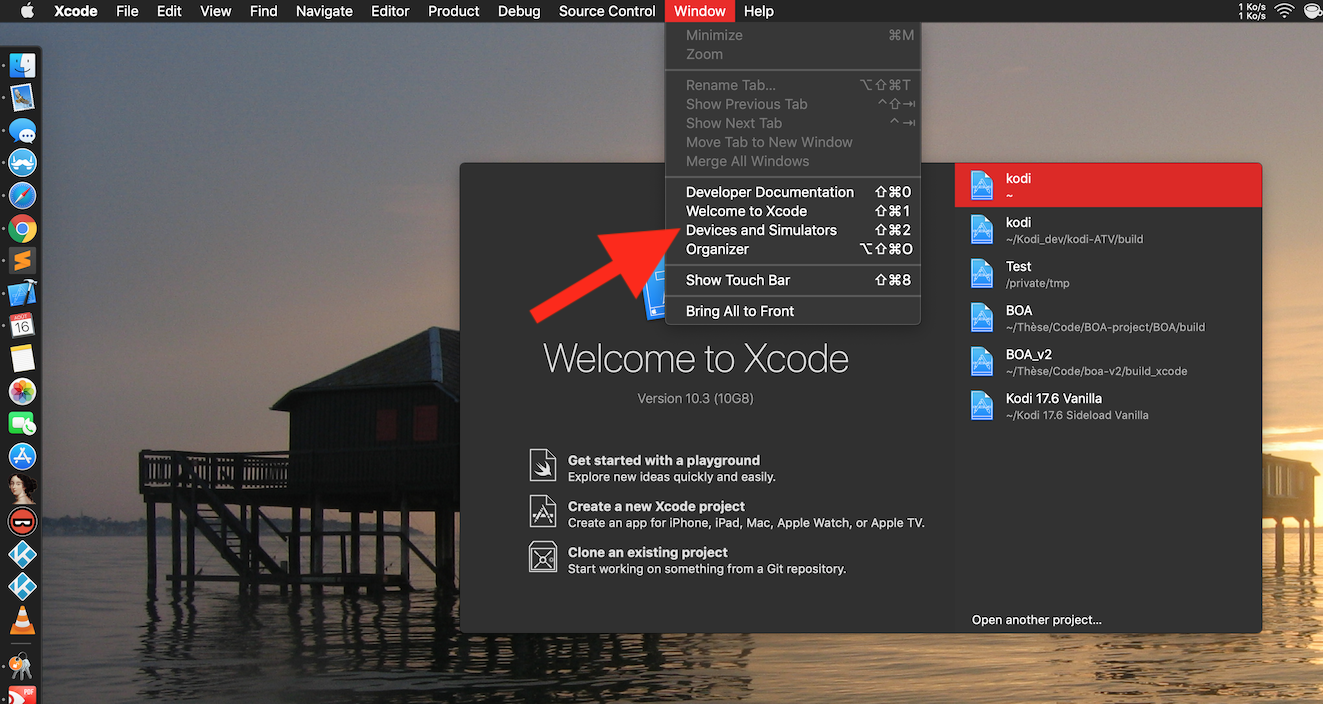
Step 5: Launch Xcode and then navigate to "Window" --> "Devices and Simulators" from the menu bar on top.
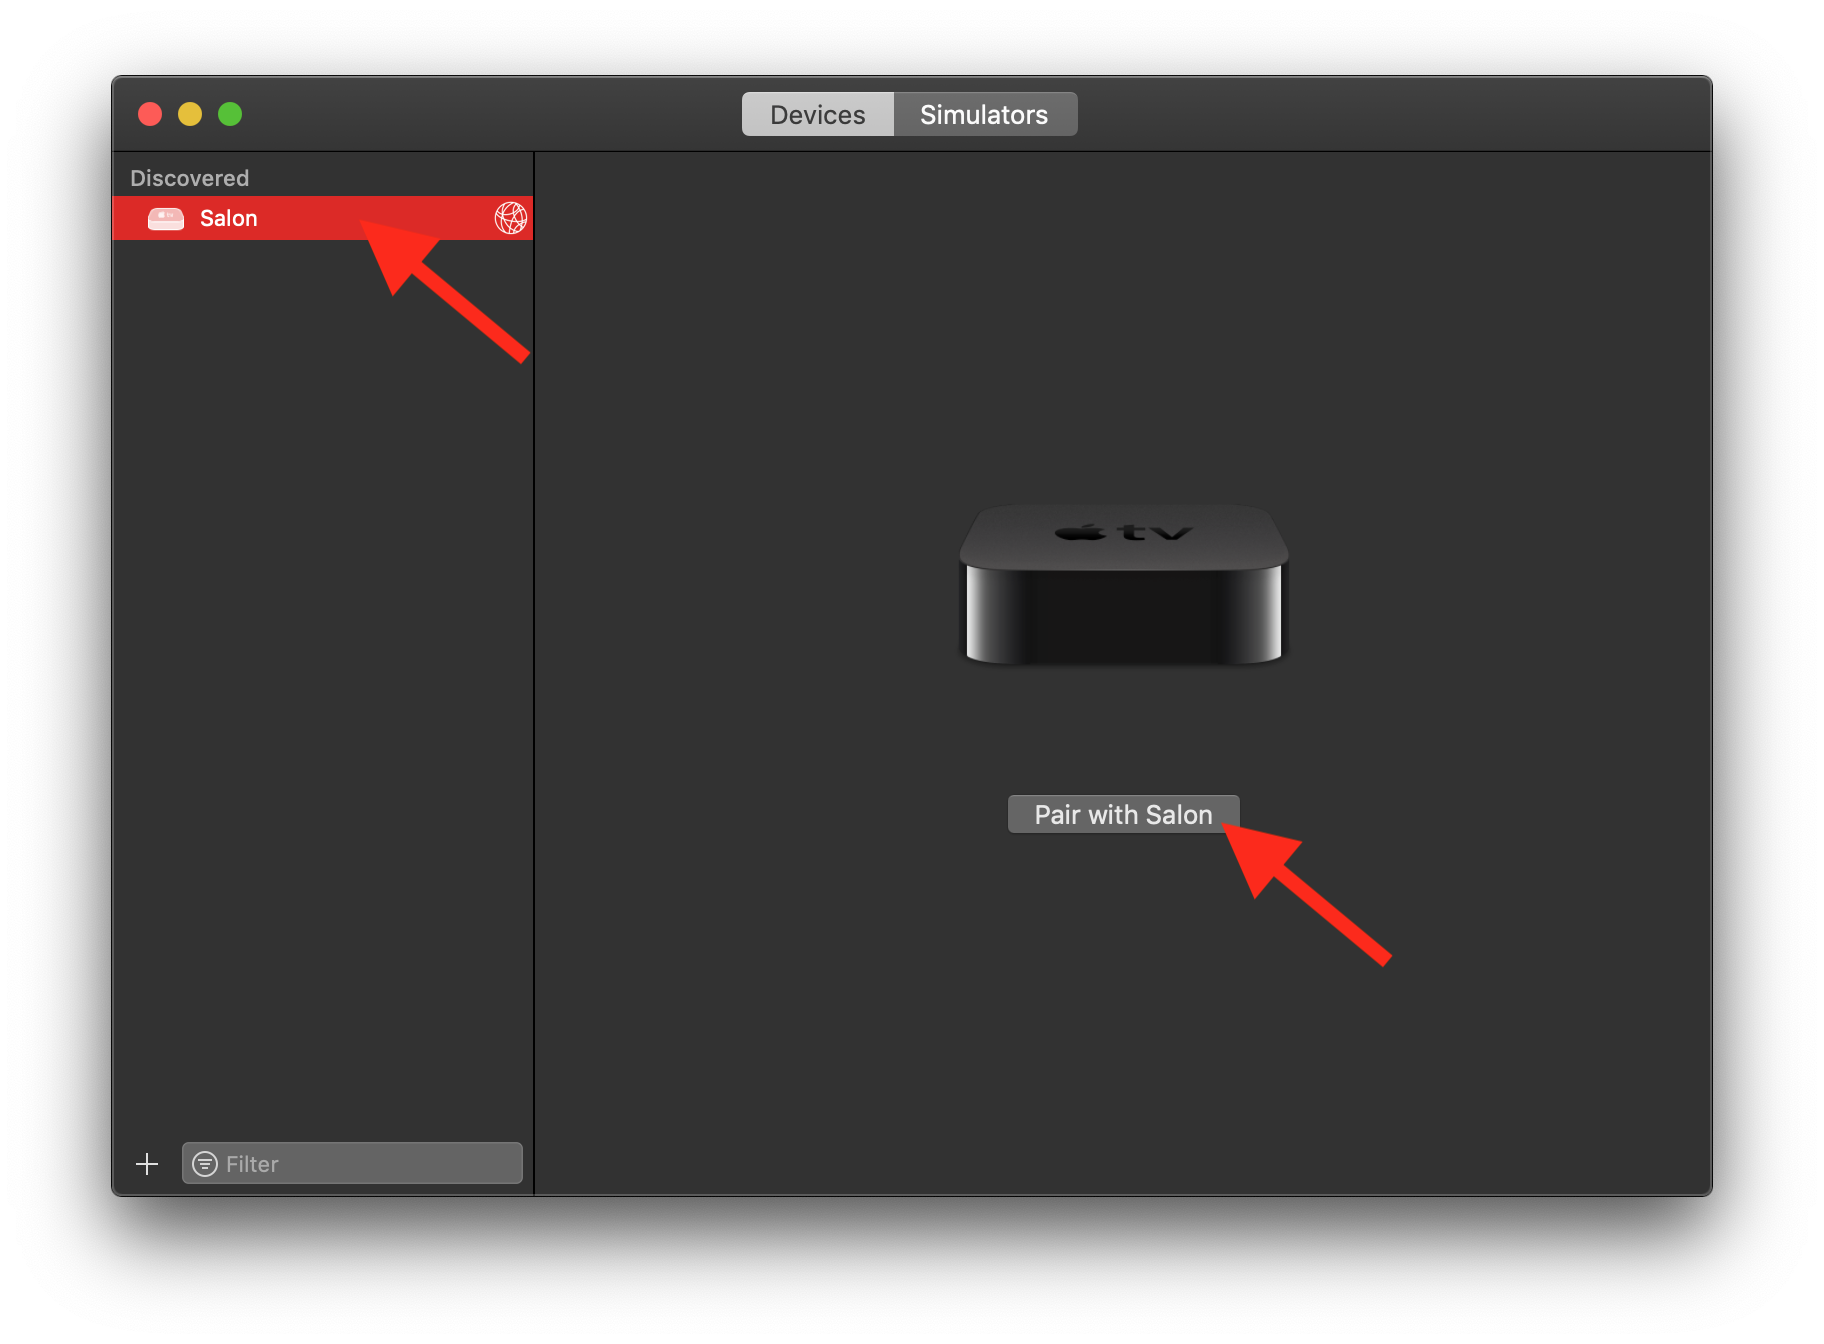
Step 6: Select your Apple TV on the left panel and click "Pair".

Step 7: Fill the verification code that appear on your Apple TV screen and click on "Connect". Your device is now paired with Xcode!


Connect your Apple account in Xcode
Follow the step-by-step guide below in order to connect your iCloud/Apple account in Xcode.
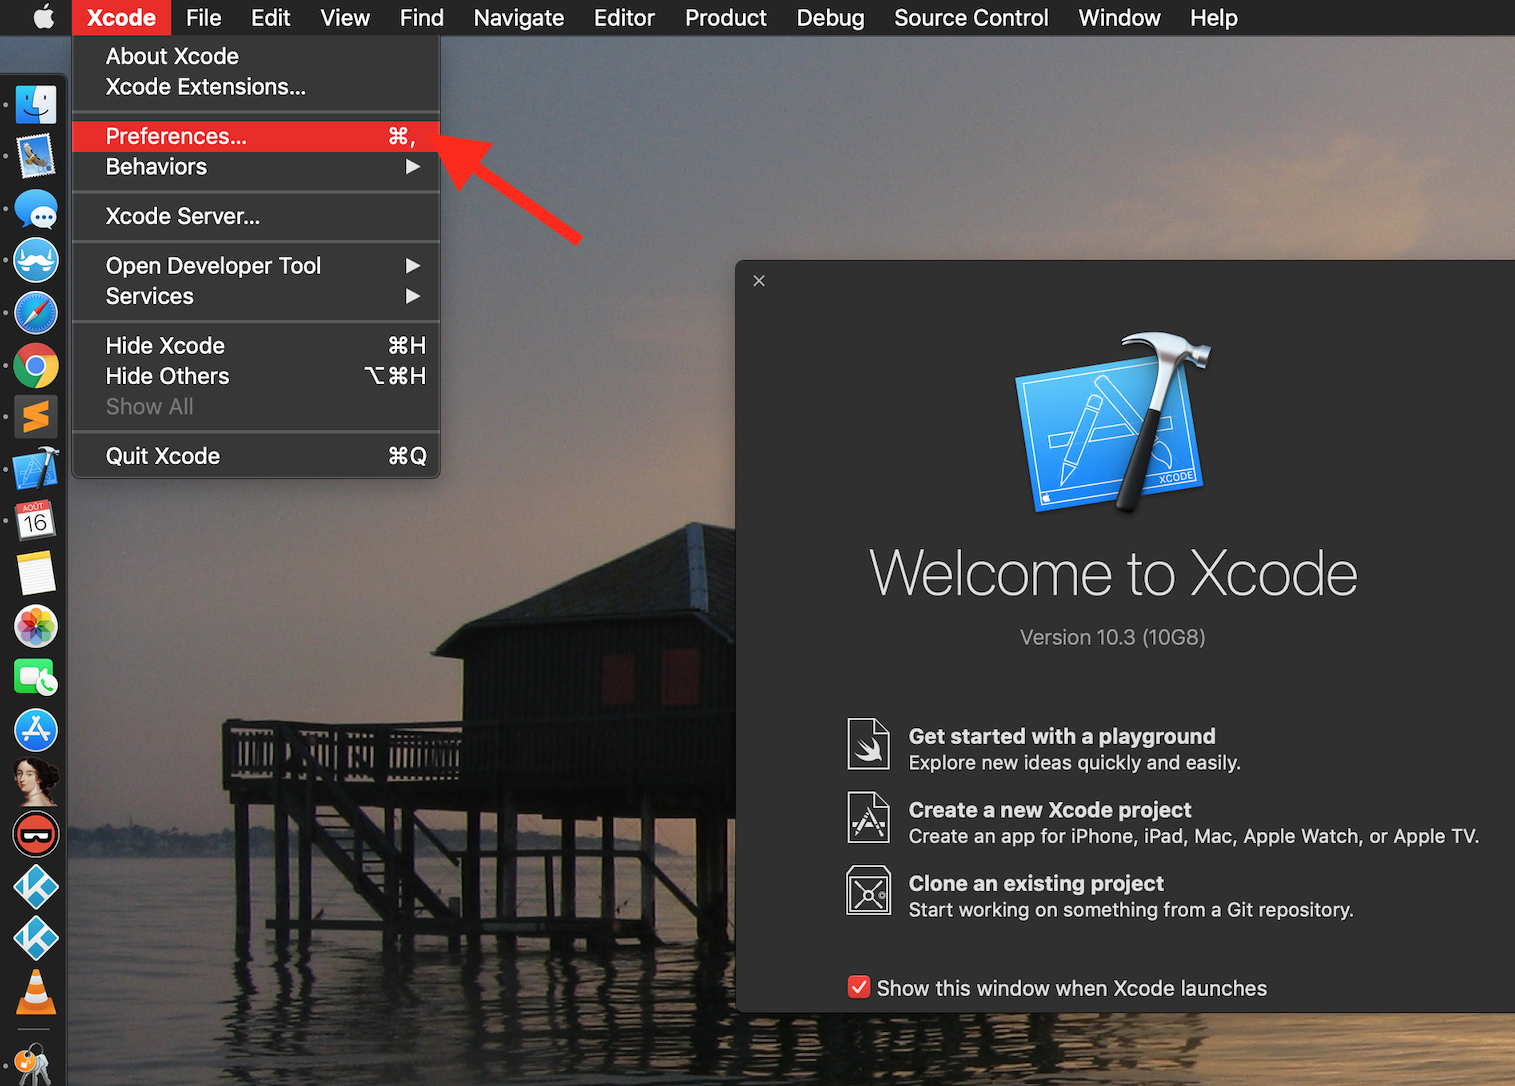
Step 1: Launch Xcode and open "Preferences" from the menu bar on top.
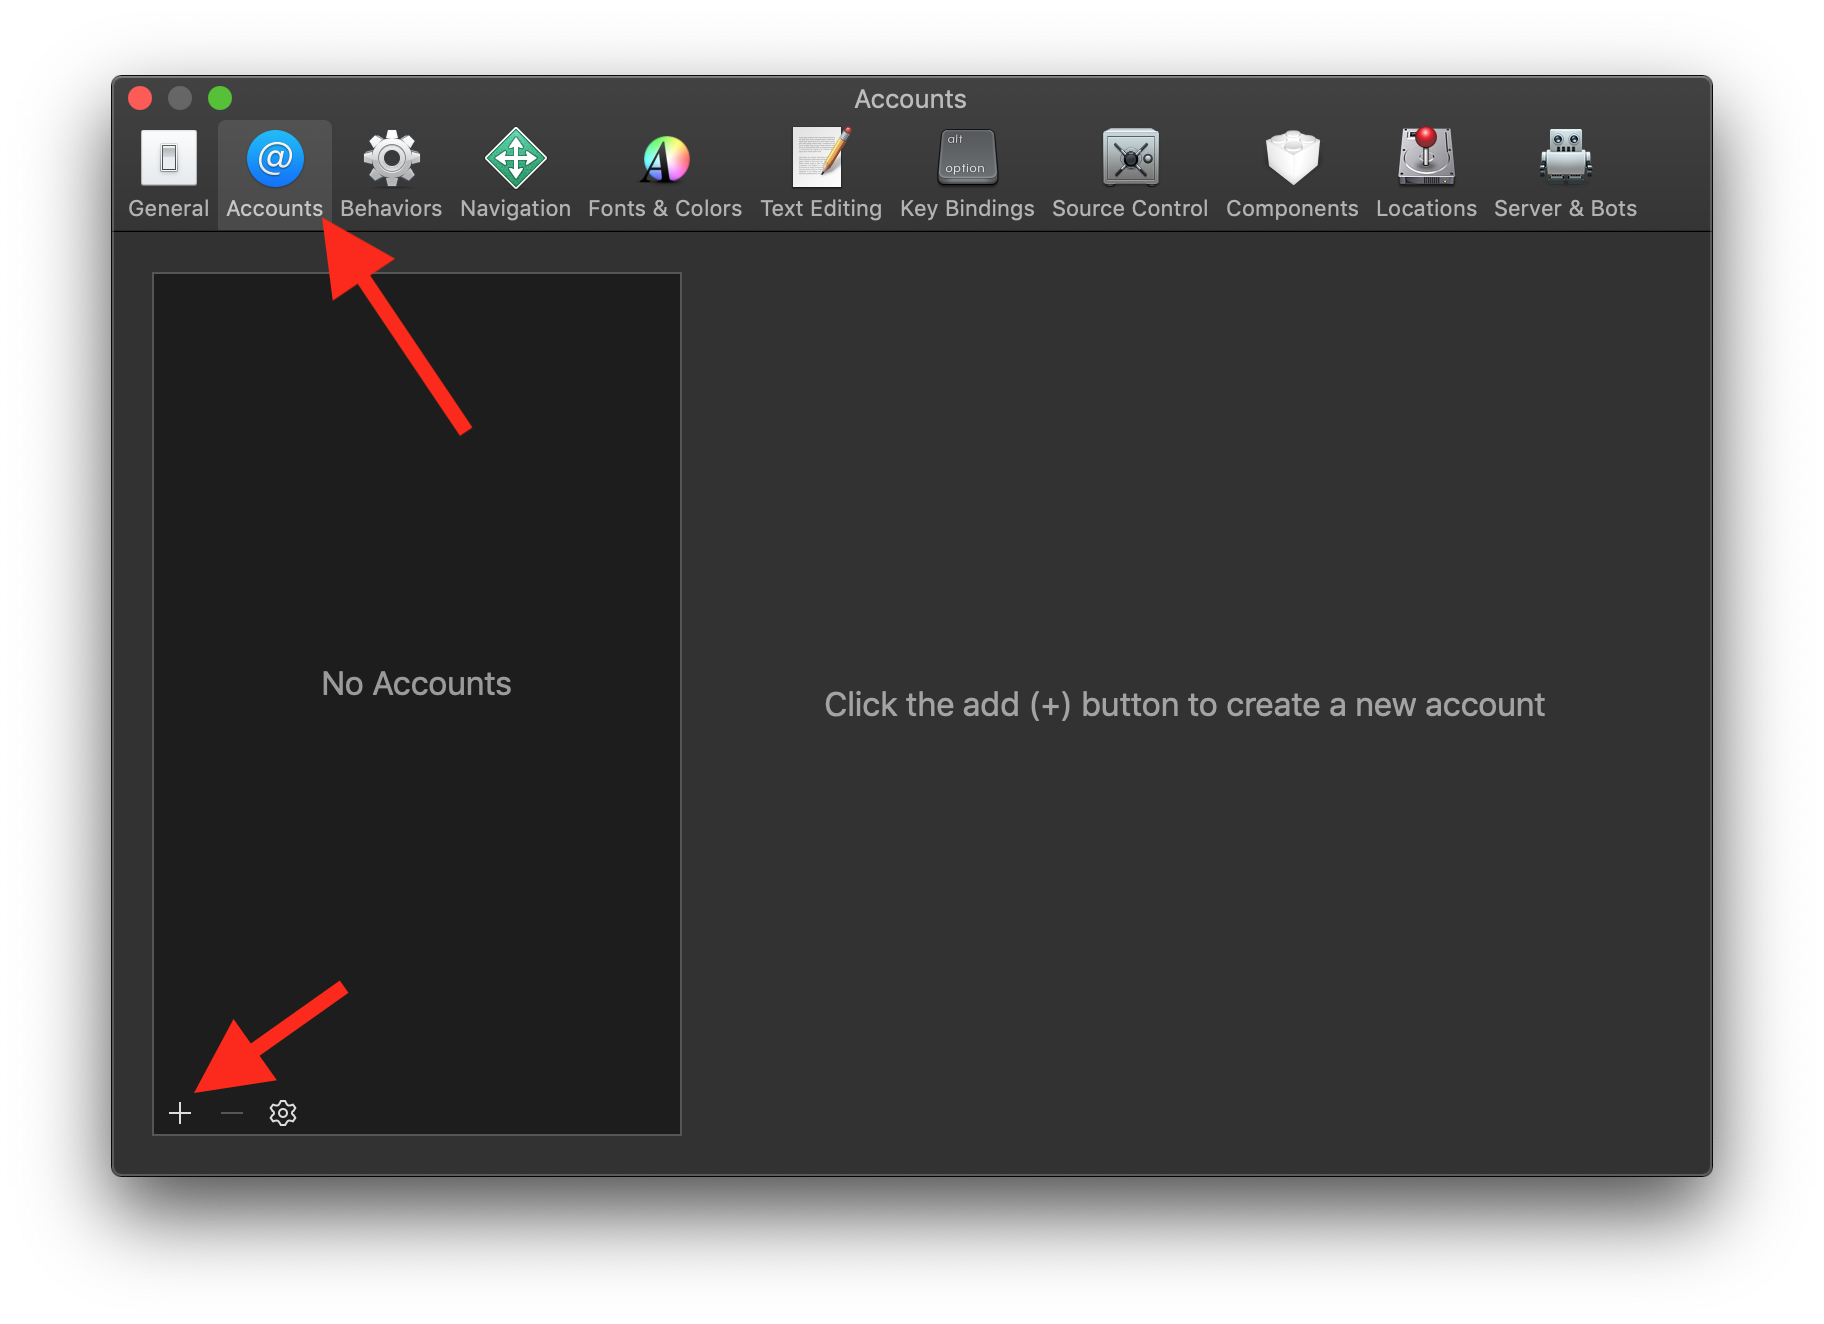
Step 2: Open the "Accounts" tab and add an account with the "+" button.
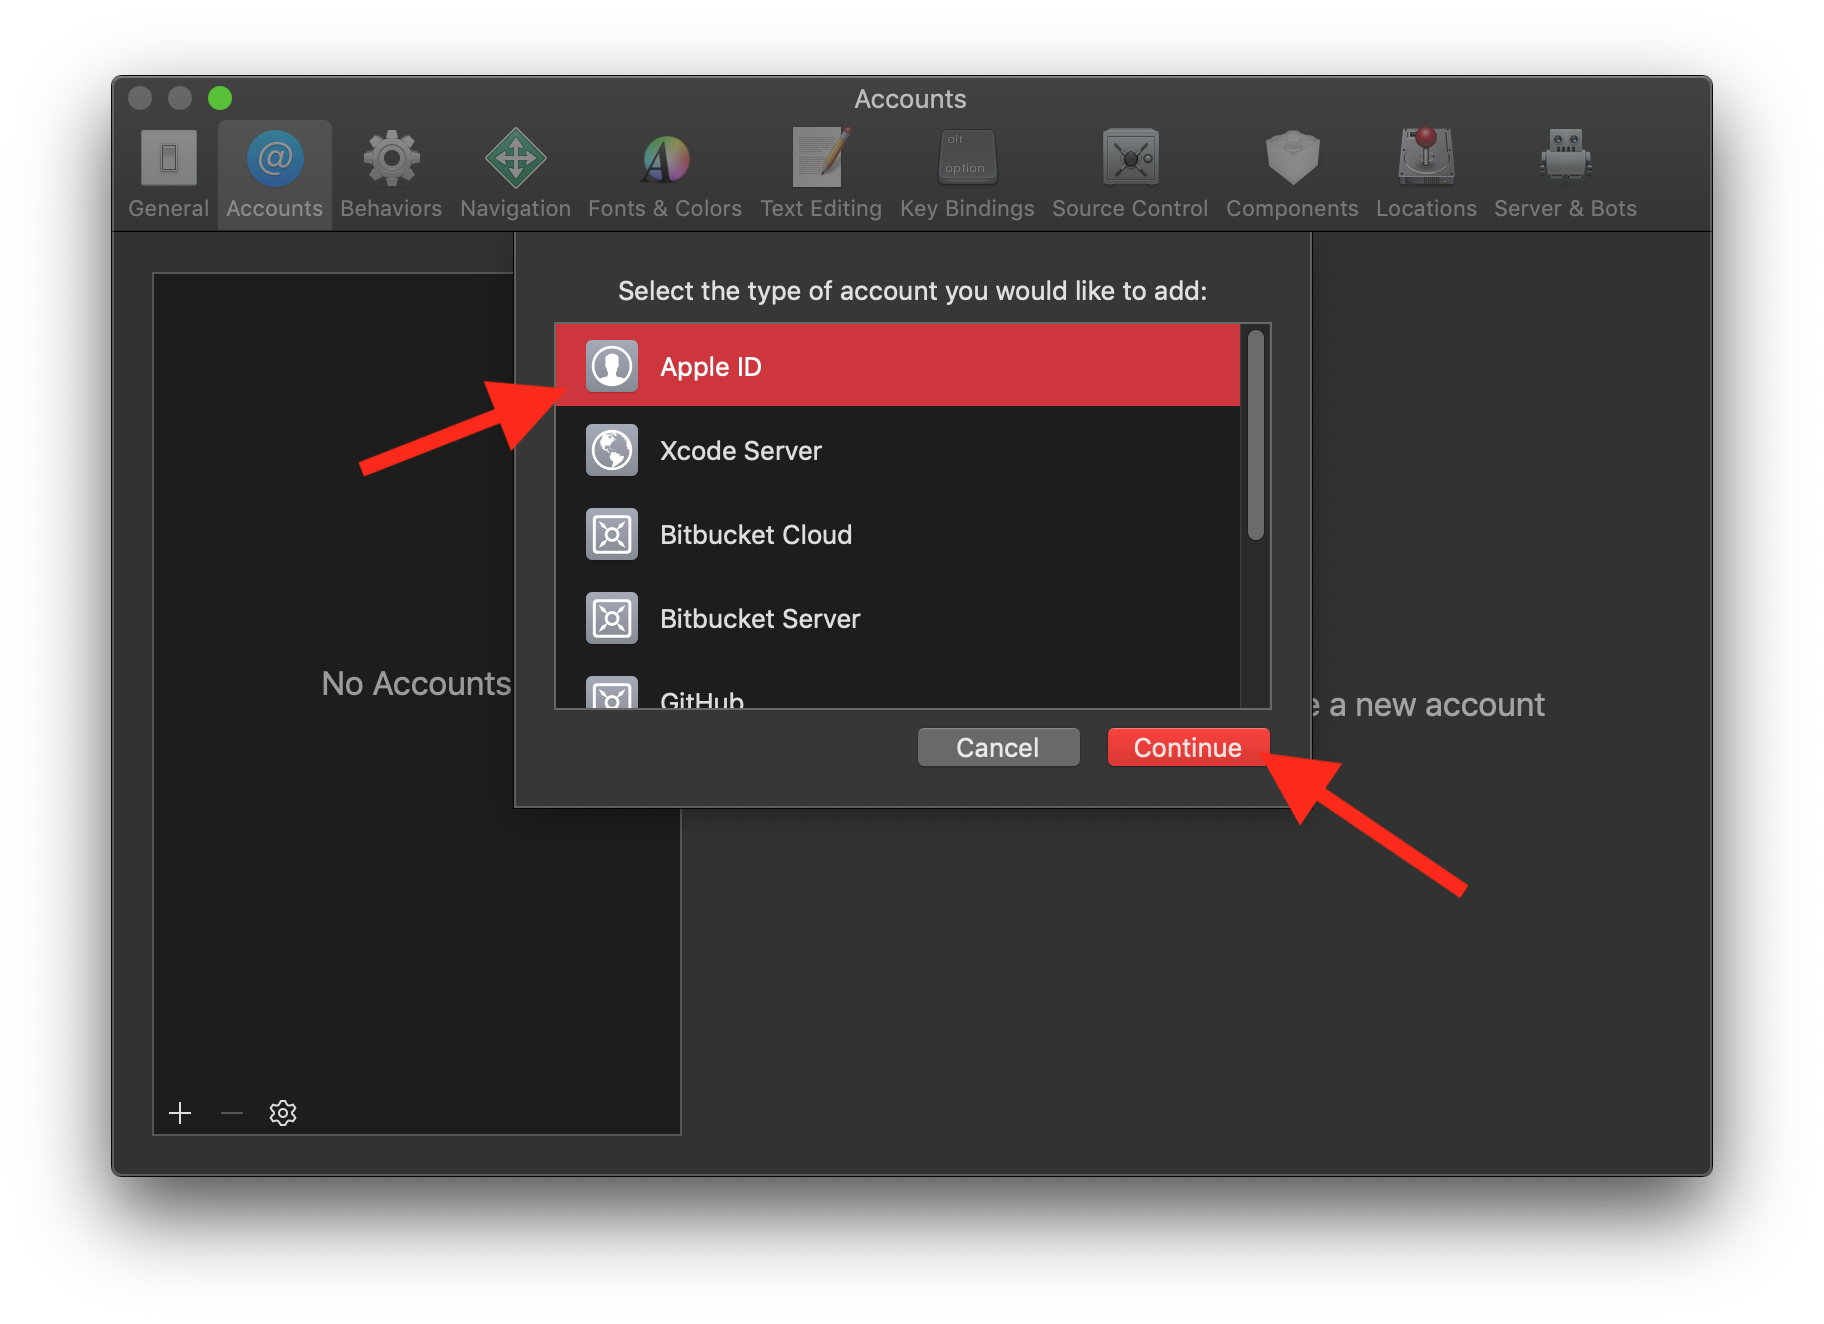
Step 3: Choose "Apple ID" then click "Continue".
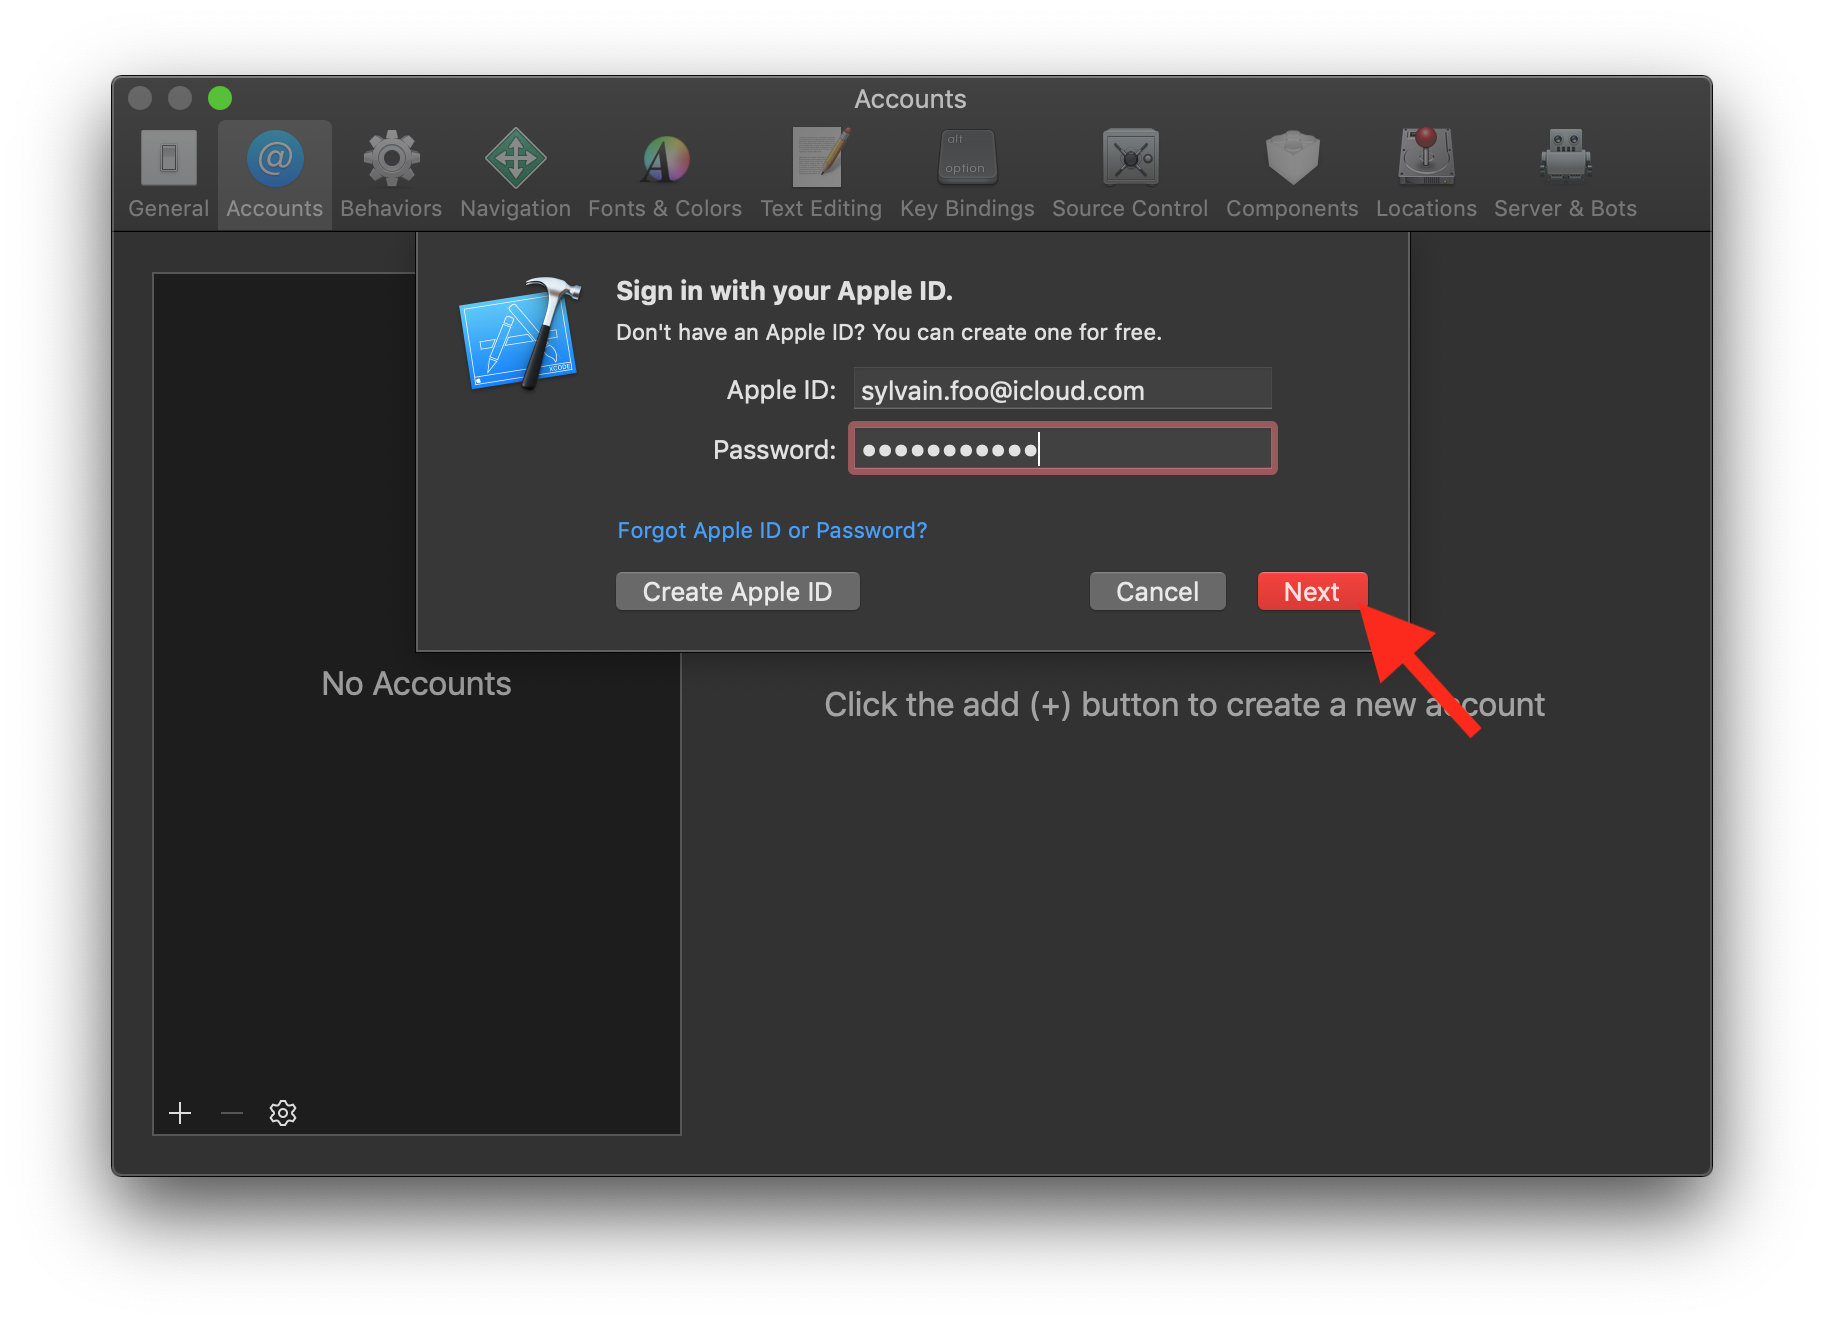
Step 4: Fill in your Apple account credentials then click "Next".
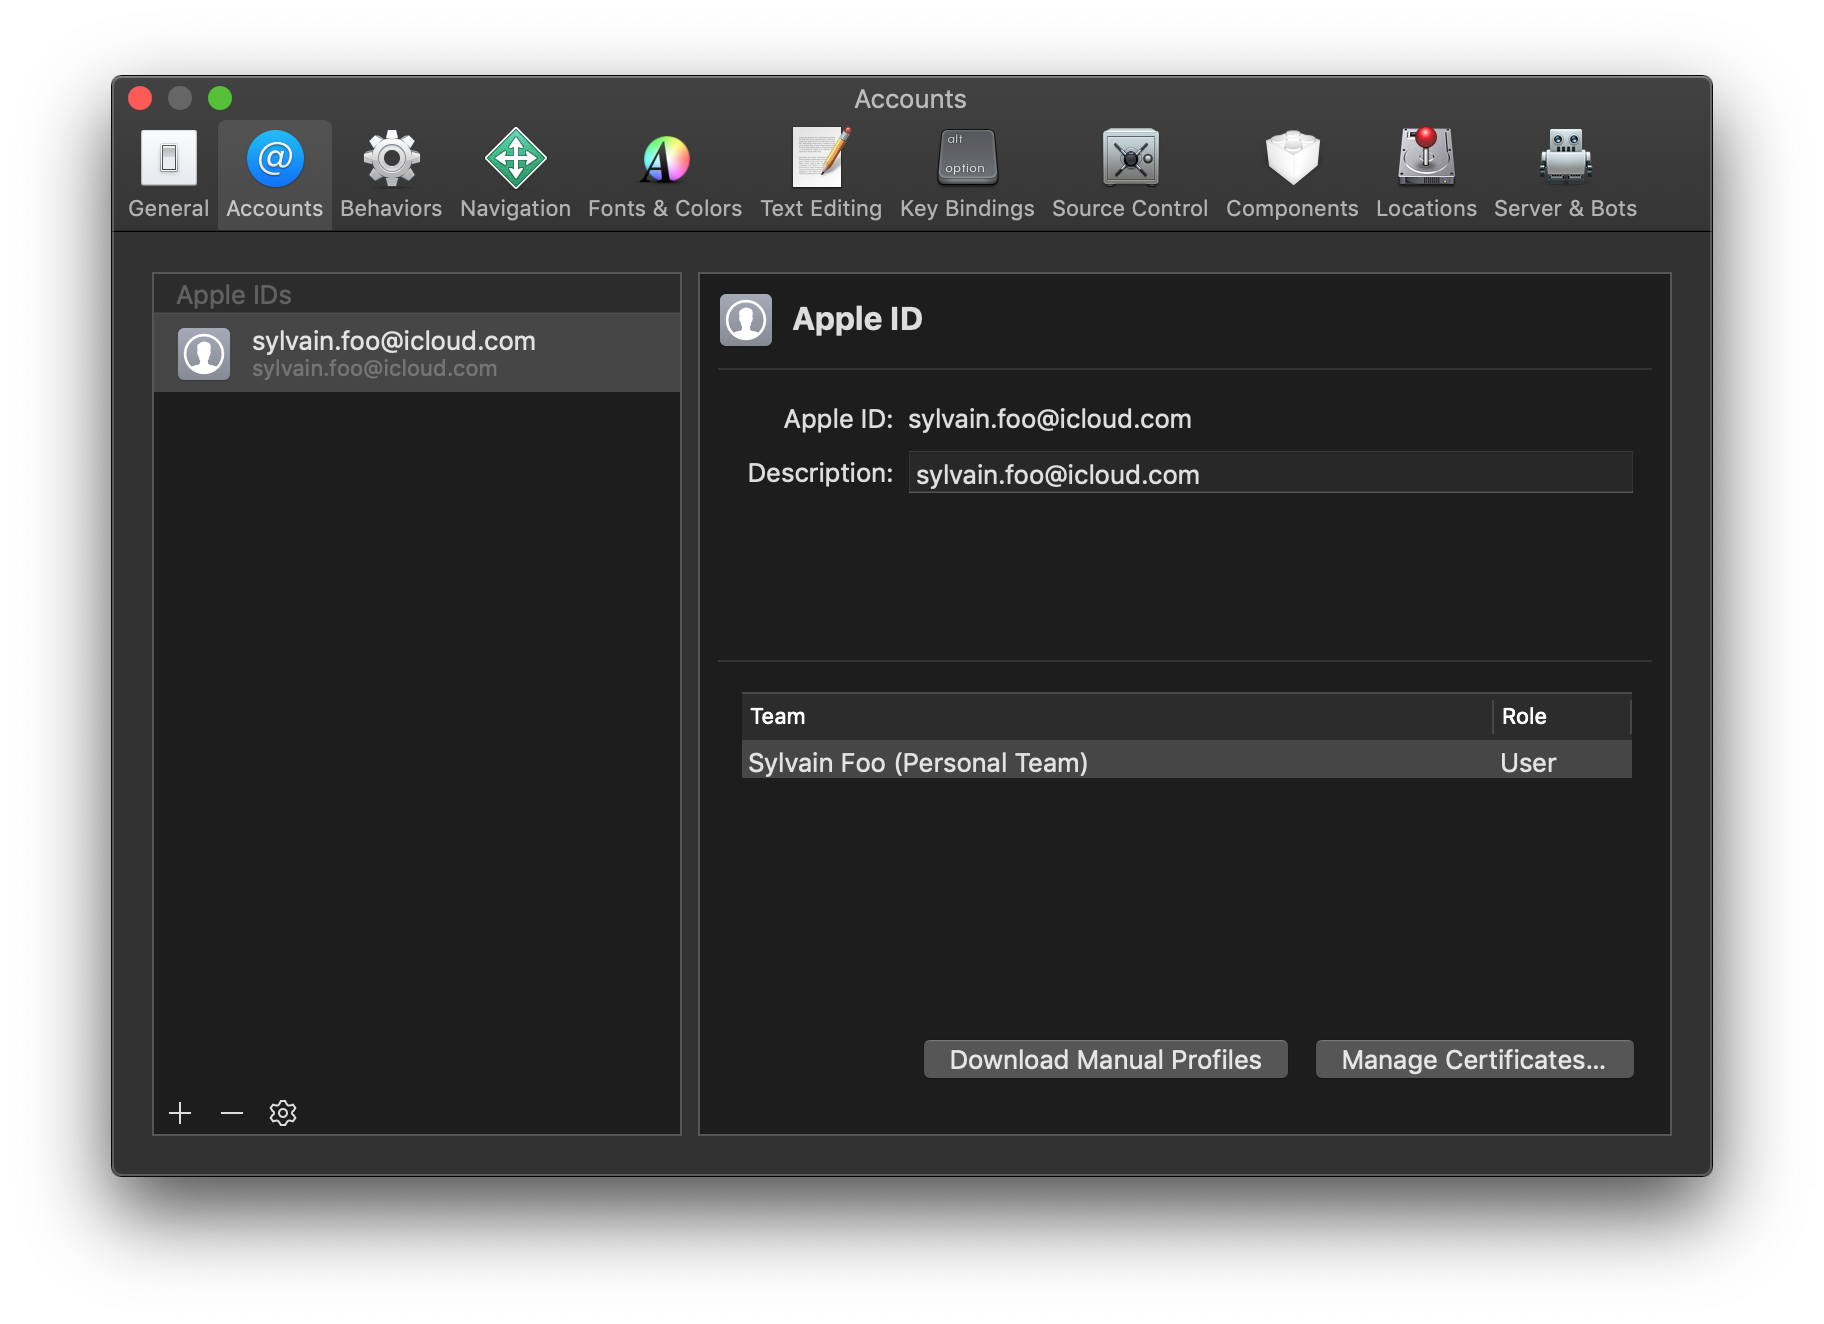
Step 5: Now your Apple account is linked with Xcode!


Generate Kodi IPA file from deb file
If you have a free Apple developper account (this is usually the case if you are a "lambda" user) please follow the section FREE Apple dev account, else if you have a paid developper account (99$/year) please follow the PAID Apple dev account section.
(option A) FREE Apple dev account without TopShelf
|
|
NOTICE: If you are using a free Apple developper account you will need to re-sign and re-install Kodi every 7 days and the Top Shelf feature will not work |
Follow the step-by-step guide below in order to (i) obtain a valid signing certificate and provisioning profile for your Kodi app and (ii) pack and sign Kodi .deb file in an .ipa file

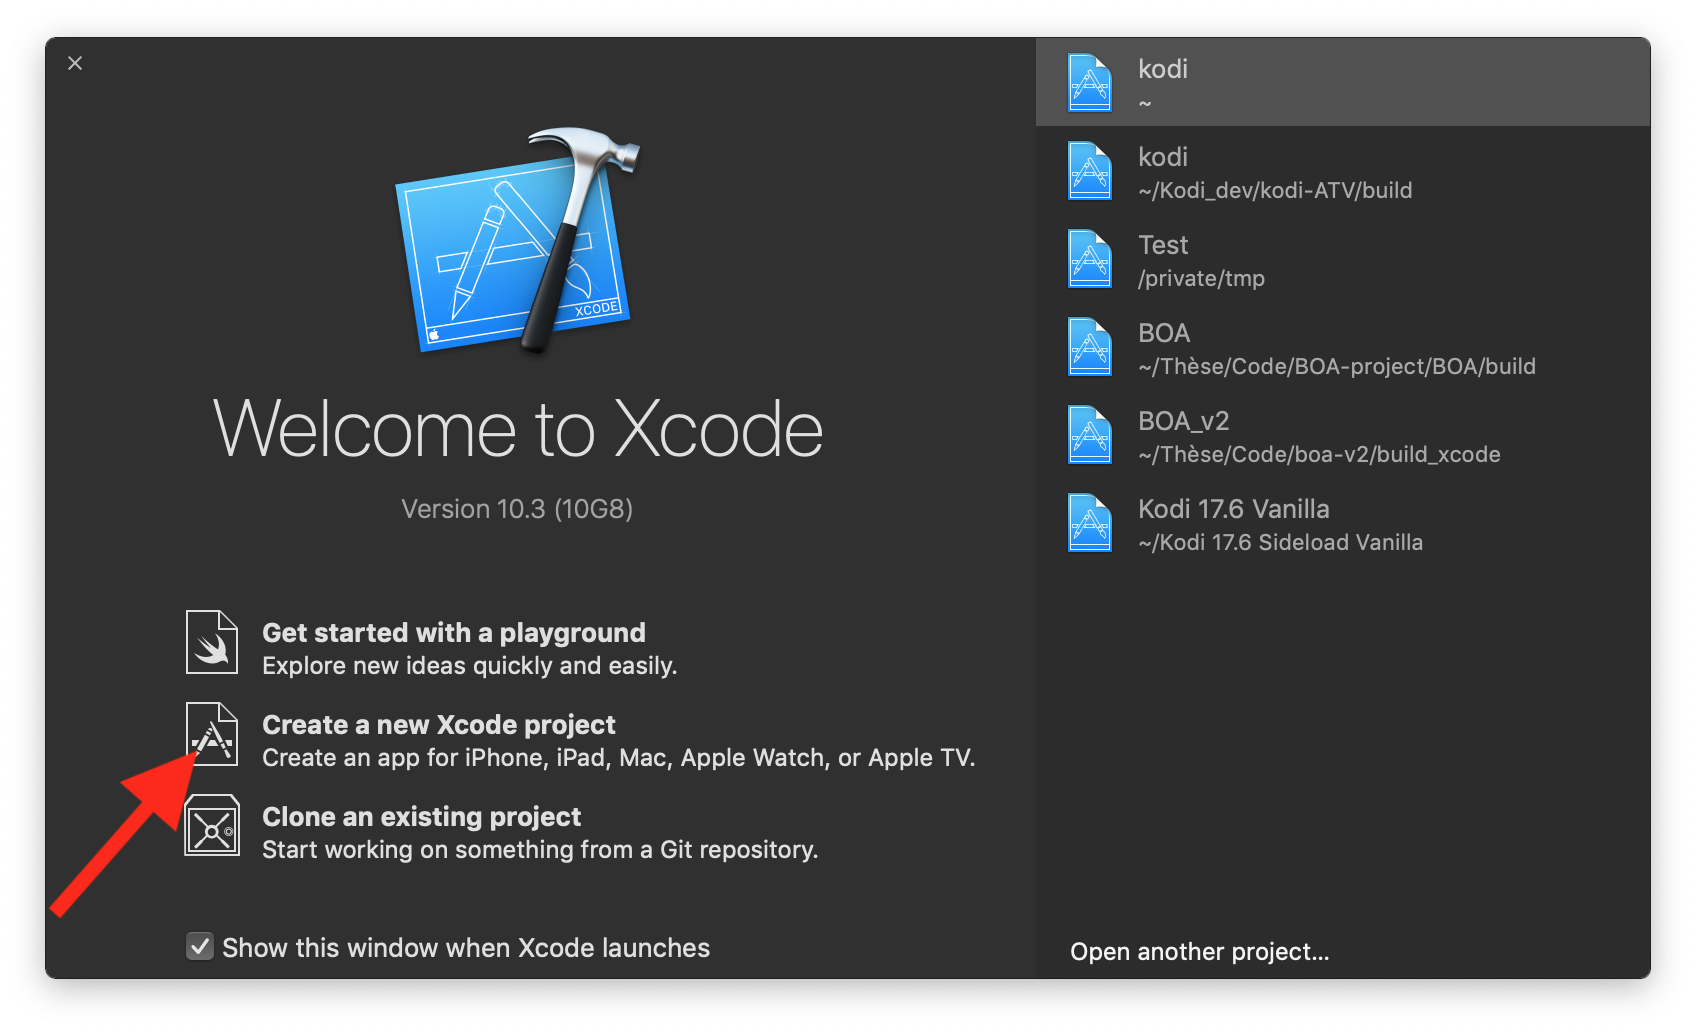
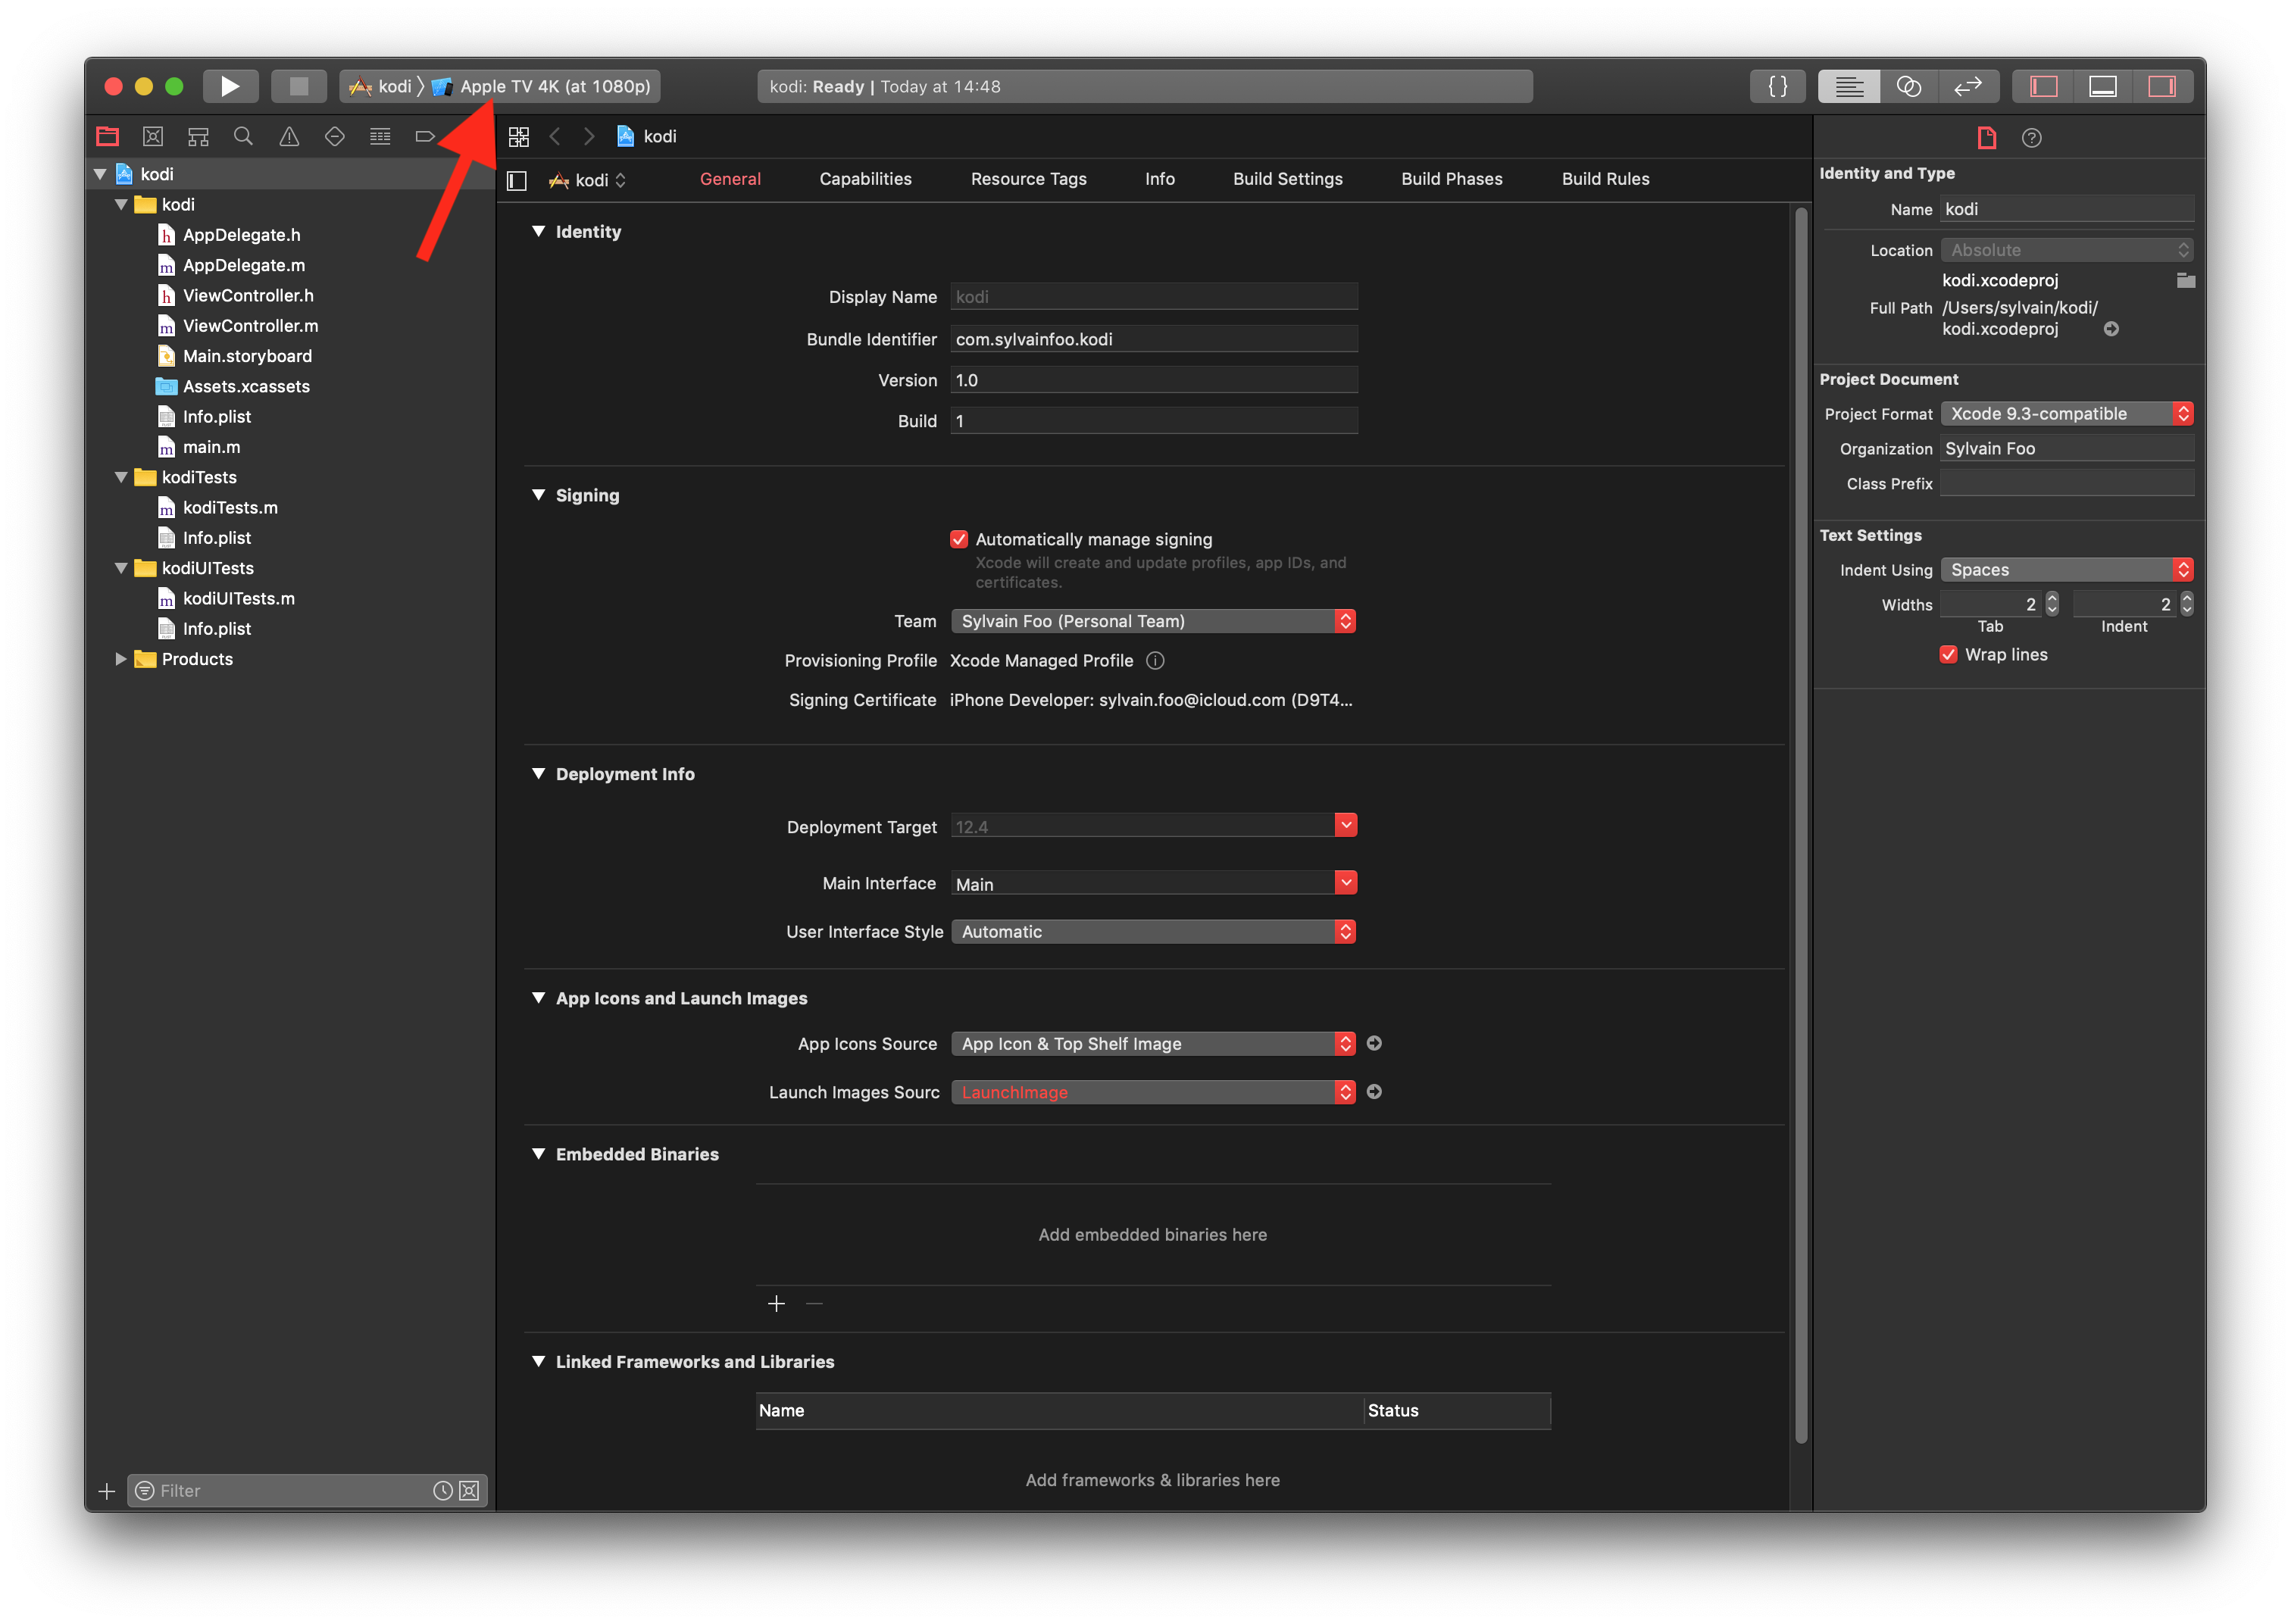
Step 1: Open Xcode and click on "Create a new Xcode project".

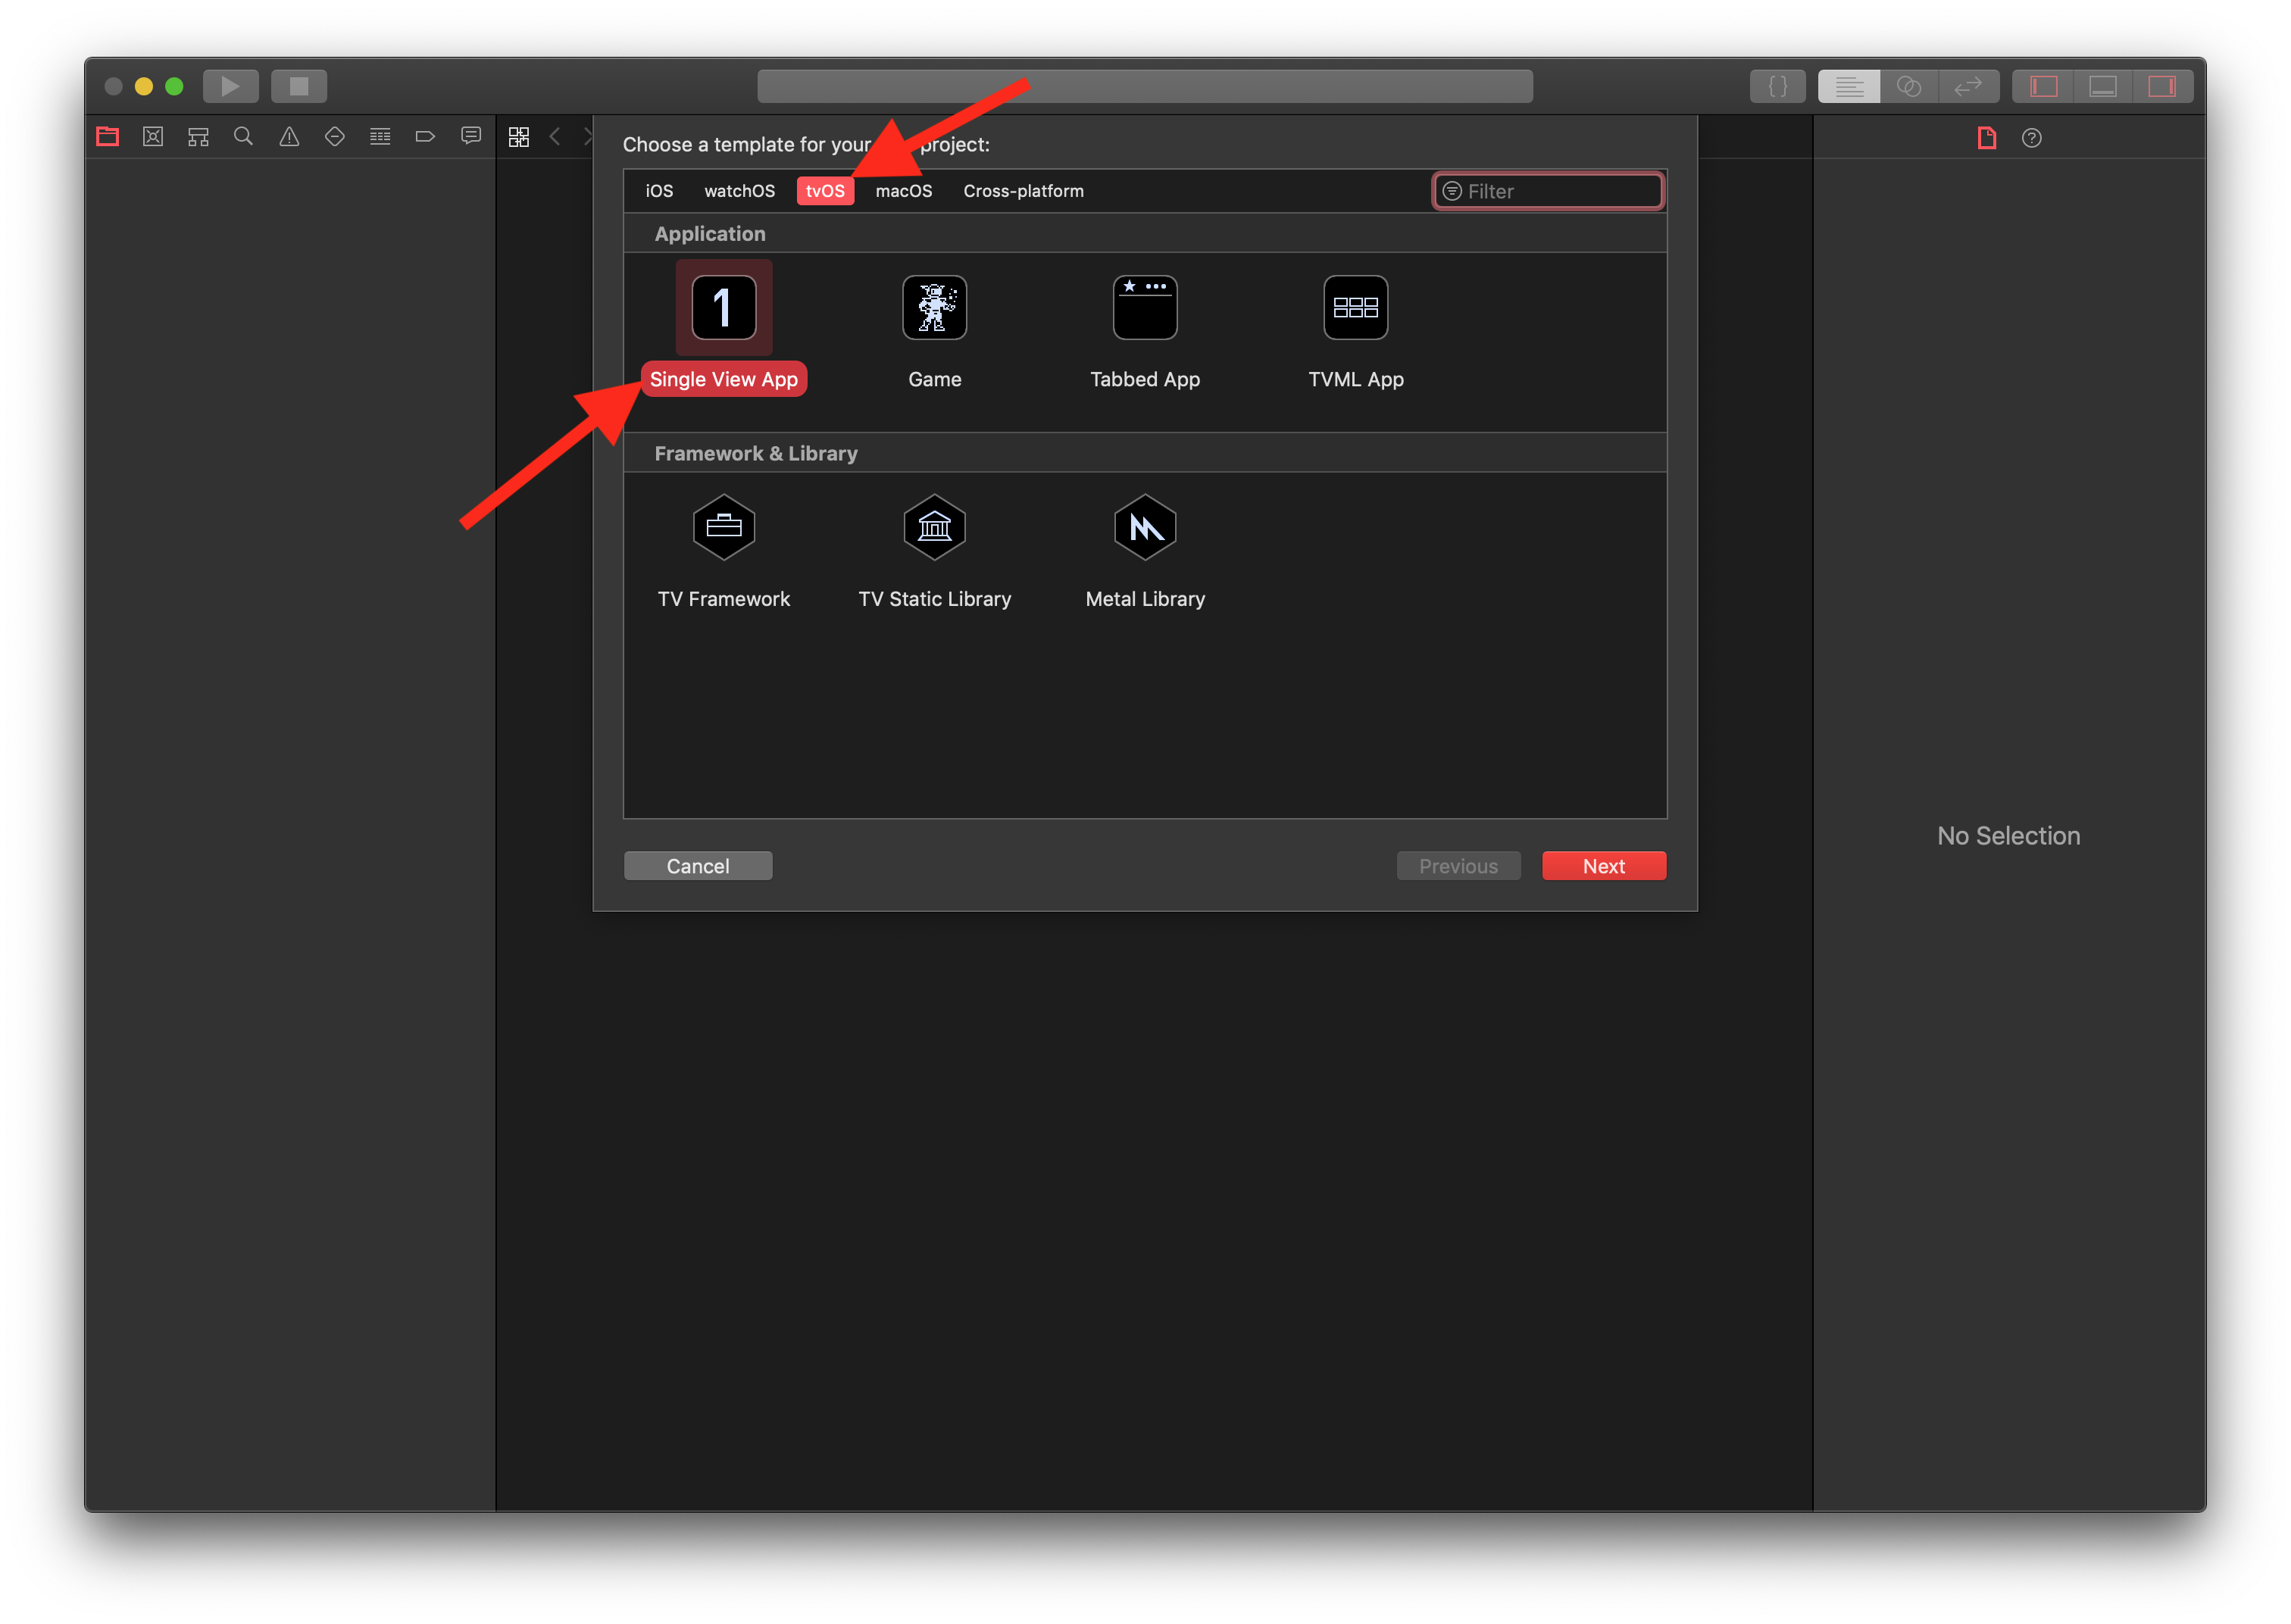
Step 2: Choose "tvOS" and "Single View App" then click on "Next".
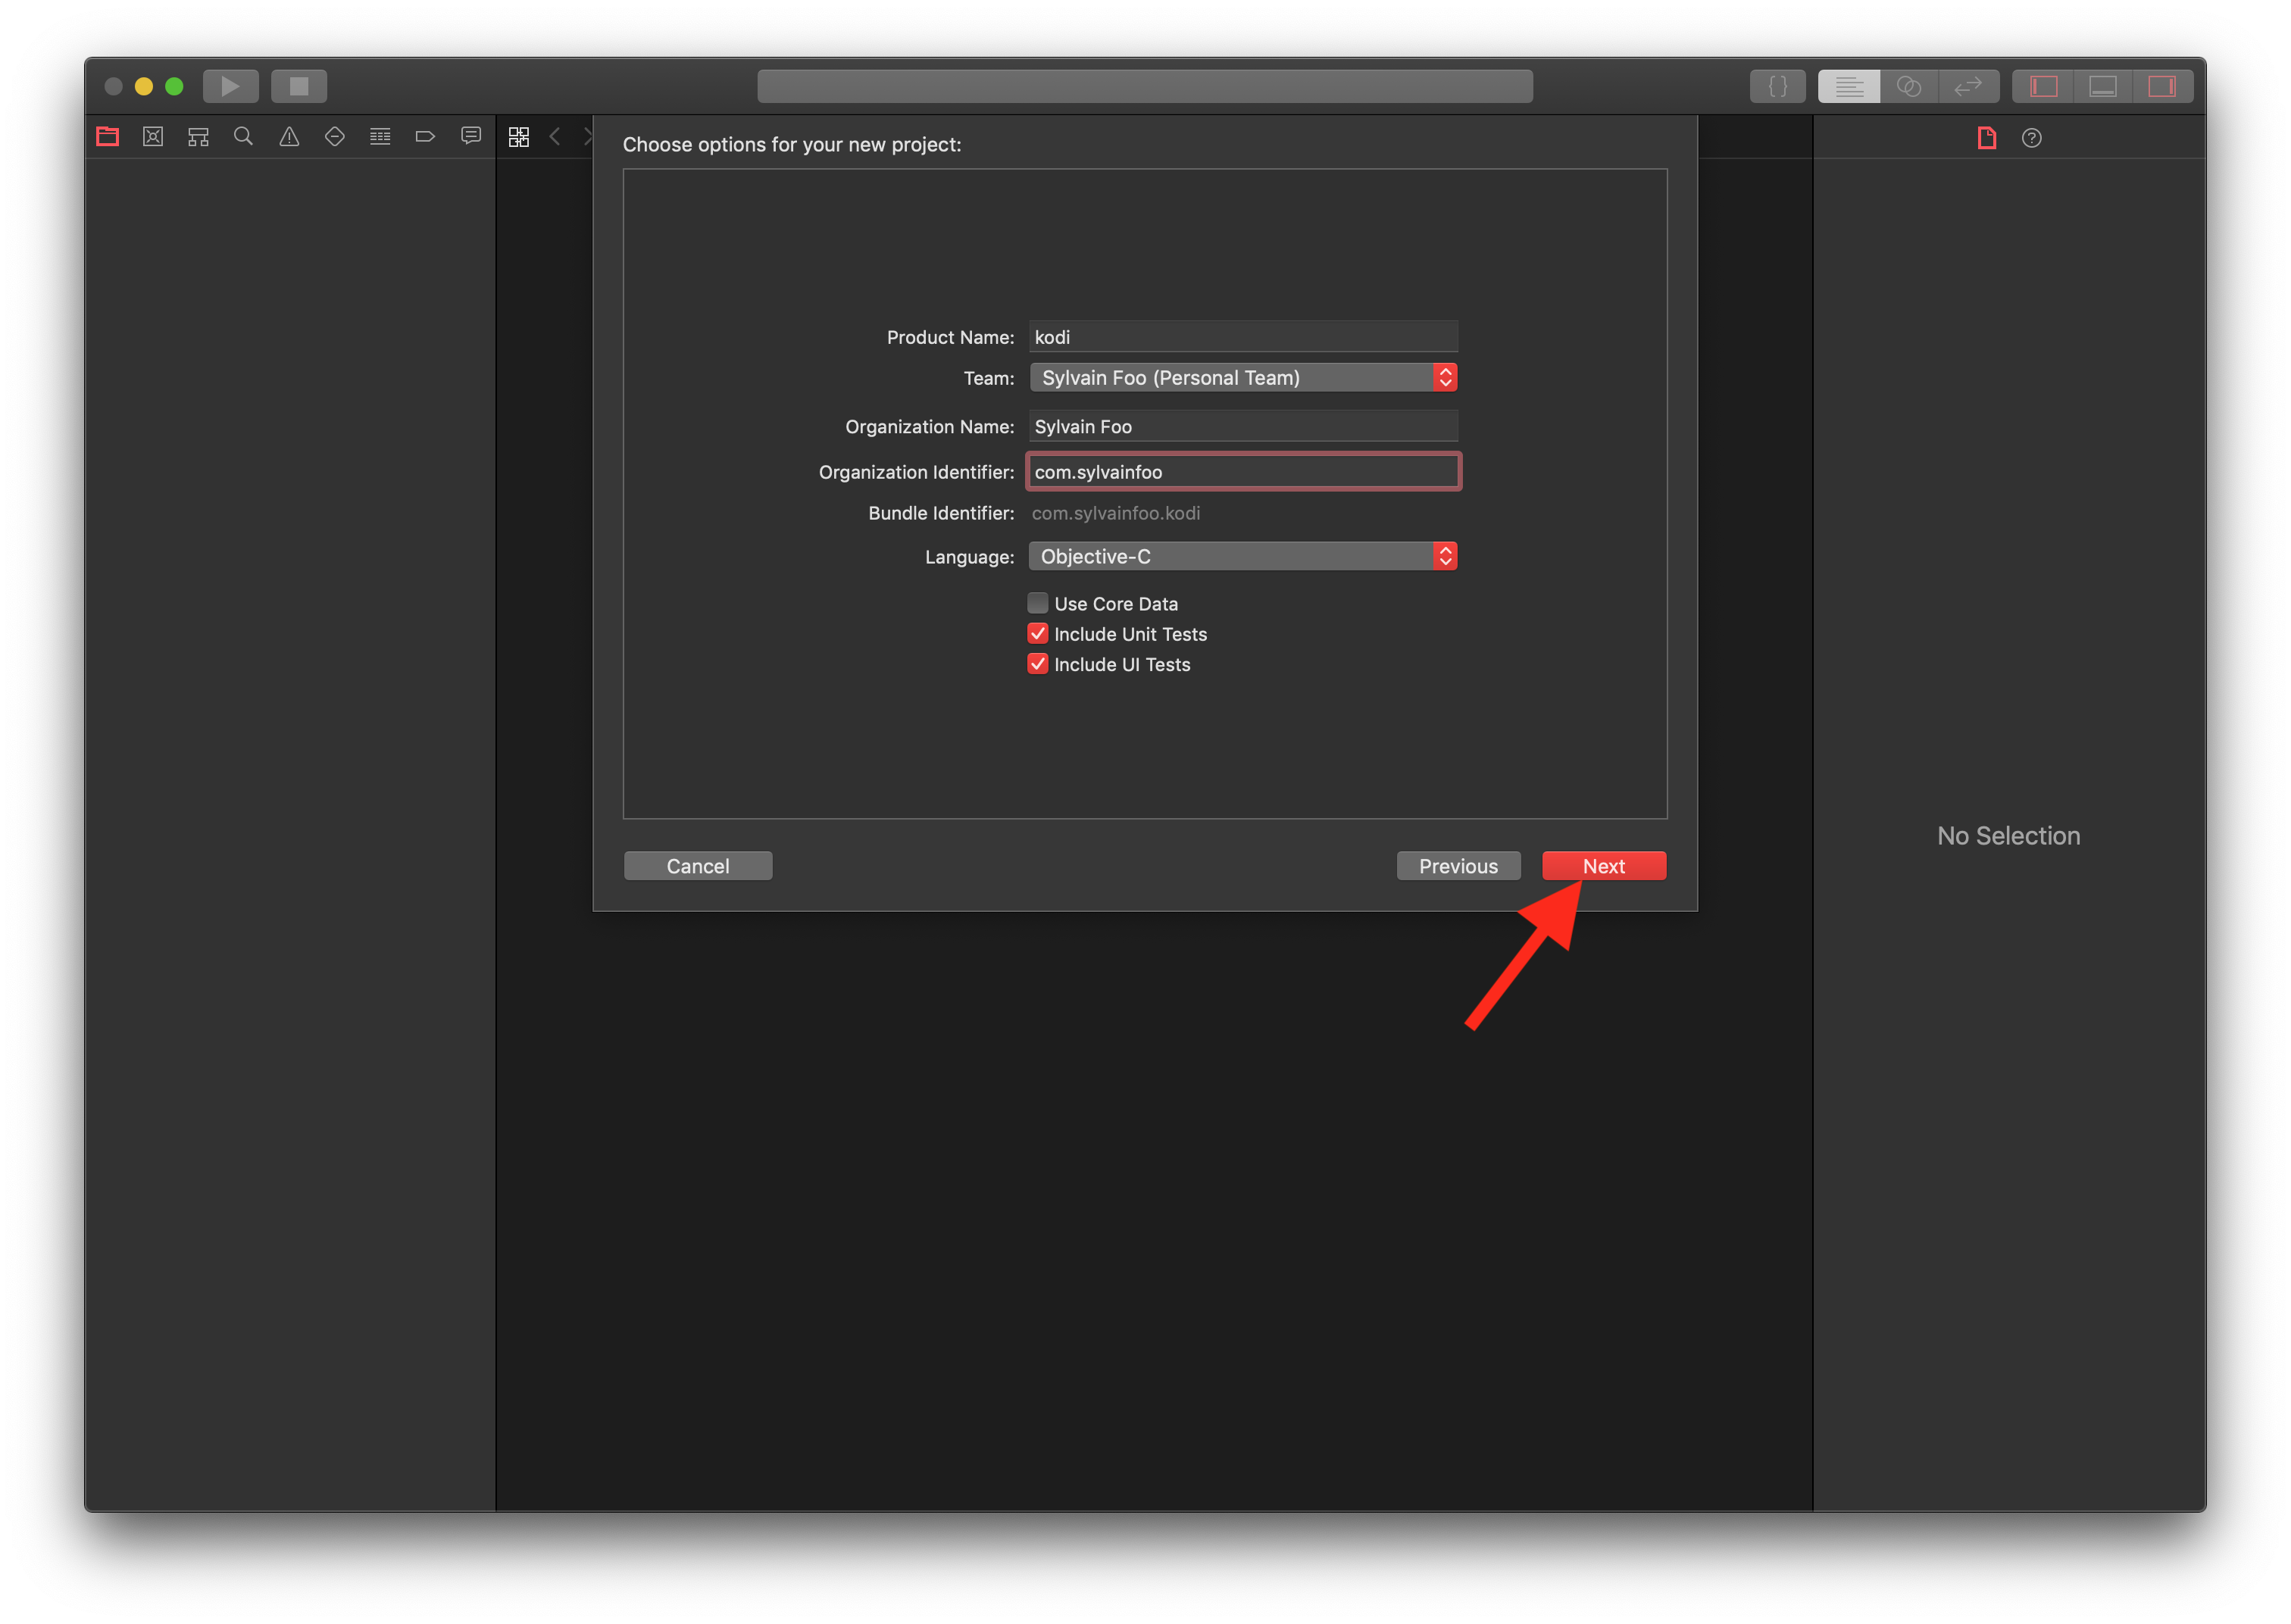
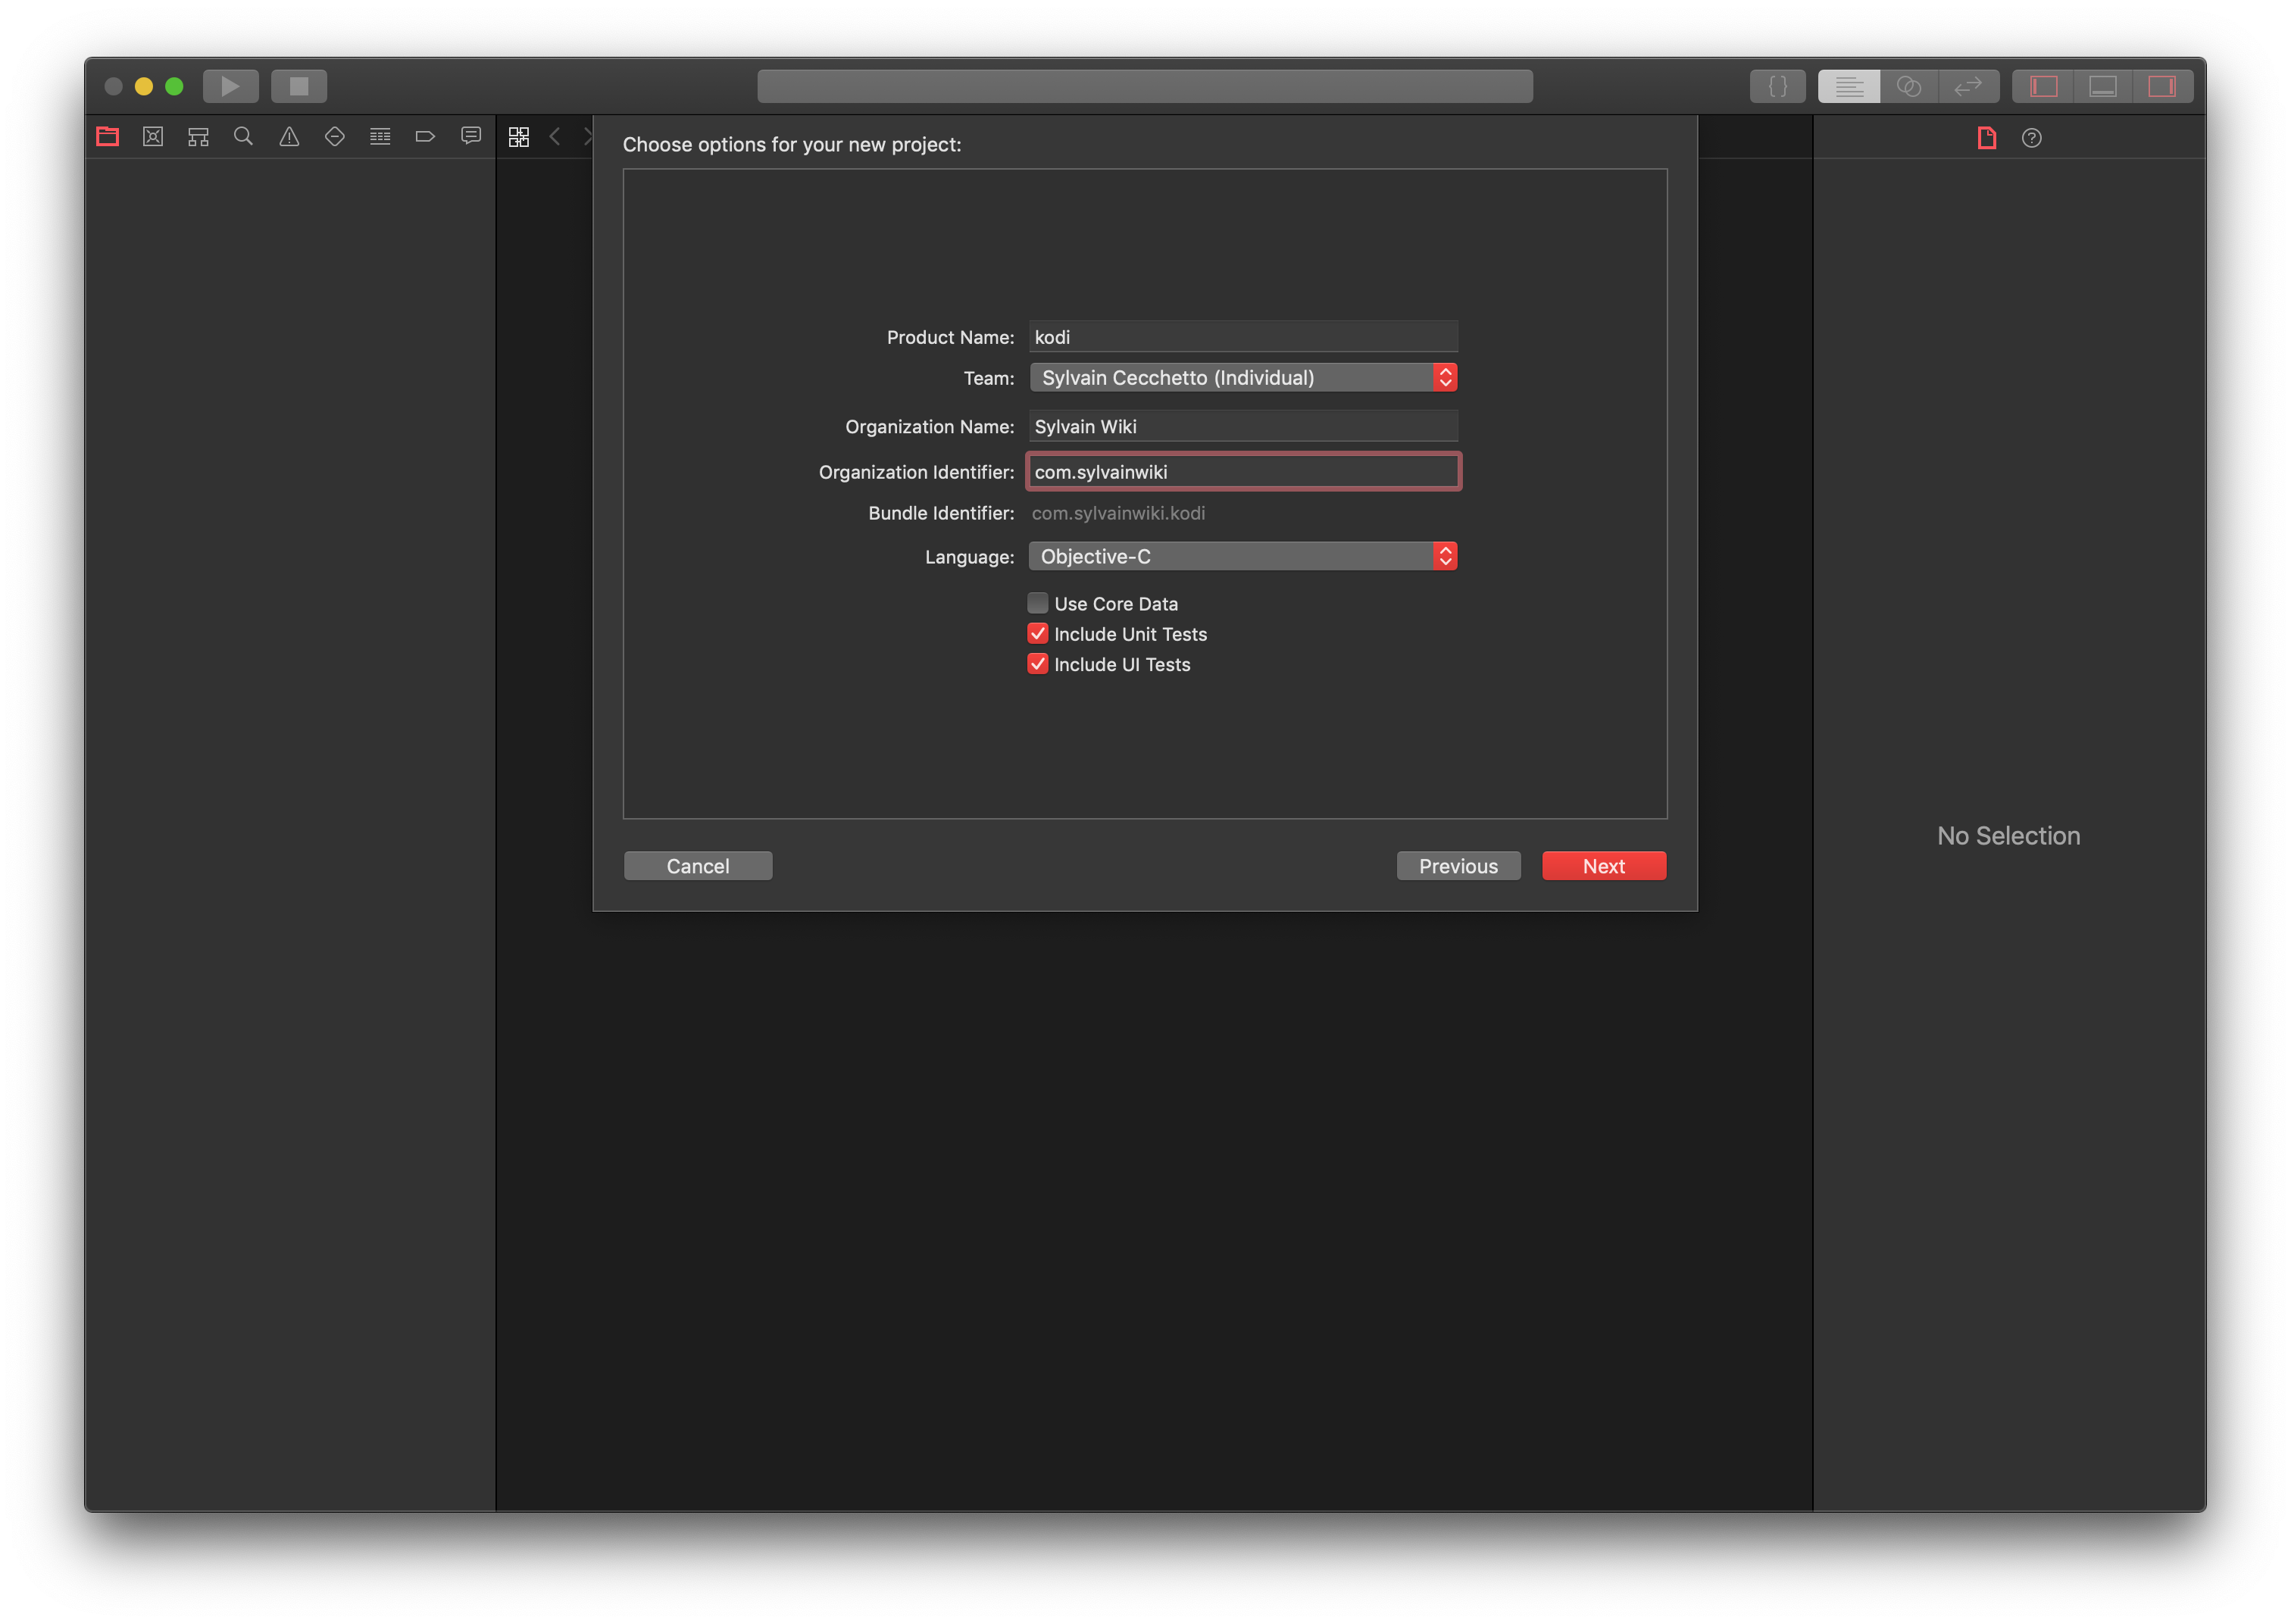
Step 3: Fill the "Product Name" with "kodi", choose your Apple account name for the team, choose your name for the "Organization Name" and "com.yourusername" (without any space) for your "Organization identifier". Then click on "Next".
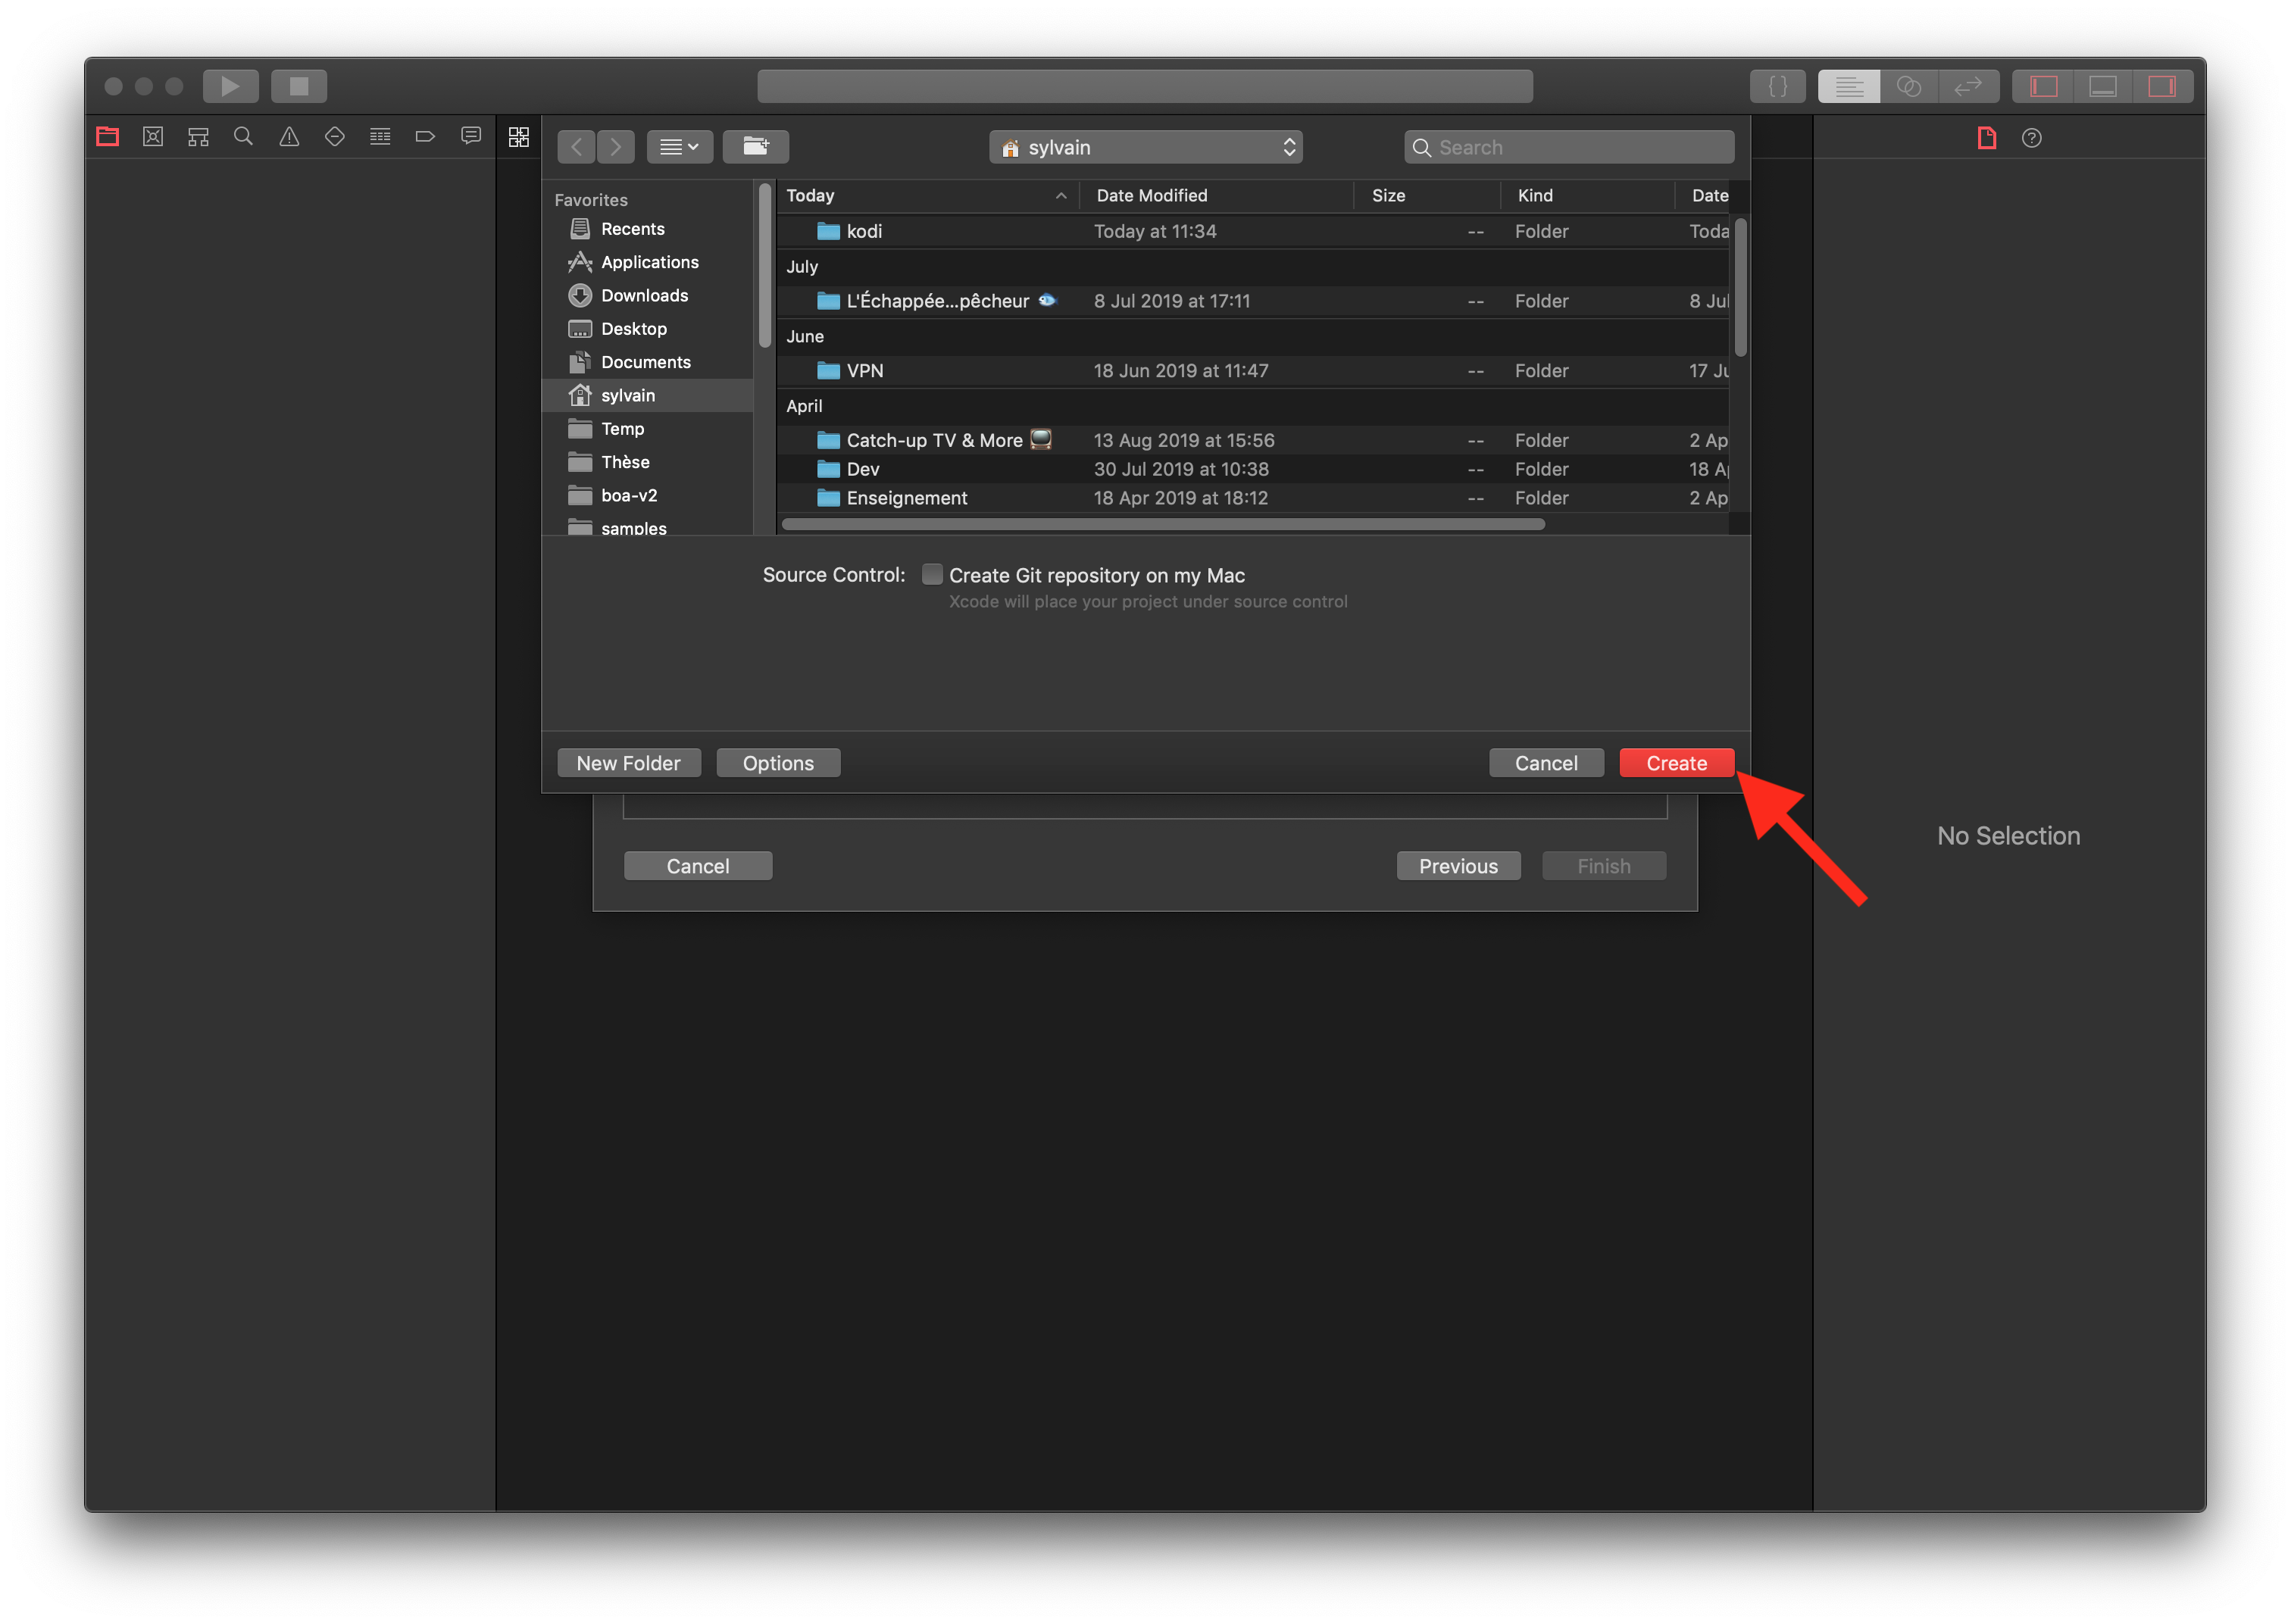
Step 4: Finally choose a location for the Xcode project then click on "Create".

Step 5: Your Xcode project is now alive, open the devices list by clicking on the target device on the top left.
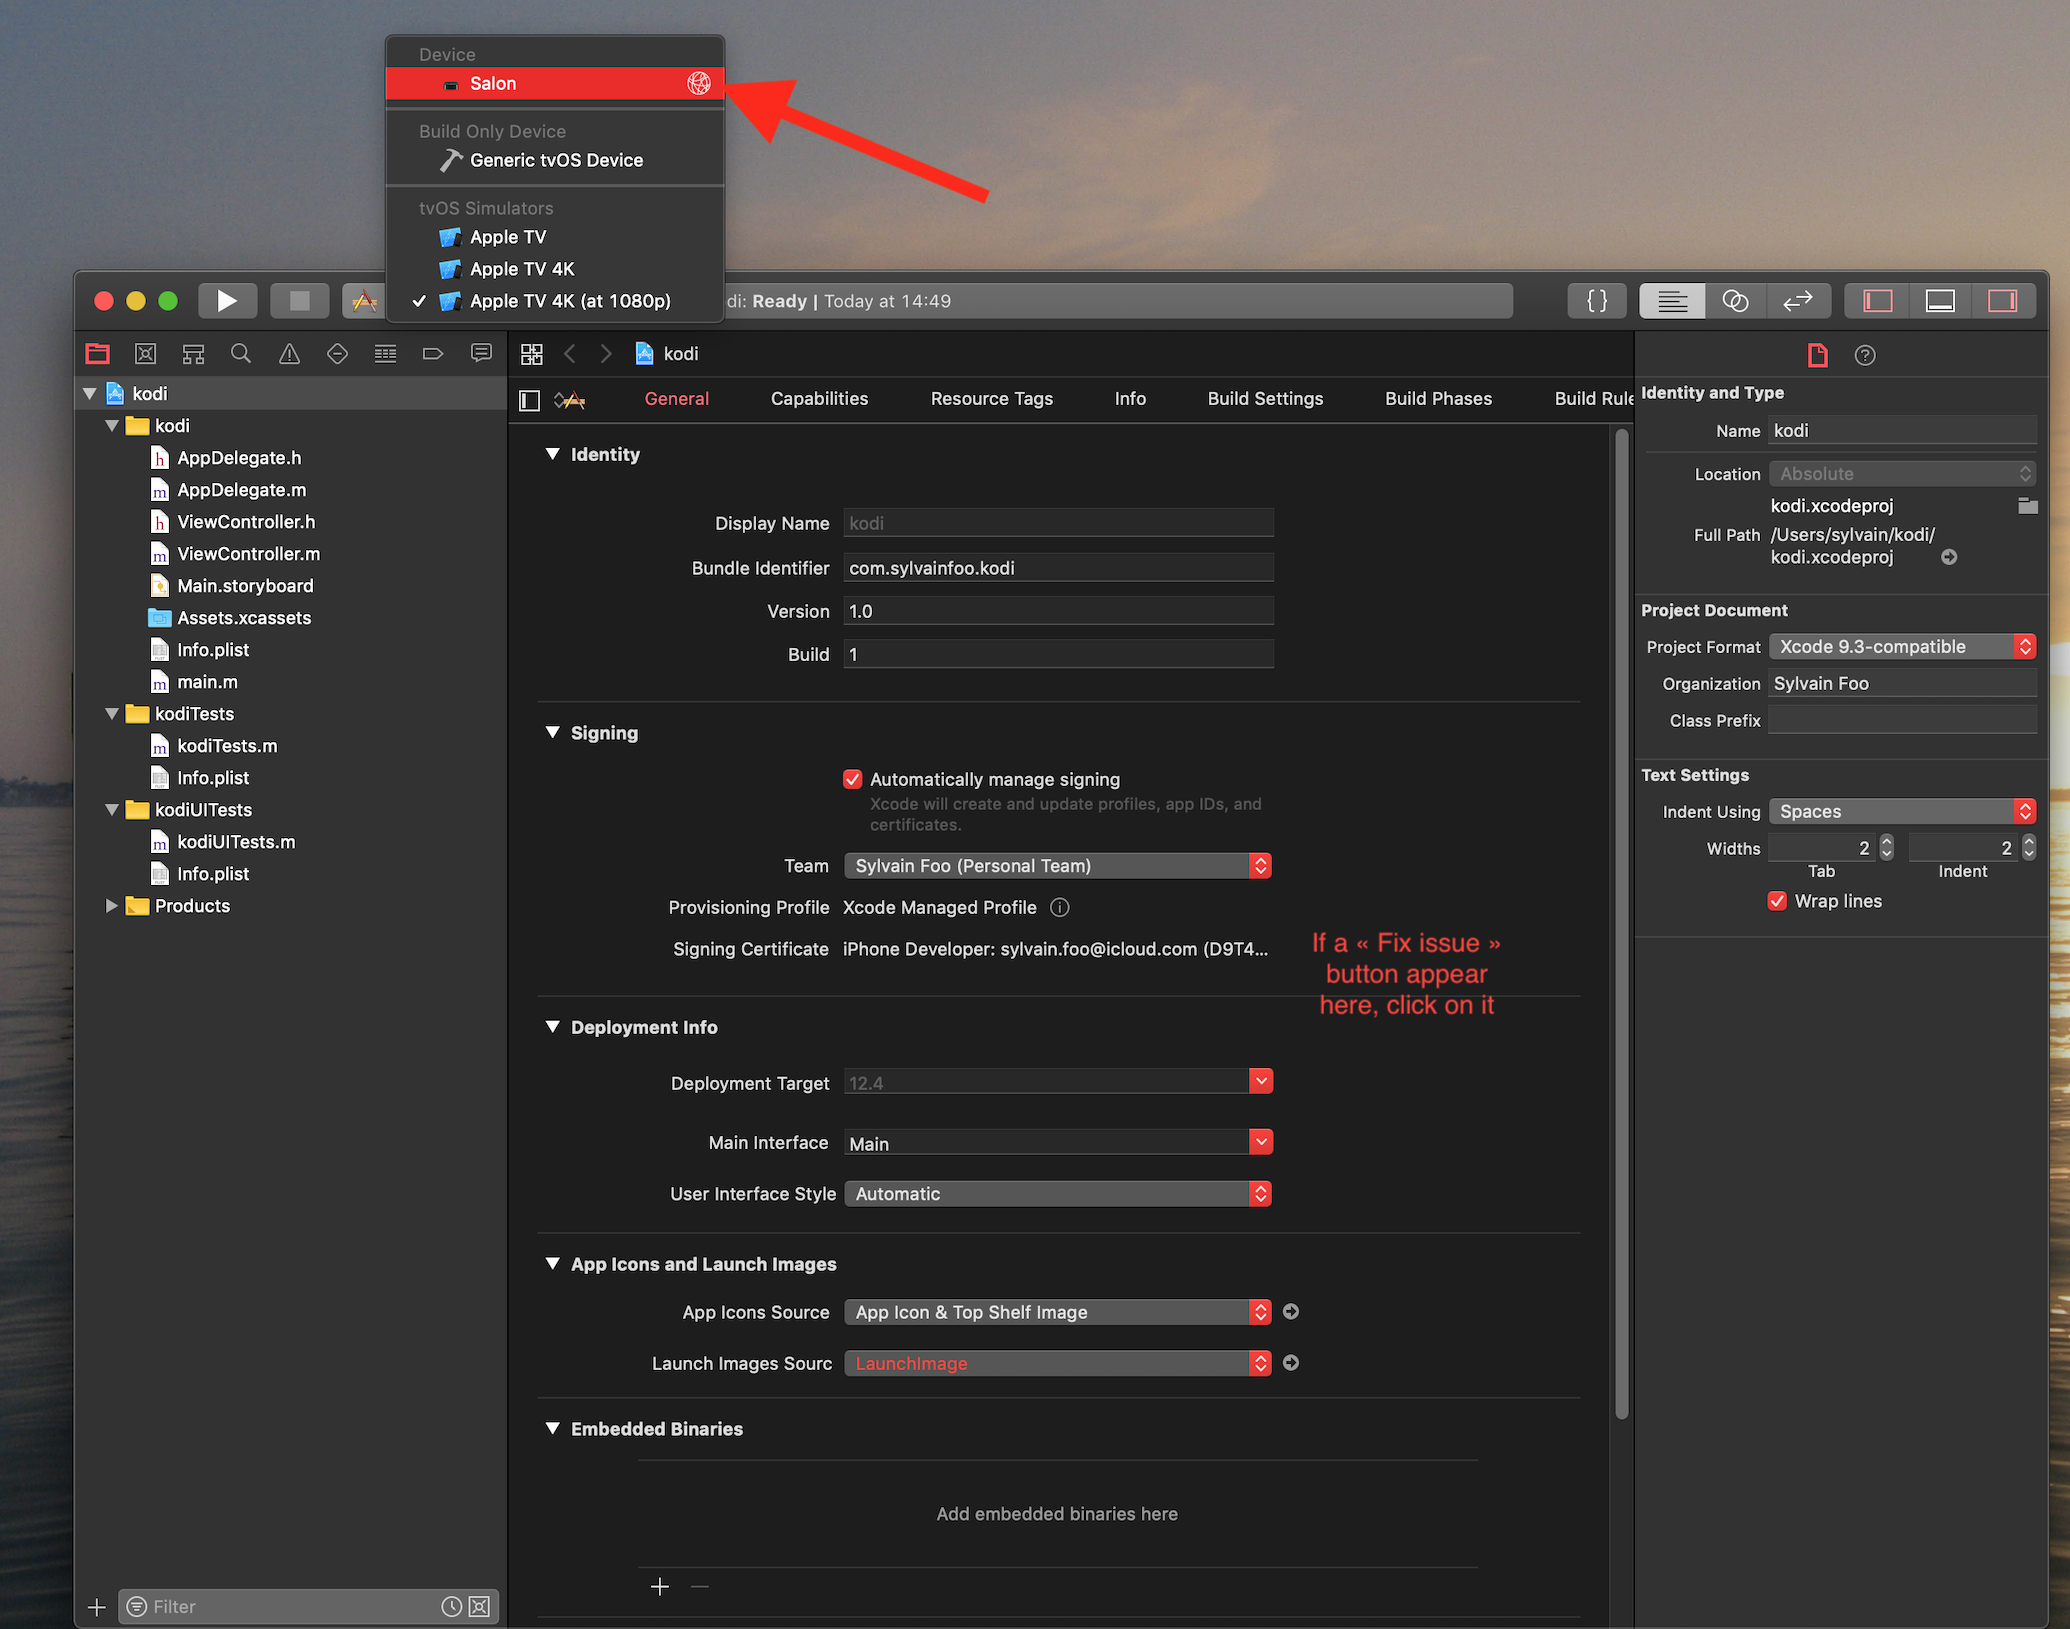
Step 6: Choose your your "real" connected Apple TV. Also, check for a "Fix issue" button on the signing panel, if this button is present click on it. Now you can close your Xcode window.
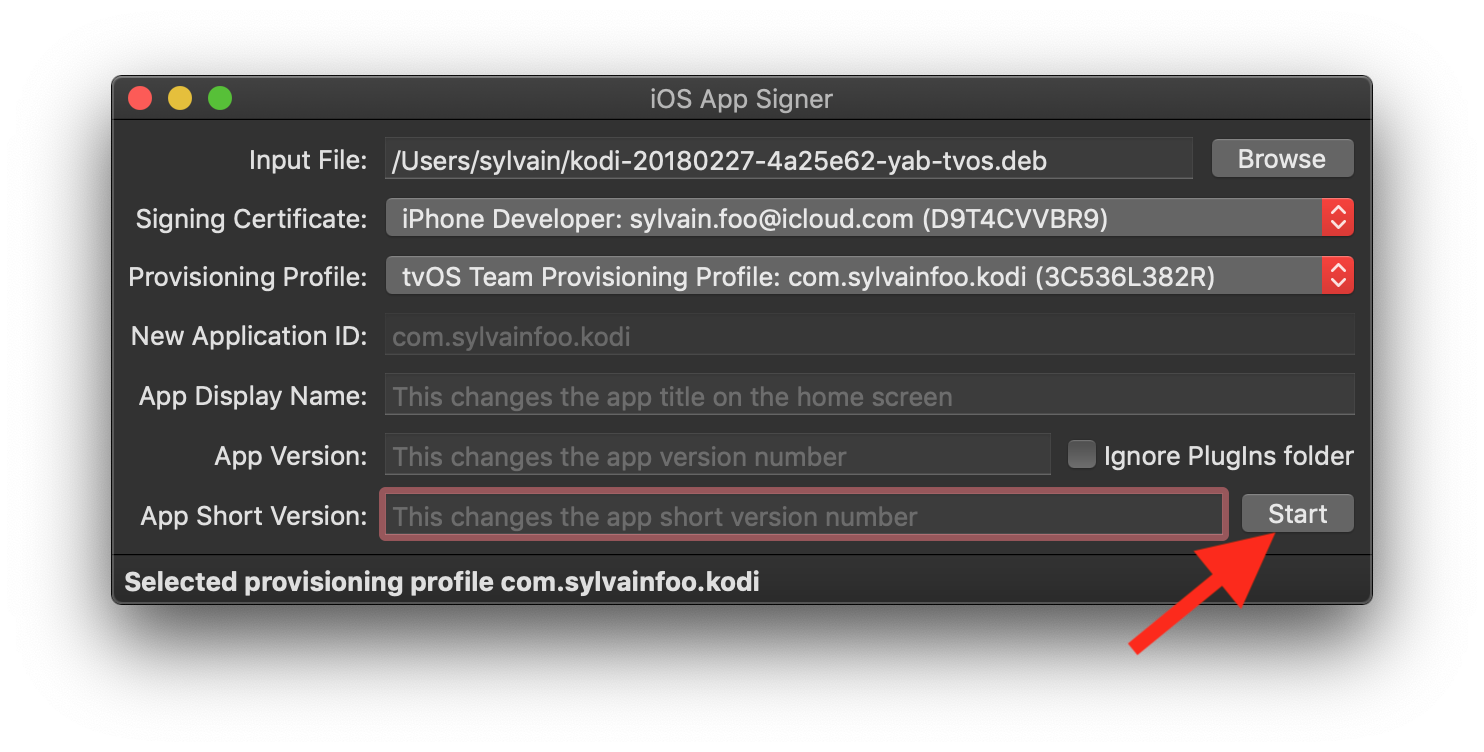
Step 7: Now open iOS App Signer, click on "Browse" and choose the Kodi DEB file, select the signing certificate corresponding to your Apple account, select the provisioning profile corresponding to the organization identifier that you have previously chosen, then click on "Start".
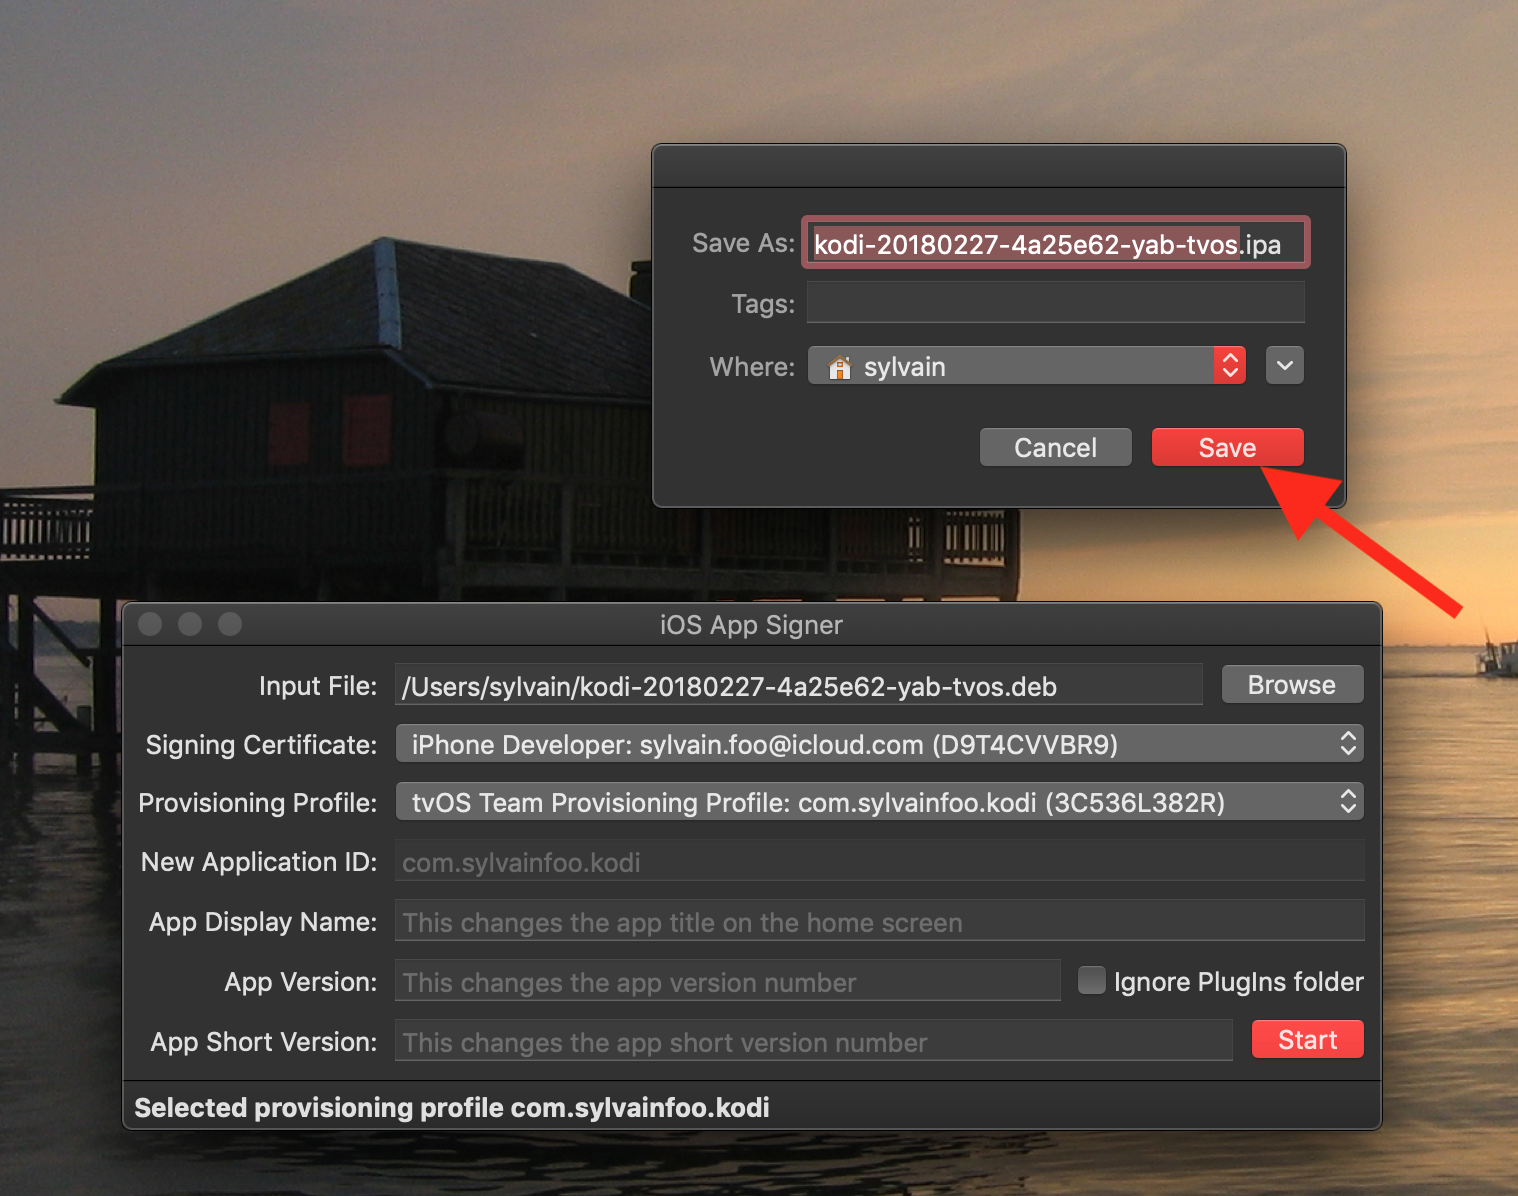
Step 8: Click on "Save" and wait until the Kodi IPA file appears in the same folder as the DEB file.


(option B) PAID Apple dev account with TopShelf
During the step-by-step guide below you will need to extract the .deb file, to do that you can use an extractor app like The Unarchiver.
Step 1: Open Xcode and click on "Create a new Xcode project".
Step 2: Choose "tvOS" and "Single View App" then click on "Next".
Step 3: Fill the "Product Name" with "kodi", choose your Apple account name for the team, choose your name for the "Organization Name" and "com.yourusername" (without any space) for your "Organization identifier". Then click on "Next".

Step 4: Finally choose a location for the Xcode project then click on "Create".
Step 5: Your Xcode project is now alive, open the devices list by clicking on the target device on the top left.

Step 6: Choose your your "real" connected Apple TV. Also, check for a "Fix issue" button on the signing panel, if this button is present click on it. Now you can close your Xcode window.
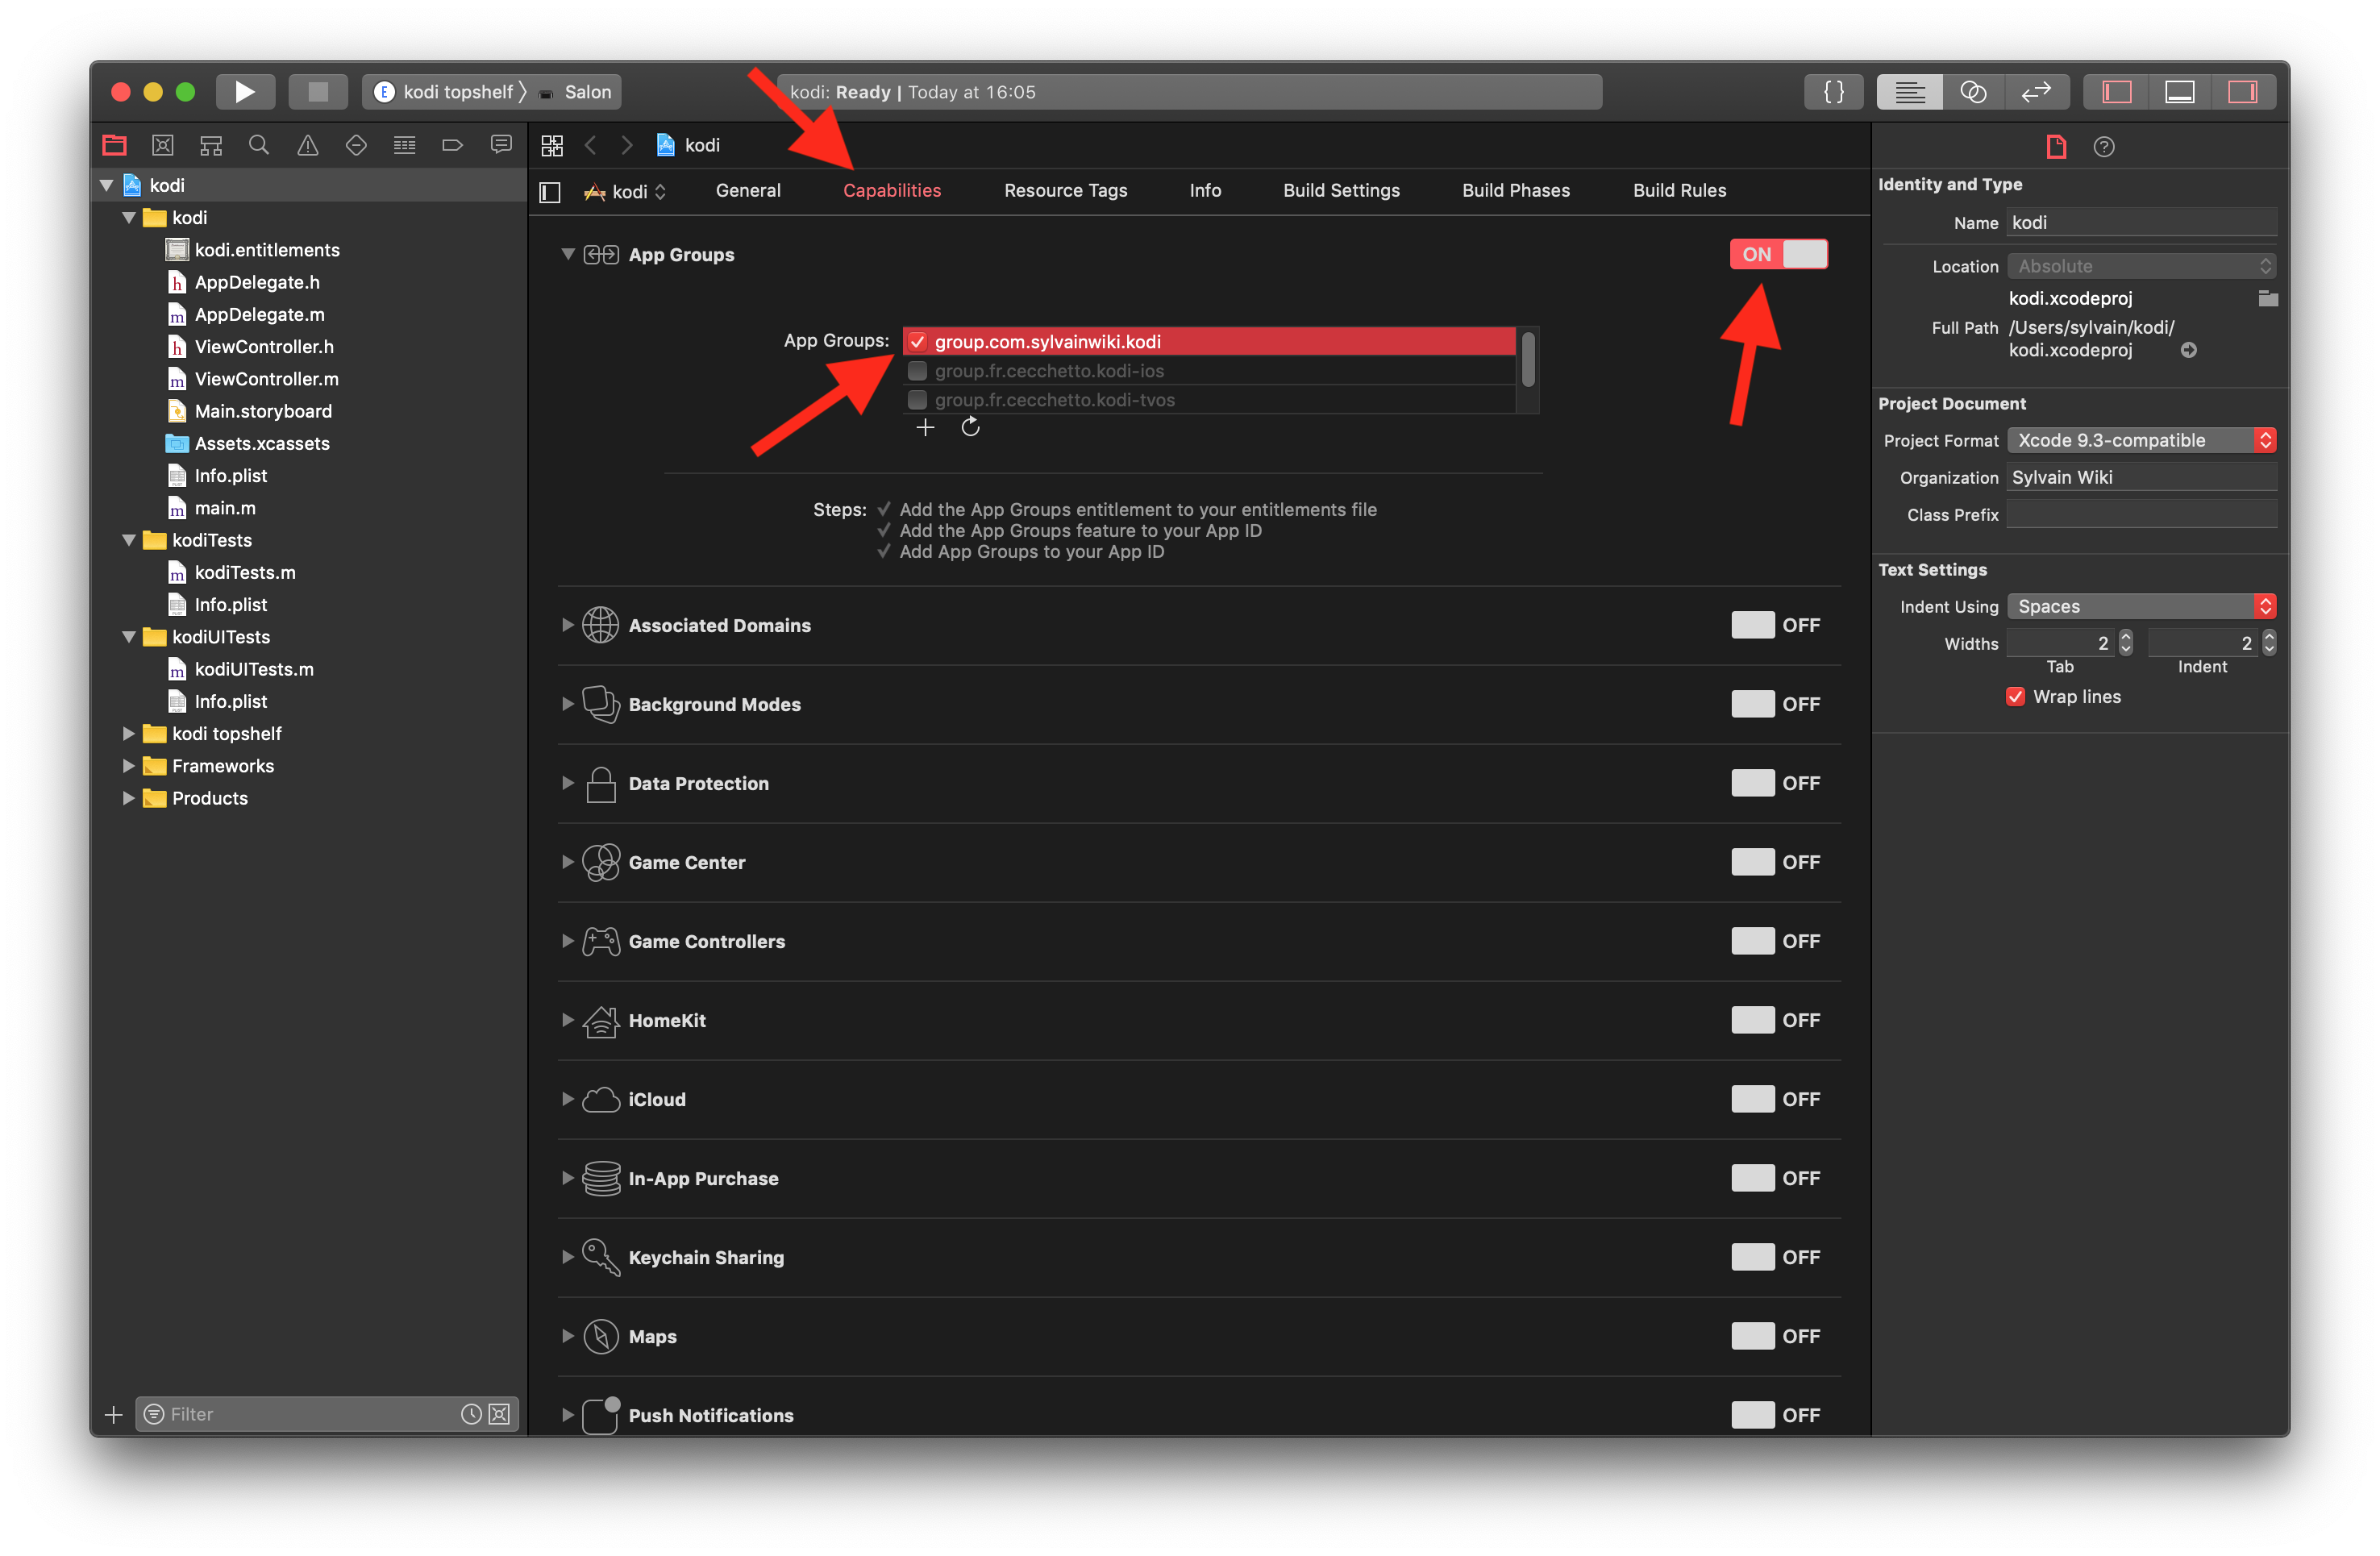
Step 7: Click on "Capabilities", then enable "App Groups", click on the "+" button and create a new group group.com.yourusername.kodi, and finally enable this group.
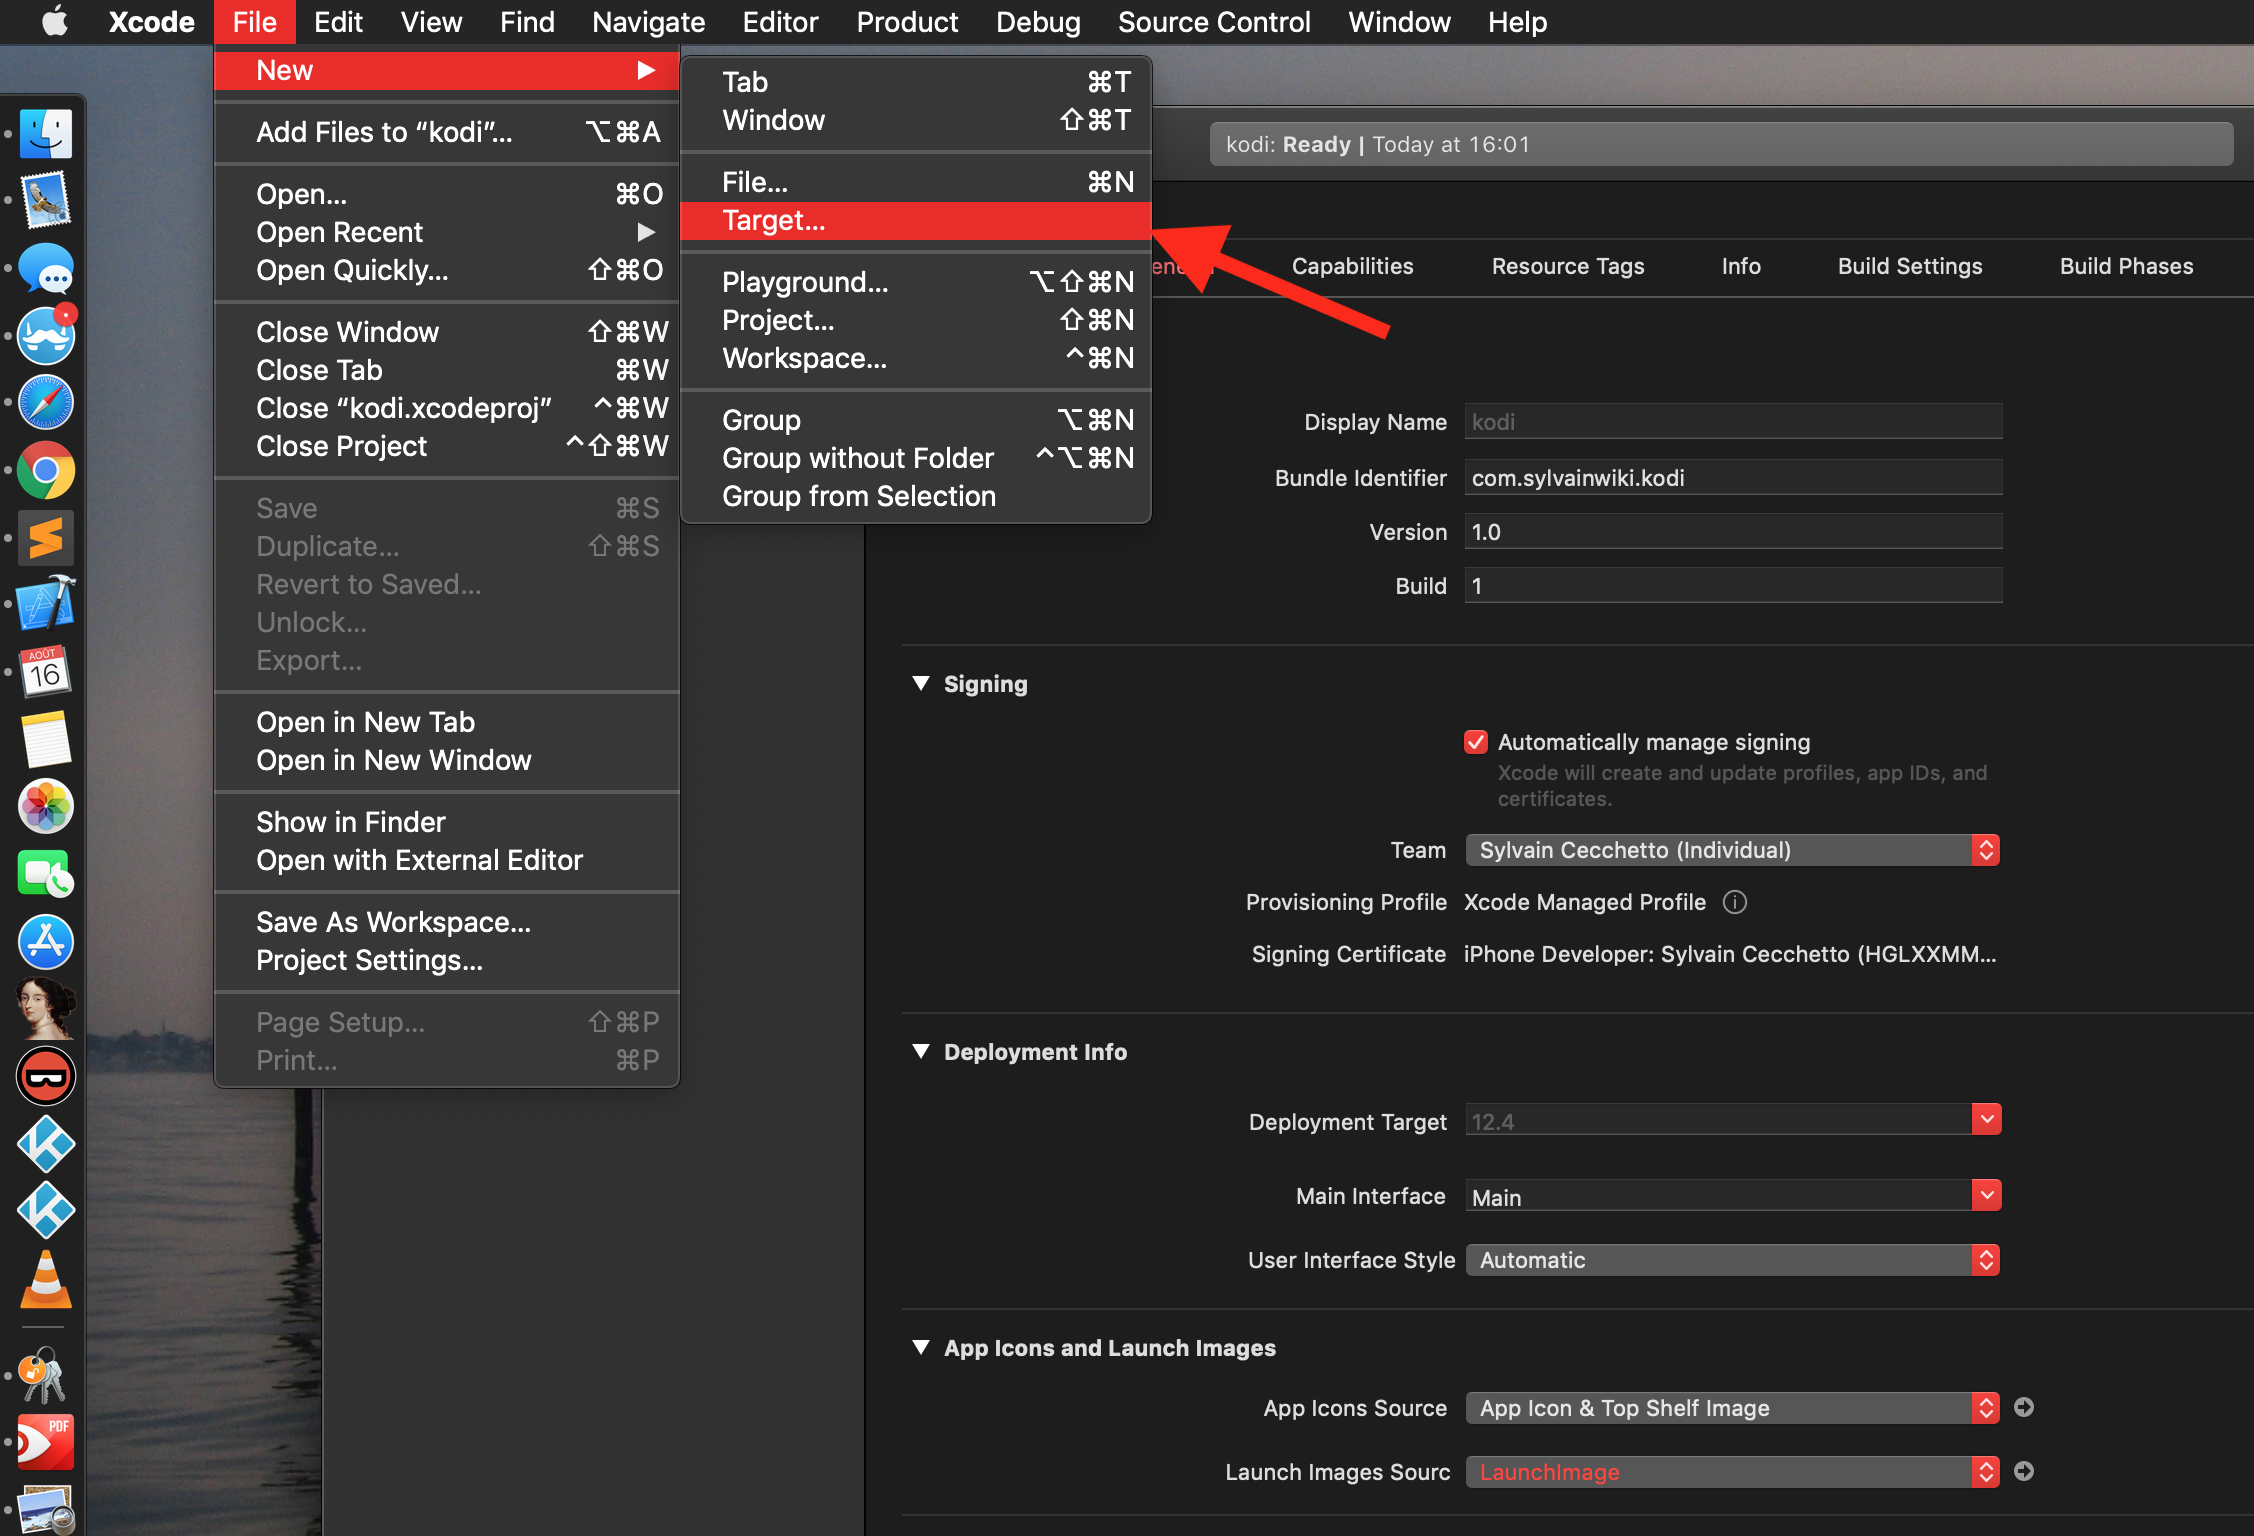
Step 8: Click on "File" --> "New" --> "Target.."
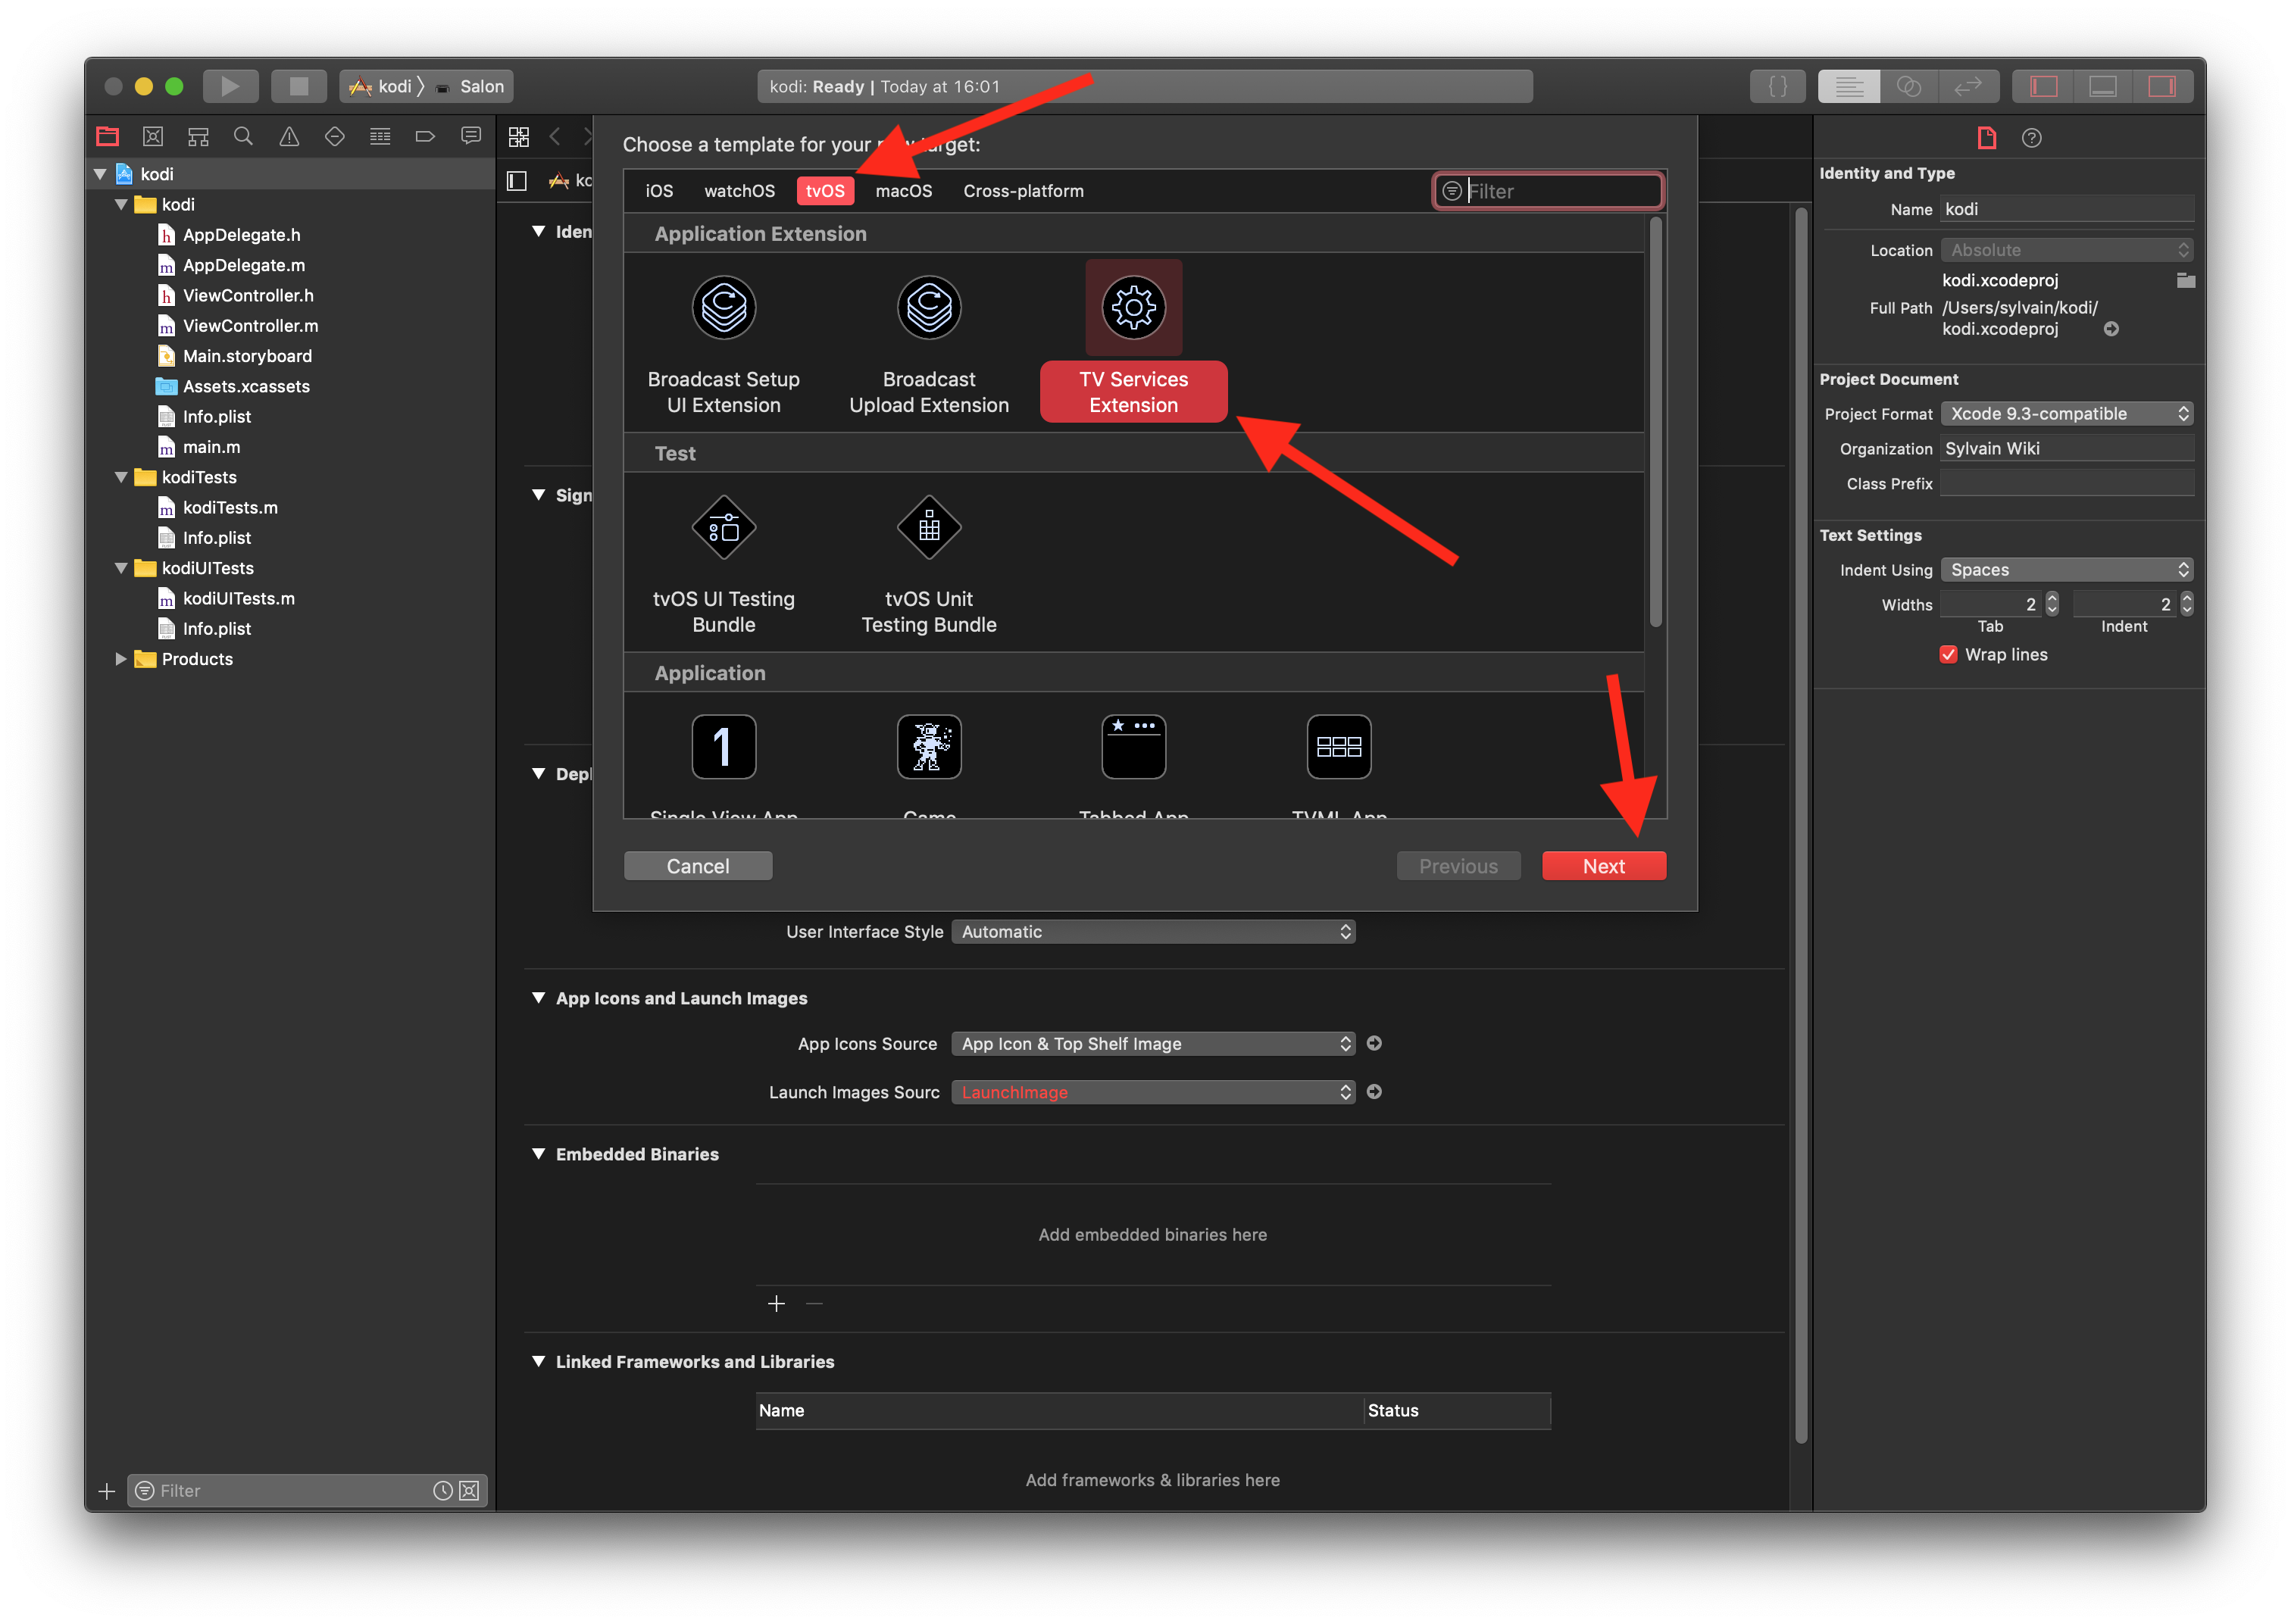
Step 9: Choose "tvOS", "TV Services Extension" then click on "Next".
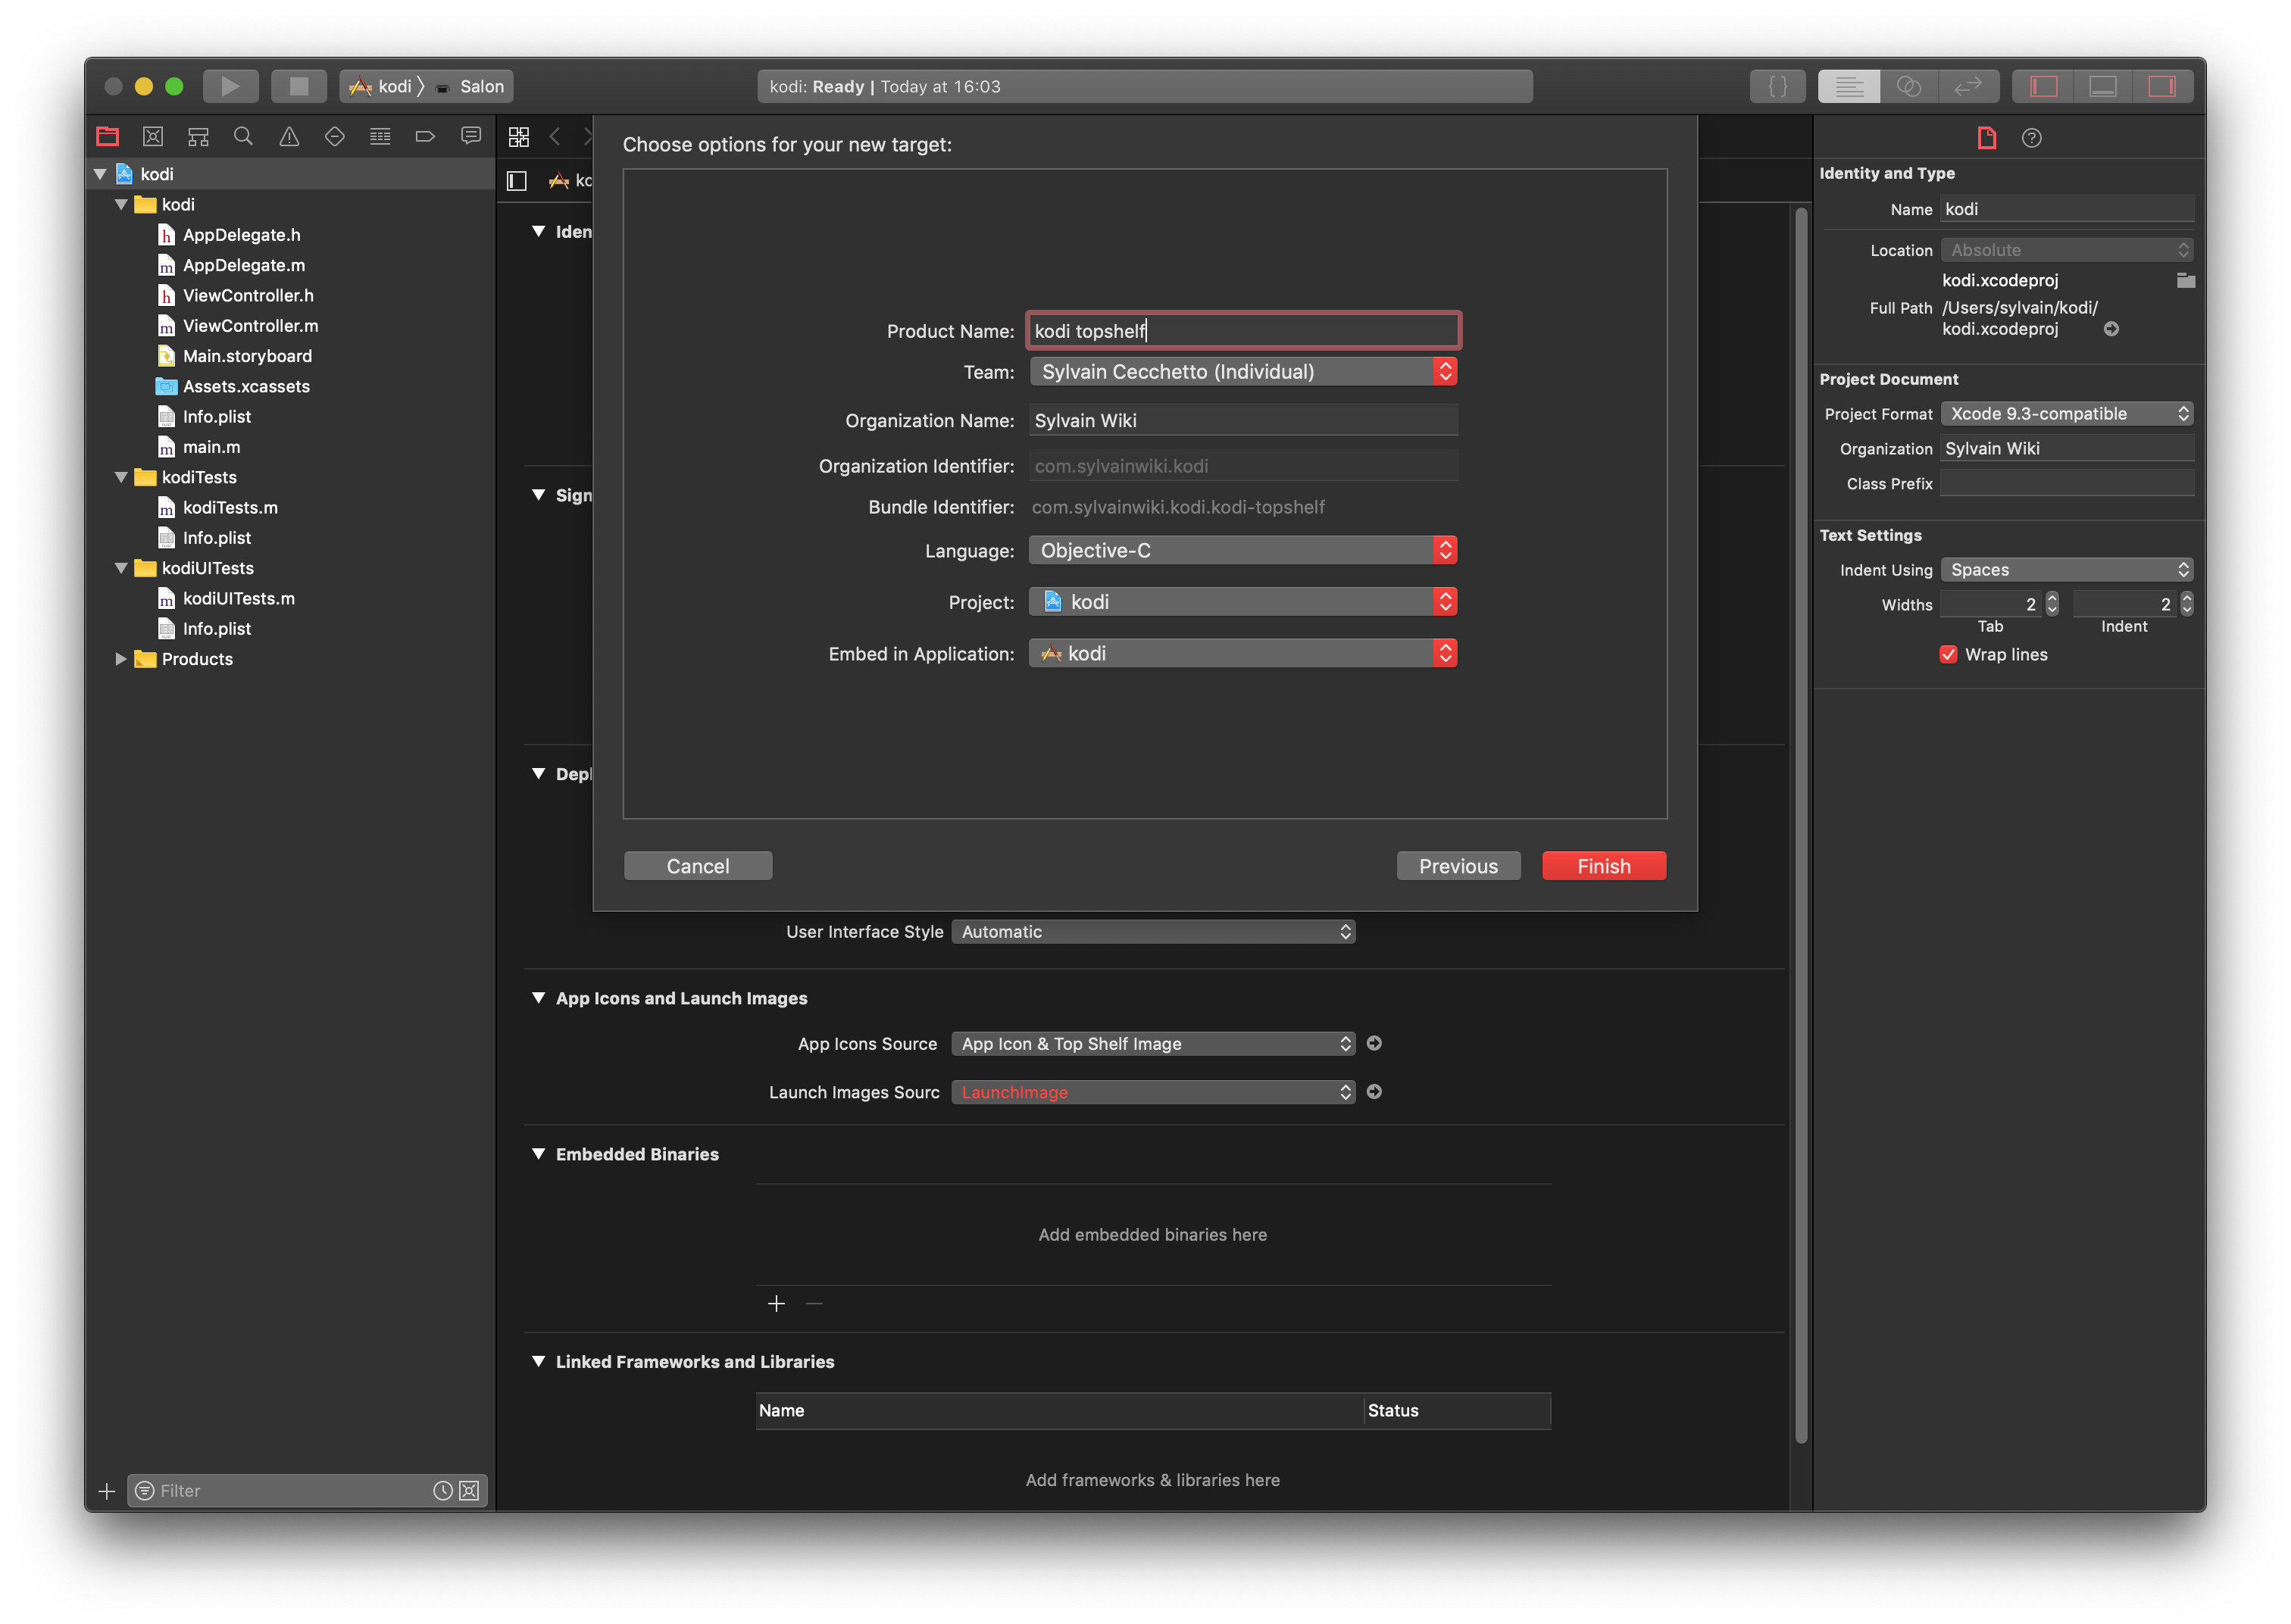
Step 10: Fill the "Product Name" with "kodi topshelf", choose your Apple account name for the team and choose your name for the "Organization Name", then click on "Finish".
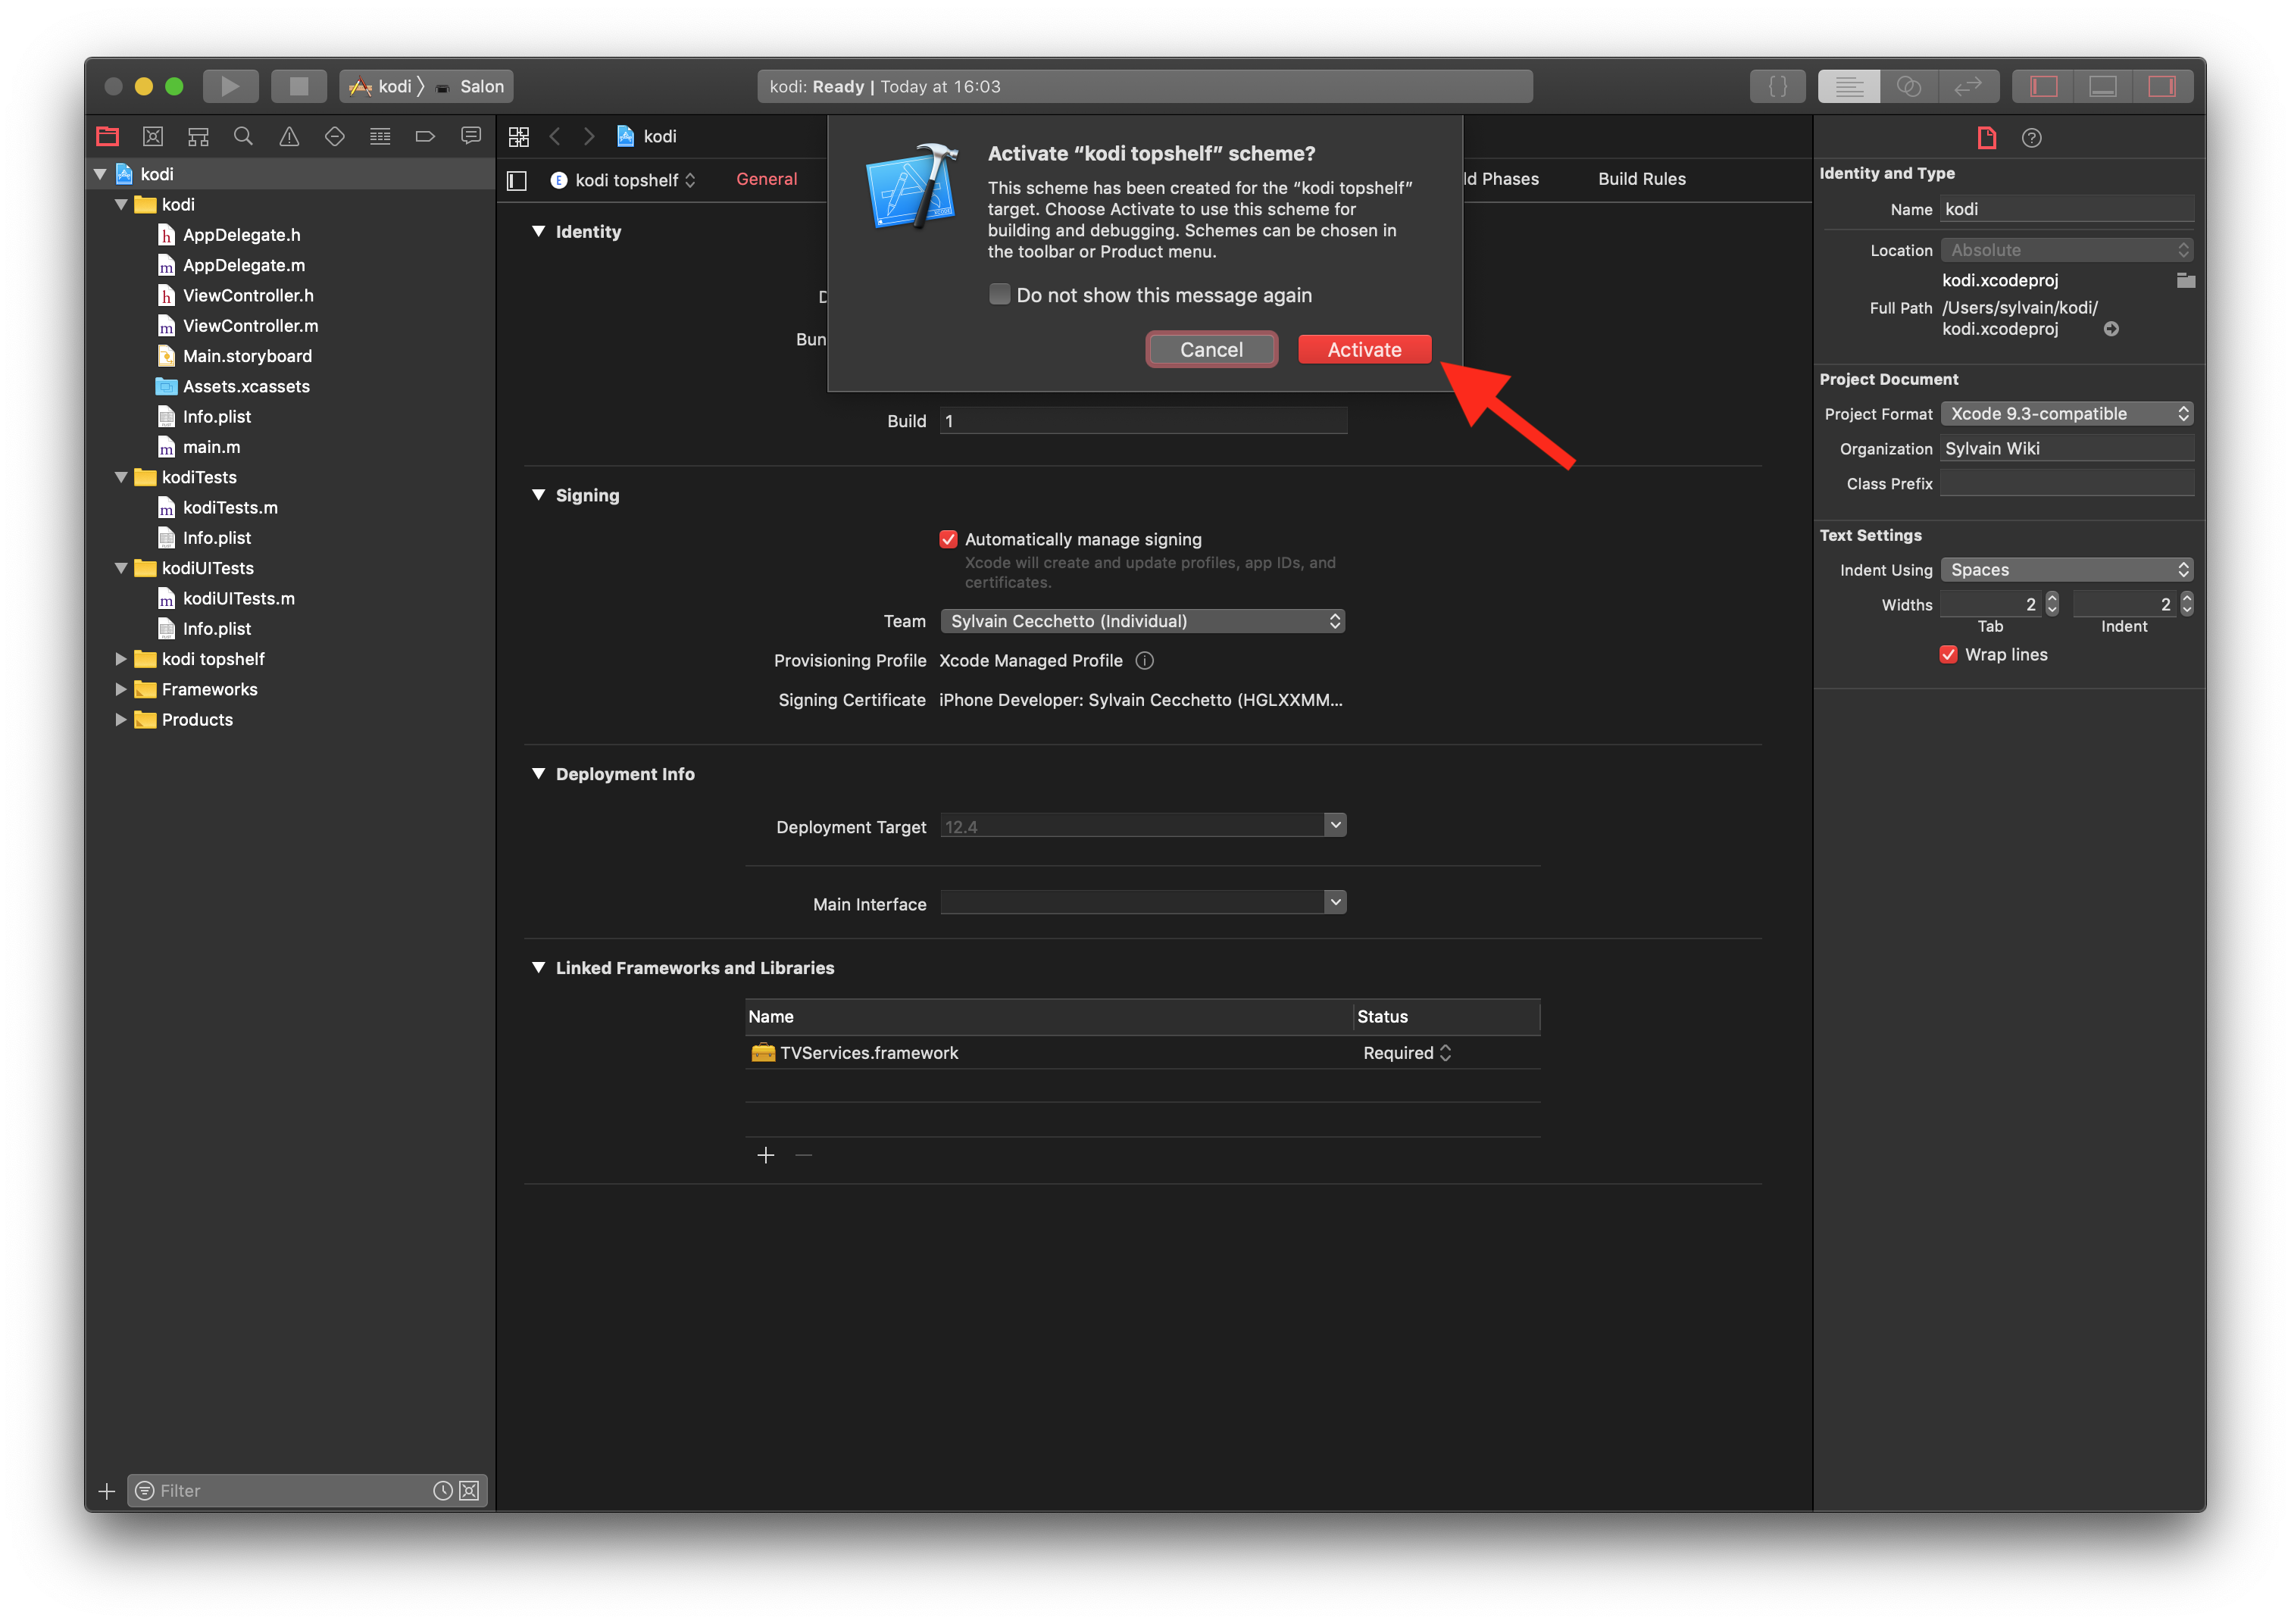
Step 11: Click on "Activate".
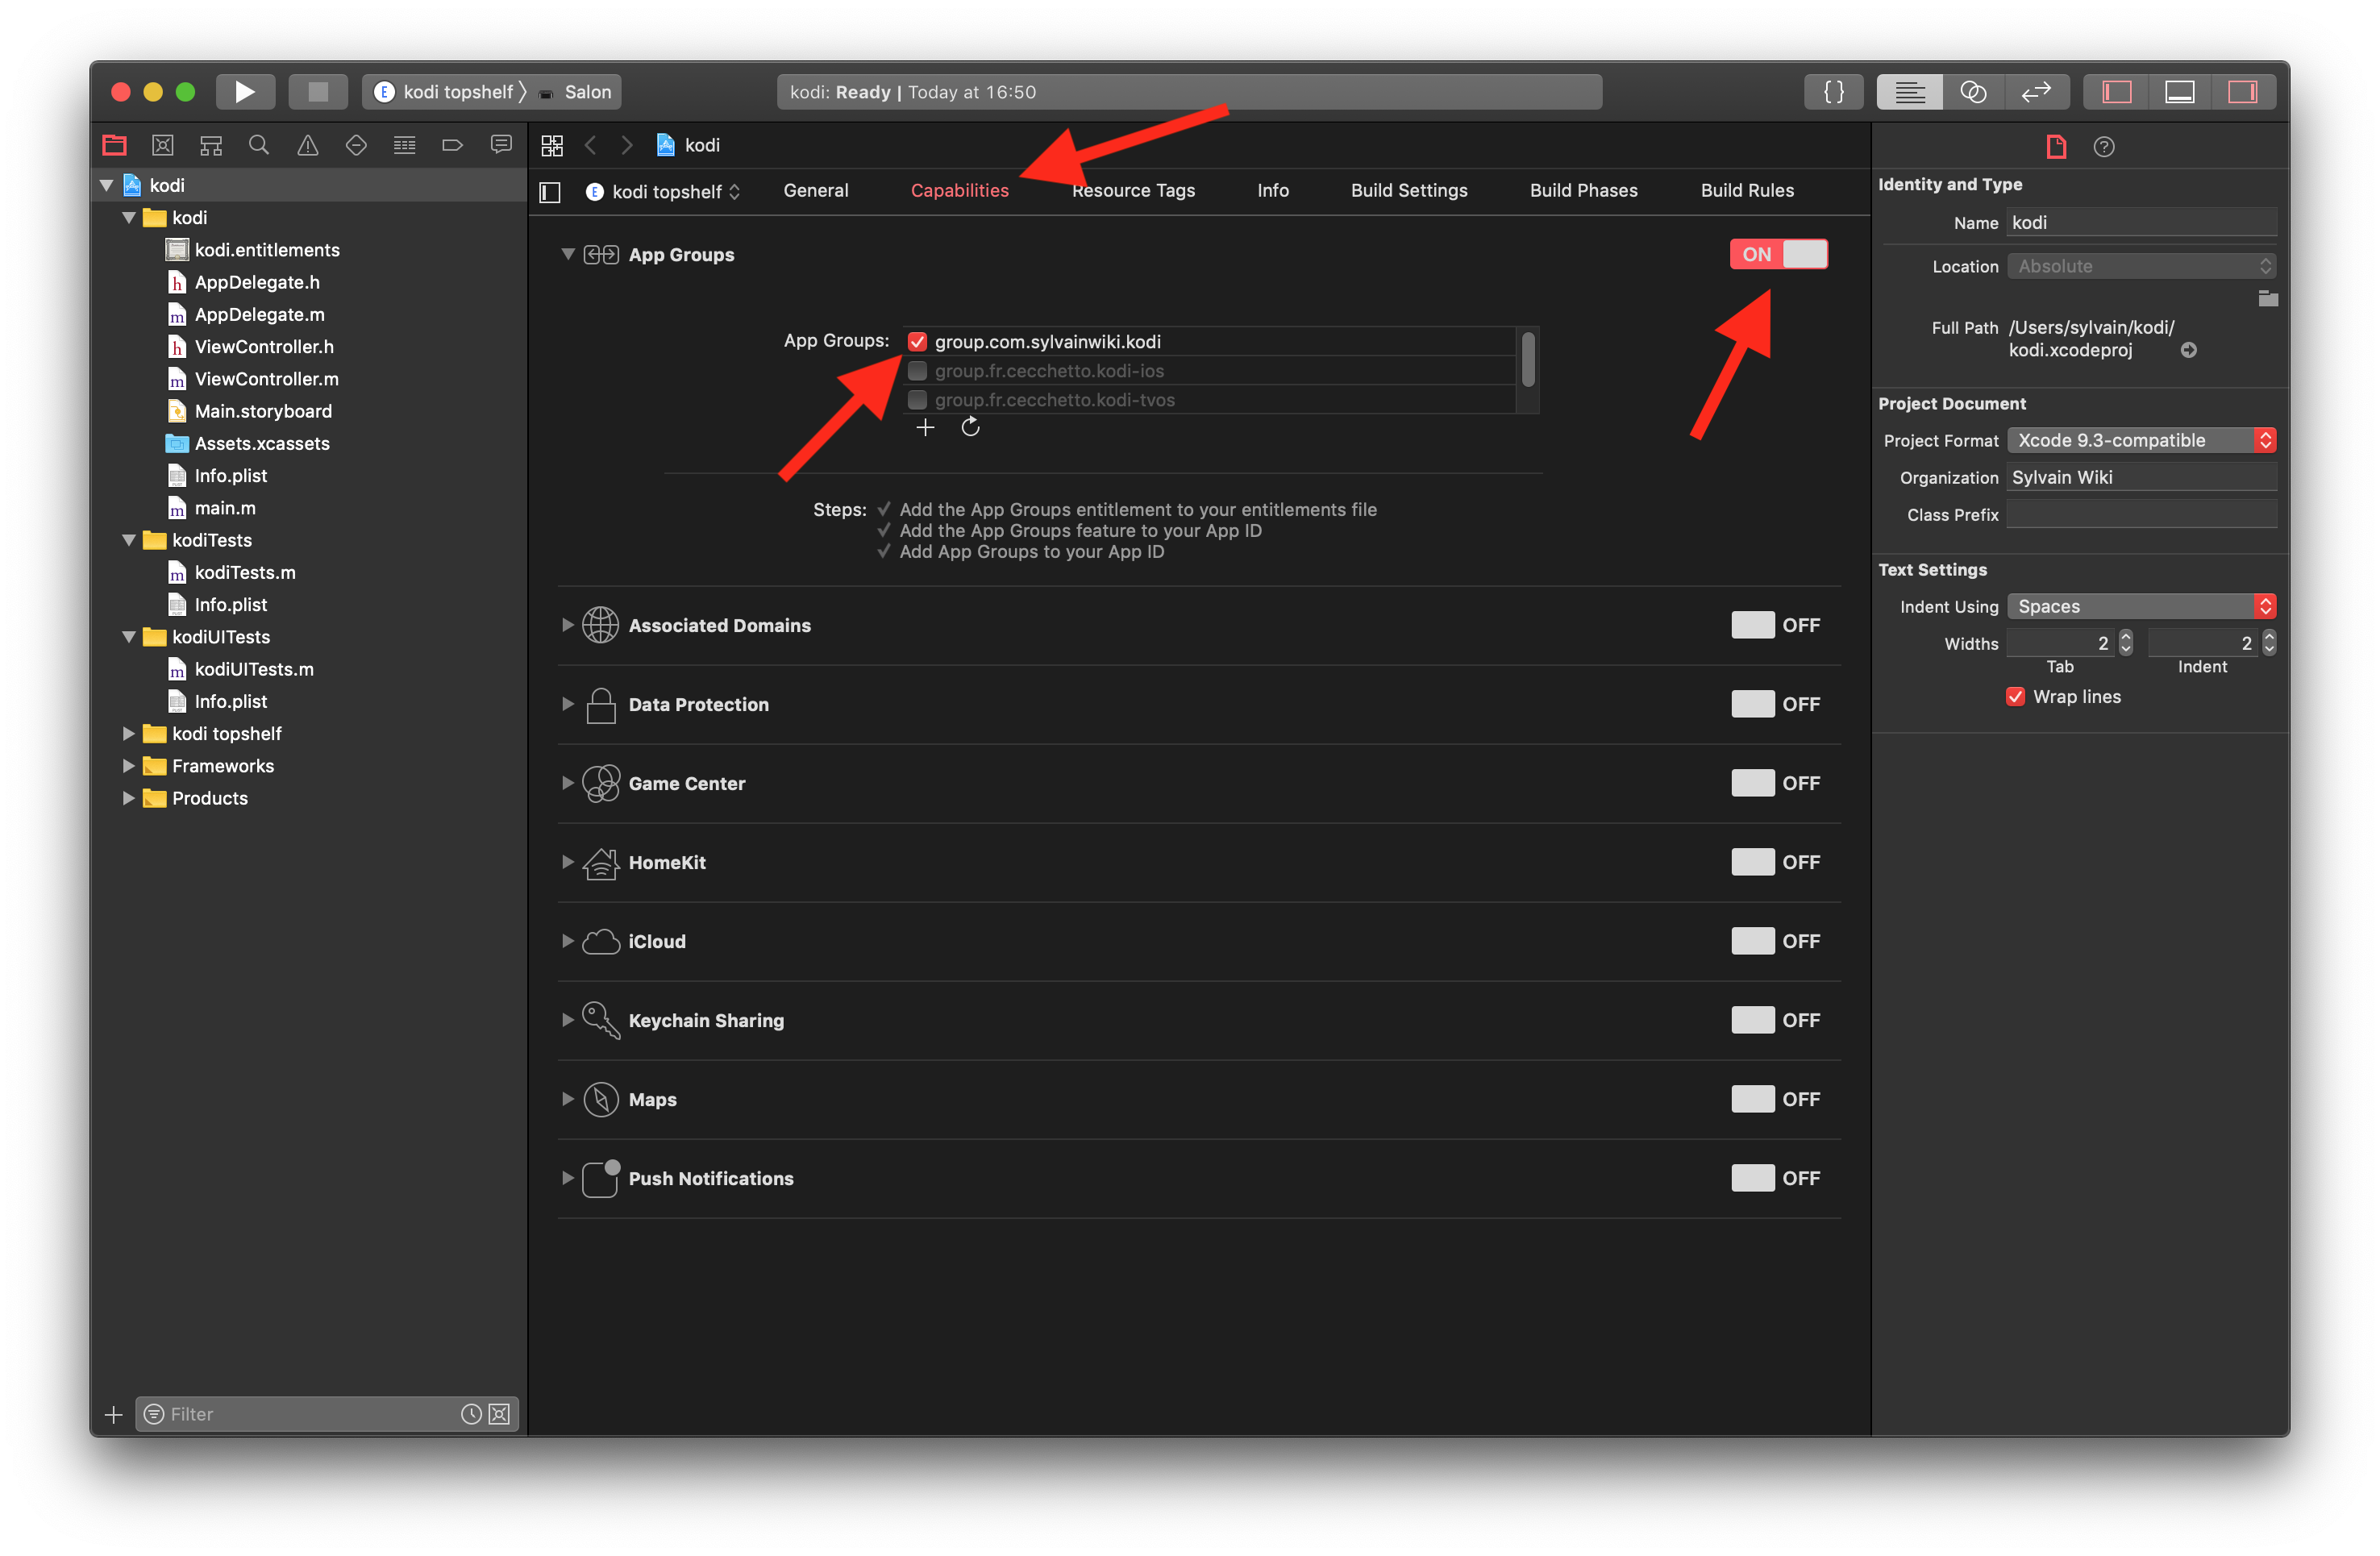
Step 12: Click on "Capabilities", then enable "App Groups" and enable the group previously created.

Step 13: Now close Xcode and open the folder that contains your Kodi DEB file, then right click on it and open it with your unarchiver app. You will obtain 3 files.
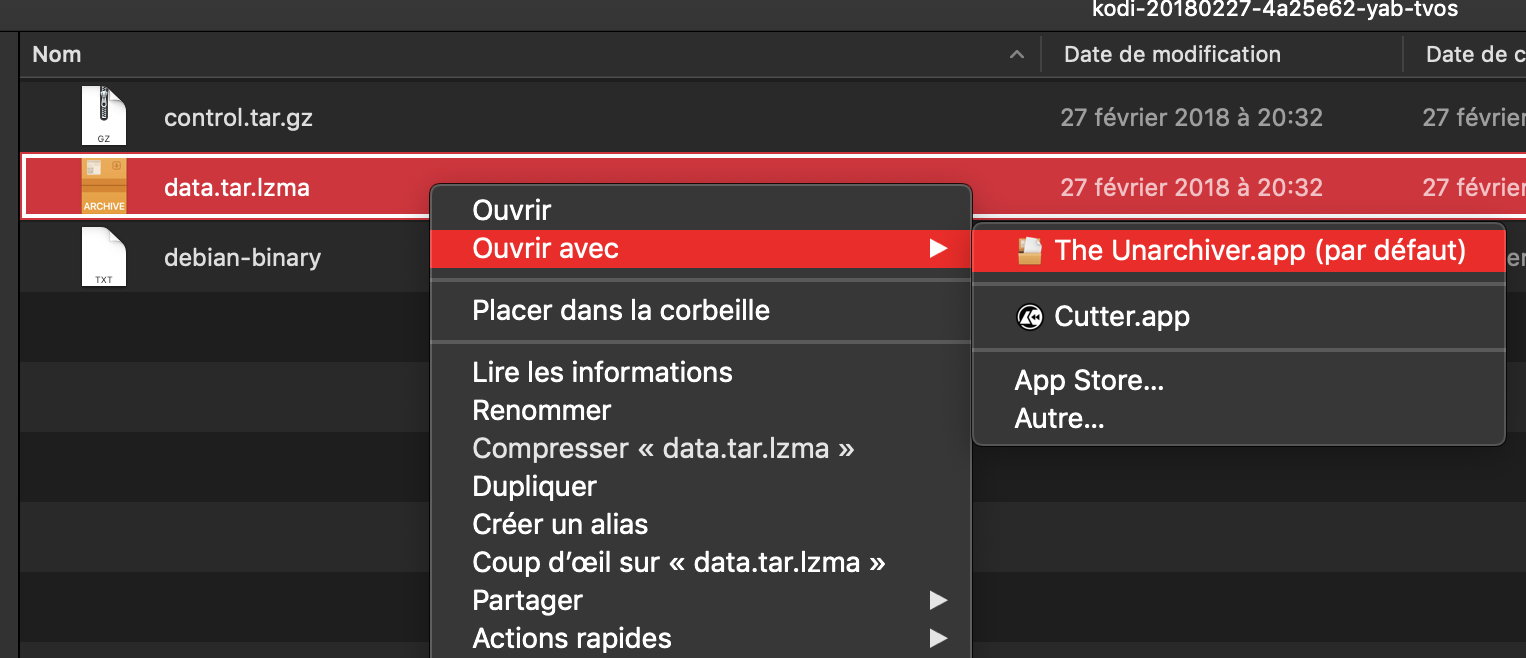
Step 14: Right click on "data.tar.lzma" and open it with your unarchiver app. You will obtain a folder named "data". Open "data" and all other folders until you find the "Kodi.app" file. Right click on it and choose "Show Package Contents" then open the "PlugIns" folder.
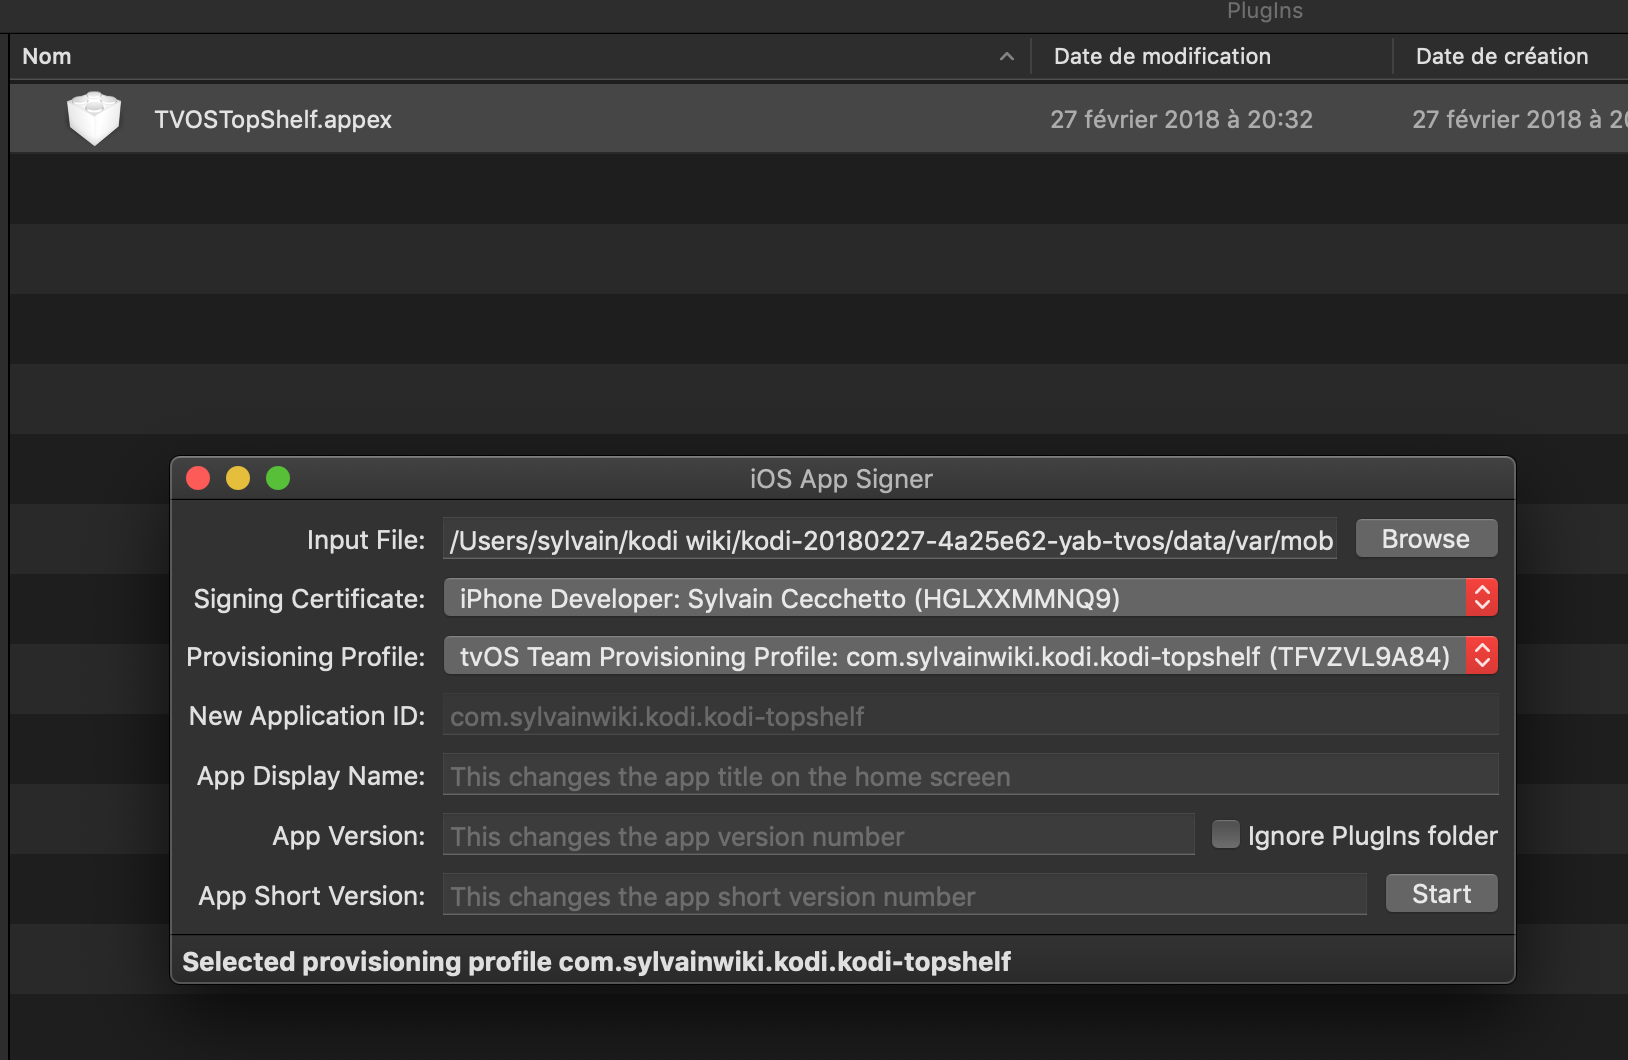
Step 15: Open iOS App Signer, drag and drop "TVOSTopShelf.appex" in the "Input File" field, select the signing certificate corresponding to your Apple account, select the provisioning profile "com.yourusername.kodi.kodi-topshelf", then click on "Start". When the process has finished close iOS App Signer.
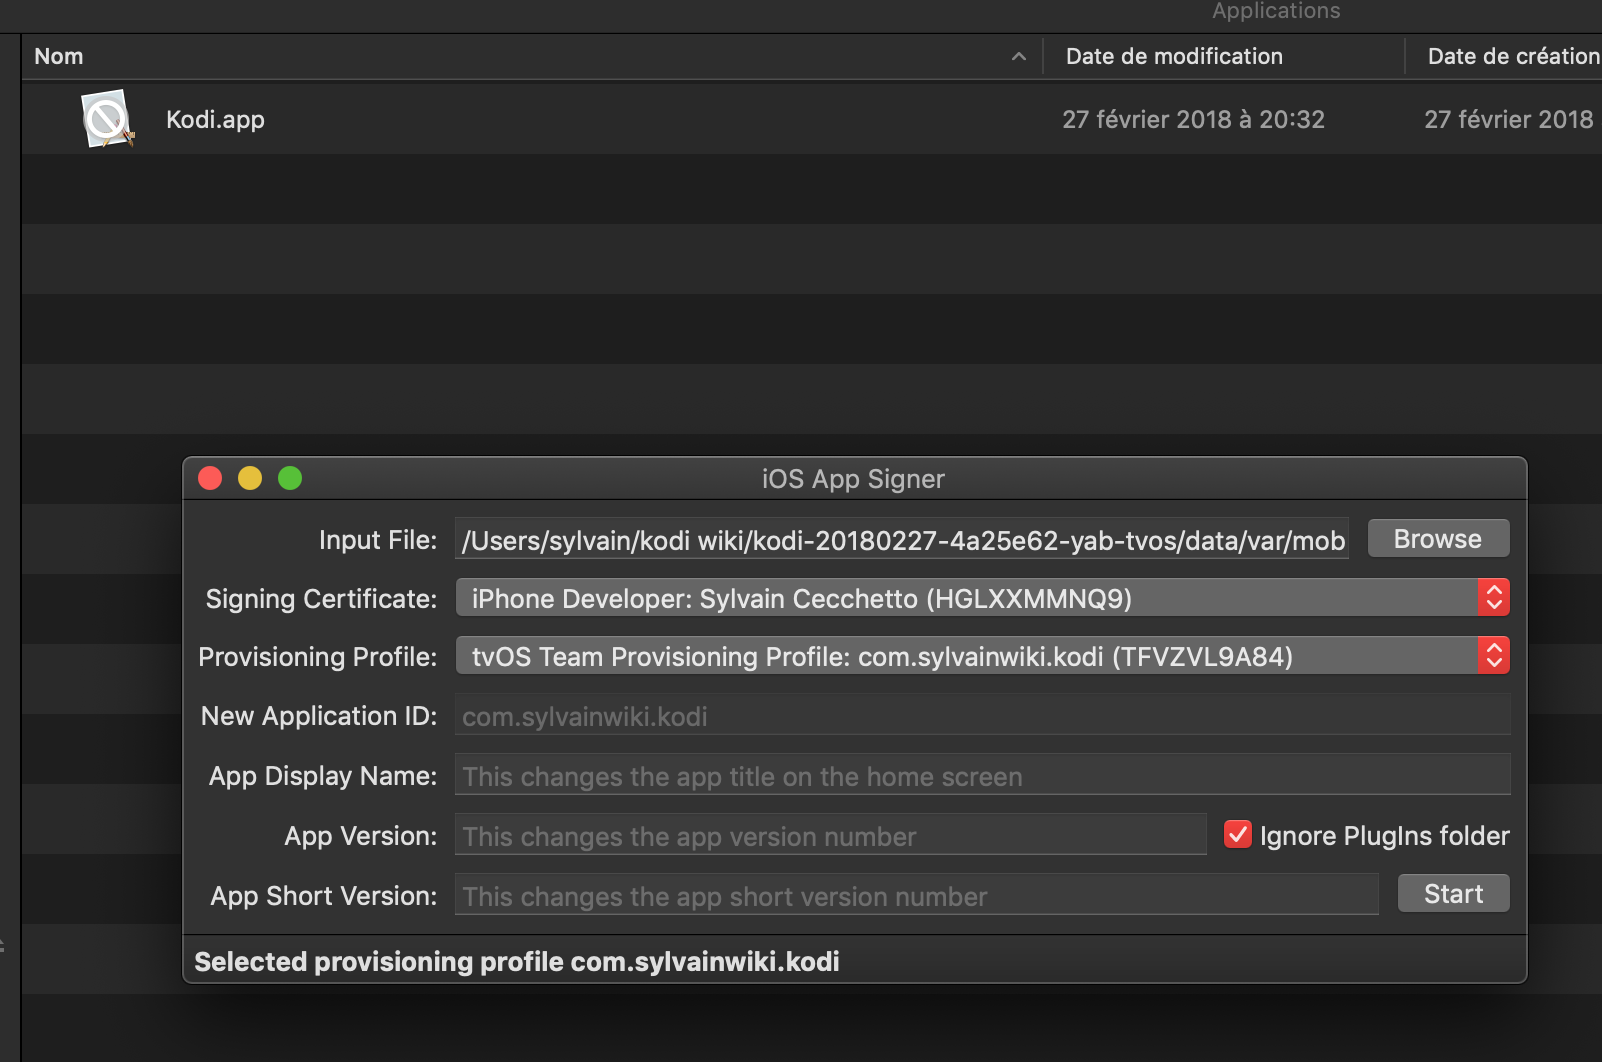
Step 16: In your Finder window go back until you see the "Kodi.app" file. Open iOS App Signer, drag and drop "Kodi.ipa" in the "Input File" field, select the signing certificate corresponding to your Apple account, select the provisioning profile "com.yourusername.kodi", check "ignore PlugIns folder", then click on "Start". Click on "Save" and wait until the Kodi IPA file appears in the same folder as the "Kodi.app" file.


Install Kodi on your Apple TV
Finally you have to install your freshly created IPA file to your device. to do that follow the step-by-step guide below.
Step 1: Start your Apple TV and stay on the main menu screen. Launch Xcode and then navigate to "Window" --> "Devices and Simulators" from the menu bar on top.

Step 2: Select your device on the left panel and click on the "+" button.
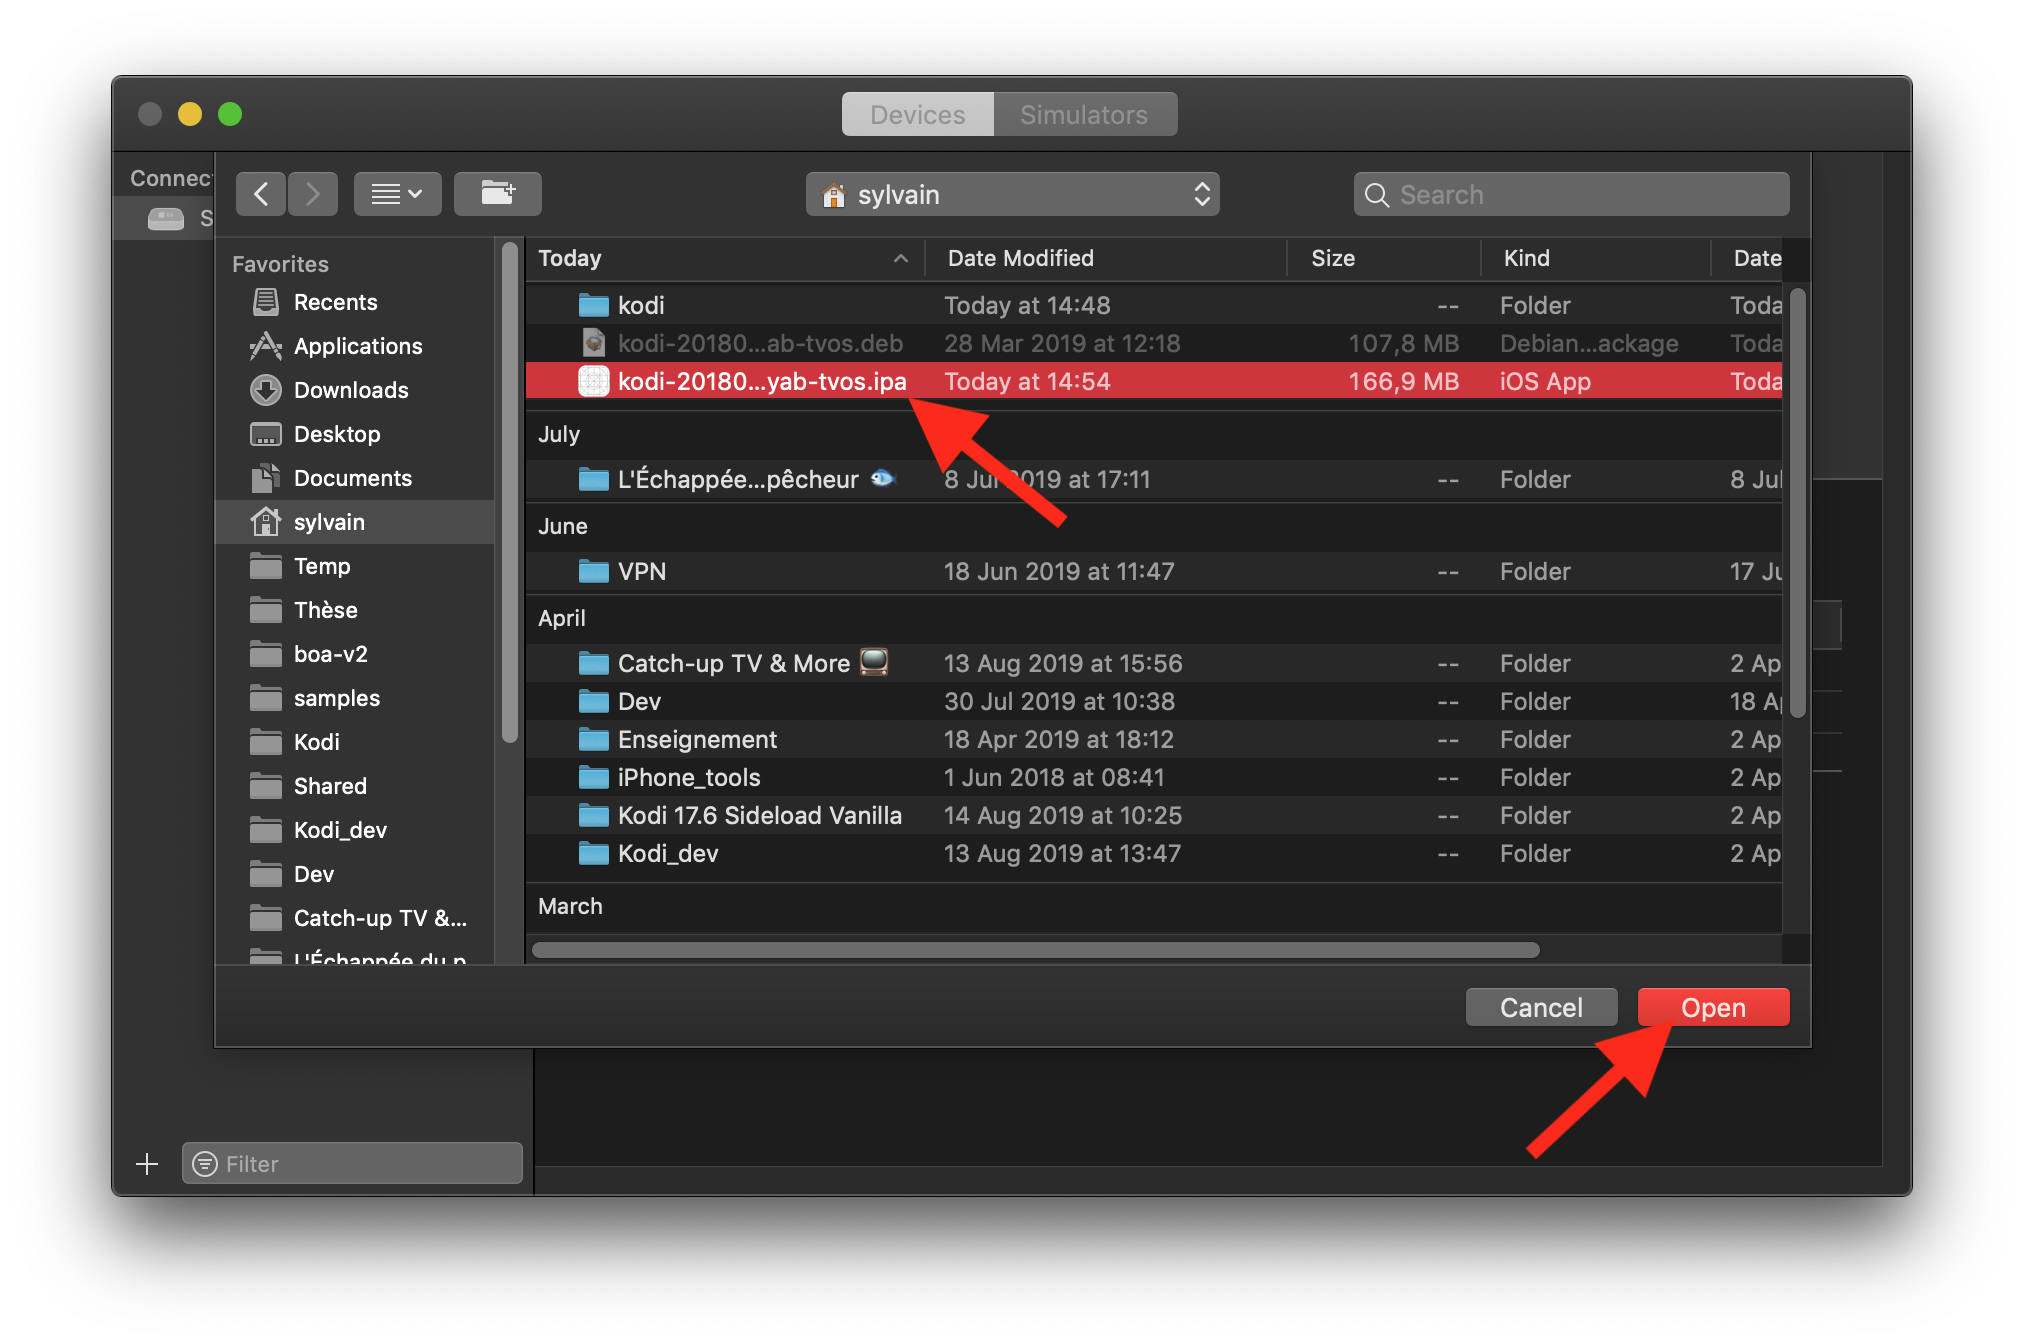
Step 3: Select your freshly generated IPA file then click on "Open", finally wait until Kodi appear on your Apple TV main menu screen.


Install on a jailbroken Apple TV
It is simple to get Kodi working on your jailbroken Apple TV. Here you can find the current tvOS versions with an available jailbreak for the Apple TV 4 and 4K:
Once your Apple TV is jailbroken:
- Download the latest .deb file of Kodi for tvOS from Test builds and put it on your Desktop.
- Open a terminal window on your computer.
- Move to your desktop with
cd ~/Desktop. - Send the deb file to your Apple TV with
scp DEB_FILE root@IP_ADDRESS:/var/root/'(adapt with your case, for examplescp kodi-20180227-4a25e62-yab-tvos.deb [email protected]:/var/root/), the default password isalpine. - Connect to your Apple TV with
ssh root@IP_ADDRESS, default password isalpine. - Install Kodi with
dpkg -I /var/root/kodi-20180227-4a25e62-yab-tvos.deb. - Refresh icons cache with
uicache. - Kodi should be on your main Apple TV screen.