Video playback
Introduction
This page will detail how to select and play a title from your video library. It will alse describe the settings and options that are available for, and during, playback of the title.
This page assumes that you understand how to navigate Kodi and are familiar with the various screens.
- See: Basic controls
Keyboard Controls
Kodi is primarily designed to be used with a correctly programmed remote control or a keyboard. Mouse support is limited.
Keyboard shortcuts can be found here...
- See: Keyboard controls
Play
Navigate to the Movies, TV Shows or Music Videos main menu item and enter it to view a listing of all available titles in your library. Once you have Highlighted the title for playback, there are numerous methods to commence playback:
- Press Enter/OK on a remote control, or Press ↵ Enter on a keyboard or left click with a mouse
- Using the Context Menu, select Play
- From the Information page, select Play
If a Resume Point is available, additional options will be Play from beginning and Resume from hh:mm:ss
The default option for the above keypresses can be modified to open the Information Page instead of play. See here... 1.1 Default select action
Video Player OSD
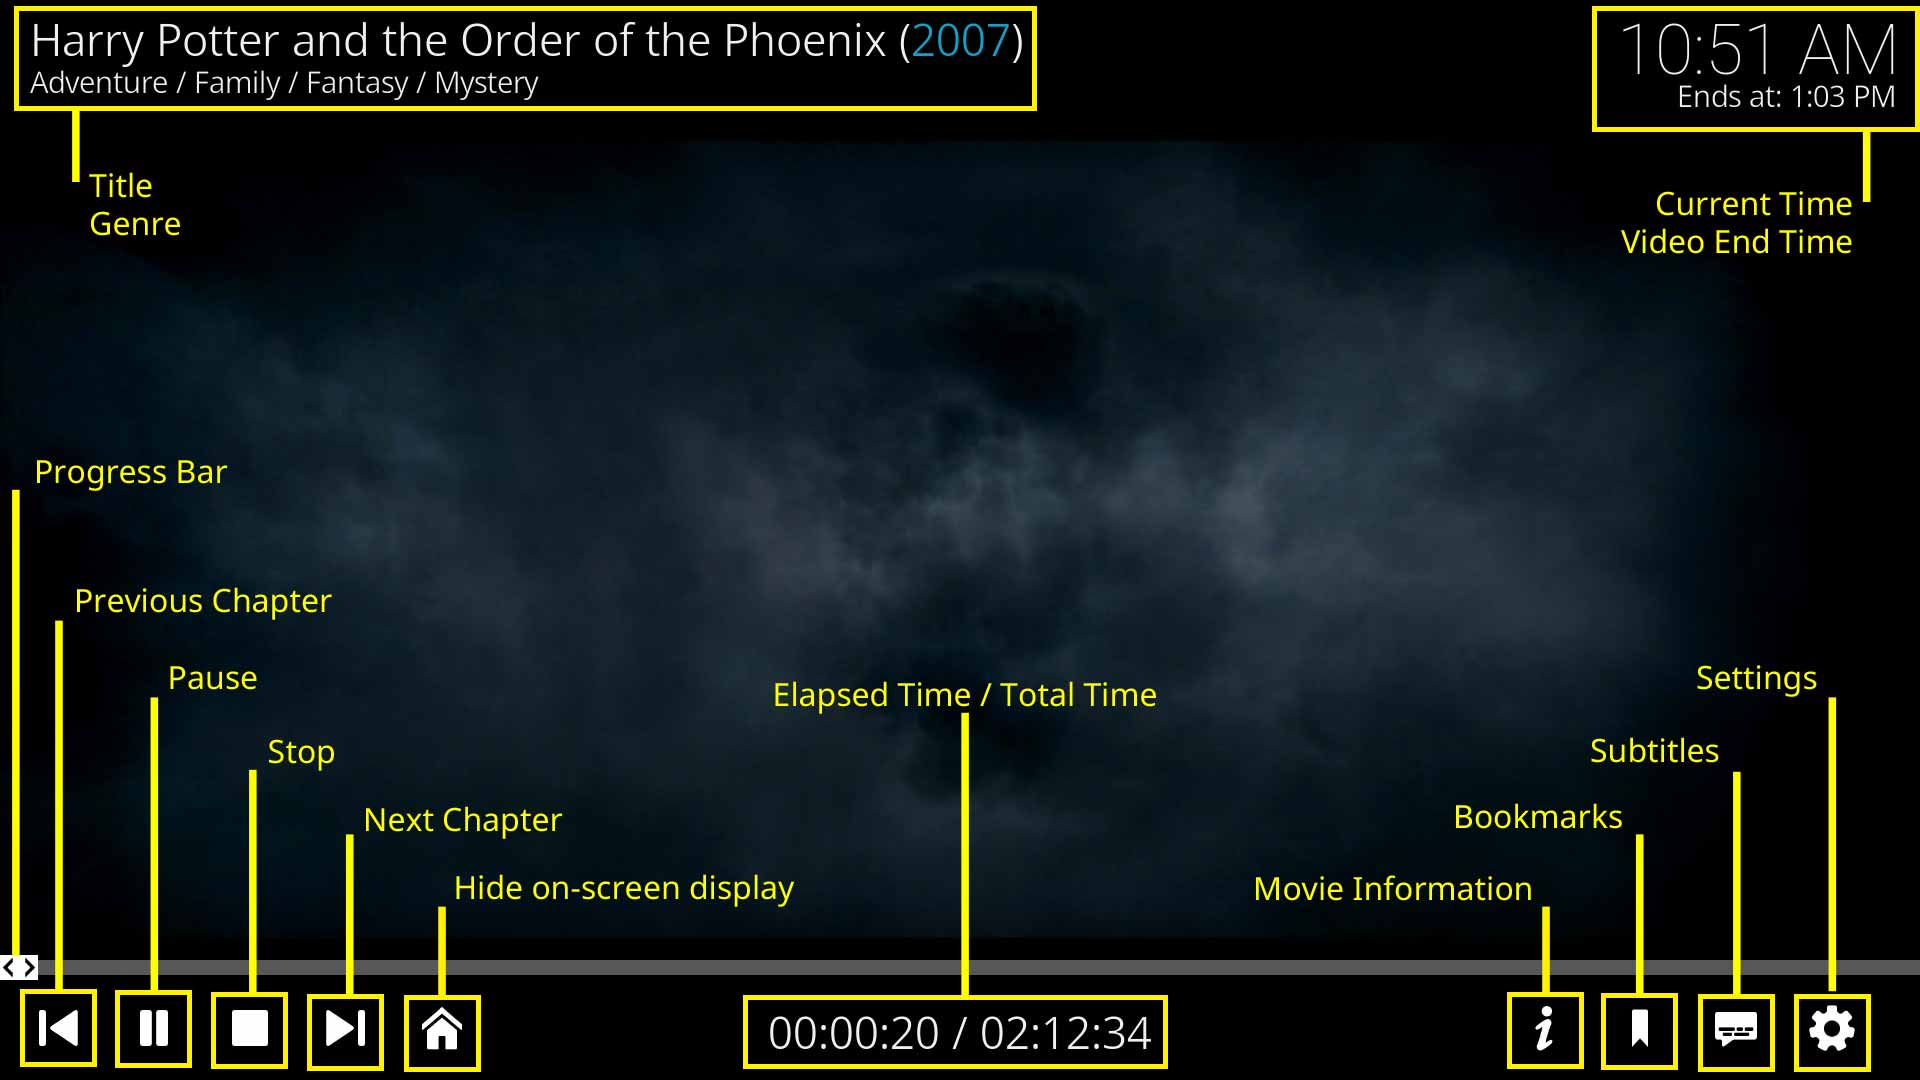
This image shows the main OSD (On Screen Display) for the Video Player during playback. It has been overlayed with labels for illustrative purposes.
Most of the OSD is self-explanatory. This page will cover the four icons in the bottom right corner, along with other available OSD examples which are separate to the below image.
Note that all OSD's are skin dependant and may show more or less information, and in a different format, than the default skin Estuary.
Information
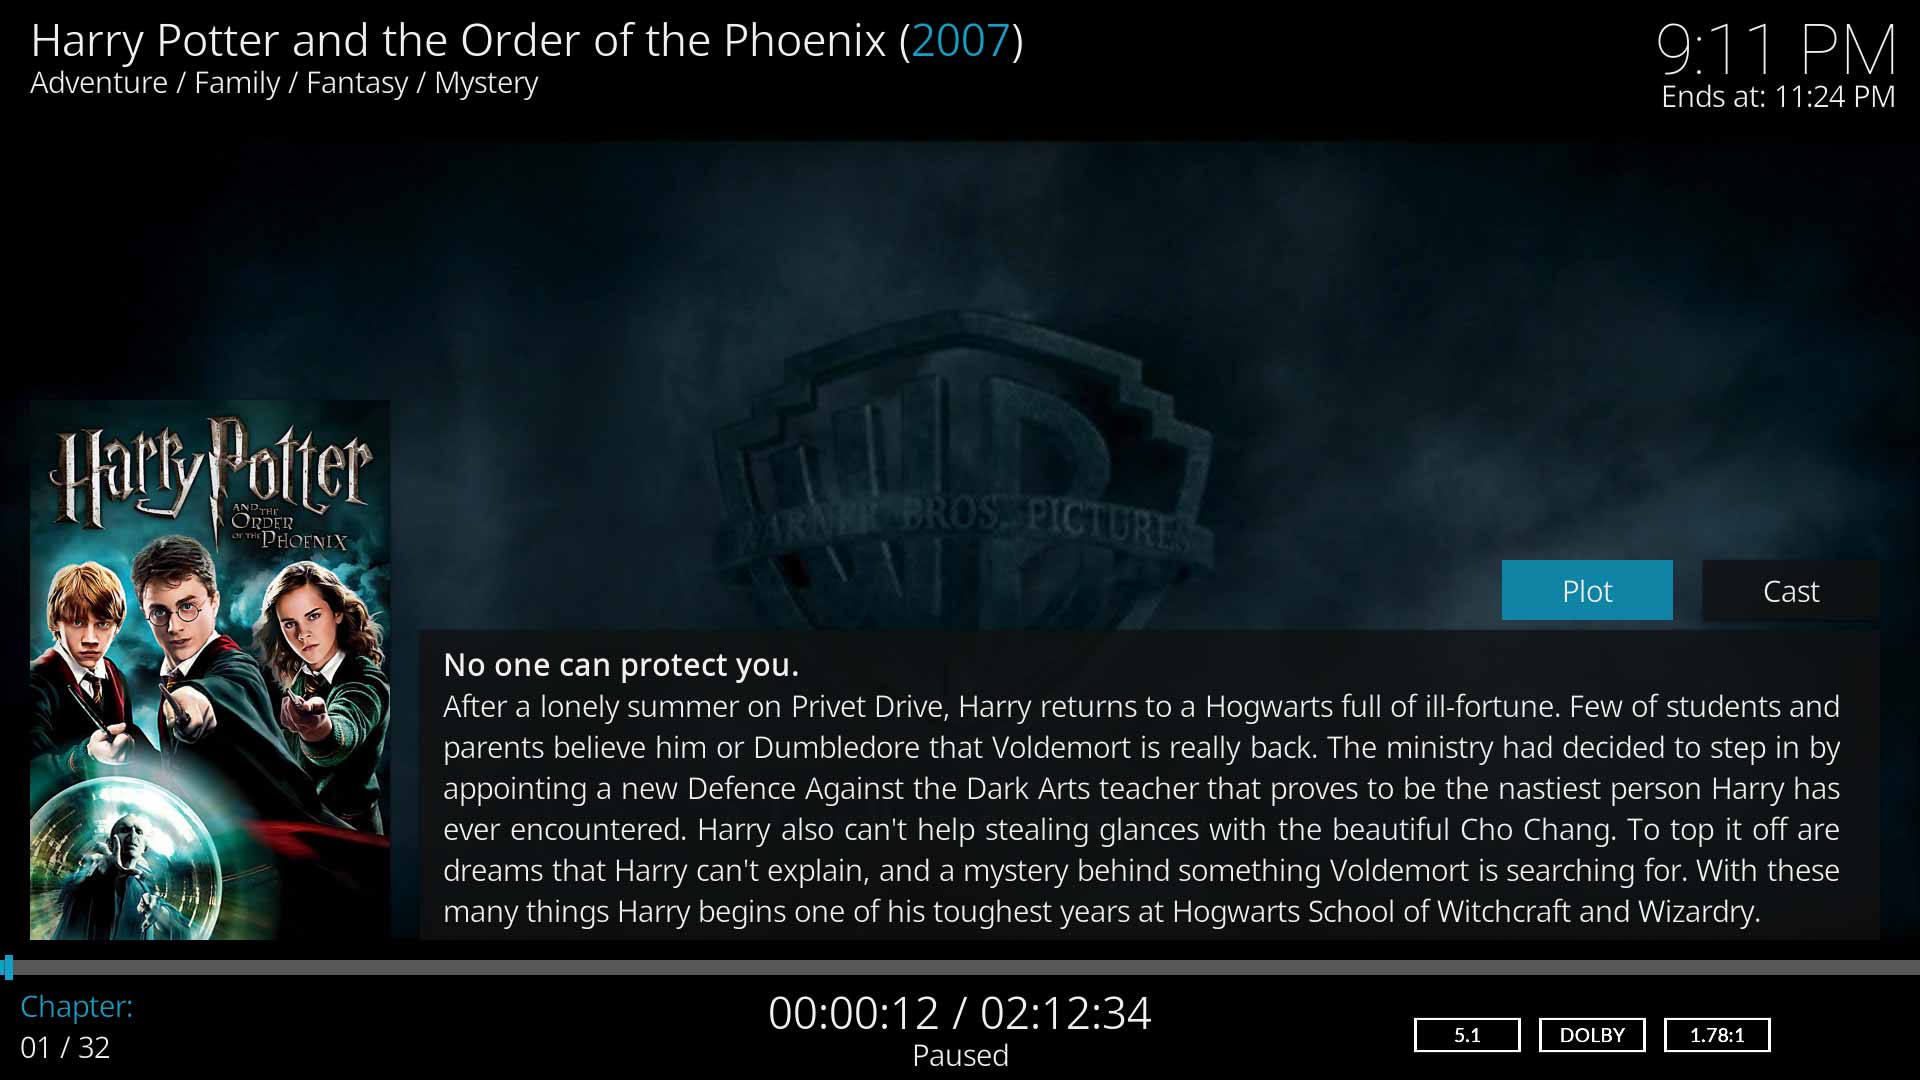
The Information icon will display available data for the title currently playing. Amongst other information, it shows the Tagline, Plot and Poster. Selecting Cast will list the Actors.
Media codec information is displayed along the bottom right corner.
The two methods to display this screen are:
- Select the icon described in the image in the previous section
- Press i on a remote control
- Press i on a keyboard
Bookmarks
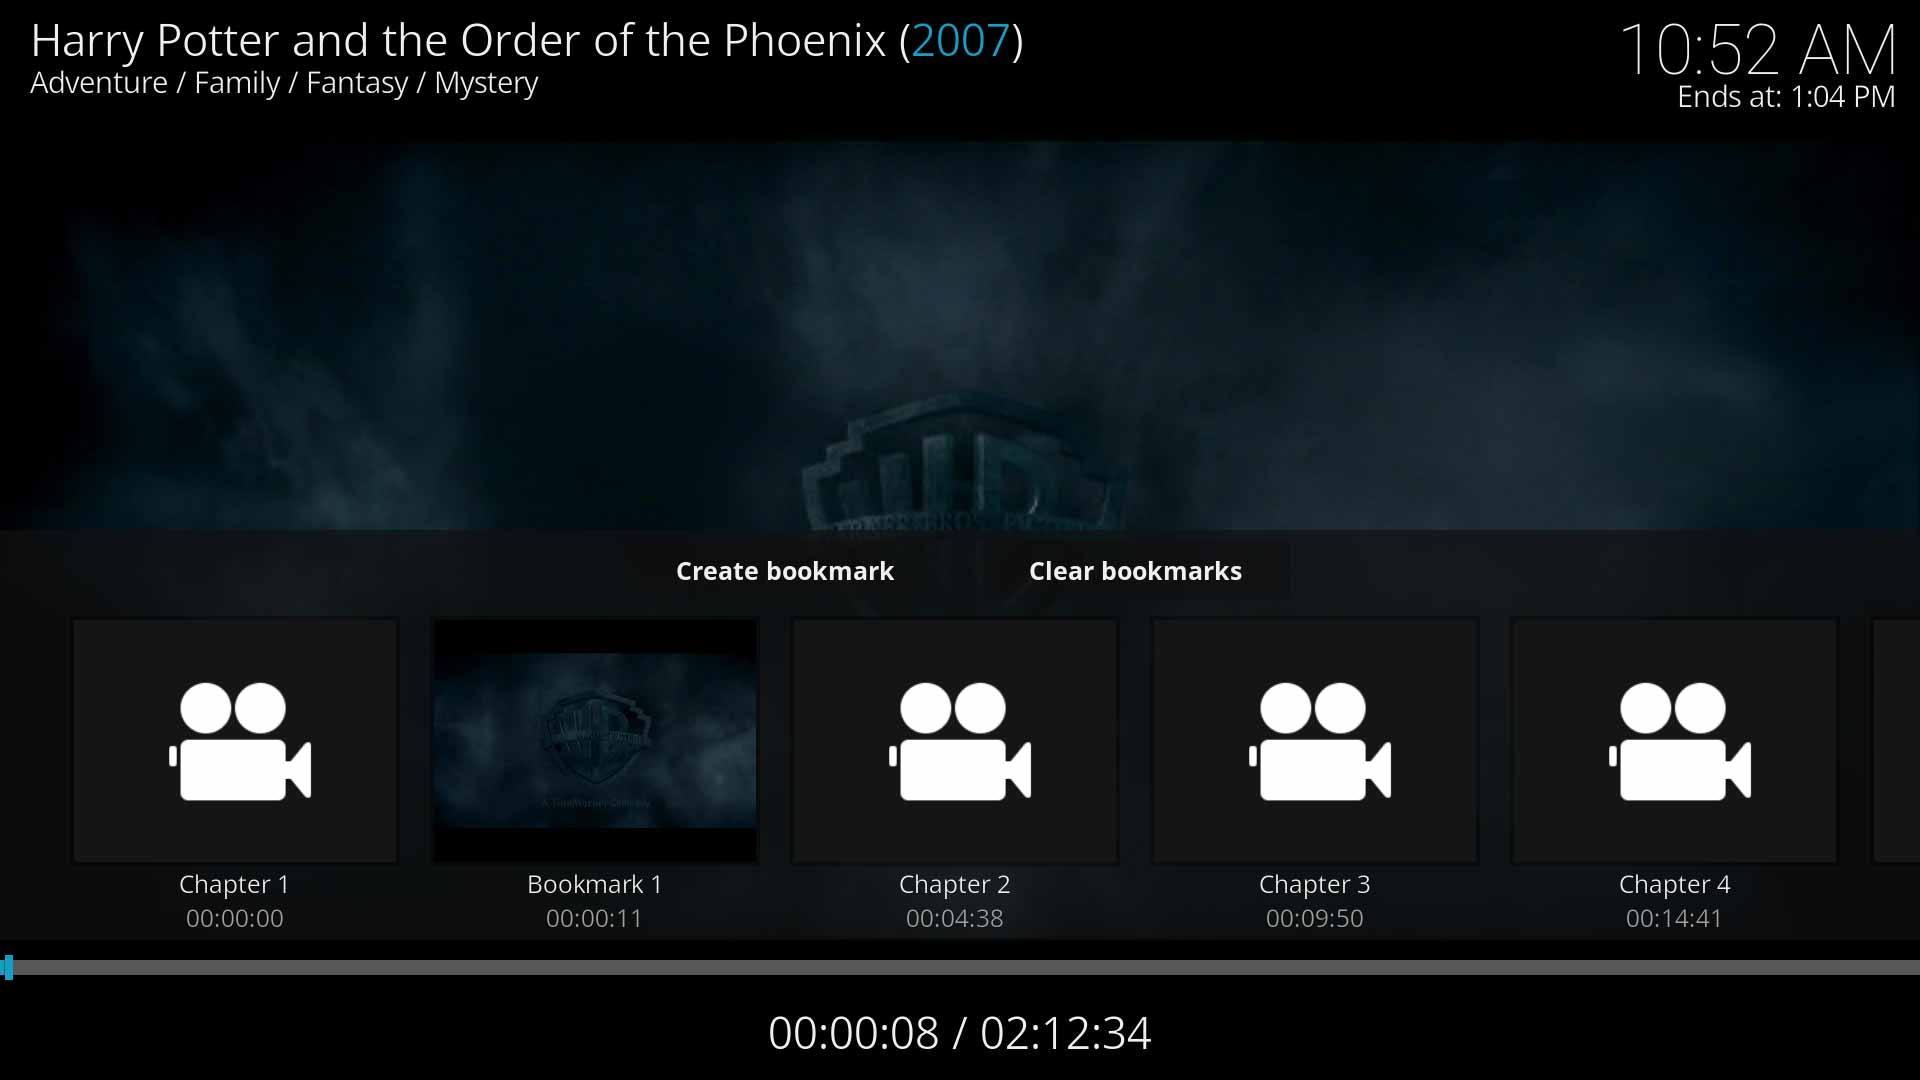
Displays a graphical listing of Chapters along a time-line. The listing will populate with Screenshots if the setting Extract thumbnail is enabled.
This screen also allows the user to create bookmarks which can then be accessed from this screen when required.
Subtitles
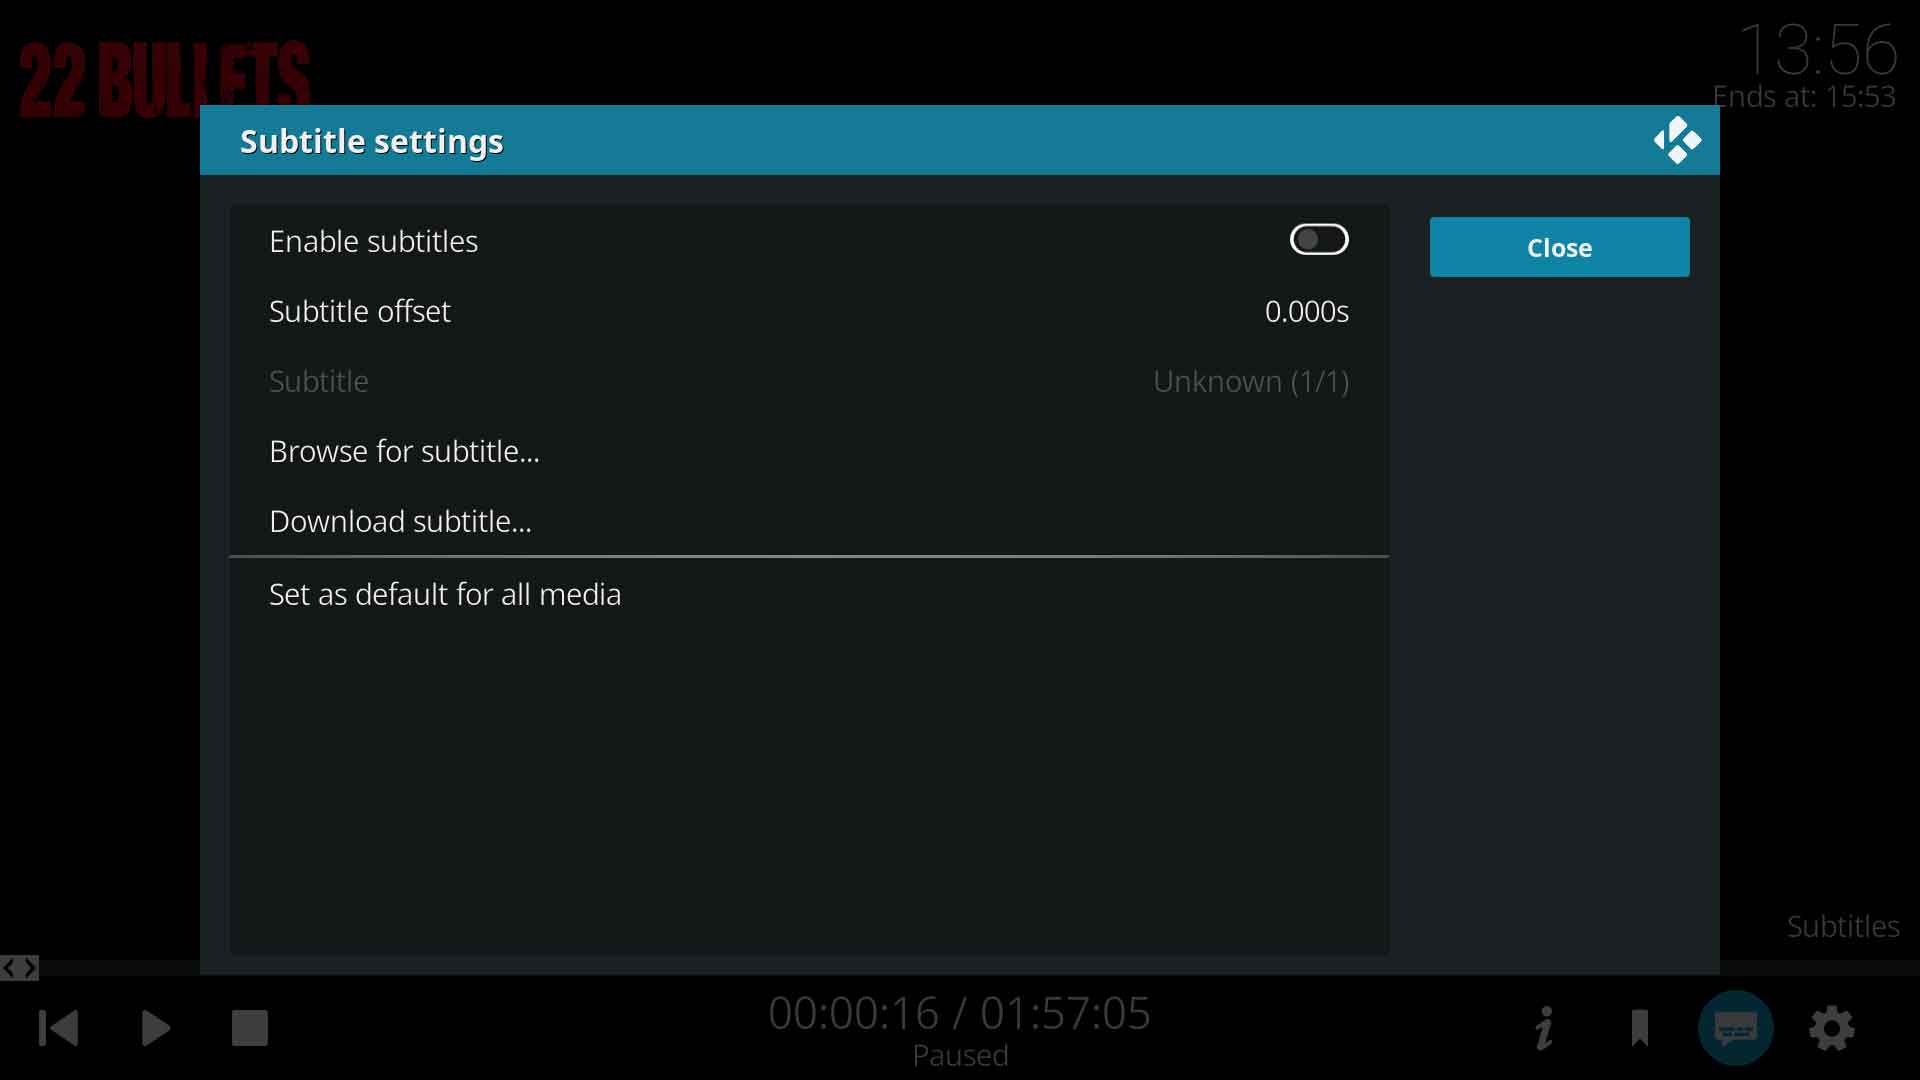
Allows the control of Subtitles for the currently playing title. If no internal or external subtitles are found, all options except Download will be inaccessible.
When both internal and external subtitles are available Kodi defaults to using external subtitles.
Available options are:
- Enable subtitles
- Allows subtitles to be displayed during playback of the current title. Subtitle tracks with the forced flag are unaffected by this and should always display.
- Subtitle offset
- If the sync between the display and the subtitles is not correct, adjustments can be made here in milliseconds
- Subtitle
- Select which subtitle stream to display. If only one subtitle track is available, this option will not be available.
- Kodi will auto select subtitle language based on your global settings. To set a default subtitle language for all videos see: 2.1 Preferred Subtitle Language
- Browse for subtitle
- Allows you to browse the filesystem for locally saved subtitle files
- Download subtitle
- Download subtitle files from the provider. Requires configuring add-ons. See: Setup Subtitle Services and Download Services
- Set as default for all videos
- Selecting this will make the current settings the default for all videos
- See: Subtitles
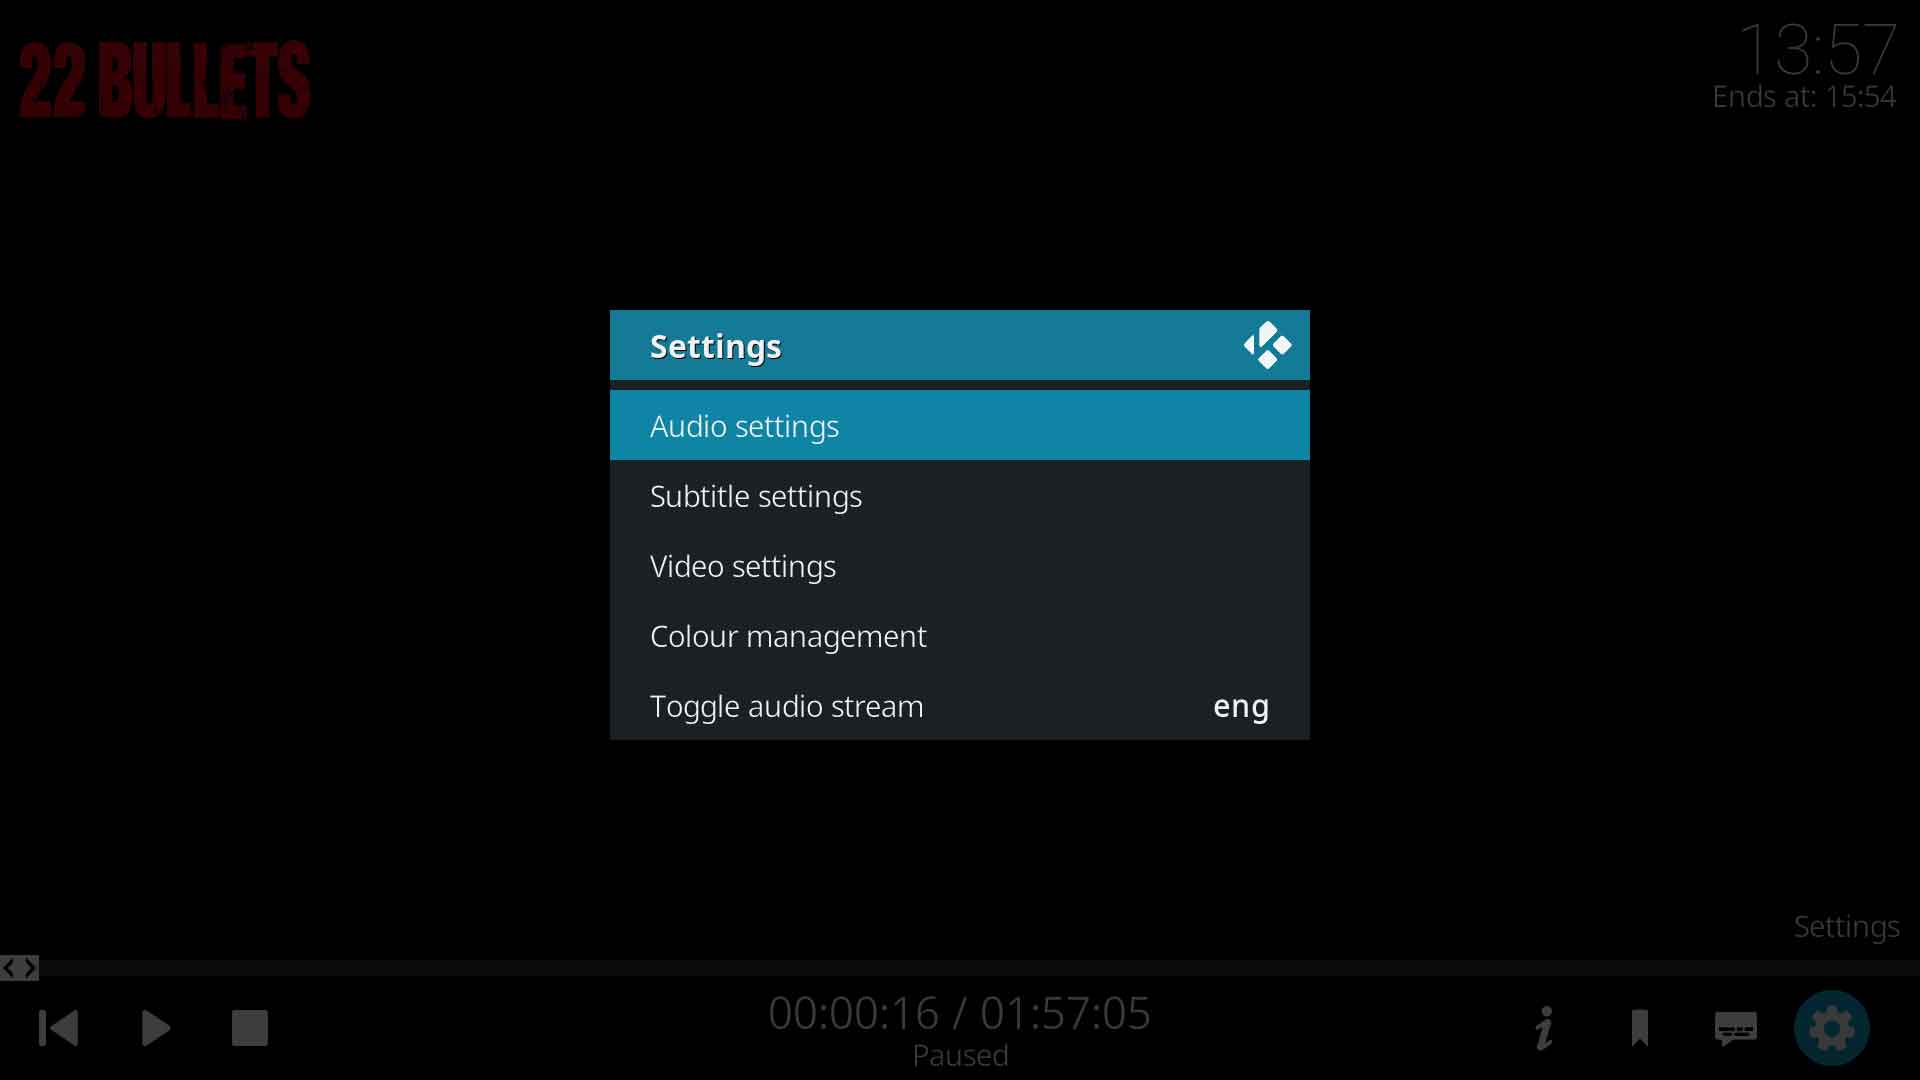
Settings
The cog icon in the bottom right corner will display the Settings menu detailed in the image.
The following items are available
- Audio settings- See 5.5 Audio Settings
- Subtitle settings- See 5.3 Subtitles
- Video settings- See 5.6 Video Settings
- Colour management- Configure LUT files
- Toggle audio stream- Allows selection of an alternate language track if more than one is available.
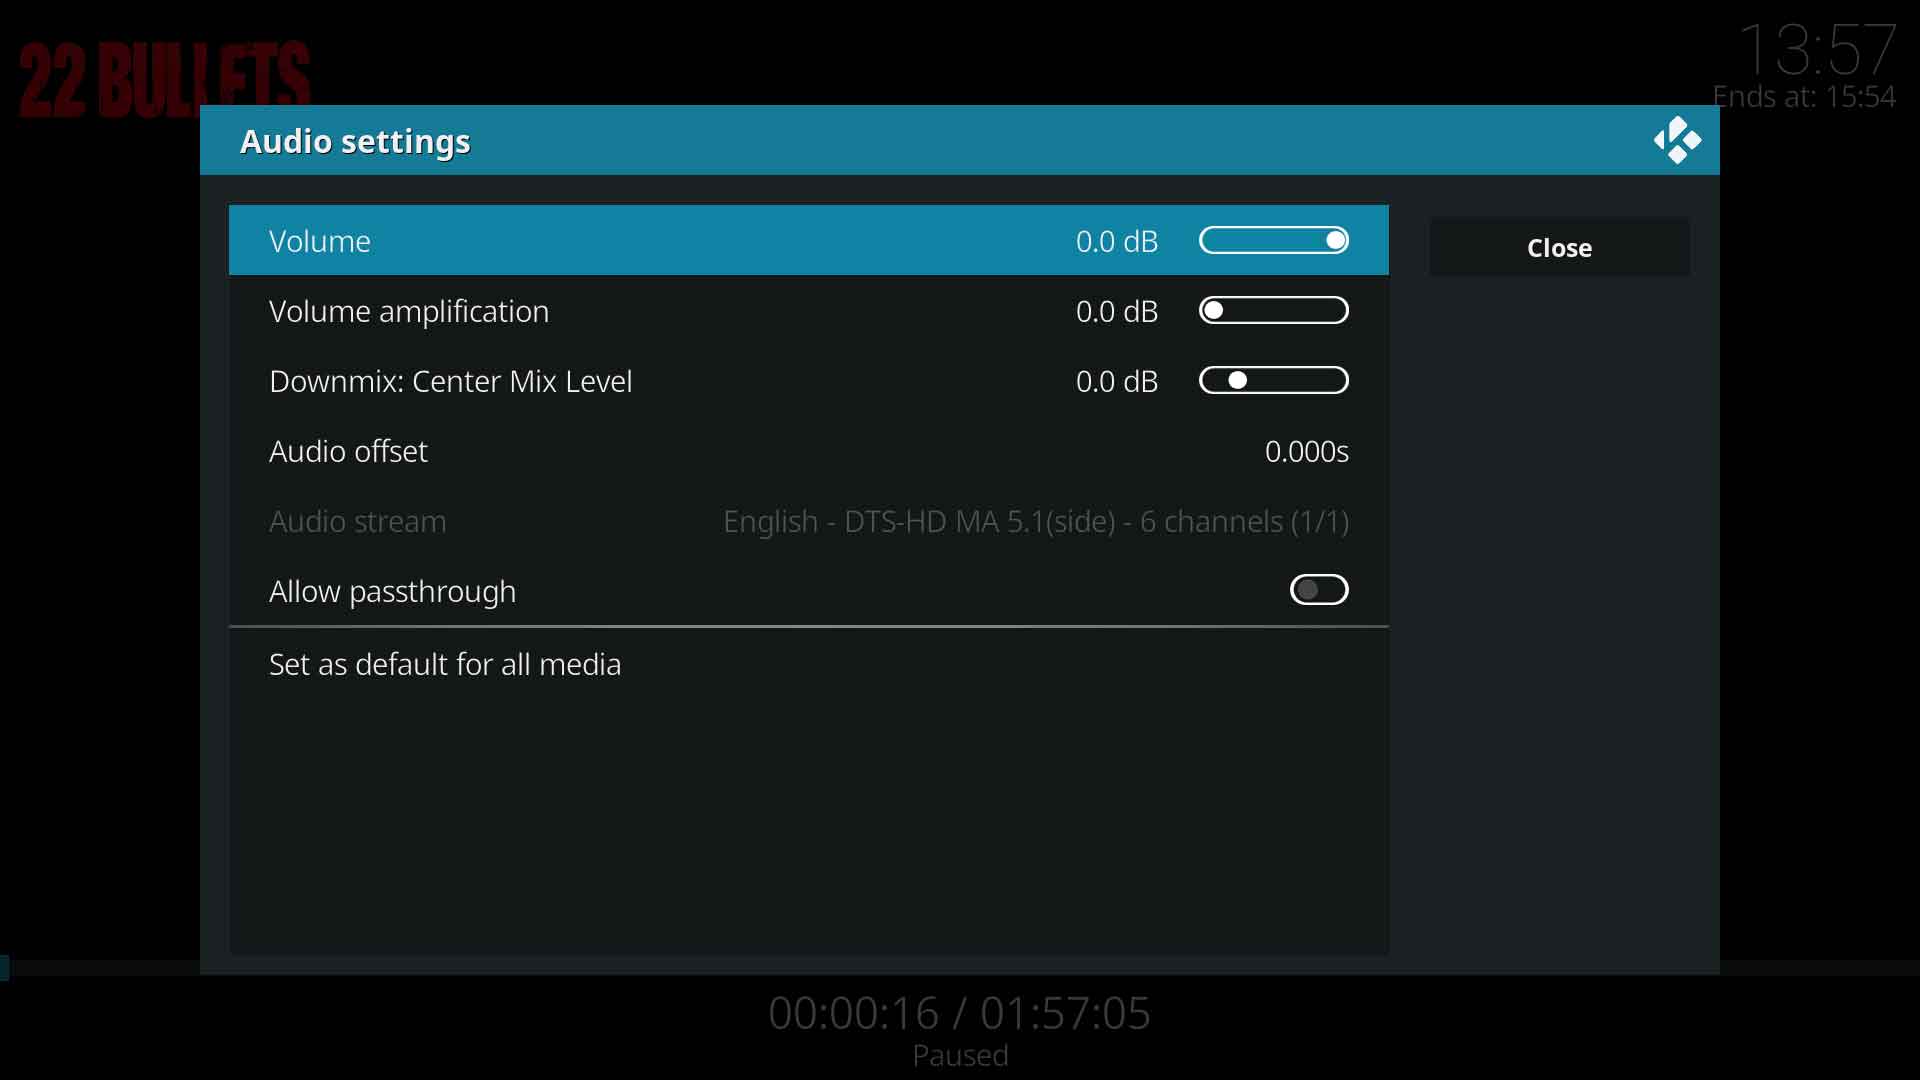
Audio Settings
The following settings can be used to modify the behaviour of the currently playing title. There is an option to save the settings as the default for all video media.
- Volume
- Allows you to adjust the playback volume. If audio passthrough is in use, this option will have no effect
- Volume amplification
- Additional audio amplification that is then limited/compressed at a certain threshold to prevent clipping. If audio passthrough is in use, this option will have no effect
- Downmix- Center Mix level
- If dialogue volume is too low, use this setting to boost the volume of the dialogue (centre) channel
- Only available when:
- Audio Passthrough is disabled, and
- When the setting 1.2 Number of channels is different to the number of channels in the stream. ie your setup only uses two speakers, but the audio stream is 5.1
- Audio offset
- Adjusts how long that the audio is advanced or delayed in relation to the video. This is useful when viewing poorly synced videos.
- Audio stream
- If the video file contains more than one audio stream you can select them here.
- Kodi will auto select audio language based on your global settings. See: 1.1 Preferred Audio Language
- Allow passthrough
- When enabled, Kodi will not decode the audio. The RAW audio stream is sent to a compatible AVR or TV that will decode the stream.
- Set as default for all videos
- Selecting this will make the current settings the default
- See: Subtitles
- See also: Settings/Player/Language#Subtitles
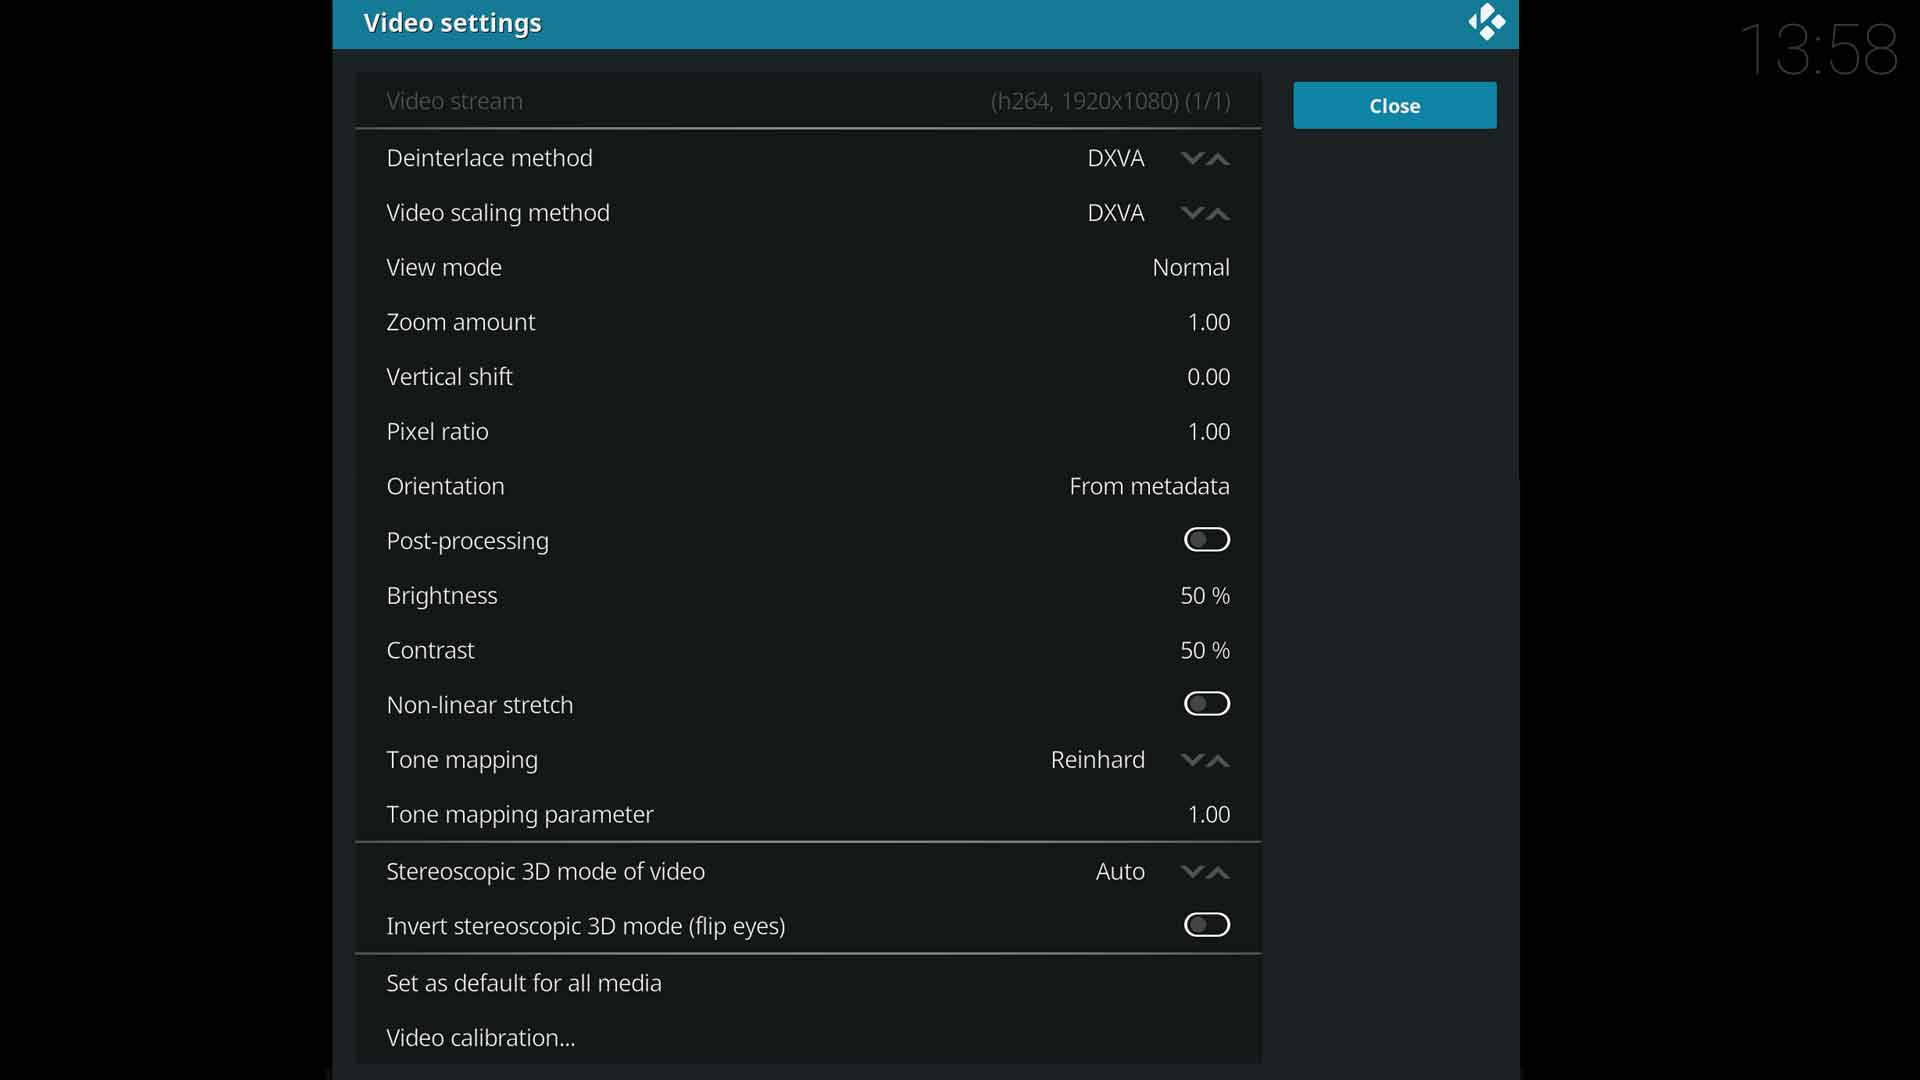
Video Settings
The following settings can be used to modify the behaviour of the currently playing title.
The section is based on a Windows installation. Your system may show different options.
- Video stream
- If more than one video stream is available, this option becomes accessible and allows selection of an alternate video stream.
- Deinterlace method
- Set the method used to convert interlaced video into a non-interlaced format
- The methods available here are hardware dependant
- Video scaling method
- Changes the size of a video frame in order to match the resolution of the display device. All methods here are non-adaptive so they may produce different amount of aliasing, blurring and edge halos. There are no best methods it’s up to personal taste what method you should use. The methods are:
- Auto - If supported uses Lanczos3 Optimized when video resolution is lower than 720p (1280x720) and video FPS is lower than 30, otherwise it uses Bilinear.
- Bilinear - fairly simple and fast method (video resized with this method may appear slightly smoothed/blurred but with no edge halos also called ringing artifacts).
- Bicubic - more sophisticated method than Bilinear (more precise and slightly sharper video than Bilinear, but can introduce some ringing artifacts).
- Lanczos2 - 4-tap filter that uses a 2-lobe Lanczos windowed sinc function (sharper than Bicubic with less aliasing).
- Spline36 Optimized - 4-tap + 3-lobe filter, more precise than Lanczos2, which tries to produce the sharpest image with slightly less ringing artifacts then Lanczos3 Optimized (differences only noticeable with high resizing factors or when downsizing).
- Lanczos3 Optimized - 4-tap filter that uses a 3-lobe Lanczos windowed sinc function (comparable results to Spline36 Optimized, with less aliasing and more sharpness, but more ringing artifacts).
- Spline36, Lanczos31 - 6-tap filters that are more precise variants of above "Optimized" versions (they are sharper but might produce more ringing artifacts in some situations).
- Characteristics of different methods:
- Sharpness - Bilinear < Bicubic < Lanczos2 < Spline36 Optim < Lanczos3 Optim < Spline36 < Lanczos3
- Aliasing artifacts - Lanczos3 < Spline36 < Lanczos3 Optim < Spline36 Optim < Lanczos2 < Bicubic < Bilinear
- Ringing artifacts - Bilinear (no ringing) - Bicubic < Lanczos2 < Spline36 Optim < Lanczos3 Optim < Spline36 < Lanczos3
- 1 On GL builds these methods are slower than the optimized versions; this is the reason why they are not available by default but can be activated by advanced users in advancedsettings.xml
- 2 <dxvaallowhqscaling>true</dxvaallowhqscaling> for <video> (may) need to be added to an advancedsettings.xml in order to use all high quality scalers available - Hardware dependent.
- View mode
- Allows you to choose how the video is displayed. The options are:
- Normal - Movie is displayed so that at least 1 dimension fills the screen. No cropping will occur. Aspect ratio is unaffected.
- Zoom - Movie is zoomed in, and the movie cropped so that there are no black bars on screen. Aspect ratio is unaffected.
- Stretch 4x3 - Movie is stretched to fill a 4x3 frame. Aspect ratio is changed.
- Stretch 14x9 - Movie is stretched to fill a 14x9 frame. Aspect ratio is changed.
- Stretch 16x9 - Movie is stretched to fill a 16x9 frame. Aspect ratio is changed.
- Original Size - Movie is displayed so that the height (in pixels) displayed is the height of the movie exactly. No zooming is performed. Aspect ratio is unaffected.
- Custom - Movie is displayed using the Zoom and Pixel Ratio settings as defined in the video On Screen Display. See below for more details.
- Zoom amount
- Allows you to control how much that the view is zoomed into the video.
- Vertical shift
- Used to move the video image up or down the screen (helpful for projectors)
- Pixel ratio
- Allows you to adjust the pixel ratio that the video is displayed at. This can be used to adjust videos that are not displaying at the proper aspect ratio.
- Orientation
- Used to rotate the image in 90° steps. Useful for videos created on a smart phone in Portrait mode.
- Post-processing
- Basically puts an unsharpen mask over the image to reduce pixellation/macroblocking on low-res/low-bitrate videos
- Brightness
- Adjust brightness
- Contrast
- Adjust contrast
- Non-linear stretch
- Will stretch the video to fill a 16x9 display when using 4:3 video WITHOUT disturbing aspect ratio (View mode options would disturb AR).
- Tone mapping
- The algorithm method used for enhancing UHD high dynamic range (HDR) video to UHD standard dynamic range (SDR) video. Passthrough is not available using Kodi VideoPlayer. Currently Reinhard is the only option until other methods are introduced. This expands the tone curve producing a brighter picture.
- Tone mapping parameter
- Raises and lowers luminance based on your display capabilities (NIT Value). Displayed by scale and not actual NIT values. 1.00 is default. Higher or lower value may improve perceived image based on viewing environment and display capabilities.
- [VDPAU] Noise reduction
- Only visible when VDPAU is in use
- Select level of noise reduction for video content
- [VDPAU] Sharpness
- Only visible when VDPAU is in use
- Select sharpness amount to apply to video content
- Stereoscopic 3D mode of video
- Auto, Side by side, Over / Under. Same as Settings/System/Display/Preferred mode with fewer options. Auto is preferred. Can be changed on the fly here should your display fail to enter the correct corresponding 3D mode automatically.
- Invert stereoscopic 3D mode (flip eyes)
- Left and right overlapped frames are either left over right or vice versa depending how the 3D video was processed.
- Commonly used for 3D SBS video when Left side first needs to be changed to Right side first so field of depth is corrected. Placing glasses upside down will quickly reveal if the 3D video is LSF or RSF because objects that should be in the front depth field may be in the rear for example. This setting will correct rather than wear your glasses upside down should it be necessary
- Set as default for all videos
- Selecting this will make the current settings the default
- Video calibration
- Opens the Video calibration window
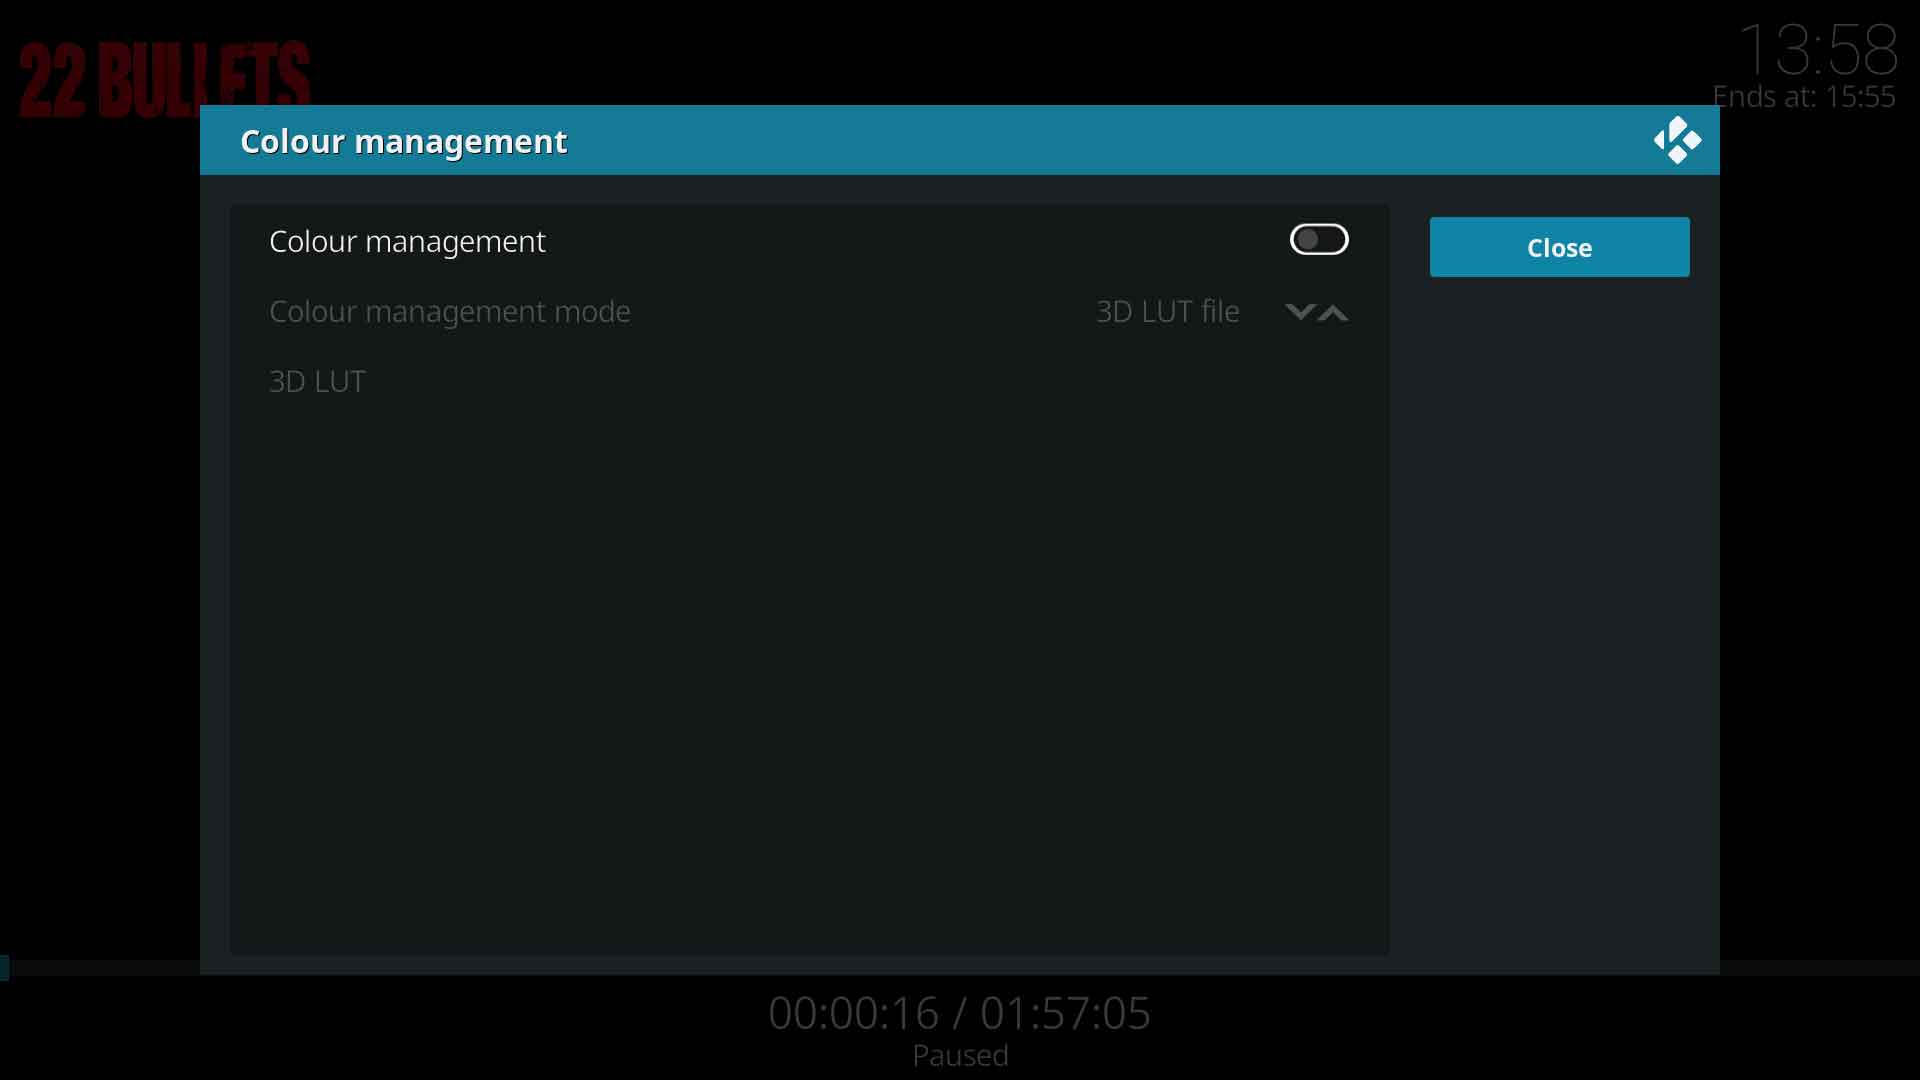
Colour Management
- Colour management
- Allows the use of 3D LUT file(s) or ICC mode profiles created from light meter calibrated measurements especially for HDR titles converted to SDR. Multiple files can be stored and selected based on a particular environment change such as a well lit room becoming dark.
- Colour management mode
- 3D LUT file(s) or ICC mode profiles. See above.
- 3D LUT
- Navigate and select where your 3D LUT file(s) is stored
Player Process Info
- See: Player process info
Player Debug Info
- See: Player process info
Video Debug Info
- See: Player process info
Display Info
- See: Player process info
| Return to top |
|---|
