Archive:Chromebox
| These pages are maintained by the community and should not be considered an endorsement or recommendation. Device pages are made when there's a bunch of useful information for a particular device, and someone takes the time to make that page. Keep in mind, some devices simply don't need a page of specific information, but are still excellent devices. * |
| Chromebox | |
|---|---|
 | |
| Released | 2014-03-14 (US) |
| OS | ChromeOS |
| CPU |
Intel® Celeron 2955U/2957U Intel® Core i3-4010U/4030U Intel® Core i7-4600U |
| Storage | 16GB internal SSD (M.2 SATA) |
| RAM |
2GB/4GB/8GB standard, 16GB max Dual Channel DDR3L-12800 |
| Graphics |
Intel® HD Graphics/GT1 (Celeron) Intel® HD Graphics 4400/GT2 (i3/i7) |
| Connectivity |
HDMI 1.4a DisplayPort 1.2a Bluetooth 4.0 USB 3.0 (4x) 802.11 abgn/AC wifi 10/100/1000 Ethernet 2 -in-1 Card Reader 3.5mm headphone plug |
| Dimensions | 4.88 x 4.88 x 1.65 inch (WxDxH) |


The Chromebox is an inexpensive small form-factor PC which runs Google's ChromeOS; it is the desktop variant of a Chromebook laptop. Although Kodi does not run natively under ChromeOS, the Chromebox can easily be made to run Linux (or Windows) and Kodi.
This page is a collection of links, information, tips, and guides related to running Kodi on Chromebox mini PCs.
Note: This page was originally written for the Haswell-based ASUS Chromebox, but the information herein is valid for all Haswell/Broadwell-based Chromeboxes. Model-specific features are enumerated below.
ChromeBox Overview
Chromeboxes are small, lightweight x86-64 PC that natively runs ChromeOS, but with a few simple tweaks, has the capability to run any Linux-based OS (some models can also run Windows 8.1+). They use customized open-source firmware components (mainly coreboot) to boot ChromeOS in a secure/verified manner. By putting it in Developer Mode, we disable the verified boot restriction, and allow the ChromeBox to boot in "legacy mode" (via a Legacy Boot payload, SeaBIOS), which enables other operating systems (eg: LibreELEC, GalliumOS) to be installed / dual booted. If ChromeOS isn't needed, then custom firmware can be installed to directly boot the legacy BIOS. A simplified overview of the ChromeBox boot process is shown here (click for full-size):

This wiki page will guide you through the steps necessary to put the ChromeBox into Developer Mode and set up Kodi in either a dual boot or standalone (non-ChromeOS) configuration. The majority of the process has been automated via the ChromeBox Kodi E-Z Setup Script, making it safe and (relatively) easy to run Linux/Kodi on your ChromeBox.
Generations and Models
SandyBridge
There is only one SandyBridge based Chromebox -- the Samsung Series 3 Chromebox -- though it was available with Celeron and Core-i5 mobile CPUs. It's not recommended for Kodi use due to the limitations of the integrated GPU (24p bug, no advanced deinterlacing), and the availability of the significantly more capable Haswell/Broadwell-based boxes, usually at a lower cost. It's also not capable of dual-booting ChromeOS + Kodi, due to lack of Legacy Boot mode in the stock firmware.
Haswell
Haswell Chromeboxes were first released in March 2014, and quickly became the low-cost x86 platform of choice due to the combination of the speed U-series Celeron CPU and capable integrated GPU.
Capability wise, the Haswell ChromeBoxes fully support hardware accelerated H.264/MPEG-2/VC-1 video playback at up to 2160p24/p30 (4K), proper 24p output, and full 7.1/HD audio bitstream output. 3D playback is supported (HSBS/HTAB), though the decoding of MVC streams (as used in 3D Blu-ray ISOs) is not supported under Linux at this time; the hardware itself is capable. Hi-10P (H.264) playback is software decoded, but works well with few exceptions. 4K (2160p) output is limited to 30Hz via both the DisplayPort and HDMI 1.4a outputs. H.265/HEVC is software (CPU) decoded, so playback is limited to 1080p max and low/moderate bit-rates. From a purely Kodi/media playback standpoint, there's no advantage to the Core i3/i7 models over the Celeron model (outside of non-GPU decoded formats, like Hi-10P and HEVC); dual channel memory (2 identical capacity modules) can provide a decent performance boost in some situations but certainly not needed for a standard OpenELEC/LibreELEC/Kodi setup.
| Make / Model | Asus Chromebox CN60 | HP Chromebox CB-1 | Acer Chromebox CXI | Dell Chromebox 3010 |
| CPU/GPU | Celeron 2955U (HD Graphics / GT1) Core i3-4010U, Core i7-4600U (HD Graphics 4400 / GT2) |
Celeron 2955U (HD Graphics / GT1) | Celeron 2957U (HD Graphics / GT1) Core i3-4030U (HD Graphics 4400 / GT2) |
Celeron 2955U (HD Graphics / GT1) Core i3-4010U, Core i7-4600U (HD Graphics 4400 / GT2) |
| RAM | Dual-channel DDR3 1333/1600 MHz 2x SO-DIMMs, 2/4GB stock, 16GB total max. |
Single-channel DDR3 1333/1600 MHz 1x SO-DIMMs, 2/4GB stock, 8GB total max. |
Dual-channel DDR3 1333/1600 MHz 2x SO-DIMMs, 2/4GB stock, 16GB total max. | |
| Display Outputs | 1x HDMI 1.4a 1x DisplayPort 1.2 | |||
| Internal storage | m.2 SATA SSD, 42mm (2242) MiniPCIe slot, 16GB stock | |||
| Ethernet | 1x RJ45, 10/100/1000 Mbps | |||
| WiFi / BT | Atheros AR9462 802.11 abgn + BT 4.0 | Intel 7260 802.11 ac + BT 4.0 | ||
| Audio | 7.1 digital audio (bitstream or PCM) via HDMI and DisplayPort Rear-panel 3.5mm headset jack | |||
| USB Ports | USB 3.0: 2x rear, 2x front | |||
| Card Reader | Internal USB 2.0-attached full-size SD card slot | |||
| Model Notes | Quietest fan SSD/RAM easily accessible for upgrading |
Loudest fan SSD/RAM require a few extra screws to disassemble chassis single RAM slot |
Medium fan noise Upright chassis design SSD/RAM require removing the entire board as slots are on the underside |
Medium fan noise SSD/RAM easily accessible for upgrading only model with -AC WiFi. |
All Haswell model Chromeboxes are fully supported by the ChromeBox Kodi E-Z Setup Script.
Broadwell
Broadwell Chromeboxes were announced in the Spring of 2015, but not available to purchase until the Fall. Even now, their availability is still limited to the Haswell boxes, which have displayed remarkable staying power given the release of replacement models. Broadwell CPUs are ~15% faster than Haswell, like for like, but GPU performance is nearly identical, and for Kodi use they are likely indistinguishable.
Capability wise, the Broadwell ChromeBoxes are essentially identical to the Haswell Chromeboxes, with the addition of supporting 4K (2160p) at 60Hz via DisplayPort. HEVC is still software decoded, making 4K output a spec-sheet checkmark for the most part.
| Make / Model | Asus Chromebox CN62 | Acer Chromebox CXI2 | Lenovo ThinkCentre Chromebox | |
| CPU/GPU | Celeron 3205U (HD Graphics / GT1) Core i3-5005U, Core i7-5500U (HD Graphics 5500 / GT2) |
Celeron 3205U (HD Graphics / GT1) Core i3-5005U, Core i7-5500U (HD Graphics 5500 / GT2) |
Celeron 3205U (HD Graphics / GT1) Core i3-5005U (HD Graphics 5500 / GT2) | |
| RAM | Dual-channel DDR3 1333/1600 MHz 2x SO-DIMMs, 2/4GB stock, 16GB max. |
Celeron model: Single-channel DDR3 1333/1600 MHz 1x SO-DIMMs, 2/4GB stock, 8GB max. | ||
| Display Outputs | 1x HDMI 1.4a 1x DisplayPort 1.2 | |||
| Internal storage | m.2 SATA SSD, 42mm (2242) MiniPCIe slot, 16GB stock | |||
| Ethernet | 1x RJ45, 10/100/1000 Mbps | |||
| WiFi / BT | Intel 7260 802.11 ac + BT 4.0 | |||
| Audio | 7.1 digital audio (bitstream or PCM) via HDMI and DisplayPort Rear-panel 3.5mm headset jack | |||
| USB Ports | USB 3.0: 2x rear, 2x front | |||
| Card Reader | Internal USB 2.0-attached full-size SD card slot | None | ||
| Model Notes | Quietest fan SSD/RAM easily accessible for upgrading |
Medium fan noise Upright chassis design SSD/RAM require removing the entire board as slots are on the underside |
Medium fan noise SSD/RAM require a single screw to access single RAM slot (Celeron model) no SD card reader external WiFi antenna | |
All Broadwell model Chromeboxes are fully supported by the ChromeBox Kodi E-Z Setup Script.
Kabylake
Kabylake Chromeboxes were released in the Spring of 2018, and feature a few notable improvements over the previous Haswell/Broadwell models (which are effectively identical). The Kabylake SoC provides a nice speed bump, but more importantly the GPU features full 10-bit HEVC/VP9 decoding, as well as 4Kp60 output (via USB-C DisplayPort alt-mode).
Unfortunately, the GPU in the Kabylake SoC still doesn't natively support HDMI 2.0 output. This means that 4Kp60 output still requires the use of a DisplayPort to HDMI 2.0 adapter (via the USB-C port), and thus a LSPCON (level shifter/protocol converter). The use of a LSPCON means that HD audio bitstreaming almost certainly won't work (due to driver limitations), so one must choose between using the HDMI 1.4 output with HD audio, or the USB-C output with 4K output.
Also, although the Kabylake SoC is HDR capable, Intel has not implemented HDR capability under Linux. Because of this and the above factors, it's hard to recommend a Kabylake Chromebox at this time, unless you simply want a faster, HEVC/VP9 capable device and the aforementioned limitations do not bother you. Even still, there likely better options available at a lower price point.
| Make / Model | Asus Chromebox 3 / CN65 | Acer Chromebox CXI3 | HP Chromebox G2 | CTL Chromebox CBx1 |
| SoC/GPU | Kabylake-U / HD610 (Celeron, i3/i5-7xxx) Kabylake-R / UHD620 (i5/i7-8xxx) | |||
| CPU | Celeron 3865U, Core i3-7100U, Core i5-8250U, Core i7-8550U | Celeron 3865U, Core i3-7130U, Core i5-8250U, Core i7-8550U | Celeron 3865U, Core i5-7300U, Core i7-8560U | Celeron 3865U, Core i7-8550U |
| RAM | Dual-channel DDR4 2133, 2x SODIMMs, 32GB max. | |||
| Display Outputs | 1x HDMI 1.4a 1x USB-C | |||
| Internal storage | m.2 SATA SSD, 42mm (2242); 80mm drives can be used as well Core-i models support NVMe drives (PCIe x4) | |||
| Ethernet | 1x Realtek RT8169, RJ45, 10/100/1000 Mbps | |||
| WiFi / BT | Intel 7265 802.11 ac + BT 4.0 | |||
| Audio | 7.1 digital audio (bitstream or PCM) via HDMI and DisplayPort Front-panel 3.5mm headset jack (not functional under Linux currently due to driver issues) | |||
| USB Ports | USB 3.0: 3x rear, 2x front USB 3.1 Gen 1 Type-C: 1x rear | |||
| Card Reader | Front internal micro-SD card slot | |||
| Model Notes | ||||
All Kabylake model Chromeboxes are fully supported by the ChromeBox Kodi E-Z Setup Script. Currently, Legacy Boot Mode is broken in Google's stock firmware, so dual booting is not functional at this time.
Device Preparation
Disable Firmware Write Protect
Disabling the firmware write protect will allow us to shorten the timeout on the developer boot screen (from 30s to ~1s) in a dual boot configuration, and optionally boot directly in "legacy mode" (and into GalliumOS/LibreELEC). Disabling the write protect is also necessary for standalone setups so that the stock firmware can be replaced with a custom version.
With the device powered off and unplugged:
- Remove (4) rubber feet from bottom of unit
- Remove (4) screws under rubber feet
- Take off the bottom cover.
- Tip: Thread two of the screws that you just removed into the VESA mounting holes, and use them to pull/separate bottom cover.
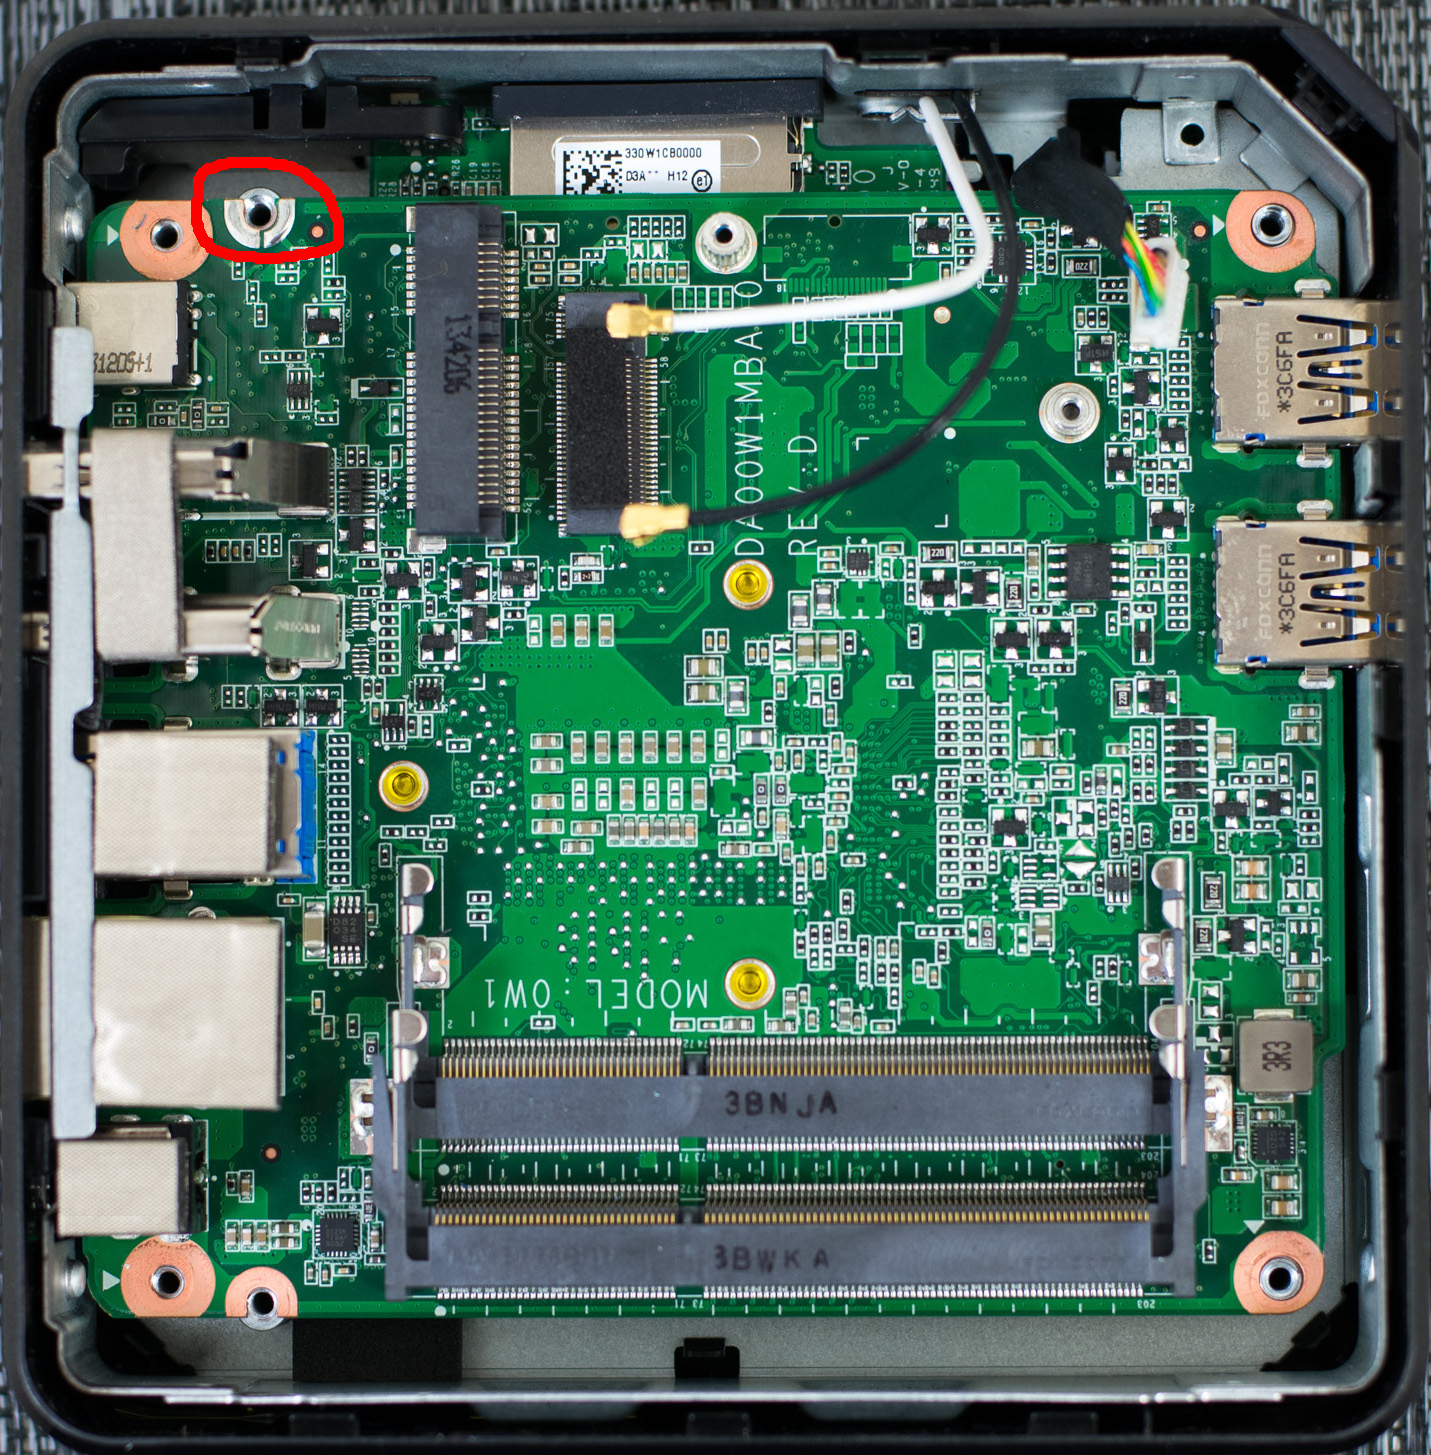
- Remove write-protect screw circled below:
- Asus CN60,CN62/HP CB-1/Dell 3010:
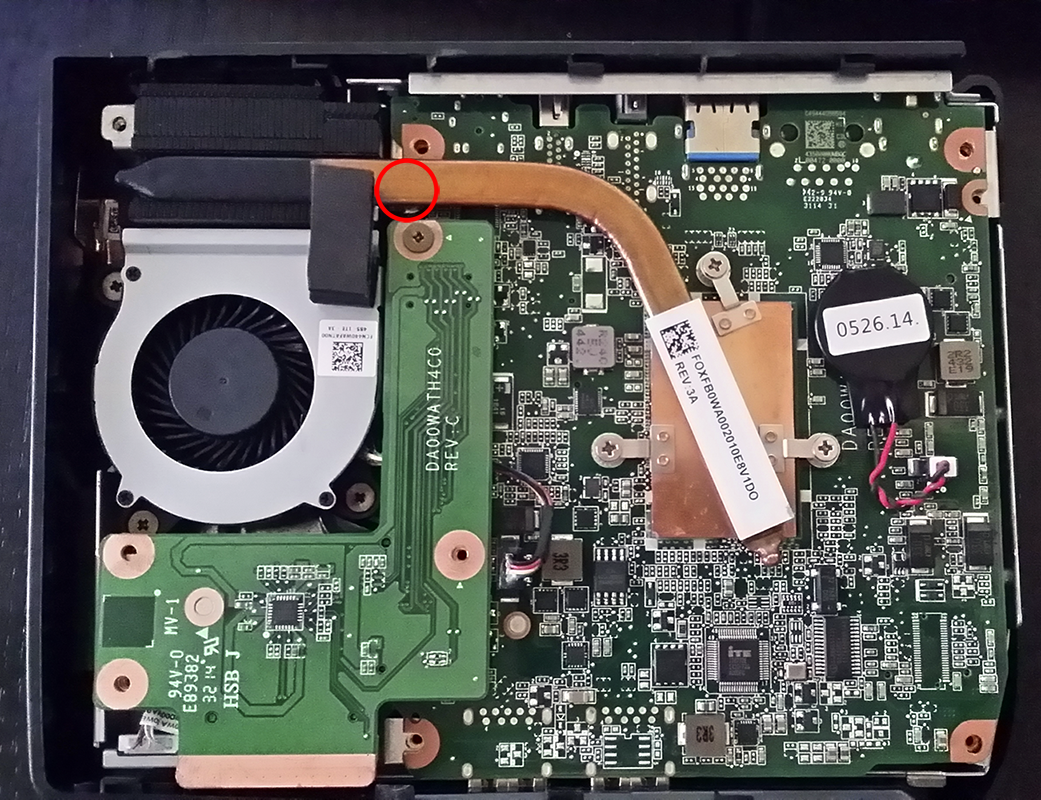
- Acer CXI,CXI2:
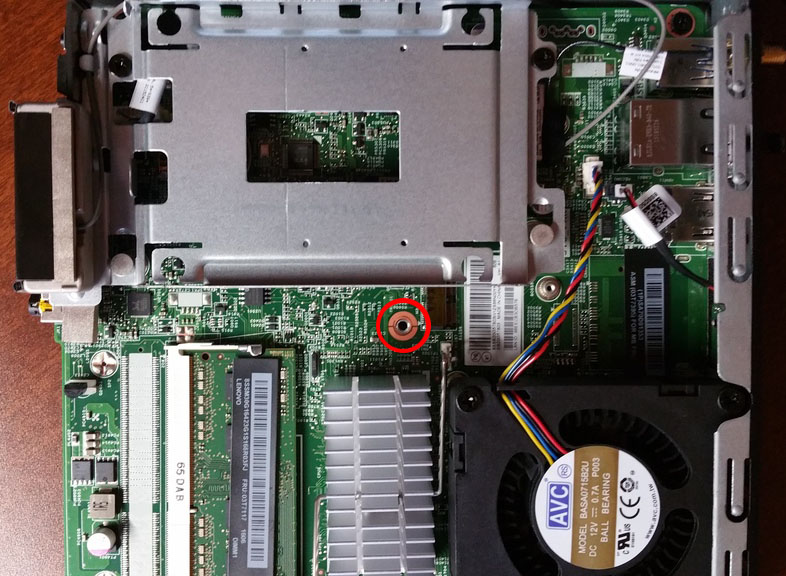
- Lenovo Thinkcenter Chromebox:
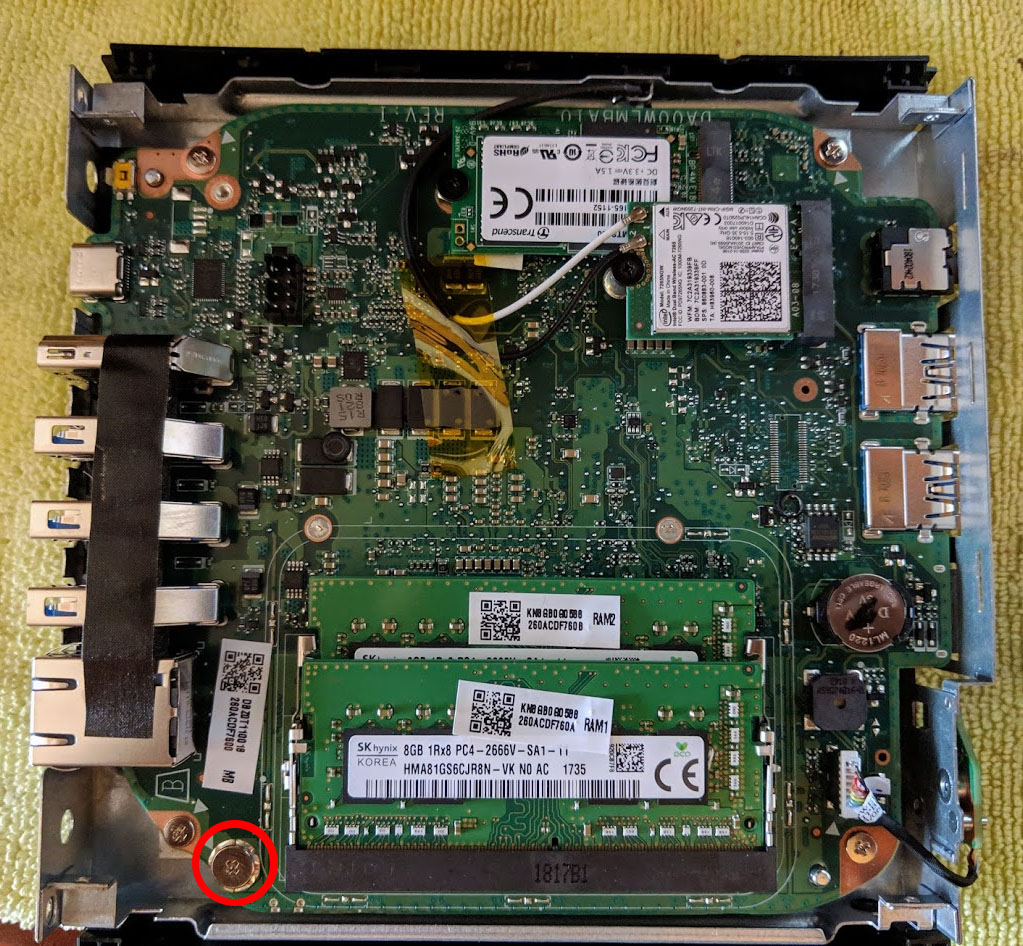
- 2018 (Kabylake) Chromeboxes (Asus CN65, Acer CXI3, CTL CBx-1, HP CB G2):
- Notes:
- -- The write-protect screw on the Acer model is under the heat pipe, which needs to be removed to access it. Be sure to smooth out (or replace) the heatsink grease before reinstallation of the heatsink / heat pipe.
- -- On some boxes (this is rare, but seems to be most common on the Dells), even after removing the write-protect screw, there is still connectivity between the two semi-circles, in which case you may need to use a small flathead screwdriver (eg) to lightly scrape away the excess material which is causing continuity. You can verify with a DMM.
- Reassemble in reverse order


Important: The write-protect screw should be left out permanently.
Note without the screw there was a case registered with bootloop when powering from USB-C Power Delivery. Your mileage may vary.
Put in Developer Mode
Putting the ChromeBox in developer mode will disable verified boot mode, and allow you to access the underlying Linux operating system features necessary for installing/running Kodi (via LibreELEC/GalliumOS).
WARNING: This will erase all user data on the device.
With the device powered off:
- Insert a paperclip into the hole left of the SD card slot and press the recovery button
- Power on the device, then remove the paper clip
- When greeted with the recovery screen, press [CTRL-D] to enter developer mode
- Press the recovery button (with paperclip) to confirm.

After confirming, the device will reboot and wipe any existing user data - this will take ~5 minutes. Afterwards, the ChromeBox will be in developer mode (vs verified boot mode), and the developer boot screen (shown below) will be displayed at each boot.
Note: The recovery button (and booting to recovery mode) are a function of the stock firmware. If you've flashed a custom firmware on your box (either as part of a standalone setup or otherwise), the recovery button has no function and the ChromeOS recovery mode doesn't exist.

The developer boot screen has a warning about OS verification being off. Do not hit [SPACE], as it will return the device to verified boot mode. The ChromeBox must remain in developer mode, else you will potentially have to redo the setup from the beginning. The developer mode boot screen has a ~30s timeout, followed by two beeps, before booting. You can skip the delay by pressing [CTRL-D] to immediately boot into ChromeOS.
Perform a Factory Reset
A factory reset is not needed for a standalone setup, but must be performed prior to any dual-boot (re)install.
- Create recovery media using step 2 of Google's instructions here: https://support.google.com/chromebook/answer/1080595?hl=en or use the ChromeBook Recovery Utility from the Chrome web store.
Note: Google's recovery tool can be picky about what kind/size of USB/SD media you use. If one USB stick doesn't work, try another.
- With the device powered off, use a paperclip to press the Recovery button and power on the device
- Insert the recovery media (USB or SD) when prompted
Note that this will re-partition the internal hard drive and restore the original copy of ChromeOS, erasing anything else on the drive. The ChromeBox will still be left in developer mode, and if you changed the Boot Options they will still be set - so be sure to reset them back to the 'ChromeOS + 30s default' option before performing a factory reset. If you forget to do that, you'll need to press [CTRL-D] on the developer boot screen (or before the legacy boot/SeaBIOS boot screen) in order to boot ChromeOS after performing the recovery.
Note: The recovery media created using Google's recovery tool works only when the ChromeBox is booted into recovery mode, which only exists when using the stock firmware. If you've flashed a custom firmware on your box (either as part of a standalone setup or otherwise), ChromeOS recovery mode doesn't exist, and attempting to boot the recovery media from SeaBIOS will not work (it will boot you into a non-functional version of ChromeOS).
Installation, Configuration, and Updating
OS and Kodi Installation
Kodi can be installed on the ChromeBox in a variety of ways. The two most common are via LibreELEC or GalliumOS+Kodi, in either a standalone or dual boot configuration. This is accomplished via the ChromeBox Kodi E-Z Setup Script, which must be run (at least initially) from ChromeOS.
The EZ setup script will facilitate everything needed to install either a dual boot setup, or install a custom firmware which allows the installation of any Linux-based OS in standalone mode.
To run the ChromeBox E-Z Setup script, perform the following steps:
- Power on and boot to ChromeOS. Do not log in, but ensure a network connection is established.
- Hit [CTRL][ALT][F2] to open a command prompt ([CTRL][ALT][<--] for ChromeOS keyboards)
- Login with user chronos (no password required)
- Download and run the ChromeBox Kodi E-Z Setup Script using the following command (hit enter afterwards):
- curl -L -O https://mrchromebox.tech/setup-kodi.sh && sudo bash setup-kodi.sh
Full instructions and a detailed explanation of the script's functions and usage can be found at the following forum thread: http://forum.kodi.tv/showthread.php?tid=194362
Older Kernels: If installing a Linux-based OS other than LibreELEC not via the E-Z Setup Script (eg, Kodibuntu), you may need to manually update the kernel for optimal operation. Kernel version 3.18.4 is the minimum recommended, as it has a fix for an Intel GPU bug that can cause hanging during video playback. Updating the kernel is OS-specific and beyond the scope of this wiki, but instructions are easily found by googling.
Ubuntu 15.10: Ubuntu Wily Werewolf (15.10) ships with Linux kernel 4.2.0, which immediately panics upon boot on Chromeboxes. To fix this, you can boot by adding 'acpi=off' as a GRUB kernel boot parameter, then manually update to kernel 4.3 (or later) after the OS is installed/booted.
If the LibreELEC install media created by the script doesn't work (or you forget to create it before rebooting, or just want to do a fresh install), then you can create install media by using the LibreELEC USB/SD creator tool, which is available for Windows/Mac/Linux.
Dual Boot OS Selection
When dual booting with ChromeOS and LibreELEC/GalliumOS, due to the ChromeBox's firmware setup, there is no conventional boot menu. Instead, the OS selection is made via keyboard shortcuts on the developer mode boot screen (shown above): [CTRL-D] boots directly ChromeOS; [CTRL-L] boots the legacy BIOS (and whatever secondary OS is installed). The default OS and boot timeout are set using the 'Set Boot Options' feature of the EZ Setup Script.
Updating Kodi
LibreELEC
The Chromebox is, at its core, a standard 64-bit x86 system (albeit, like the NUC, with an ultra low power processor). The standard LibreELEC builds - labeled 'Generic' for x86_64 PCs - work perfectly well, and it is recommended to use LibreELEC's auto-update feature (System --> LibreELEC --> System --> Automatic Updates: auto). Automatic updates won't update from a stable to a beta release, but will update stable->stable, beta->beta, and beta->stable within the same major version. If the automatic update doesn't work for some reason, or you want to update to a test/nightly/beta/RC build, you can manually update using the instructions on the LibreELEC wiki.
Manual update file:
LibreELEC 8.0.1 / Kodi 17.1
NOTE: LibreELEC versions 7.0 and above now require a larger system partition than previous versions. Attempting to upgrade may fail with a 'system size check' error. In this case, the easiest resolution is to backup (using LE's built-in backup tool), doing a fresh install (from USB) of whatever version you're looking to run, and then restore the backup (which you saved to USB or otherwise copied elsewhere).
Recommended Settings
Kodi General
For the most part, the default / out-of-the-box settings are correct/optimal for the ChromeBox, though the following changes are suggested:
- System-->Settings-->System: Settings Level: Expert
- System-->Settings-->System-->Power Saving: Shutdown function: Suspend (sets remote power toggle to suspend)
- System-->Settings-->Videos-->Playback: Adjust display refresh rate: On start / stop
- System-->Settings-->Videos-->Playback: -Pause during refresh rate change: set as needed depending on your display (0.0s - 0.5s is usually adequate)
- System-->Settings-->Videos-->Acceleration: Enable HQ Scalers for scalings above: 20%
- System-->Settings-->Videos-->Acceleration: Allow hardware acceleration (VDPAU): Off
- System-->Settings-->Videos-->Acceleration: Allow hardware acceleration (VAAPI): On (default)
- System-->Settings-->Videos-->Acceleration: -Use MPEG-2 VAAPI: On (default)
- System-->Settings-->Videos-->Acceleration: -Use MPEG-4 VAAP): On (default)
- System-->Settings-->Videos-->Acceleration: -Use VC-1 VAAPI: On (default)
- System-->Settings-->Videos-->Acceleration: -Prefer VAAPI render method: On (default)
- System-->Settings-->System-->Video Output: Vertical blank sync: Let driver choose (default)
- System-->Settings-->System-->Video Output: Use limited colour range (16-235): set as needed to achieve proper black levels; users of PC monitors will need to deselect this, otherwise blacks will be washed out. (Intel-EGL builds only)
Also see the video playback / deinterlacing settings as shown in the screenshots below. These settings are accessed during video playback by bringing up the menu and selecting video playback options (the movie reel icon). Change as needed, then hit 'Set as default for all videos' to save.
LibreELEC Specific
- System-->LibreELEC-->System: Automatic Updates: on
- System-->LibreELEC-->Network: Wireless Networks/Active: On (if using WiFi)
- System-->LibreELEC-->Network: Wait for network before starting Kodi: On if using a external mysql database; otherwise Off (breaks Wi-Fi, only use for wired/ethernet connections)
- System-->LibreELEC-->Services: Enable Bluetooth: On if using a Bluetooth remote, otherwise leave off
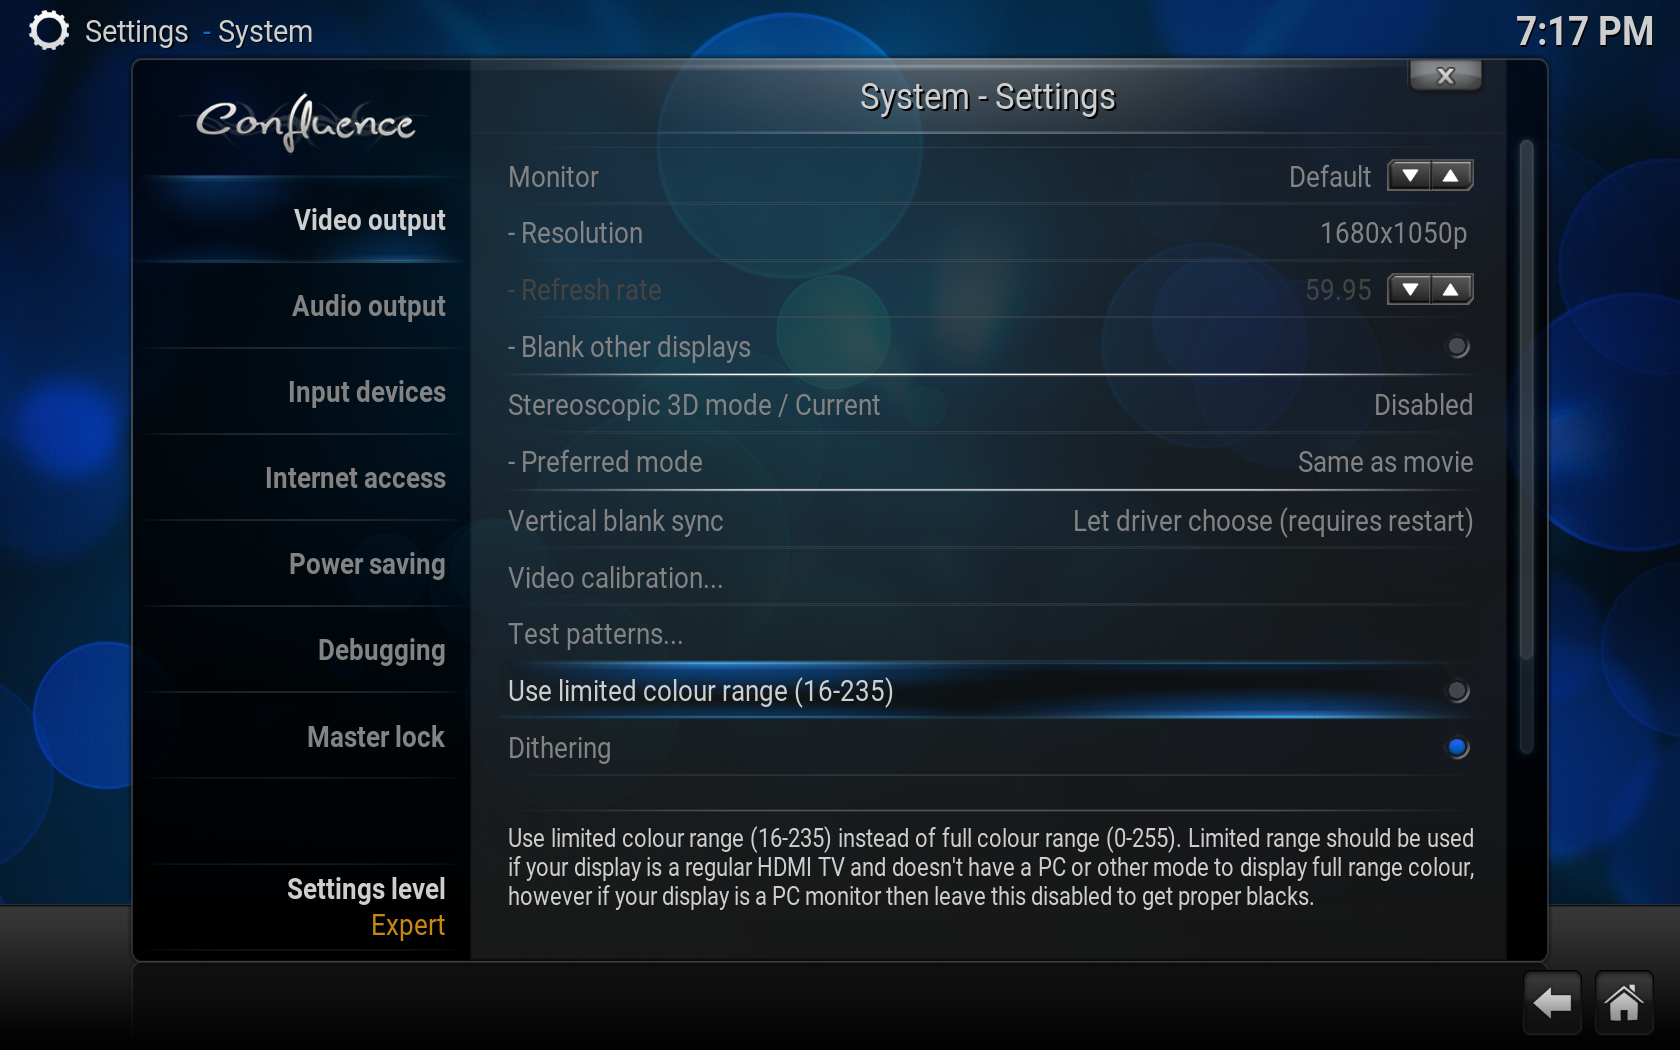
ChromeBox Settings: System/Video Output

ChromeBox Settings: Video/Playback
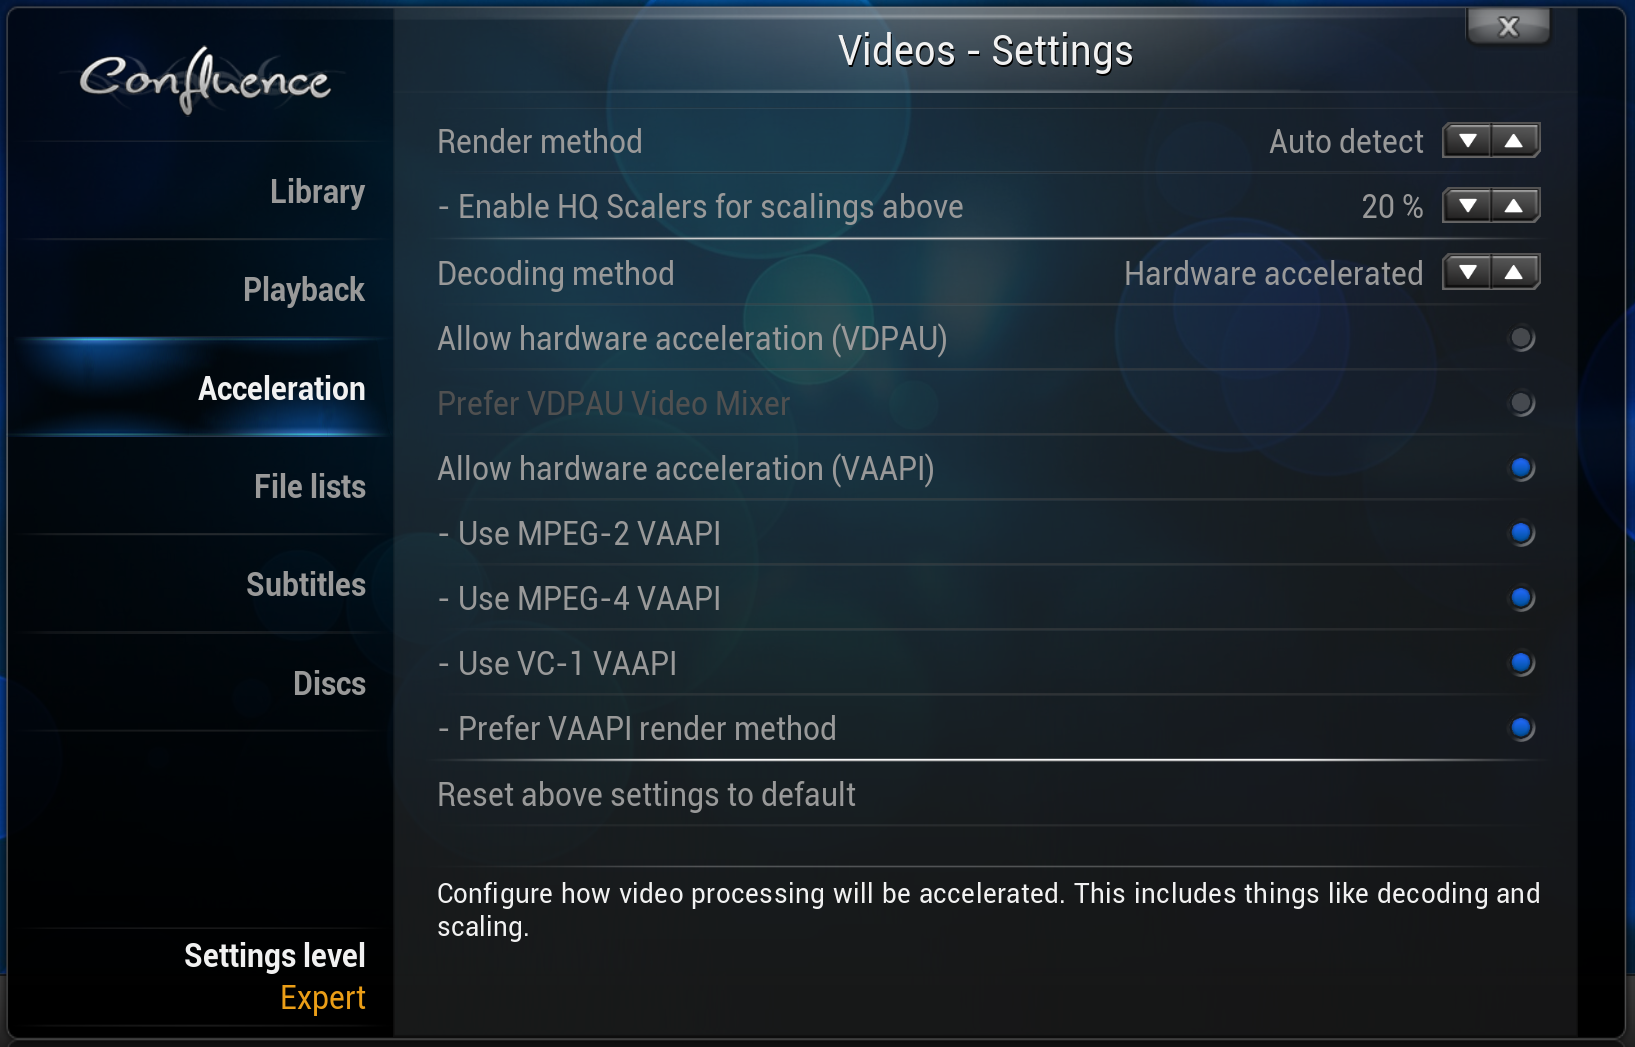
ChromeBox Settings: Video/Acceleration
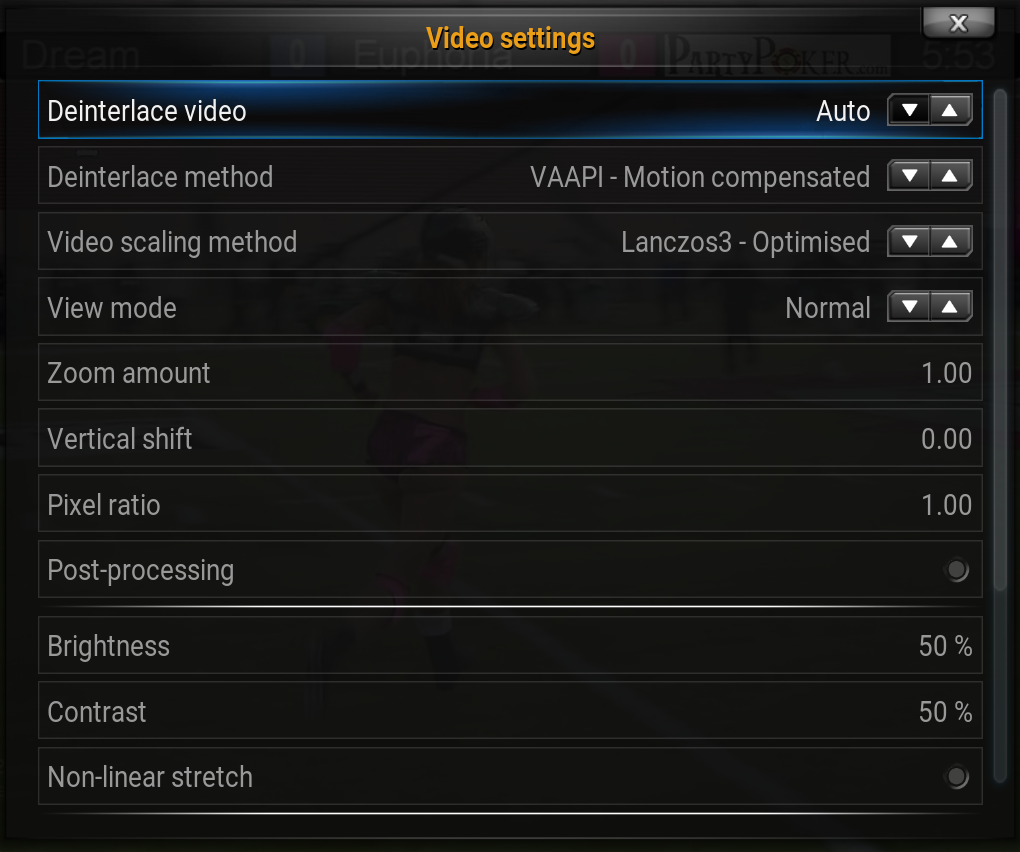
ChromeBox Video Playback Settings (1/2)
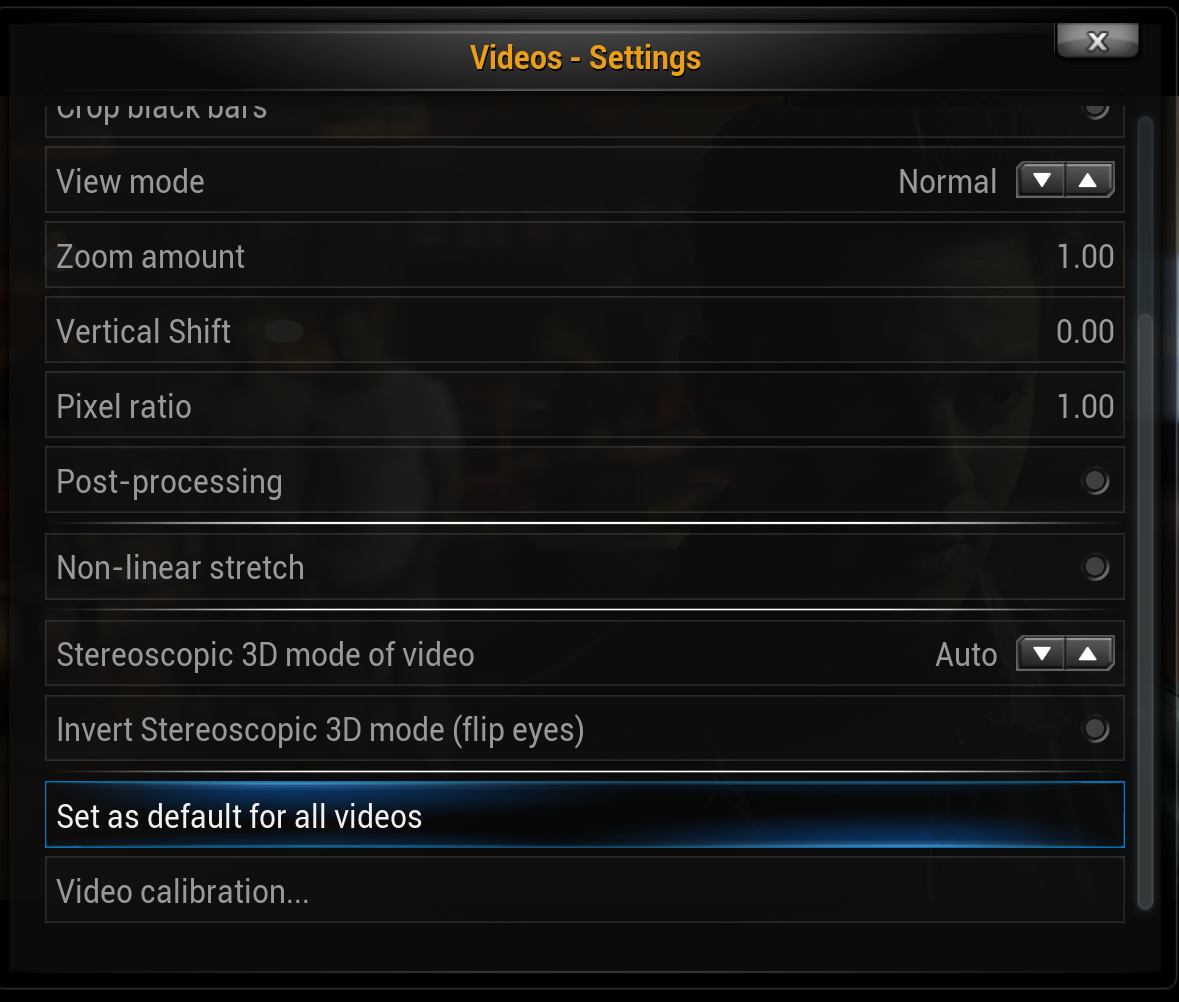
ChromeBox Video Playback Settings (2/2)


Switching between Standalone and Dual Boot configurations
If you have a dual boot setup and wish to switch to a standalone setup, the steps are no different than installing on a "fresh" system, though you can obviously skip the steps you have already performed (removing the write-protect screw, putting the box in developer mode). The easiest way to do this is to boot ChromeOS ([CTRL+D] from Developer Mode boot screen / before SeaBIOS loads) and re-run the E-Z Setup Script as before. If you can't boot ChromeOS for whatever reason, then simply create/boot a Linux ISO from USB (I use/recommend GalliumOS) and run the script from a terminal there.
If you have an LibreELEC dual boot setup and are switching to an LibreELEC standalone setup, then you can backup your settings etc using the built-in tools, copy to another PC/USB, and then restore after performing the standalone setup.
If you have a standalone setup and wish to switch to a dual boot setup, you need to first restore the stock firmware, then perform a factory reset, after which you can continue with the dual boot setup.
Recommended Accessories / Hardware Upgrades
For most users, there's no need to upgrade the ChromeBox's RAM or HDD; LibreELEC uses minimal RAM and disk space, and there's no benefit to upgrading. However, users who opt for a full Linux + Kodi setup, and plan on running lots of background processes etc, may find it beneficial to install additional RAM or upgrade to a larger SSD.
RAM:
- The ChromeBox has two (2) 204-Pin SODIMM slots (HP models only have one), which use DDR3L (1.35V) 1600MHz/PC3-12800 modules. Known working modules include:
- Crucial CT25664BF160B (2GB, 1.35v/1.5v)
- Crucial CT2CP51264BF160B (8GB [4GB x2] 1.35v/1.5v)
- Crucial CT2KIT102464BF160B (16GB [8GB x2] 1.35v/1.5v)
- Hynix HMT351S6CFR8C-PB (2GB, OEM)
- HP H6Y75AA (4GB, 1.35v)
- Crucial also has a list of 1.35v-only compatible modules here: http://www.crucial.com/usa/en/compatible-memory-for/ASUS/chromebox
SDD:
- The ChromeBox uses a single 2242 M.2 SATA SSD (22mm x 42mm); stock is a 16GB unit (usually Sandisk or Kensington). Any M.2 SATA 2242 replacement drive should work without issue.
Remote Controls:
- The ChromeBox does not have a built-in IR sensor, and must therefore use a USB IR receiver (or a Bluetooth remote). In general, any remote/receiver listed on the Kodi wiki as fully working under Linux should be fine, though some have issues when connected to USB3 ports. A Microsoft eHome compatible remote/receiver is one of the most compatible, subject to the limitations listed in the 'Known Issues' section above. Specific models tested as working include:
- Flirc
- Flirc users need to set the "sleep detection" bit and program a wake key when setting it up, otherwise absolutely any IR signal will wake up your box from sleep.
- HP IR receiver model 5188-1667 (MCE/eHome)
- HP IR receiver model 5187-4593 (MCE/eHome)
- HP IR receiver model 5070-2584 (MCE/eHome)
- Microsoft IR receiver model 1040 (MCE/eHome)
- Sony IR receiver model PCVA-IR8U (MCE/eHome)
- HP IR remote/receiver kit OVU400102/71 (MCE/eHome, includes 5187-4593 receiver)
- Ortek IR remote/receiver kit VRC-1100 (MCE clone, receiver also works well w/Logitech Harmony remotes)
- Rosewill RHRC-11002 remote (MCE clone, includes receiver model IR605)
- Rosewill WMC RRC-127 remote/receiver
- Microsoft XBOX 360 IR remote (with MCE/eHome receiver or Flirc)
- Microsoft XBOX One IR remote (with MCE/eHome receiver or Flirc)
- Logitech Harmony remotes (programmed as Microsoft Media Center Extender - not as a keyboard - with MCE/eHome receiver; not recommended for use with a Flirc)
- Sony Playstation 3 (PS3) Bluetooth remote (works with built-in BT receiver)
- press/hold START + ENTER to pair, choose 'Trust and Connect', then hit Ok and Enable Standby after connecting
- Logitech Harmony Smart Hub (via Bluetooth, works with built-in BT receiver, see forum post here)
- Measy RC11 Android Monitor Wireless Keyboard Air Mouse Remote Controller With Gyroscope (cannot wake up Chromebox but works otherwise nicely, with keys as well as with mouse pointer at both OpenELEC and ChromeOS)
- Amazon FireTV / Fire Stick remotes (Bluetooth)
- Flirc
- NOTE: If you need to re-map remote buttons, you can use the Keymap Editor Add-on to do so.
- Currently non-working:
- AVS Gear HA-IR01SV (MCE/eHome)
- All Topseed manufactured MCE IR receivers
USB Audio Devices:
- As the ChromeBox only has HDMI and analog audio outputs, if you need SPDIF, then either a converter or external/USB device must be used. The following devices have been tested/confirmed working:
- Turtle Beach Audio Advantage Micro II (plug/play in both OpenELEC and Win8.1)
- ASUS Xonar U3 USB (OpenELEC: requires un-muting the SPDIF line, see this forum post)
HDMI-CEC:
- The ChromeBox does not support HDMI-CEC natively, but support can be added using an external USB CEC adapter from Pulse-Eight. The USB CEC Adapter needs power to the USB port BEFORE there is any video out, or it simply will not pass through any video signal. There are several ways to work around this:
- Either always leave your Chromebox on, or just put it into standby; never turn it off
- Use an externally powered source (eg, USB hub, TV set) to power the adapter (rather than the ChromeBox itself), so it always has power
- If you have a spare HDMI port, you actually can split video in and control in for one HDMI channel using two physical HDMI ports. The video will be connected to the main port, and that's the port you use in the HDMI config settings in Kodi, and then you simply connect the USB CEC adapter to a spare HDMI port, does not appear to matter which.
Troubleshooting, Known Issues, Fixes/Workarounds
Installation, Dual Booting, USB booting:
- Some keyboards seem to have issues working on the ChromeOS developer boot screen (before the OS is booted), and therefore cannot be used to setup/install Kodi on a ChromeBox, or to select between OSes in a dual boot setup. The Logitech K400 is one of these, so use another keyboard to install if yours doesn't appear to be working. Most Bluetooth keyboards will not work due to the fact that they require the OS to be loaded in order to reconnect to the ChromeBox.
- An effort is underway on the forums to catalog which keyboards work (and which do not); the thread (which is being updated regularly) can be found here: http://forum.kodi.tv/showthread.php?tid=211797
- Help! I'm stuck on the black SeaBIOS boot screen, with the "booting from hard disk" text displayed (and possibly a bunch of nonsensical text afterwards).
- This happens because SeaBIOS is trying to boot from the internal hard drive, but no bootable OS (or only ChromeOS) is installed.
- If you have a dual boot setup, 99% of the time this is due to not having performed a factory reset prior to running the EZ Setup Script, as listed in the Device Prep section above. Simply perform the factory reset, then redo the dual boot setup using the script as before.
- If you have a standalone setup, and are trying to boot from USB:
- If you see the 'Press ESC for boot menu' text but pressing it doesn't work, then the issue is your keyboard, so try using a different one.
- If you don't see the 'Press ESC for boot menu' text, then the issue is with your boot media, so try using a different USB flash drive.
- Ok, I have an OS installed, but I can't boot from USB - it boots too fast!
- This means your USB boot media isn't being recognized, otherwise you would have 5s to press ESC and bring up the boot menu. Re-create your boot media, possibly using a different USB stick. If you're trying to boot a Linux ISO, write the ISO directly to USB (using Win32DiskImager or dd), don't use a tool like unetbootin (eg).
- If you're getting an error similar to "It appears your computer only has 639K of low ("DOS") RAM.", then you're pressing the dual boot selection keys (CTRL-D/CTRL-L) too late in the boot sequence - they need to be pressed on the developer mode boot screen, before it boots either ChromeOS or the Legacy BIOS (SeaBIOS). On some displays, this may mean pressing them before the display comes on, particularly if you've set the boot delay to 1s.
- If the install media created by the script doesn't work (or you forget to create it before rebooting), then you can simply download the disk image version of LibreELEC as per the instructions above.
- Some TVs/displays are not able to show the ChromeOS developer boot screen due to the resolution it uses (1024x768 @ 60Hz), in which case you'll need to use a different display to complete the initial setup steps.
- Many TVs have overscan enabled by default, which will cut off the text display of the ChromeOS shell. Be sure to set your TV to a mode which does not overscan (varies by manufacturer - often called 'just scan', 'exact' 'pixel perfect'; some TVs require you to label the input as a PC).
- Using a passive DisplayPort-->HDMI cable/adapter is often problematic, and can cause the video output drop out after booting. Use either a straight DP cable or straight HDMI/HDMI-->DVI cable; if you have to use a DisplayPort-->HDMI adapter, be sure it is the active type.
- Some keyboards seem to have issues working on the ChromeOS developer boot screen (before the OS is booted), and therefore cannot be used to setup/install Kodi on a ChromeBox, or to select between OSes in a dual boot setup. The Logitech K400 is one of these, so use another keyboard to install if yours doesn't appear to be working. Most Bluetooth keyboards will not work due to the fact that they require the OS to be loaded in order to reconnect to the ChromeBox.
No Audio and/or corrupted video on Wakeup from Suspend:
- Some displays/AVRs don't successfully handshake when resuming from suspend, leading to no audio output and/or corrupted video output until the Chromebox is rebooted.
- Solution: If using a universal remote, such as a Harmony, ensure that you are turning off (suspending) the ChromeBox before your AVR/TV, and turning it on (resuming) after the AVR/TV.
- Solution: download/enable a script that will force the ChromeBox to reset the audio/video output on resume from suspend. Use an SSH client like Putty to connect to the ChromeBox, and execute the following commands:
- For Openelec:
- mkdir -p /storage/.config/sleep.d
- cd /storage/.config/sleep.d
- curl -L -O https://mrchromebox.tech/files/kodi/01-cbox_resume.power
- chmod +x 01-cbox_resume.power
- For Ubuntu:
- cd /lib/systemd/system-sleep
- sudo wget https://mrchromebox.tech/files/kodi/01-cbox_resume.power
- sudo chmod +x 01-cbox_resume.power
- For Openelec:
- Then reboot the ChromeBox
- Some displays/AVRs don't successfully handshake when resuming from suspend, leading to no audio output and/or corrupted video output until the Chromebox is rebooted.
- Note: If connected via the DisplayPort output, use a text editor (eg, nano) to edit the script and replace references to 'HDMI1' with 'DP1'.
Remote Controls:
- Most MCE IR receivers work properly now when connected to USB3 ports under Linux with kernel 3.16+ (older kernels will require a patch/fix); OpenELEC 4.0+ is fully up to date. The version of Ubuntu installed by the ChromeBox EZ setup script in a dual boot setup also includes an up-to-date kernel. However, some buggy MCE receivers still do not work properly (at all), as noted below in the Hardware/Remotes section.
- For standalone Ubuntu (or any other distro) installs, you will need to update to a 3.16 (or later) kernel.
Unreliable Wireless Devices attached to USB 3.0 ports:
- Use a USB extension cable to move the device as far away from the USB port as possible. USB 3.0 can cause wireless interference. Intel has released a whitepaper documenting the issue.
Power Management:
- Suspend/resume is generally problematic with the stock firmware (dual boot setups - OpenELEC will reboot on resume), but works reliably in standalone setups running the coreboot firmware. Resume via IR remote (USB) and wake-on-lan (eg, via YATSE) work perfectly well.
- Note: WOL only works when the ChromeBox is suspended, not fully powered off, and requires the MAC address of the box to be set (eg, in YATSE)
Windows 8/8.1/10:
- (Updated 2016/11/17) HDMI audio now works OOTB using the custom UEFI firmware from https://mrchromebox.tech.
- Bluray disc playback doesn't work, as PowerDVD and WinDVD report that the video drivers are not supported, even though they report the hardware is capable.
- (Updated 2016/11/17 -- now fixed in custom UEFI firmware) The CPU fan will shut down at boot and not come back on unless a utility like SpeedFan is used to start it. After manually starting the fan (set PWM1 to 50%), set Speedfan for automatic control and then create a shortcut for it to run at startup.
- Windows 7 doesn't install/work, so don't ask for help with it.
- Discussion of running Windows on a ChromeBox can be found on this forum thread: http://forum.kodi.tv/showthread.php?tid=203040
Linux Video Tearing:
- Some users may experience screen tearing under the Linux desktop, or when watching video (e.g., Netflix). The fix for this is documented on the Arch Wiki, and copied here for convenience.
- from a terminal/shell prompt:
- sudo nano /usr/share/X11/xorg.conf.d/20-intel.conf
- from a terminal/shell prompt:
- copy/paste the following:
- Section "Device"
- Identifier "Intel Graphics"
- Driver "intel"
- Option "TearFree" "true"
- EndSection
- Section "Device"
- then save, exit, and reboot.
High CPU usage at Idle:
- When running a Linux setup, there is high idle CPU usage with some older kernels which do not fully support the Haswell platform; be sure to update to the latest kernel available (at least 3.18.4). On some (mostly dual boot) setups, it may also be necessary to add the following kernel boot parameters to disable the TPM: tpm_tis.force=1 tpm_tis.interrupts=0
No HDMI Audio on 2018/Kabylake Chromeboxes:
- the snd_soc_skl audio driver is breaking things, so we need to blacklist it. Open up the 'configfiles' network share on your Chromebox, then the modprobe.d folder. If it doesn't already exist, create a new text file blacklist.conf and add the line 'blacklist snd_soc_skl' to it. Save and reboot the Chromebox.
Slow Ethernet performance with LibreELEC 9.0/9.01 (or kernel 4.19+):
- Note: this issue is fixed in LibreELEC 9.0.2/kernel 4.19.36
- A regression was introduced in kernel 4.19 which severely cripples the Realtek rt8169 Ethernet throughput on Haswell/Broadwell/Kabylake Chromeboxes (this only affects the built-in rt8169 Ethernet, and not wifi nor USB to Ethernet adapters). This issue can be mitigated by the addition of the kernel command-line parameter 'pcie_aspm.policy=performance'.
- On LibreELEC setups:
- ssh root@<ip address>
- <enter password, default is 'libreelec'>
- mount -o remount,rw /dev/sda1 /flash
- (Note: use /dev/sda6 for dual-boot setups)
- nano /flash/syslinux.cfg
- (Note: will be '/flash/extlinux.conf' on dual boot/legacy boot setups)
- <add ' pcie_aspm.policy=performance' after 'quiet'>
- <save and quit: CTRL+o CTRL+x>
- reboot
- ssh root@<ip address>
LibreELEC Fails to boot:
- If the OS isn't shutdown cleanly, sometimes a filesystem check (fsck) will be automatically performed. In some cases, the automatic repair is unsuccessful, and an error will show:
- ***Error in check_disks: could not repair filesystem, dropping to debug shell, try to run 'fsck' manually: ***
- ### Starting debugging shell... type exit to quit ###
- sh: can't access tty; job control turned off
- #_
In this case, simply run fsck manually as instructed, using the following commands, hitting [enter] after each:
For a standalone setup:
- fsck /dev/sda1
- fsck /dev/sda2
For a dual-boot setup:
- fsck /dev/sda6
- fsck /dev/sda7
After the fsck is run, type 'reboot' then hit [enter] and the system should boot normally.
Firmware/BIOS Updating
As depicted in the overview section above, the ChromeBox's firmware consists of two main parts: the main firmware (coreboot), and the Legacy BIOS payload (SeaBIOS). Users running a dual-boot configuration only need to update the Legacy BIOS portion. Users running a standalone setup should update the custom coreboot firmware only, as it contains an updated SeaBIOS payload (which can not be updated separately).
NOTE: Under normal conditions, the ChromeBox's firmware does not need to be updated after the initial install/update via the EZ Setup Script. As the old saying goes: if it ain't broke, don't fix it. Only update if you are having an issue that is specifically noted in the changelog as being addressed by a newer version.
Dual-boot users should simply boot to ChromeOS and re-download/re-run the EZ Setup Script, choosing the Update Legacy BIOS option under the Dual Boot heading.
Standalone users should also re-download/re-run the setup script, but instead choosing the coreboot firmware install/update option under the Standalone heading. The script can be run under any version of Linux with a full bash shell; as LibreELEC does not have a full bash shell, OE users will need to boot a live Linux USB (like GalliumOS or Ubuntu), as described near the end of the EZ Setup Script forum post.
Resetting to Stock
If you have a dual boot setup, simply perform a factory reset, then hit [space] on the developer mode boot screen to revert to verified boot mode. Done. (Note: be sure to use the Kodi EZ Setup Script to reset the boot options to default before doing this, or you may not be able to exit developer mode)
If you have standalone setup, it is necessary to restore the stock firmware before performing a factory reset to reload ChromeOS.
In order to do this, you will need to download/run the ChromeOS Firmware Utility script and select the appropriate option from the menu. The script will give you the option to restore from either a backup file from USB (which you created before originally flashing the custom coreboot firmware) or from a generic copy extracted from Google's recovery image. Like the Kodi EZ Setup Script, this script must be run from a Linux terminal with a full bash shell; OpenELEC users will need to boot a Linux Live USB (Ubuntu 16.04 64-bit works fine) from which to run the script. Just download the ISO of and write it to USB using Win32DiskImager (from Windows) or dd (Linux/MacOS).
- Boot the Linux live USB, then open a terminal/shell window
- Download and run the ChromeOS device Firmware Utility script using the following command (hit enter afterwards):
- cd; curl -L -O https://mrchromebox.tech/firmware-util.sh && sudo bash firmware-util.sh
- Select option 9, Restore Stock Firmware
- Choose whether to restore from a backup file on USB or not
- If not, select your ChromeBox model so the appropriate firmware can be downloaded
After restoring the stock firmware, reboot, and proceed to Perform_a_Factory_Reset above to restore/reload ChromeOS.