ServerWMC: Difference between revisions
No edit summary |
|||
| Line 8: | Line 8: | ||
== Configuring Windows Media Center == | == Configuring Windows Media Center == | ||
Windows Media Center must first be fully configured (tuners configured, EPG configured, channels setup, etc) on the PC to be used as the TV Server. This setup will vary slightly based on the tuner you are using. The following is setup information for popular devices: | Windows Media Center must first be fully configured (tuners configured, EPG configured, channels setup, etc) on the PC to be used as the TV Server. This setup will vary slightly based on the tuner you are using. The following is setup information for popular devices: | ||
* [http://www.silicondust.com/products/hdhomerun/atsc/ '''HDHomeRun'''] - http://www.silicondust.com/support/hdhomerun/instructions/wmc7/ | * [http://www.silicondust.com/products/hdhomerun/atsc/ '''HDHomeRun'''] - http://www.silicondust.com/support/hdhomerun/instructions/wmc7/ | ||
* [http://www.silicondust.com/products/hdhomerun/prime/ '''HDHomeRun Prime'''] - http://www.silicondust.com/support/hdhomerun/instructions/prime/ | * [http://www.silicondust.com/products/hdhomerun/prime/ '''HDHomeRun Prime'''] - http://www.silicondust.com/support/hdhomerun/instructions/prime/ | ||
| Line 15: | Line 14: | ||
== Installing ServerWMC == | == Installing ServerWMC == | ||
The latest version of ServerWMC can be found here: https://googledrive.com/host/0ByNnAMYBoWvfTk8tRWJXYko1T2c/index.html | |||
ServerWMC includes an installer package so simply download, unzip and run '''Installer_ServerWMC.msi''' as administrator. | |||
'''ServerWMC must be installed on the same PC that was configured for Windows Media Center above.''' | |||
<br /> | <br /> | ||
<br /> | <br /> | ||
== Configuring ServerWMC == | == Configuring ServerWMC == | ||
{| cellpadding="8" cellspacing="0" | |||
|- valign="top" bgcolor="whitesmoke" | | |||
| '''1.''' || Launch ServerWMC from the Start Menu. An entry was created during installation at Start/ServerWMC/ServerWMC )'' | |||
|- valign="top" | | |||
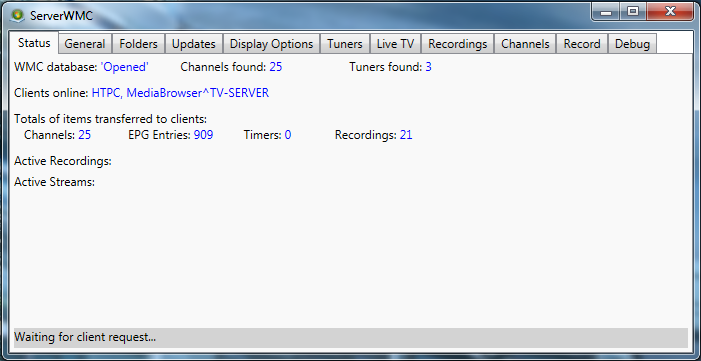
| '''2.''' || [[File:ServerWMC_Status.png|right|border]]ServerWMC will open to the '''Status''' tab. | |||
* '''WMC database:''' - | |||
* '''Channels found:''' - | |||
* '''Tuners found:''' - | |||
* '''Clients online:''' - | |||
* '''Total of items transferred to clients:''' - | |||
** Channels | |||
** EPG Entries | |||
** Timers | |||
** Recordings | |||
* '''Active Recordings:''' - | |||
* '''Active Streams:''' - | |||
|- valign="top" bgcolor="whitesmoke" | | |||
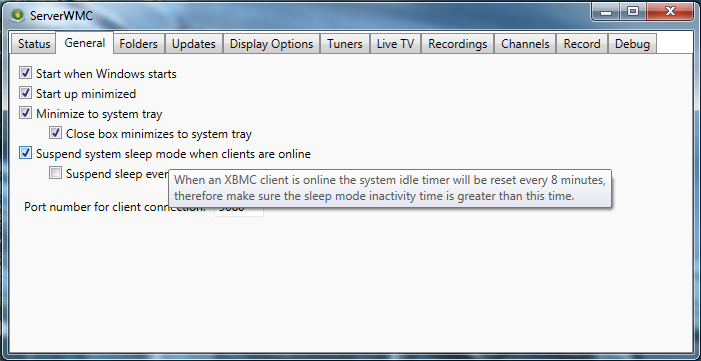
| '''3.''' || [[File:ServerWMC_General.png|right|border]]Click on the '''General''' tab. (We'll come back to 'Status' later.) | |||
* '''Start when Windows starts''' - Checking this box will start ServerWMC when Windows starts. Unless you have a need to start the server manually after a reboot, this option should be enabled. | |||
* '''Startup minimized''' - Checking this box will start ServerWMC minimized. | |||
* '''Minimize to system tray''' - Checking this box will send ServerWMC to the System Tray when minimized instead of the Task Bar. | |||
* '''Port number for client connection''' - This box specifies the port on which the pvr.wmc plug-in will communicate with ServerWMC. The default port is 9080. Unless you have another program communicating on this port, there is no reason to change from default. | |||
|- valign="top" | | |||
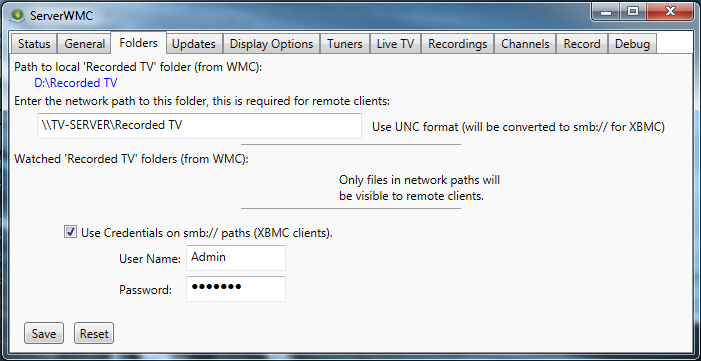
| '''4.''' || [[File:ServerWMC_Folders.png|right|border]]Click on the '''Folders''' tab. | |||
* '''Path to local 'RecordedTV' directory from WMC settings:''' | |||
* '''Enter the network share path to the 'Recorded TV' folder (for remote client access):''' | |||
* '''Use Credentials (primarily for non-windows clients)''' | |||
** '''User Name''' | |||
** '''Password''' | |||
|- valign="top" bgcolor="whitesmoke" | | |||
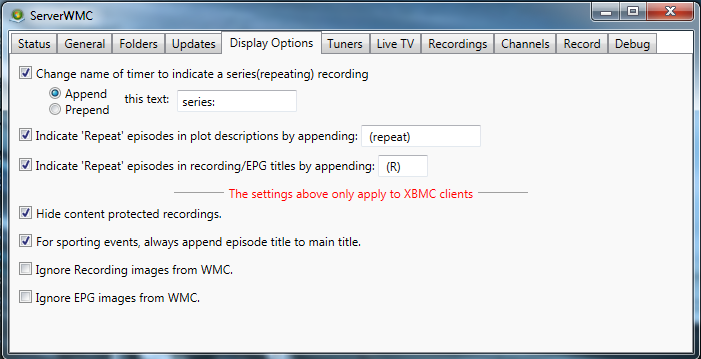
| '''5.''' || [[File:ServerWMC_Display_Options.png|right|border]]Click on the '''Display Options''' tab. | |||
|- valign="top" | | |||
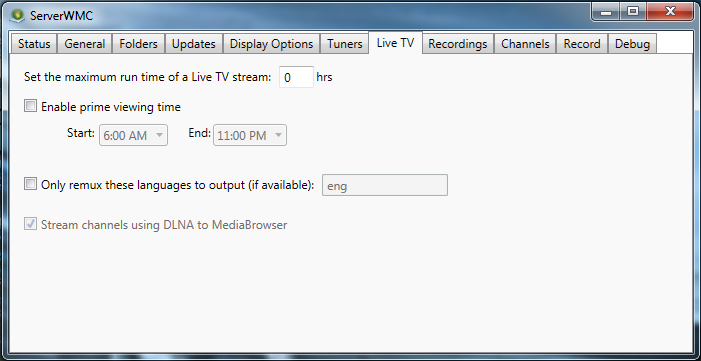
| '''6.''' || [[File:ServerWMC_Live_TV.png|right|border]]Click on the '''Live TV''' tab. | |||
|- valign="top" bgcolor="whitesmoke" | | |||
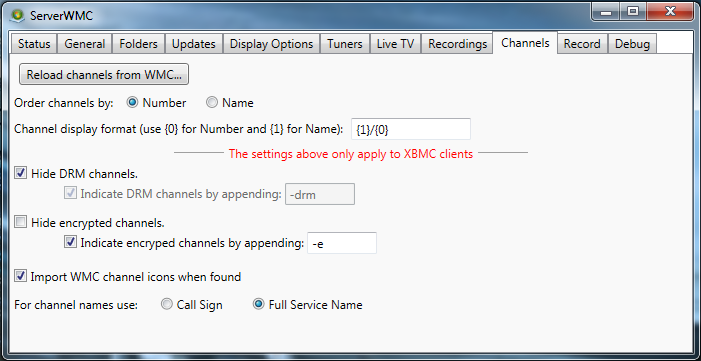
| '''7.''' || [[File:ServerWMC_Channels.png|right]]Click on the '''Channels''' tab. | |||
|- valign="top" | | |||
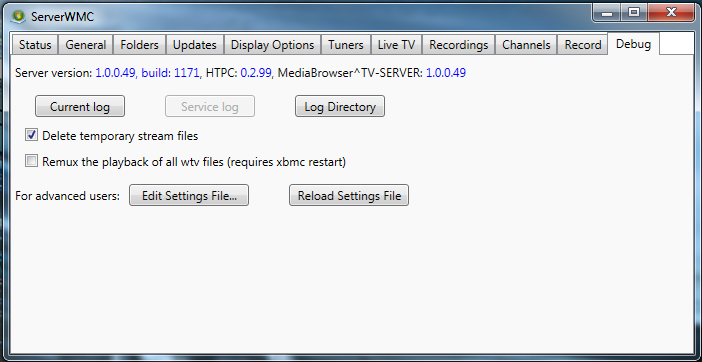
| '''8.''' || [[File:ServerWMC_Debug.png|right|border]]Click on the '''Debug''' tab. | |||
|} | |||
;Additional info coming soon. | ;Additional info coming soon. | ||
For now, all the necessary information can be found here: [[Add-on:PVR.WMC]] | For now, all the necessary information can be found here: [[Add-on:PVR.WMC]] | ||
Revision as of 16:17, 29 September 2013
PVR/Contents
ServerWMC is software for Windows which allows Windows Media Center to be used a PVR backend. It provides an interface to the recording and EPG services that WMC uses.
Configuring Windows Media Center
Windows Media Center must first be fully configured (tuners configured, EPG configured, channels setup, etc) on the PC to be used as the TV Server. This setup will vary slightly based on the tuner you are using. The following is setup information for popular devices:
- HDHomeRun - http://www.silicondust.com/support/hdhomerun/instructions/wmc7/
- HDHomeRun Prime - http://www.silicondust.com/support/hdhomerun/instructions/prime/
- Ceton InfiniTV Products (All) - http://cetoncorp.com/product-support/
Installing ServerWMC
The latest version of ServerWMC can be found here: https://googledrive.com/host/0ByNnAMYBoWvfTk8tRWJXYko1T2c/index.html
ServerWMC includes an installer package so simply download, unzip and run Installer_ServerWMC.msi as administrator.
ServerWMC must be installed on the same PC that was configured for Windows Media Center above.
Configuring ServerWMC
| 1. | Launch ServerWMC from the Start Menu. An entry was created during installation at Start/ServerWMC/ServerWMC ) |
| 2. | ServerWMC will open to the Status tab.
|
| 3. | Click on the General tab. (We'll come back to 'Status' later.)
|
| 4. | Click on the Folders tab.
|
| 5. | Click on the Display Options tab.
|
| 6. | Click on the Live TV tab. |
| 7. | Click on the Channels tab. |
| 8. | Click on the Debug tab. |
- Additional info coming soon.
For now, all the necessary information can be found here: Add-on:PVR.WMC
Connecting ServerWMC to XBMC
- Additional info coming soon.
For now, all the necessary information can be found here: Add-on:PVR.WMC
Troubleshooting
- Additional info coming soon.
Known Issues
- Additional info coming soon.
Additional Guides and Links
- ServerWMC/pvr.wmc Support Thread - http://forum.xbmc.org/showthread.php?tid=171216
