HOW-TO:Install Kodi for iOS: Difference between revisions
>NedBot m (Robot: Substituting template: XBMC wiki toc) |
>NedBot m (Robot: Cosmetic changes) |
||
| Line 3: | Line 3: | ||
;Requirements: | ;Requirements: | ||
{{#lst:Supported hardware|iDevices}} | {{#lst:Supported hardware|iDevices}} | ||
*If you have any issues, be sure to read the [[iOS FAQ]]! | * If you have any issues, be sure to read the [[iOS FAQ]]! | ||
__TOC__ | __TOC__ | ||
{{-}} | {{-}} | ||
| Line 10: | Line 10: | ||
<gallery widths=225px heights=338px> | <gallery widths=225px heights=338px> | ||
File:cydia.PNG|'''Step 1:''' Tap the Cydia icon on your homescreen. | File:cydia.PNG|'''Step 1:''' Tap the Cydia icon on your homescreen. | ||
File:repo.PNG|'''Step 2-iPhone:''' Manage - > Sources -> Edit -> Add<br/>'''Step 2-iPad:''' Sources -> Edit -> Add<br/>'''Step 3:''' Type in {{highlight|<nowiki>http://mirrors.xbmc.org/apt/ios/</nowiki>}} | File:repo.PNG|'''Step 2-iPhone:''' Manage - > Sources -> Edit -> Add<br />'''Step 2-iPad:''' Sources -> Edit -> Add<br />'''Step 3:''' Type in {{highlight|<nowiki>http://mirrors.xbmc.org/apt/ios/</nowiki>}} | ||
File:install1.PNG|'''Step 4:''' Tap on the teamXBMC source. | File:install1.PNG|'''Step 4:''' Tap on the teamXBMC source. | ||
File:install2.PNG|'''Step 5:''' Tap on the XBMC-iOS icon. | File:install2.PNG|'''Step 5:''' Tap on the XBMC-iOS icon. | ||
| Line 17: | Line 17: | ||
</gallery> | </gallery> | ||
And you're done! You should now be running XBMC v12 Frodo for iOS. See [[IOS FAQ# | And you're done! You should now be running XBMC v12 Frodo for iOS. See [[IOS FAQ#XBMC Version|here]] to verify your XBMC version. | ||
== Updating == | == Updating == | ||
Updates for stable releases of XBMC are handled by Cydia and will show up in the "Changes" section when available. | Updates for stable releases of XBMC are handled by Cydia and will show up in the "Changes" section when available. | ||
==Development builds== | == Development builds == | ||
{{main|Development builds}} | {{main|Development builds}} | ||
===Nightly builds=== | === Nightly builds === | ||
{{main|nightly builds}} | {{main|nightly builds}} | ||
Nightly builds are unstable test builds that have the latest bug fixes and feature additions. They are not fully tested, so anticipate issues and be sure to [[iOS FAQ#Backup|backup your userdata folder]]. | Nightly builds are unstable test builds that have the latest bug fixes and feature additions. They are not fully tested, so anticipate issues and be sure to [[iOS FAQ#Backup|backup your userdata folder]]. | ||
| Line 34: | Line 34: | ||
# Open http://mirrors.xbmc.org/nightlies/darwin/ios/ in a web browser and copy the url of the '''most recent file''' in that listing. | # Open http://mirrors.xbmc.org/nightlies/darwin/ios/ in a web browser and copy the url of the '''most recent file''' in that listing. | ||
#::'''EXAMPLE:''' <code><nowiki>http://mirrors.xbmc.org/nightlies/darwin/ios/xbmc-20111202-6729214-master-ios.deb</nowiki></code> | #:: '''EXAMPLE:''' <code><nowiki>http://mirrors.xbmc.org/nightlies/darwin/ios/xbmc-20111202-6729214-master-ios.deb</nowiki></code> | ||
# Open up your [[XBMC for iOS specific FAQ#SSH|terminal/ssh application]] and enter the following commands: | # Open up your [[XBMC for iOS specific FAQ#SSH|terminal/ssh application]] and enter the following commands: | ||
#:<pre>ssh [email protected]</pre> | #: <pre>ssh [email protected]</pre> | ||
#::'''EXAMPLE:''' <code>ssh [email protected]</code> | #:: '''EXAMPLE:''' <code>ssh [email protected]</code> | ||
#You will be asked for a password: ''default password is '''alpine''''' | # You will be asked for a password: ''default password is '''alpine''''' | ||
#Continue to enter the following commands: | # Continue to enter the following commands: | ||
#:<pre>rm -f *xbmc*.deb</pre> | #: <pre>rm -f *xbmc*.deb</pre> | ||
#:<pre>curl -O -L URL-FROM-STEP-1-HERE</pre> | #: <pre>curl -O -L URL-FROM-STEP-1-HERE</pre> | ||
#::'''EXAMPLE:''' <code>curl -O -L <nowiki>http://mirrors.xbmc.org/nightlies/darwin/ios/xbmc-20111202-6729214-master-ios.deb</nowiki></code> | #:: '''EXAMPLE:''' <code>curl -O -L <nowiki>http://mirrors.xbmc.org/nightlies/darwin/ios/xbmc-20111202-6729214-master-ios.deb</nowiki></code> | ||
#:<pre>dpkg -i *xbmc*.deb</pre> | #: <pre>dpkg -i *xbmc*.deb</pre> | ||
#:<pre>rm *xbmc*.deb</pre> | #: <pre>rm *xbmc*.deb</pre> | ||
And you're done! You should now have the latest nightly build of XBMC for iOS. See [[IOS FAQ# | And you're done! You should now have the latest nightly build of XBMC for iOS. See [[IOS FAQ#XBMC Version|here]] to verify your XBMC version. | ||
<!-- Hide monthly build section since Betas are newer | <!-- Hide monthly build section since Betas are newer | ||
| Line 53: | Line 53: | ||
Installing a semi-stable monthly build is the same as installing a [[#Nightly builds|nightly build]], but with the url in step 1 replaced with http://mirrors.xbmc.org/snapshots/darwin/ios/ --> | Installing a semi-stable monthly build is the same as installing a [[#Nightly builds|nightly build]], but with the url in step 1 replaced with http://mirrors.xbmc.org/snapshots/darwin/ios/ --> | ||
===Monthly builds=== | === Monthly builds === | ||
{{anchor|Monthly builds|Beta|Frodo beta|Frodo RC}} | {{anchor|Monthly builds|Beta|Frodo beta|Frodo RC}} | ||
{{see also|monthly builds}} | {{see also|monthly builds}} | ||
To install a semi-stable monthly build, follow the nightly build instructions above, but replace the url in step 1 with http://mirrors.xbmc.org/snapshots/darwin/ios/ | To install a semi-stable monthly build, follow the nightly build instructions above, but replace the url in step 1 with http://mirrors.xbmc.org/snapshots/darwin/ios/ | ||
===Installing from the iOS GUI=== | === Installing from the iOS GUI === | ||
Opening a downloaded deb file (from Safari, for example) using iFile from Cydia, will also allow for installation. | Opening a downloaded deb file (from Safari, for example) using iFile from Cydia, will also allow for installation. | ||
==Uninstalling== | == Uninstalling == | ||
=== Uninstalling just XBMC === | === Uninstalling just XBMC === | ||
<gallery widths=225px heights=338px> | <gallery widths=225px heights=338px> | ||
| Line 67: | Line 67: | ||
File:packages.png|'''Step 2:''' Tap Manage from the bottom of the Cydia menu and then tap Packages | File:packages.png|'''Step 2:''' Tap Manage from the bottom of the Cydia menu and then tap Packages | ||
File:XBMCinlist.png|'''Step 3:''' Find and tap XBMC-iOS in the list of installed packages. | File:XBMCinlist.png|'''Step 3:''' Find and tap XBMC-iOS in the list of installed packages. | ||
File:XBMC-iOS.png|'''Step 4:''' Tap on Modify in the top right and then choose Remove from the pop up menu. <br/>'''Step 5:''' Let XBMC uninstall and then press Return to Cydia. | File:XBMC-iOS.png|'''Step 4:''' Tap on Modify in the top right and then choose Remove from the pop up menu. <br />'''Step 5:''' Let XBMC uninstall and then press Return to Cydia. | ||
</gallery> | </gallery> | ||
You're all done. XBMC will now be uninstalled from your iDevice. | You're all done. XBMC will now be uninstalled from your iDevice. If you want you can also uninstall XBMC-IconPack using the same method. | ||
=== Removing settings === | === Removing settings === | ||
XBMC will uninstall from your iDevice but will leave certain things ([[XBMC databases|databases]] and everything in your [[userdata folder]]) behind to make it easier if you wanted to reinstall. | XBMC will uninstall from your iDevice but will leave certain things ([[XBMC databases|databases]] and everything in your [[userdata folder]]) behind to make it easier if you wanted to reinstall. To delete those: | ||
;From the terminal, run: | ;From the terminal, run: | ||
| Line 82: | Line 82: | ||
;From iFile: | ;From iFile: | ||
Delete /private/var/mobile/Library/Preferences/XBMC/ | Delete /private/var/mobile/Library/Preferences/XBMC/ | ||
[[Category:XBMC Manual]] | [[Category:XBMC Manual]] | ||
Revision as of 20:24, 6 May 2013
The current stable release of XBMC for iOS is v12 Frodo.
- Requirements
- If you have any issues, be sure to read the iOS FAQ!
Installing from Cydia
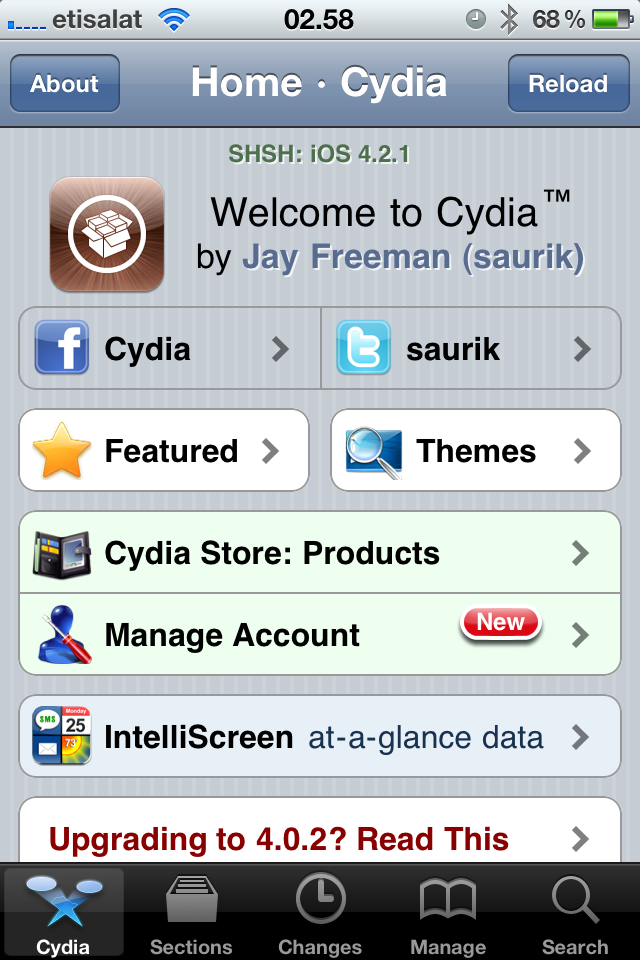
Step 1: Tap the Cydia icon on your homescreen.
- Repo.PNG
Step 2-iPhone: Manage - > Sources -> Edit -> Add
Step 2-iPad: Sources -> Edit -> Add
Step 3: Type in http://mirrors.xbmc.org/apt/ios/ 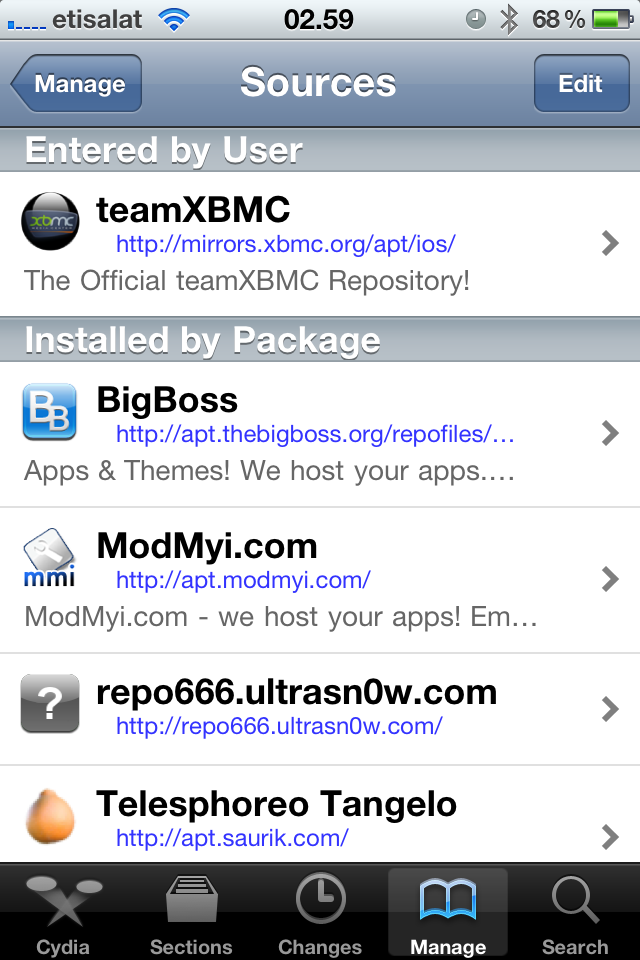
Step 4: Tap on the teamXBMC source.
- Install2.PNG
Step 5: Tap on the XBMC-iOS icon.
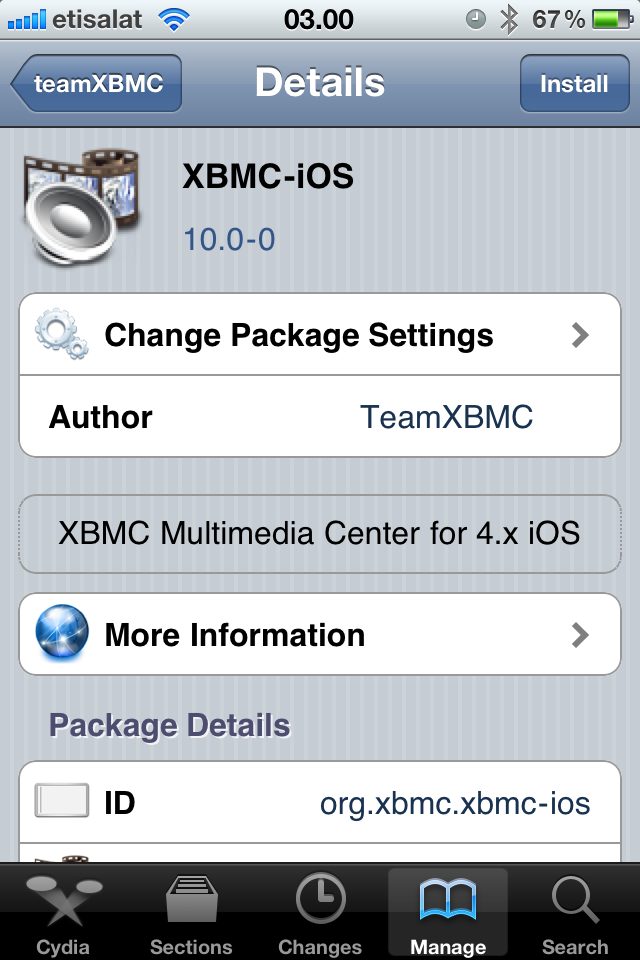
Step 6: Tap install, then confirm.
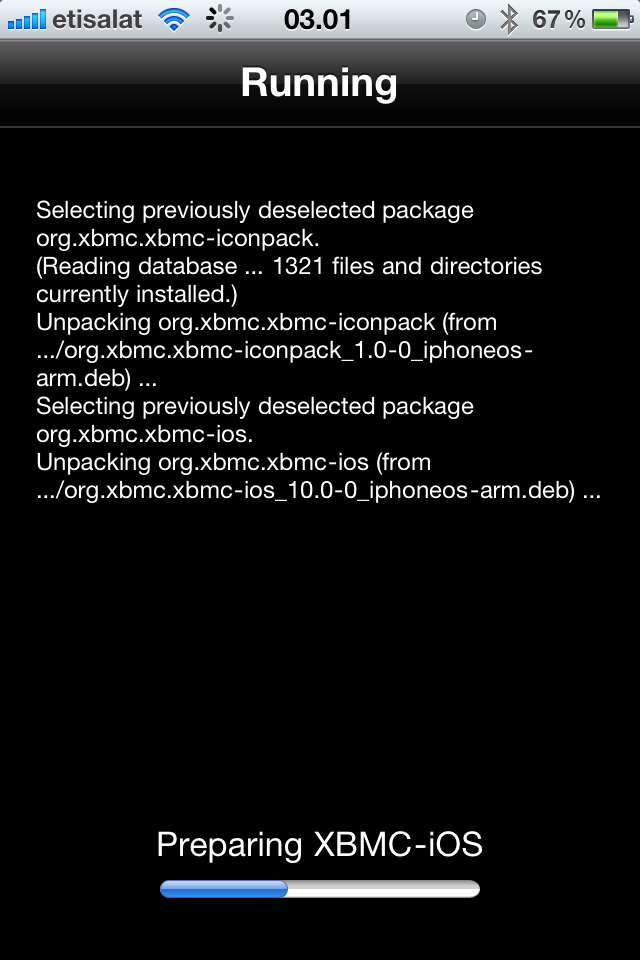
Step 7: Let it install, then exit Cydia. You should now have a new XBMC icon on your screen.


And you're done! You should now be running XBMC v12 Frodo for iOS. See here to verify your XBMC version.
Updating
Updates for stable releases of XBMC are handled by Cydia and will show up in the "Changes" section when available.
Development builds
Nightly builds
Nightly builds are unstable test builds that have the latest bug fixes and feature additions. They are not fully tested, so anticipate issues and be sure to backup your userdata folder.
- Installing from the command line
- Change history: trac timeline or commit history
NOTE: You MUST install the stable version before you can install a nightly build. You only need to install the stable version once and you don't need to uninstall previous versions to upgrade (or downgrade) XBMC.
- Open http://mirrors.xbmc.org/nightlies/darwin/ios/ in a web browser and copy the url of the most recent file in that listing.
- EXAMPLE:
http://mirrors.xbmc.org/nightlies/darwin/ios/xbmc-20111202-6729214-master-ios.deb
- EXAMPLE:
- Open up your terminal/ssh application and enter the following commands:
ssh [email protected]
- EXAMPLE:
ssh [email protected]
- EXAMPLE:
- You will be asked for a password: default password is alpine
- Continue to enter the following commands:
rm -f *xbmc*.deb
curl -O -L URL-FROM-STEP-1-HERE
- EXAMPLE:
curl -O -L http://mirrors.xbmc.org/nightlies/darwin/ios/xbmc-20111202-6729214-master-ios.deb
- EXAMPLE:
dpkg -i *xbmc*.deb
rm *xbmc*.deb
And you're done! You should now have the latest nightly build of XBMC for iOS. See here to verify your XBMC version.
Monthly builds
To install a semi-stable monthly build, follow the nightly build instructions above, but replace the url in step 1 with http://mirrors.xbmc.org/snapshots/darwin/ios/
Installing from the iOS GUI
Opening a downloaded deb file (from Safari, for example) using iFile from Cydia, will also allow for installation.
Uninstalling
Uninstalling just XBMC
Step 1: Tap the Cydia icon on your homescreen.
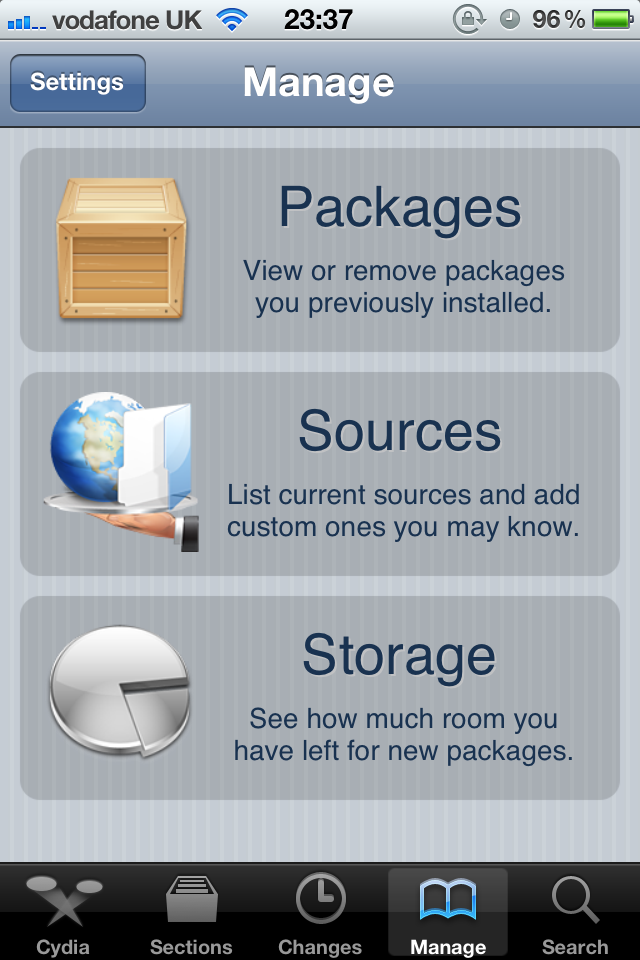
Step 2: Tap Manage from the bottom of the Cydia menu and then tap Packages
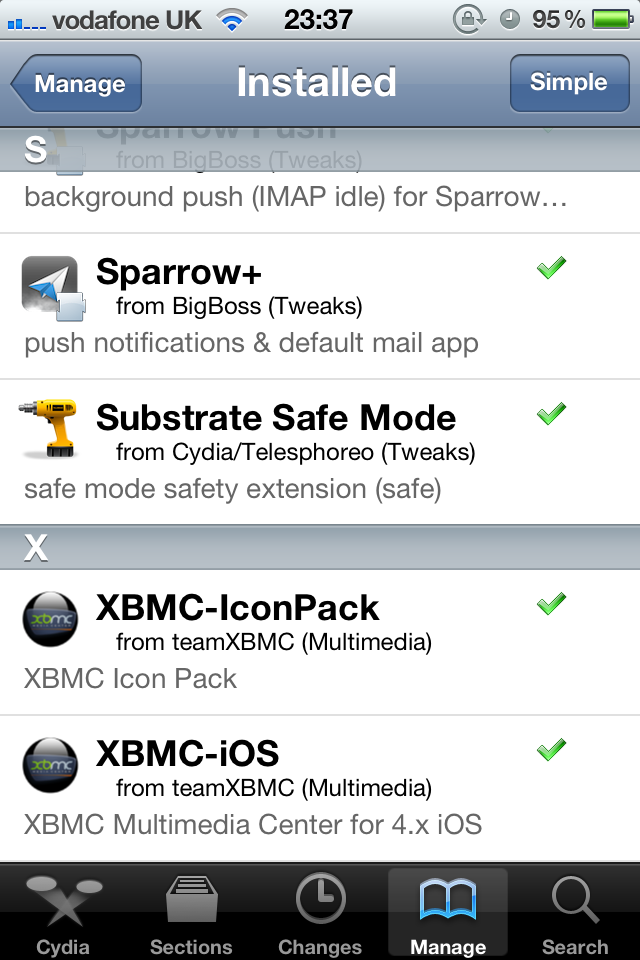
Step 3: Find and tap XBMC-iOS in the list of installed packages.
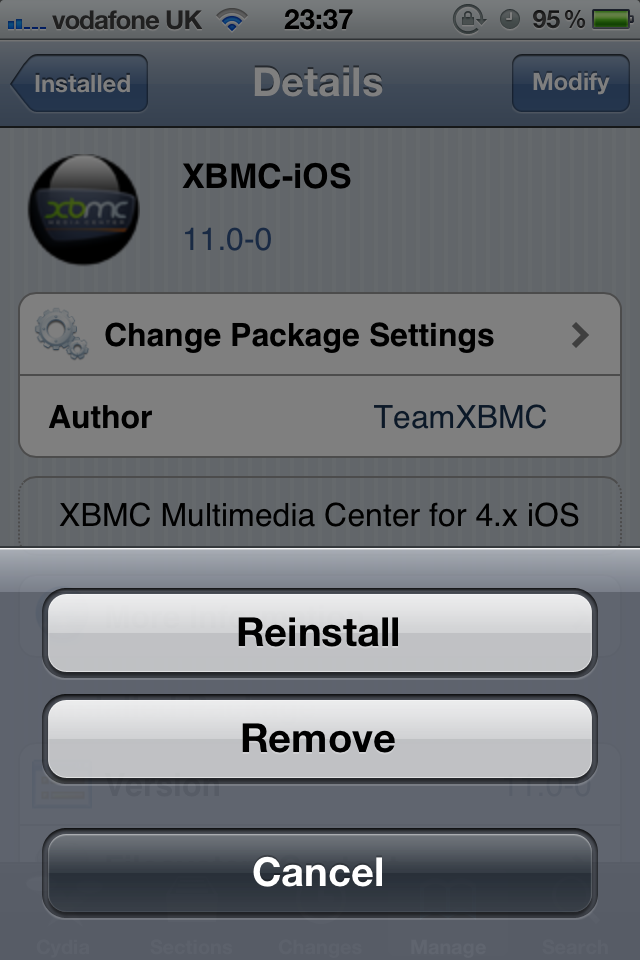
Step 4: Tap on Modify in the top right and then choose Remove from the pop up menu.
Step 5: Let XBMC uninstall and then press Return to Cydia.


You're all done. XBMC will now be uninstalled from your iDevice. If you want you can also uninstall XBMC-IconPack using the same method.
Removing settings
XBMC will uninstall from your iDevice but will leave certain things (databases and everything in your userdata folder) behind to make it easier if you wanted to reinstall. To delete those:
- From the terminal, run
rm -Rf /private/var/mobile/Library/Preferences/XBMC/
- Or
- From iFile
Delete /private/var/mobile/Library/Preferences/XBMC/