Archive:HOW-TO:Set up audio over HDMI on nVidia GeForce/nForce controller: Difference between revisions
>MacUsers No edit summary |
>MacUsers No edit summary |
||
| Line 56: | Line 56: | ||
Next, add the following line to "/etc/modprobe.d/alsa-base.conf" at the bottom: | Next, add the following line to "/etc/modprobe.d/alsa-base.conf" at the bottom: | ||
<source lang="bash"> | <source lang="bash"> | ||
sudo echo "# Audio over HDMI" >> /etc/modprobe.d/alsa-base.conf | |||
sudo echo "options snd-hda-intel model=6stack-dig" >> /etc/modprobe.d/alsa-base.conf | sudo echo "options snd-hda-intel model=6stack-dig" >> /etc/modprobe.d/alsa-base.conf | ||
</source> | </source> | ||
Revision as of 14:37, 9 September 2010
All the information described below, taken from XBMC and Ububtu forum
- Note: This method was tested on ASUS P5N7A-VM motherboard [GeForce 9300 / nForce 730i] but it believed to be working for any nVidia chip-set that supports audio over HDMI.
- This method works pretty well with the default installation of ALSA v1.0.22 (as of Ubuntu 10.04, lucid). There is no need to upgrade ALSA with the alsa-upgrade script.
First, check which ALSA playback devices you have, you can use this command:
aplay -l
You should see something like this:
xbmc@htpc:~$ aplay -l
**** List of PLAYBACK Hardware Devices ****
card 0: NVidia [HDA NVidia], device 0: ALC1200 Analog [ALC1200 Analog]
  Subdevices: 1/1
  Subdevice #0: subdevice #0
card 0: NVidia [HDA NVidia], device 1: ALC1200 Digital [ALC1200 Digital]
  Subdevices: 1/1
  Subdevice #0: subdevice #0
card 0: NVidia [HDA NVidia], device 3: NVIDIA HDMI [NVIDIA HDMI]
  Subdevices: 0/1
  Subdevice #0: subdevice #0
The device is specified as hw:(card),(device). The sample above shows device 3 is labeled "NVIDIA HDMI"; we are gonna use that and it would be called hw:0,3.
Create the file "/etc/asound.conf", which configures the ALSA library for the user.
sudo cat <<EOF>> /etc/asound.conf
pcm.!hdmi-remap {
  type asym
  playback.pcm {
    type plug
    slave.pcm "remap-surround71"
  }
}

pcm.!remap-surround71 {
  type route
  slave.pcm "hw:0,3"
  ttable {
    0.0= 1
    1.1= 1
    2.4= 1
    3.5= 1
    4.2= 1
    5.3= 1
    6.6= 1
    7.7= 1
  }
}
EOF
- Note: This file only has an effect on the ALSA library if it is included by the user’s .asoundrc file, located in the user’s home directory.
Next, add the following line to "/etc/modprobe.d/alsa-base.conf" at the bottom:
sudo echo "# Audio over HDMI" >> /etc/modprobe.d/alsa-base.conf
sudo echo "options snd-hda-intel model=6stack-dig" >> /etc/modprobe.d/alsa-base.conf
Now change to "/usr/share/alsa/cards" and replace the default HDA-Intel.conf with the one at pastebin. Don't forget to make a backup copy of the original one before proceeding, in case you you need it in future. The command set below should do the job (you may have do this as "root" though):
su -
cd /usr/share/alsa/cards
mv HDA-Intel.conf ORG_HDA-Intel.conf
curl "http://pastebin.com/download.php?i=f2e38265" | tr -d \\r > HDA-Intel.conf
As said before, things will only work if there is a ".asoundrc" file in users' home directory; in this case the user is xbmc. So fire up a terminal and create one with he following (assuming the HDMI device is specified as hw:0,3, change it to suite yourself):
cat <<EOF>> ~xbmc/.asoundrc
pcm.dmixer {
   type dmix
   ipc_key 1024
   ipc_key_add_uid false
   ipc_perm 0660
   slave {
      pcm "hw:0,3"
      rate 48000
      channels 2
      format S32_LE
      period_time 0
      period_size 1024
      buffer_time 0
      buffer_size 4096
   }
}

pcm.!default {
   type plug
   slave.pcm "dmixer"
}
EOF
Make sure that master volume and default PCM devices are not muted.
sudo /usr/bin/amixer -q -c 0 sset 'Master',0 unmute && /usr/bin/amixer -q -c 0 sset 'Master',0 100
sudo /usr/bin/amixer -q -c 0 sset 'IEC958 Default PCM',0 unmute
sudo /usr/bin/amixer -q -c 0 sset 'IEC958',0 unmute && /usr/bin/amixer -q -c 0 sset 'IEC958',1 unmute
sudo alsactl store 0
This is the time to reboot the system to make changes take the effect. When you log back in, you can test the speakers with "speaker-test" command like this:
speaker-test -D hdmi -c6 -r19200 -FS32_LE
The output should be something like this:
xbmc@htpc:~$ speaker-test -D hdmi -c6 -r19200 -FS32_LE
speaker-test 1.0.23
Playback device is hdmi
Stream parameters are 19200Hz, S32_LE, 6 channels
Using 16 octaves of pink noise
Rate set to 19200Hz (requested 19200Hz)
Buffer size range from 6 to 544
Period size range from 3 to 273
Using max buffer size 544
Periods = 4
was set period_size = 108
was set buffer_size = 544
 0 - Front Left
 4 - Centre
 1 - Front Right
 3 - Rear Right
 2 - Rear Left
 5 - LFE
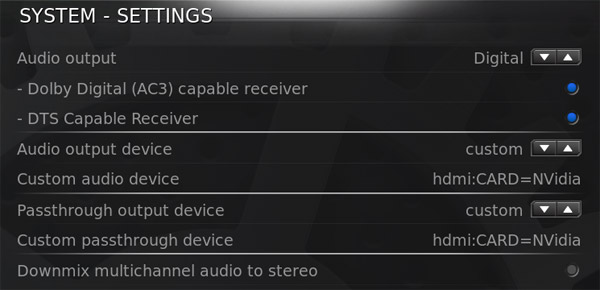
It appeared to be important that "Audio Settings" in the XBMC needs to be modified as well. Go to "Settings > System > Audio" and make the entries like the picture below.
- Note: The values for the "Custom audio device" are case-sensitive, should be exactly as it's written. Always use the default skin for basic system setup.
You may notice that the mp3 playback is faster than that usual. If that happens put these in the advancedsettings.xml and should fix the problem.
 <audio>
       <resample>48000</resample>
 </audio>
If everything goes well, by now you are listening to the audio over HDMI. Enjoy!!
