Add-on:Kodi Callbacks
| Kodi Callbacks | ||||||||||||||
| ||||||||||||||
| Need help with this add-on? See here. |
Perform custom user-defined tasks for multiple events in Kodi
Installing
This add-on is installed from the Add-on browser located in Kodi as follows:
Features
- Run a user configured task when events occur in Kodi
- Currently can create tasks for:
- Running an external script with or without the shell
- Running an external python script either directly or via dynamic import
- Running a Kodi builtin
- Sending an http string (response)
- Utilizes a simple substitution language so that runtime arguments can be mixed with static user-defined elements to send to the external file as arguments
- 23 different Kodi events are supported
- Tasks can be tested directly from the Settings page with direct user feedback for troubleshooting
- New tasks can be created and shared with others by subclassing an abstract base class and then placing the file in the resources/lib/tasks folder
Installation
Overview
The script is not currently available via the official repo (it's a localized string issue that prevents submission).
You can download the zip file and manually copy it to the Kodi Add-Ons folder, overwriting the previous version.
The most recent version of the script can be downloaded here: https://github.com/KenV99/service.kodi.callbacks/archive/master.zip
Details
To manually install the script, first unzip the script to a convenient, temporary location and then copy the entire directory named ‘service.kodi.callbacks-master’ with its structure intact to the Kodi addons directory. In windows, this is typically located on your system drive at 'Users/Username/AppData/Roaming/Kodi/addons/'. If you have a previous installation, consider backing it up to a safe place before installing.
If you are replacing xbmc.callbacks2 which will no longer be developed, the settings from there are not compatible. Copy your settings over to the new addon and then disable or delete xbmc.callbacks2
Configuration
Overview
In Kodi go to System > Add-Ons > Enabled Add-Ons > Services > Kodi Callbacks > Configure
In general:
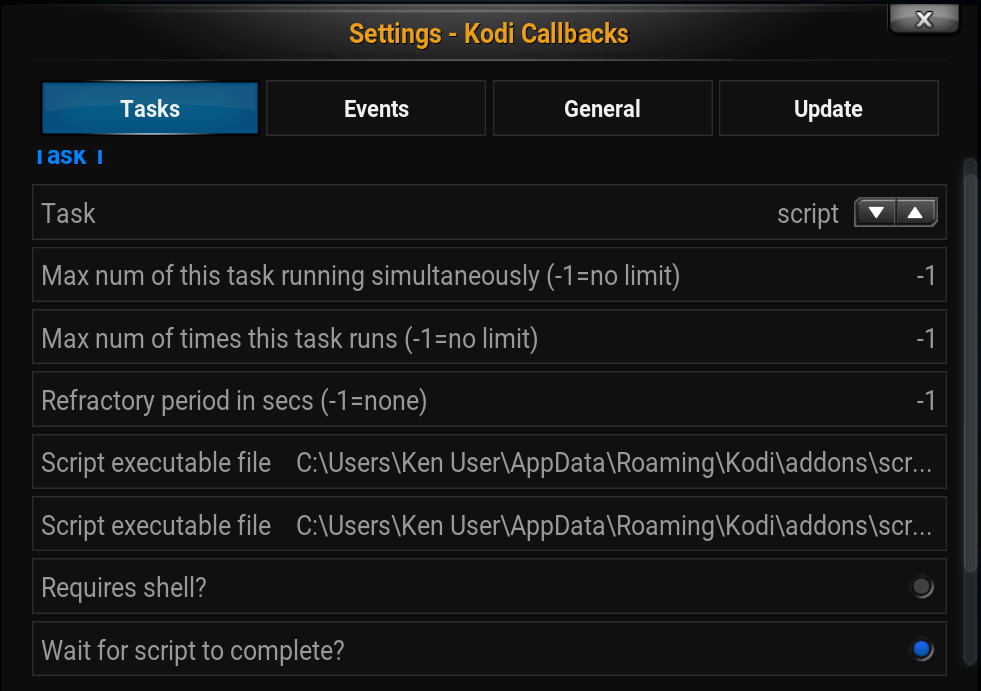
- Configure your task.
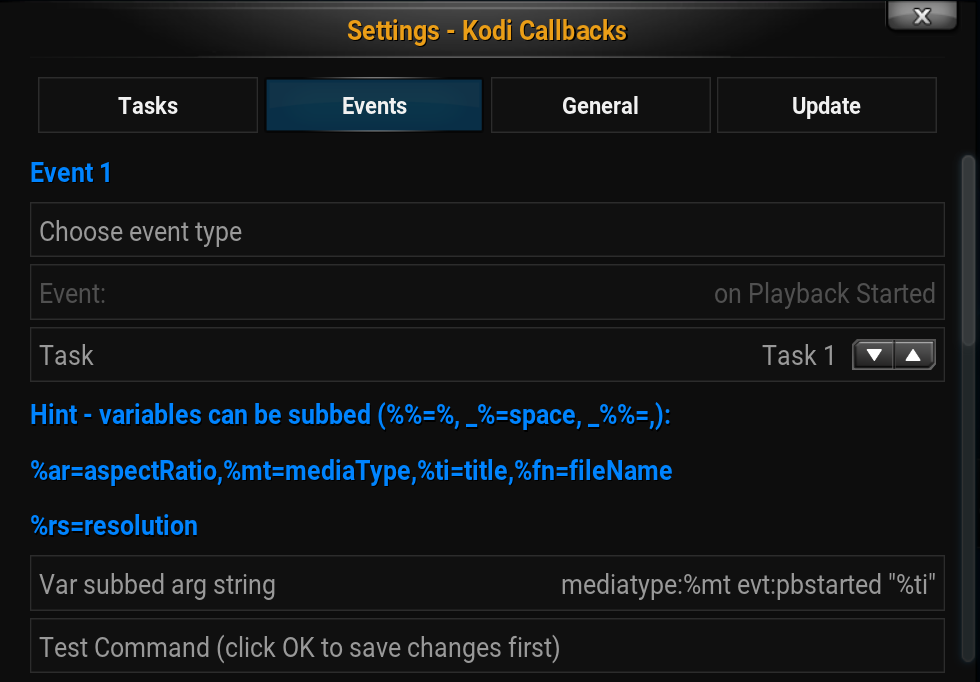
- On the next page, associate your task with one or more events.
- Click OK to save.
- Re-enter settings by clicking configure.
- Test your setup
Details
Settings - Tasks
Settings - Events
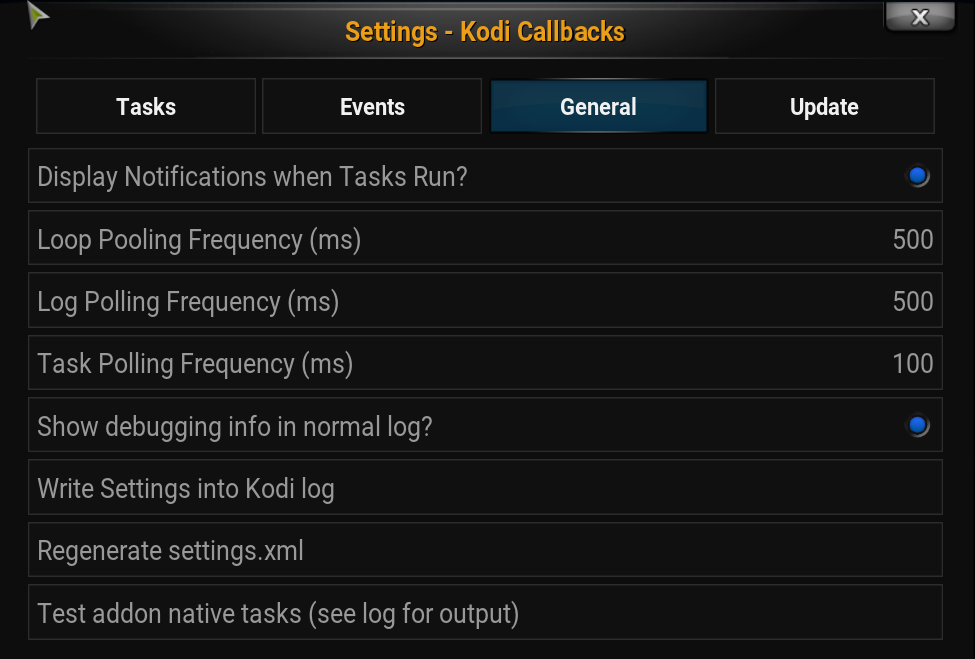
Settings - General
These are the settings that are used when using the Auto switch based on AR mode. Here, the profiles that have been previously configured in AmbiBox to be used with full screen video of various aspect ratios are configured. The default is None. If no profile is configured for a given aspect ratio, the next closest one will be chosen.
Notes
- Using the option to switch profiles based upon a file's display aspect ratio depends on the file being properly formatted. In some circumstances XBMC is able to provide that information to the script. If not, that information can sometimes be retrieved using a dll called mediainfo, which may be optionally downloaded and installed from the settings page. Not all files comply with formatting standards or have the correct information available. Furthermore, if the letterboxing is hardcoded into the file (i.e. there is actually black boxes in the video frame itself), this will not be detected.
- Switching profiles for 3D content is solely based on the file name.
- XBMCDirect capture has to be enabled as a capture mode BOTH in the Ambibox program itself and in the XBMC settings. This works by mapping the memory for video frames directly in XBMC and then passing that information on to AmbiBox. Whether this is better or worse that other capture modes is highly dependent on your system. The best way to figure this out is trial and error. This method CANNOT be used if you are using an external video player such as MPC-HC.
Limitations
- For modes other than PlayClaw or XBMCDirect, XBMC must be run in fullscreen windowed mode.
- If using an external player and not using mediainfo, the DAR may not be detected by the system.
- XBMCDirect does not work with external players.
- XBMCDirect will only activate the lights while playing audio or video content. The lights will remain off in the XBMC GUI.
- XBMCDirect will not work with most streaming video as opposed to playing from a file.
- For LiveTV content that is in a DAR other than your display's DAR, there may be black bars embedded in the content. If the video is not zoomed to fill the display window, the capture areas may not be capturing areas with active video content. This is true for all capture modes.
- XBMCDirect may not work with LiveTV SD content due to the black bar areas.
- XBMCDirect does NOT work with DSPlayer builds of XBMC Gotham.
- The automatic sensing of using a 3D mode in the GUI is not directly supported.
- Currently only hSBS and hTAB 3D video modes are supported and in a limited fashion.
FAQs
Why would I want to go through the trouble of setting up all of these different profiles, my display is 16:9, why would I use other profiles?
When video files are played that have display aspect ratios that differ from your display, some people may either zoom or stretch the video so that it fills the screen. Under those circumstances, only one profile is needed because the video content reaches to the edge of the screen and can be correctly captured in order to drive the LED’s. The other, often preferred, method of display is using letterboxing or pillaring. Black or gray bars are placed either above and below or on either side of the video in order to display the content without distortion. In this case, there is no active video content in these areas and the AmbiBox application would be capturing whatever color is in those bars if it is using a standard setup to capture around the periphery of the display. By setting up different capture profiles for content with different aspect ratios, one can capture from the edge of the active content and have the LED’s display correctly.
Why don’t my LED’s light while music is playing?
I have set up a profile using ColorMusic and AmbiBox switches to it but the lights remain dark. AmbiBox cannot hook into the audio stream if you are using WASAPI for audio output. Please go to System -> System -> Audio Output and go to the very bottom (often times this setting isn’t seen if you do not scroll) to Audio Output Device and choose something other than WASAPI.
I am having an issues, how can I get help?
The two best places to get script help are: via the XBMC forum thread here: http://forum.kodi.tv/showthread.php?tid=198173 or via the Adafruit forums in this thread: http://forums.adafruit.com/viewtopic.php?f=47&t=36032
If you believe that things are not working as expected, please also include the version number of the script and any relevant entries in the XBMC logs in your post.


