Add-on:Kodi Callbacks: Difference between revisions
No edit summary |
No edit summary |
||
| Line 21: | Line 21: | ||
== Features == | == Features == | ||
* | * Runs as a service when Kodi starts | ||
* Runs user configured tasks when events occur in Kodi | |||
* Currently can create tasks for: | * Currently can create tasks for: | ||
# Running an external script with or without the shell | # Running an external script with or without the shell | ||
| Line 42: | Line 44: | ||
To manually install the script, first unzip the script to a convenient, temporary location and then copy the entire directory named ‘service.kodi.callbacks-master’ with its structure intact to the Kodi addons directory. In windows, this is typically located on your system drive at 'Users/Username/AppData/Roaming/Kodi/addons/'. If you have a previous installation, consider backing it up to a safe place before installing. | To manually install the script, first unzip the script to a convenient, temporary location and then copy the entire directory named ‘service.kodi.callbacks-master’ with its structure intact to the Kodi addons directory. In windows, this is typically located on your system drive at 'Users/Username/AppData/Roaming/Kodi/addons/'. If you have a previous installation, consider backing it up to a safe place before installing. | ||
Remove the '-master' from the end of the folder name!!! | |||
If you are replacing xbmc.callbacks2 which will no longer be developed, the settings from there are not compatible. Copy your settings over to the new addon and then disable or delete xbmc.callbacks2 | If you are replacing xbmc.callbacks2 which will no longer be developed, the settings from there are not compatible. Copy your settings over to the new addon and then disable or delete xbmc.callbacks2 | ||
| Line 60: | Line 64: | ||
=== Details === | === Details === | ||
There are three pages of settings - Tasks, Events and General | |||
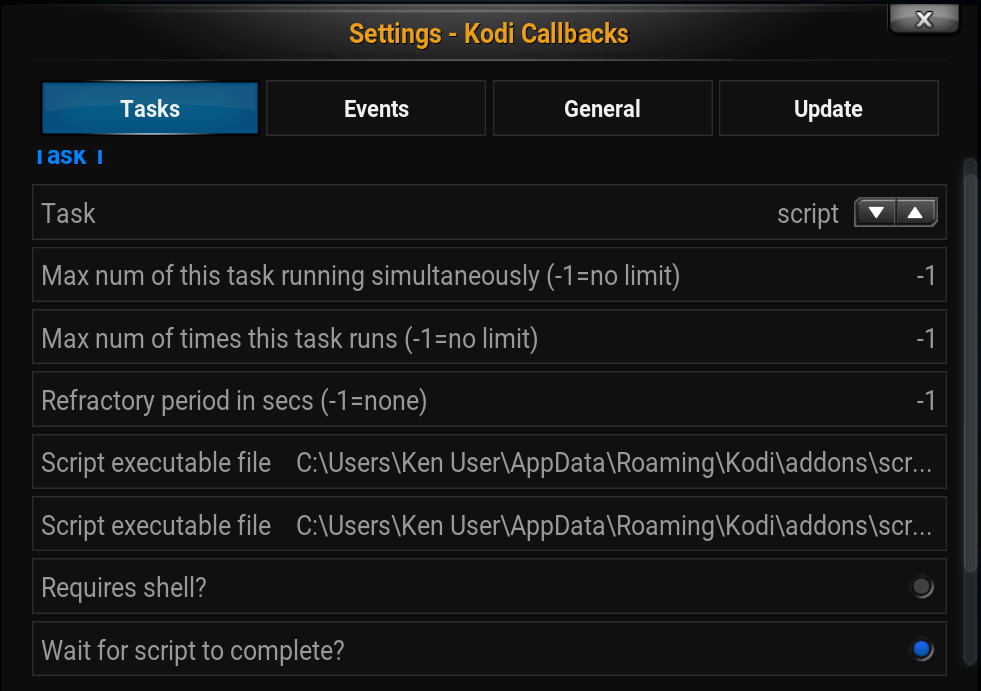
==== Settings - Tasks ==== | |||
[[File:Kodi-callbacks-settings1.PNG|800px|frameless|right]] | [[File:Kodi-callbacks-settings1.PNG|800px|frameless|right]] | ||
You can configure up to 10 tasks. | |||
For each task, select a type - builtin, http, python or script. | |||
For all you can configure: | |||
# The maximum number of this task that can be running simultaneously | |||
# The maximum number of times this task can be run for a given Kodi session | |||
# A refractory period after a task is run where it won't be re-run | |||
For different types, there are additional things to configure: | |||
For scripts, whether the script requires the shell to run | |||
For python: | |||
# Execute the python file directly | |||
# Import the file as a module and call whatever is designated within as 'run' - arguments will be passed as run(args) | |||
Note the task number as that is how it will be referred to on the next settings page. | |||
| Line 68: | Line 89: | ||
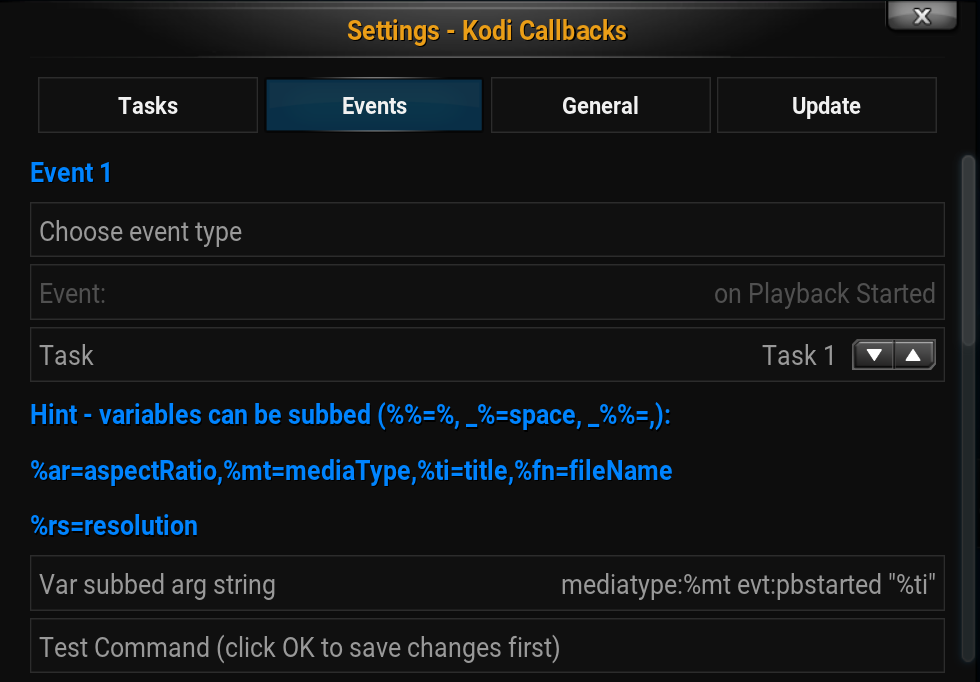
==== Settings - Events ==== | ==== Settings - Events ==== | ||
[[File:Kodi-callbacks-settings2.PNG|800px|frameless|right]] | [[File:Kodi-callbacks-settings2.PNG|800px|frameless|right]] | ||
You can configure up to 10 events and have each use a different task or reuse the same task. | |||
For each event, select an event type. There are currently 23 different events. | |||
For some events, additional information is required: | |||
# For JSON notification events, the sender, method and data are required. | |||
# For Window Open and Close events, the window id is needed (see: [[Window_IDs|Kodi Window Ids]] | |||
# For Idle events, the idle time in seconds (note that idle is when there is no user interaction and no media is playing). | |||
# For detecting when a portion of a string is written to the log onLogSimple and and onLogRegex require 'matchIf' strings. | |||
# A simple match detects a case-sensitive substring in an individual log line, while a regex match matches whatever you configure it to on a line. | |||
# Log strings can also be rejected if a different portion matches 'rejectIf'. | |||
A variable substituted argument string can then optionally be provided to pass additional information to your task. | |||
The variables that can be passed are dependent on the event and are shown on the settings page. | |||
Only the variables shown will be searched for and substituted. | |||
To ensure that literal percent signs are passed correctly, use '%%'. | |||
Because of the way arguments are passed to script files and python files, they are usually split where spaces or commas occur. | |||
If you need to ensure that a space is not split, use %_. | |||
Again, spaces can cause issues sometimes. Depending on how your file processes arguments, consider placing double-quotes around variables that may contains spaces such as titles, filenames and loglines. | |||
A fully configured event can be tested from the Event Settings Page. | |||
First click OK to cause any changes made to be written to the user settings file. | |||
Then re-enter Settings and navigate back to the event to be tested and click "Test command'. | |||
First some simple validation tests will be run and if they fail, this will be reported back to the user on the screen. | |||
Then an attempt will be made to run the task with simulated runtime arguments (i.e. the filename, title, etc will be simulated). | |||
NOTE: The test will in most circumstances wait for the task to 'return'. So if the task launches a program, no further information will be provided until that program ends. | |||
Exceptions or any returned text will then be displayed. | |||
<br clear=all> | <br clear=all> | ||
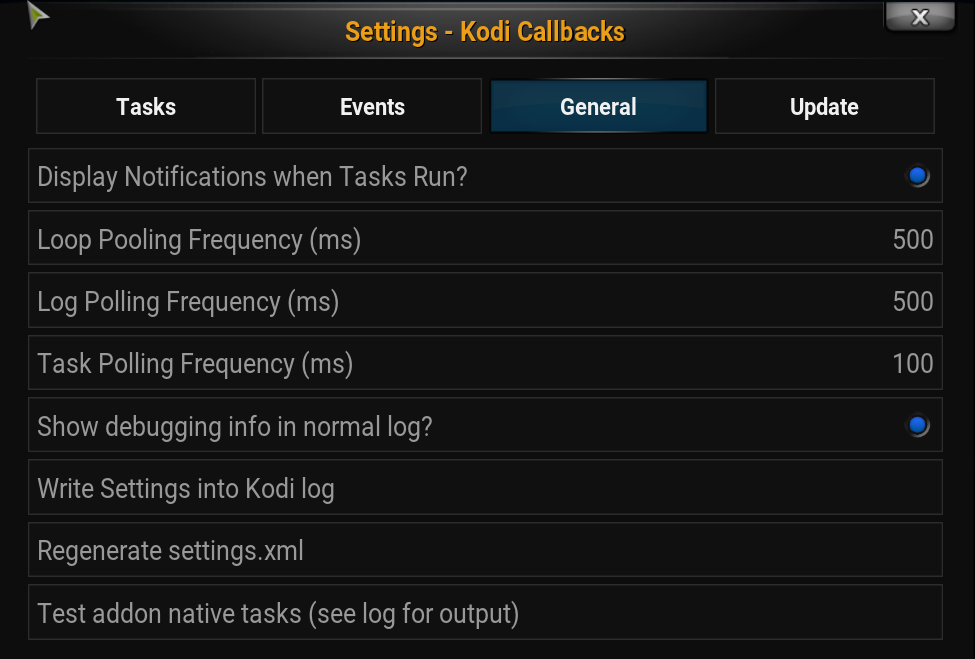
==== Settings - General ==== | ==== Settings - General ==== | ||
[[File:Kodi-callbacks-settings3.PNG|800px|frameless|right]] | [[File:Kodi-callbacks-settings3.PNG|800px|frameless|right]] | ||
The addon can optionally show a brief notification each time a task is run. | |||
Polling frequencies can be configured. If you have a low powered system and performance suffers causing video stuttering, consider increasing the times. | |||
The Loop Frequency is for events such as onIdle, onWindow open or close, profile changes and stereomode changes. | |||
The Log frequency is for the log checker. | |||
The Task frequency is for the main task dispatcher. | |||
An option is provided to elevate all routine messages to the normal log, instead of the debug log. | |||
A request has been made by the Kodi developers that addons avoid writing to the normal log. | |||
This allows you to selectively elevate messages to that log for troubleshooting and then turn it back off once fixed. | |||
This avoids having the user turn on the full debug mode with its OSD. | |||
Lastly, you can click to regenerate the addon's settings.xml file. This is only needed if you have created your own task and placed it in the resources/lib/tasks folder. This will read in whatever settings you need so that they appear on the settings pages. | |||
<br clear=all> | <br clear=all> | ||
| Line 78: | Line 160: | ||
== Notes == | == Notes == | ||
The log checking events consume the most resources and regex checks utilize more than simple checks. | |||
The loop checking items consume the next most (onStereoModeChange, onProfileChange, onWindow Open or Close and onIdle). | |||
These are only started if there is a task configured that utilizes them. | |||
== FAQs == | == FAQs == | ||
''' | '''I need to a respond to an event that isn't listed as an event. Can you make it so that I can?''' | ||
Most likely, no. Pretty much everything that can be detected is already there. | |||
''' | '''I am having an issues, how can I get help?''' | ||
The best place to get script help is in the KODI forum thread here: http://forum.kodi.tv/ | |||
If you believe that things are not working as expected, please also UPLOAD A COPY OF 'kodi.log' TO: [http://xbmclogs.com/ XBMCLogs] or [http://pastebin.com/ pastebin] AND INCLUDE A LINK TO THE LOG IN YOUR POST! | |||
The | I do not have a magic crystal ball. The program does not report back to me directly with your issue. No log link usually means no help can be provided. | ||
The forum moderators frown upon posting your log directly in the forum. | |||
[[Category:Add-ons not in the Kodi.tv repo]] | [[Category:Add-ons not in the Kodi.tv repo]] | ||
Revision as of 23:17, 11 January 2016
| Kodi Callbacks | ||||||||||||||
| ||||||||||||||
| Need help with this add-on? See here. |
Perform custom user-defined tasks for multiple events in Kodi
Installing
This add-on is installed from the Add-on browser located in Kodi as follows:
Features
- Runs as a service when Kodi starts
- Runs user configured tasks when events occur in Kodi
- Currently can create tasks for:
- Running an external script with or without the shell
- Running an external python script either directly or via dynamic import
- Running a Kodi builtin
- Sending an http string (response)
- Utilizes a simple substitution language so that runtime arguments can be mixed with static user-defined elements to send to the external file as arguments
- 23 different Kodi events are supported
- Tasks can be tested directly from the Settings page with direct user feedback for troubleshooting
- New tasks can be created and shared with others by subclassing an abstract base class and then placing the file in the resources/lib/tasks folder
Installation
Overview
The script is not currently available via the official repo (it's a localized string issue that prevents submission).
You can download the zip file and manually copy it to the Kodi Add-Ons folder, overwriting the previous version.
The most recent version of the script can be downloaded here: https://github.com/KenV99/service.kodi.callbacks/archive/master.zip
Details
To manually install the script, first unzip the script to a convenient, temporary location and then copy the entire directory named ‘service.kodi.callbacks-master’ with its structure intact to the Kodi addons directory. In windows, this is typically located on your system drive at 'Users/Username/AppData/Roaming/Kodi/addons/'. If you have a previous installation, consider backing it up to a safe place before installing.
Remove the '-master' from the end of the folder name!!!
If you are replacing xbmc.callbacks2 which will no longer be developed, the settings from there are not compatible. Copy your settings over to the new addon and then disable or delete xbmc.callbacks2
Configuration
Overview
In Kodi go to System > Add-Ons > Enabled Add-Ons > Services > Kodi Callbacks > Configure
In general:
- Configure your task.
- On the next page, associate your task with one or more events.
- Click OK to save.
- Re-enter settings by clicking configure.
- Test your setup
Details
There are three pages of settings - Tasks, Events and General
Settings - Tasks
You can configure up to 10 tasks. For each task, select a type - builtin, http, python or script. For all you can configure:
- The maximum number of this task that can be running simultaneously
- The maximum number of times this task can be run for a given Kodi session
- A refractory period after a task is run where it won't be re-run
For different types, there are additional things to configure:
For scripts, whether the script requires the shell to run For python:
- Execute the python file directly
- Import the file as a module and call whatever is designated within as 'run' - arguments will be passed as run(args)
Note the task number as that is how it will be referred to on the next settings page.
Settings - Events
You can configure up to 10 events and have each use a different task or reuse the same task. For each event, select an event type. There are currently 23 different events. For some events, additional information is required:
- For JSON notification events, the sender, method and data are required.
- For Window Open and Close events, the window id is needed (see: Kodi Window Ids
- For Idle events, the idle time in seconds (note that idle is when there is no user interaction and no media is playing).
- For detecting when a portion of a string is written to the log onLogSimple and and onLogRegex require 'matchIf' strings.
- A simple match detects a case-sensitive substring in an individual log line, while a regex match matches whatever you configure it to on a line.
- Log strings can also be rejected if a different portion matches 'rejectIf'.
A variable substituted argument string can then optionally be provided to pass additional information to your task.
The variables that can be passed are dependent on the event and are shown on the settings page.
Only the variables shown will be searched for and substituted.
To ensure that literal percent signs are passed correctly, use '%%'.
Because of the way arguments are passed to script files and python files, they are usually split where spaces or commas occur.
If you need to ensure that a space is not split, use %_.
Again, spaces can cause issues sometimes. Depending on how your file processes arguments, consider placing double-quotes around variables that may contains spaces such as titles, filenames and loglines.
A fully configured event can be tested from the Event Settings Page.
First click OK to cause any changes made to be written to the user settings file.
Then re-enter Settings and navigate back to the event to be tested and click "Test command'.
First some simple validation tests will be run and if they fail, this will be reported back to the user on the screen.
Then an attempt will be made to run the task with simulated runtime arguments (i.e. the filename, title, etc will be simulated).
NOTE: The test will in most circumstances wait for the task to 'return'. So if the task launches a program, no further information will be provided until that program ends.
Exceptions or any returned text will then be displayed.
Settings - General
The addon can optionally show a brief notification each time a task is run.
Polling frequencies can be configured. If you have a low powered system and performance suffers causing video stuttering, consider increasing the times.
The Loop Frequency is for events such as onIdle, onWindow open or close, profile changes and stereomode changes.
The Log frequency is for the log checker.
The Task frequency is for the main task dispatcher.
An option is provided to elevate all routine messages to the normal log, instead of the debug log.
A request has been made by the Kodi developers that addons avoid writing to the normal log.
This allows you to selectively elevate messages to that log for troubleshooting and then turn it back off once fixed.
This avoids having the user turn on the full debug mode with its OSD.
Lastly, you can click to regenerate the addon's settings.xml file. This is only needed if you have created your own task and placed it in the resources/lib/tasks folder. This will read in whatever settings you need so that they appear on the settings pages.
Notes
The log checking events consume the most resources and regex checks utilize more than simple checks.
The loop checking items consume the next most (onStereoModeChange, onProfileChange, onWindow Open or Close and onIdle).
These are only started if there is a task configured that utilizes them.
FAQs
I need to a respond to an event that isn't listed as an event. Can you make it so that I can?
Most likely, no. Pretty much everything that can be detected is already there.
I am having an issues, how can I get help?
The best place to get script help is in the KODI forum thread here: http://forum.kodi.tv/
If you believe that things are not working as expected, please also UPLOAD A COPY OF 'kodi.log' TO: XBMCLogs or pastebin AND INCLUDE A LINK TO THE LOG IN YOUR POST!
I do not have a magic crystal ball. The program does not report back to me directly with your issue. No log link usually means no help can be provided.
The forum moderators frown upon posting your log directly in the forum.


