HOW-TO:Install Kodi for iOS
The current stable release for iOS is Kodi v21.3 Omega.
- Requirements
- If you have any issues, be sure to read the iOS FAQ!
(Option A) Cydia

|
NOTICE: This method is only compatible on jailbroken device |
Installing
-
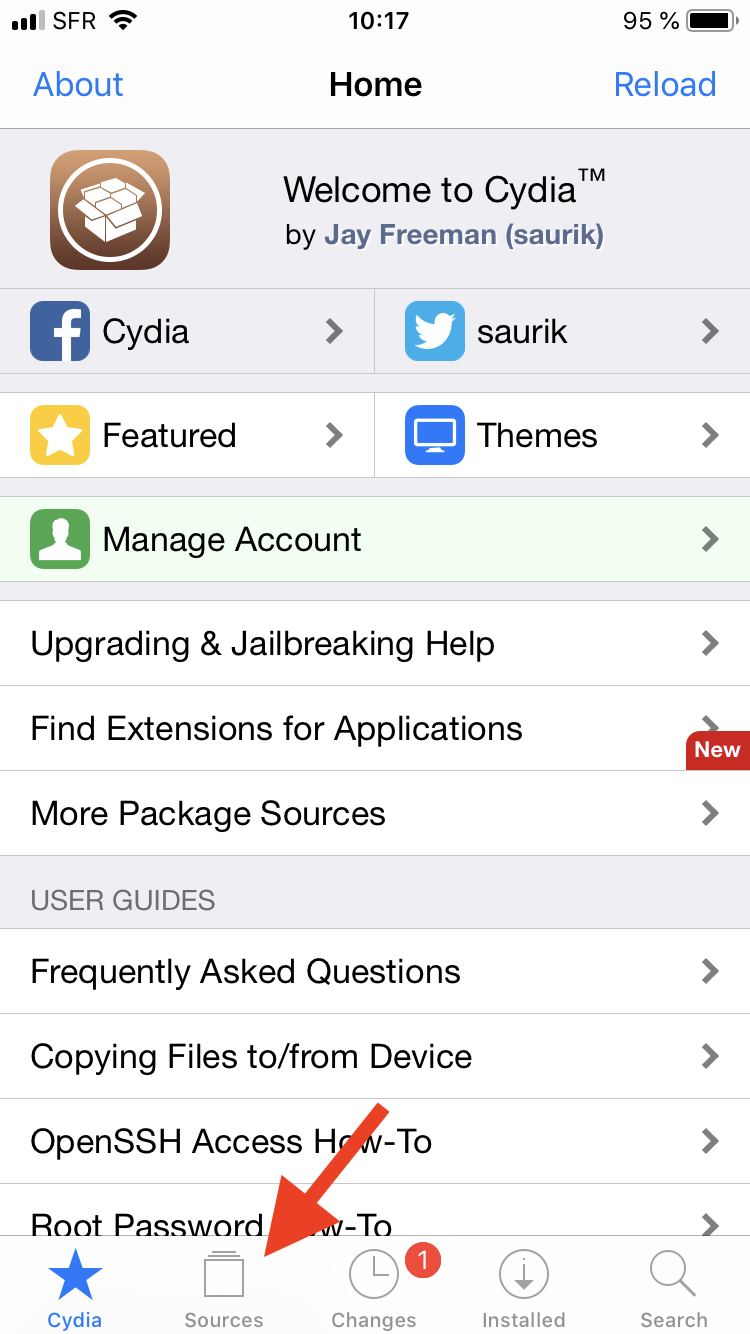
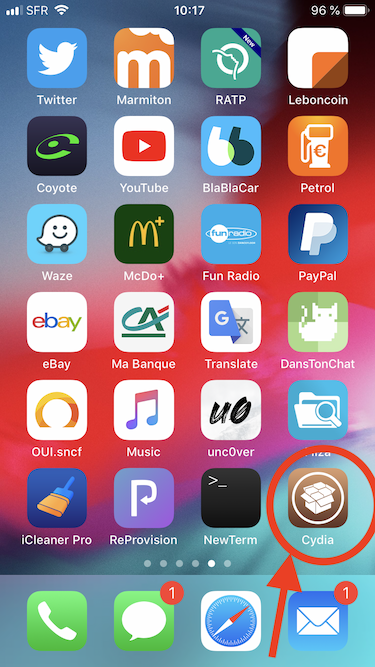
 Step 1: Tap the Cydia icon on your homescreen.
 -
 Step 2: Open "Sources" tab.
 -
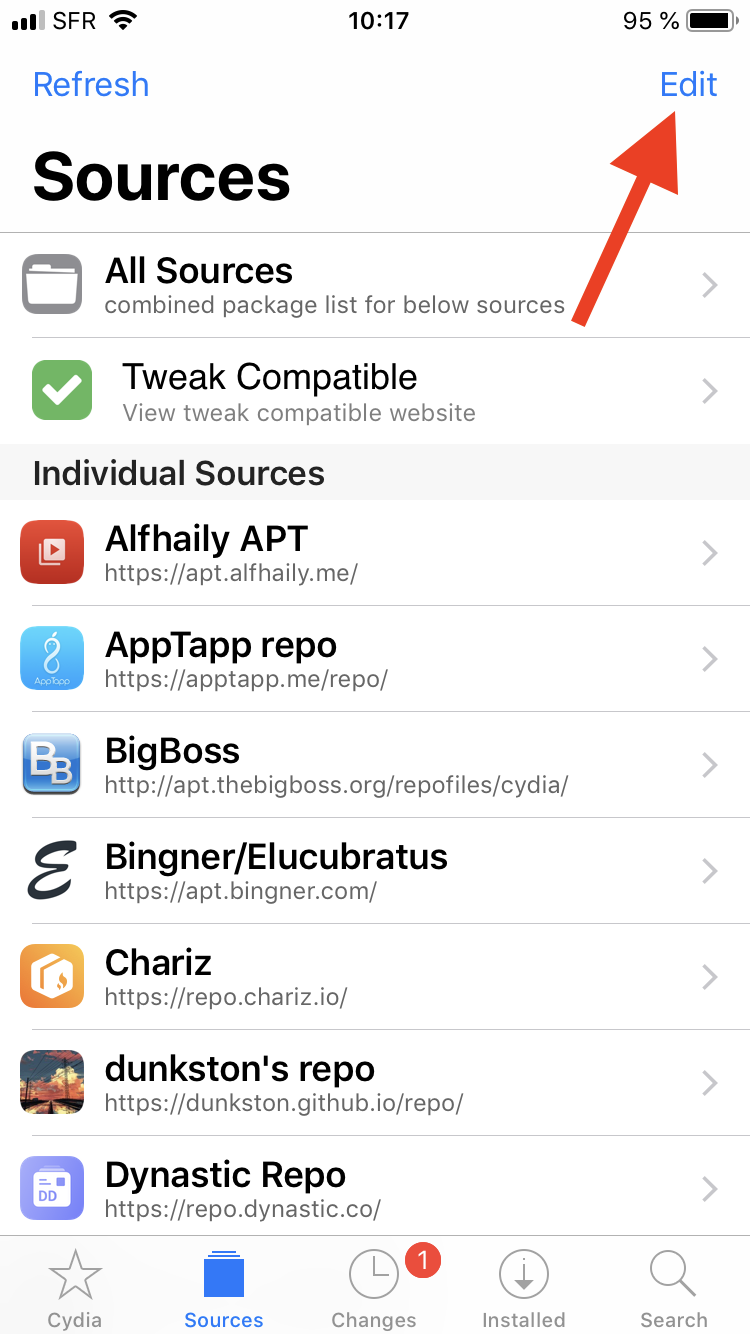 Step 3: Touch "Edit".
 -
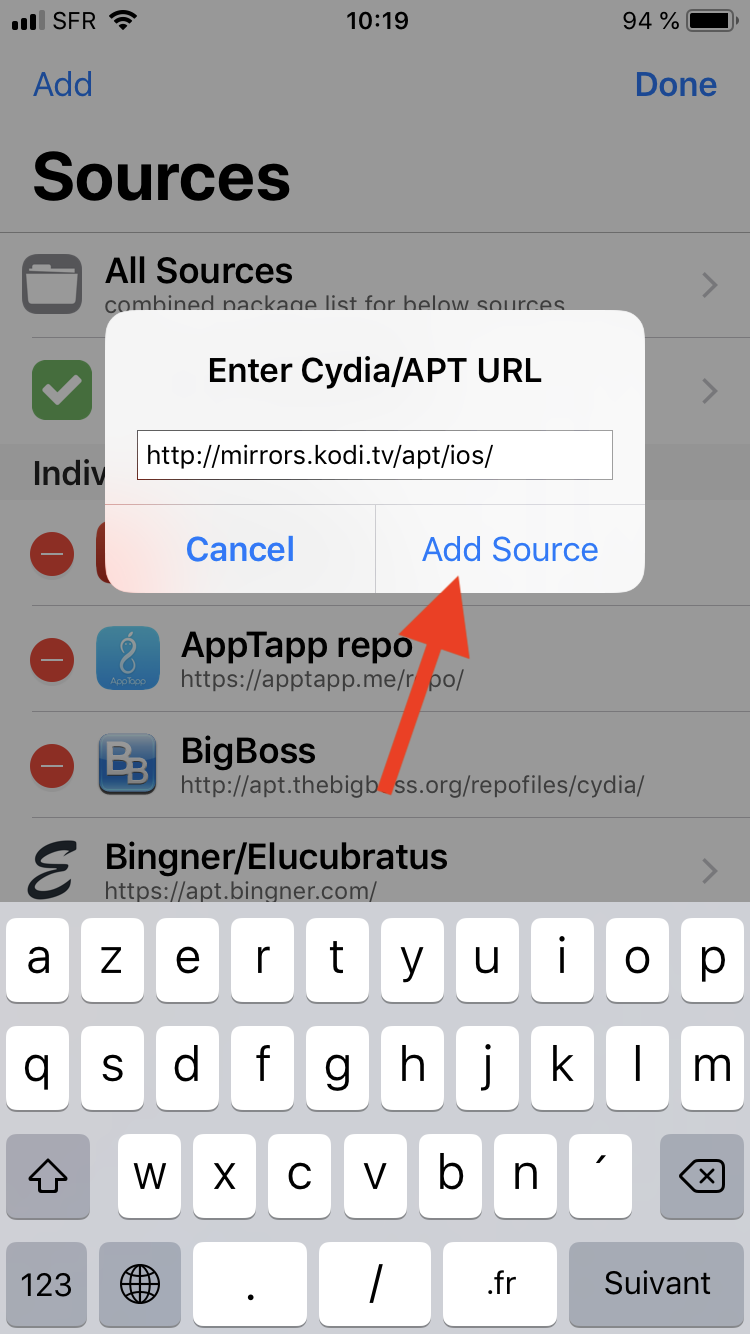 Step 4: Fill in the official Team Kodi repository: http://mirrors.kodi.tv/apt/ios/ and touch "Add Source".
 -
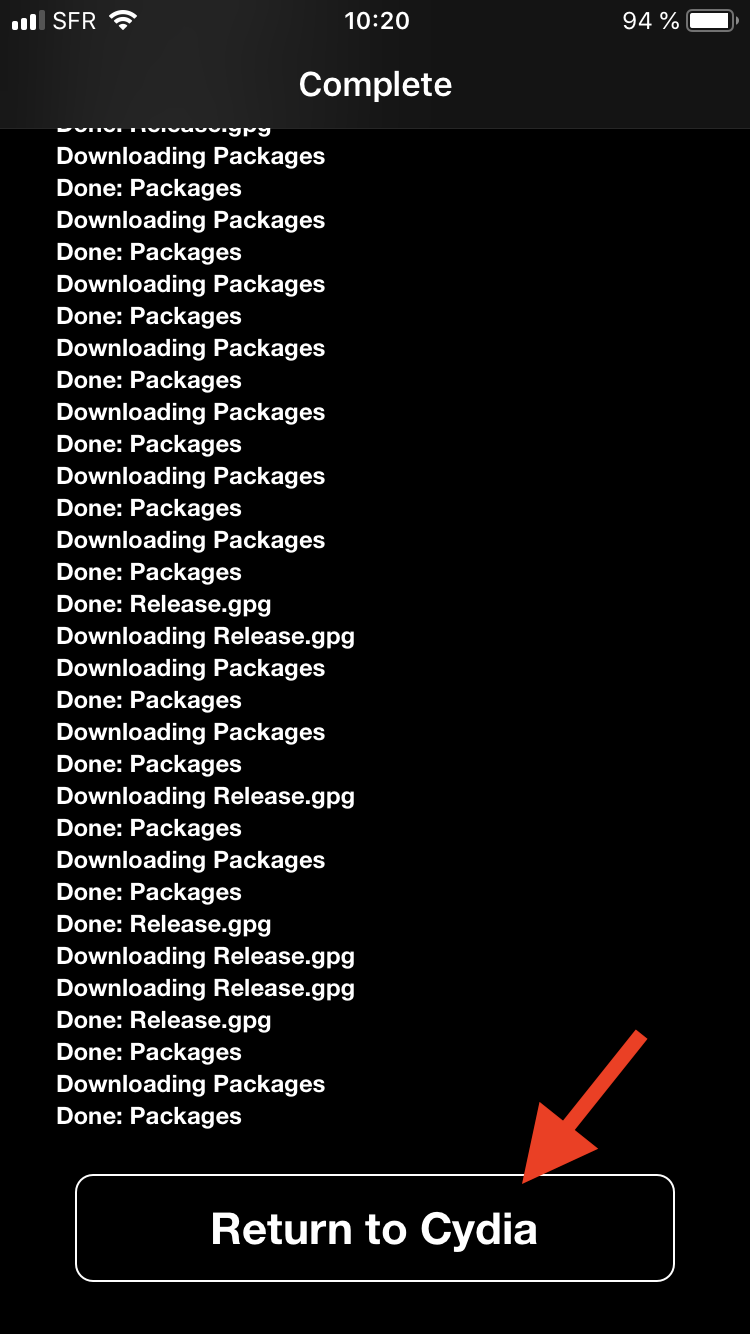 Step 5: Wait until the "Return to Cydia" button appears and touch it.
 -
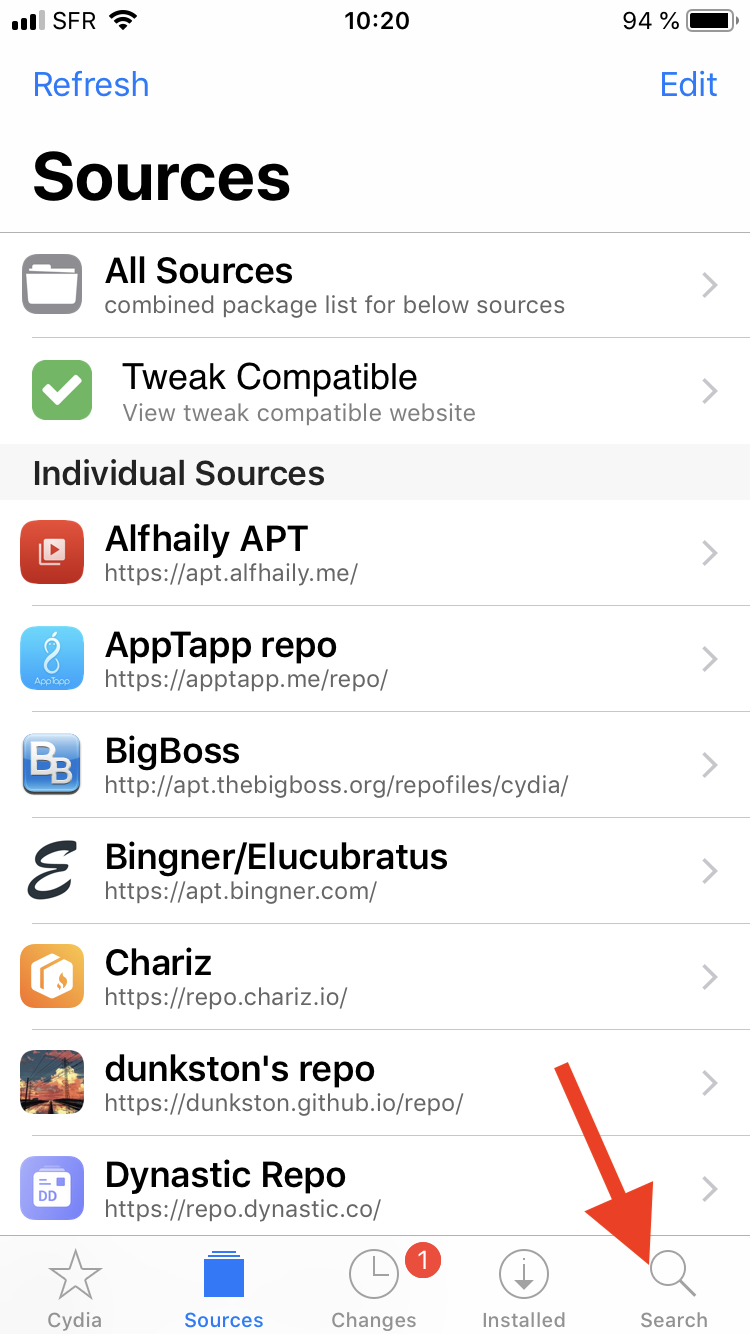 Step 6: Open "Search" tab.
 -
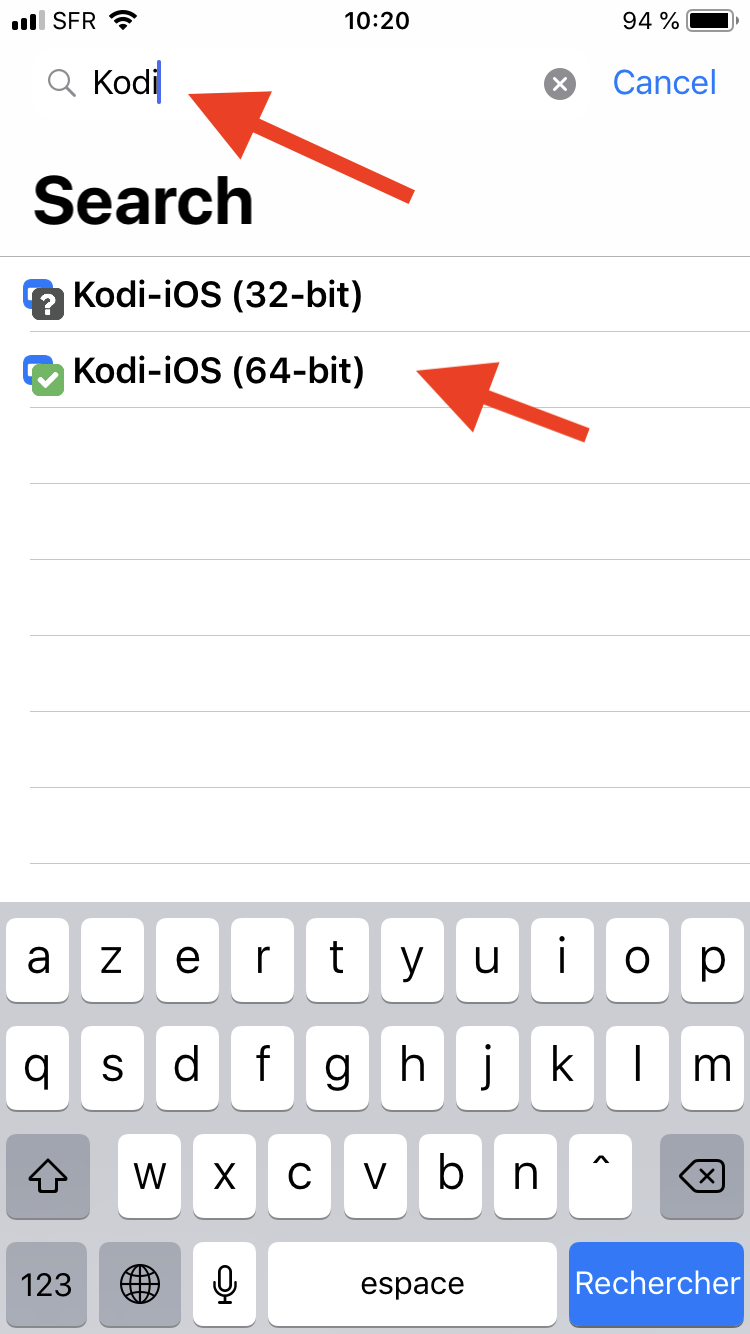 Step 7: Enter "Kodi" in the search field and touch the Kodi version corresponding to your device.
 -
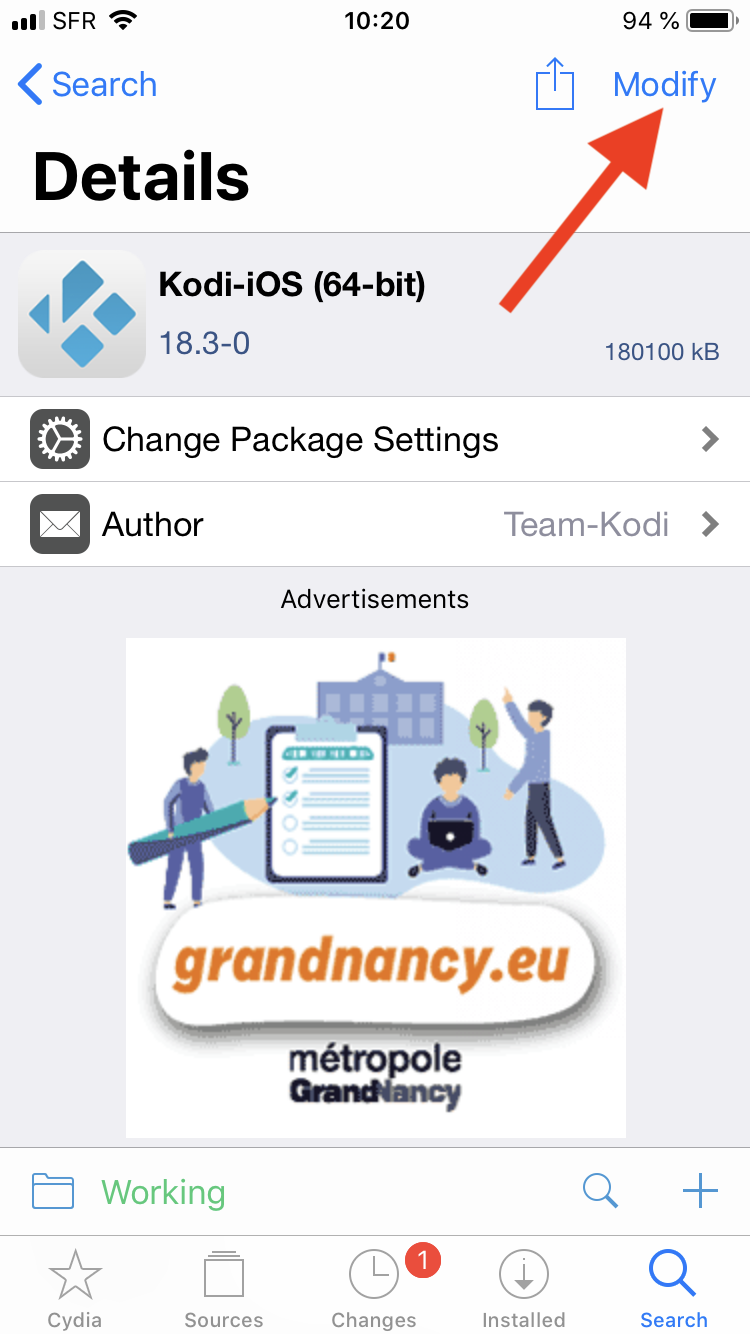 Step 8: Touch "Modify".
 -
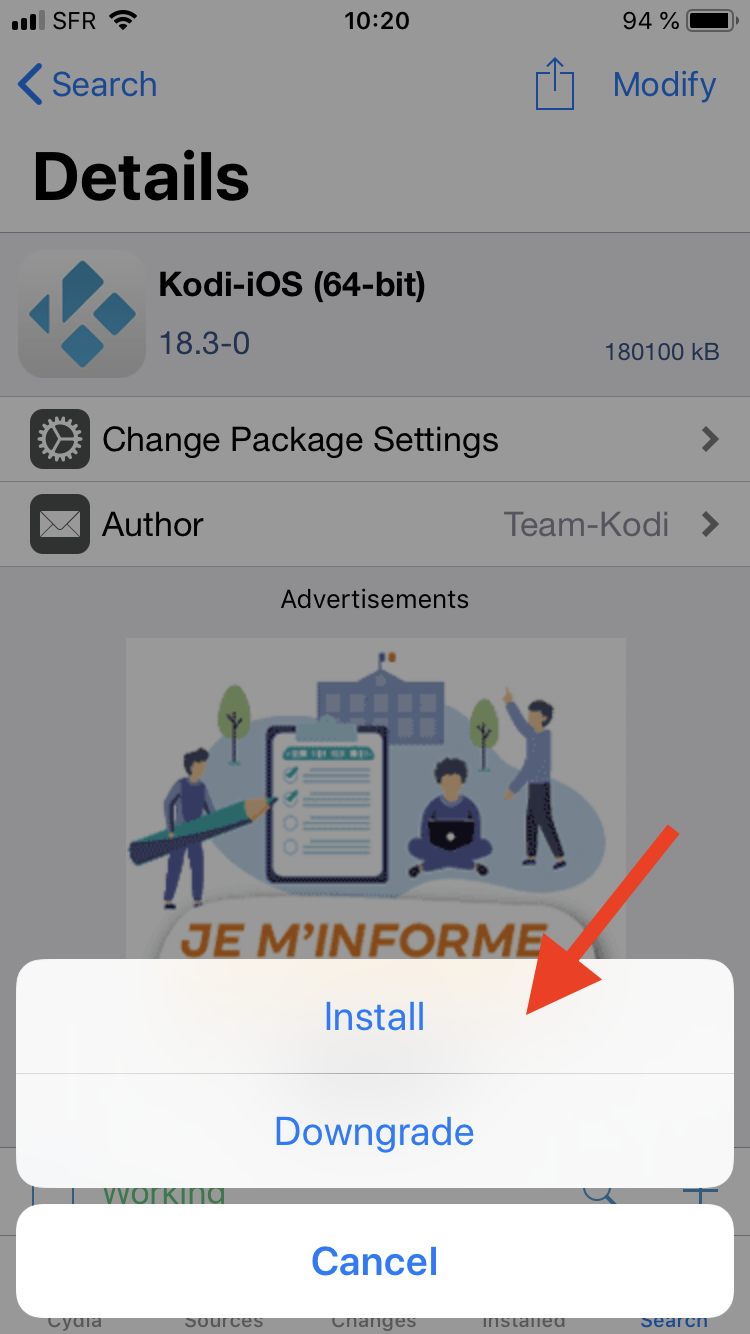 Step 9: Touch "Install".
 -
 Step 10: Touch "Confirm".
 -
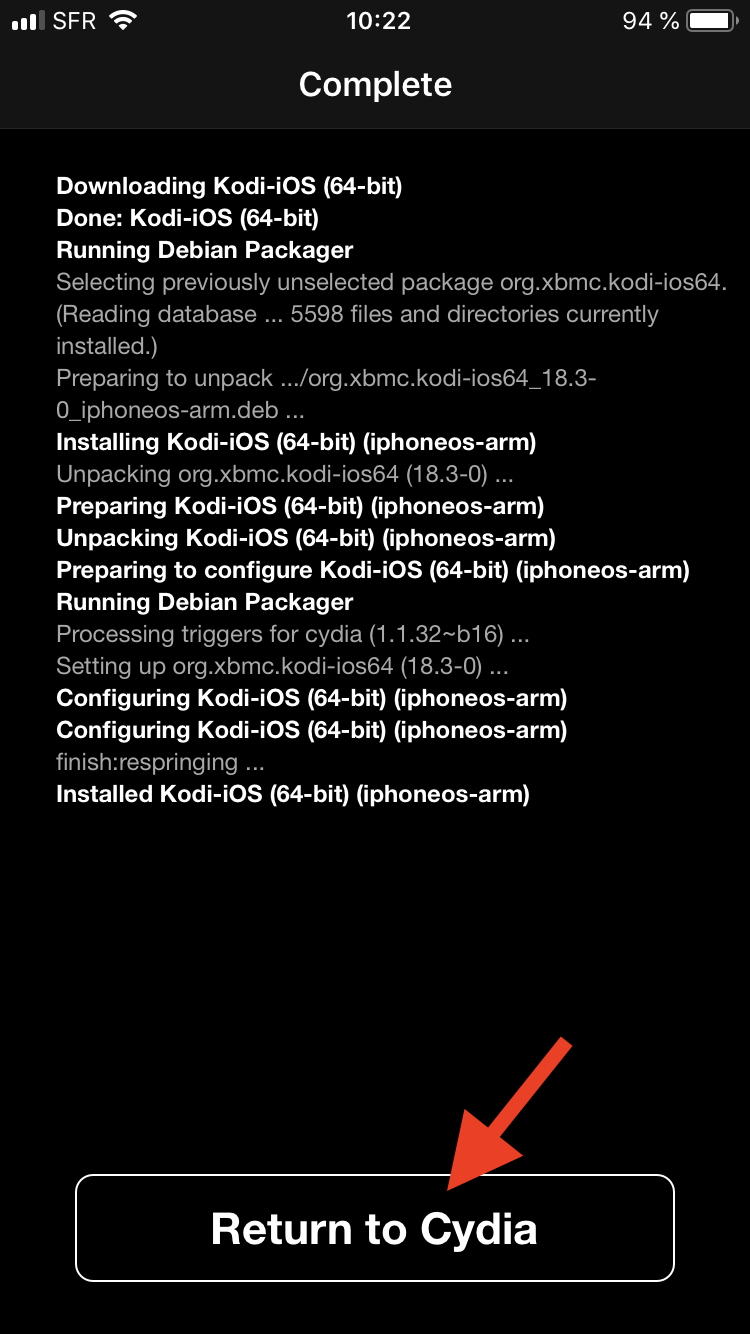 Step 11: Wait until the "Return to Cydia" button appears and touch it.
 -
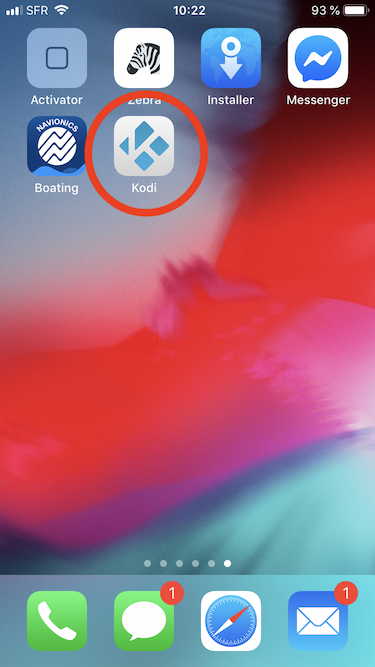 Step 12: Enjoy!


And you're done! You should now be running Kodi v21.3 Omega for iOS. See here to verify your Kodi version.
Updating
Updates for stable releases of Kodi are handled by Cydia and will show up in the 'Changes' section when available. (After updating the sources).
Uninstalling
Uninstalling just XBMC/Kodi
-
 Step 1: Tap the Cydia icon on your homescreen.
 -
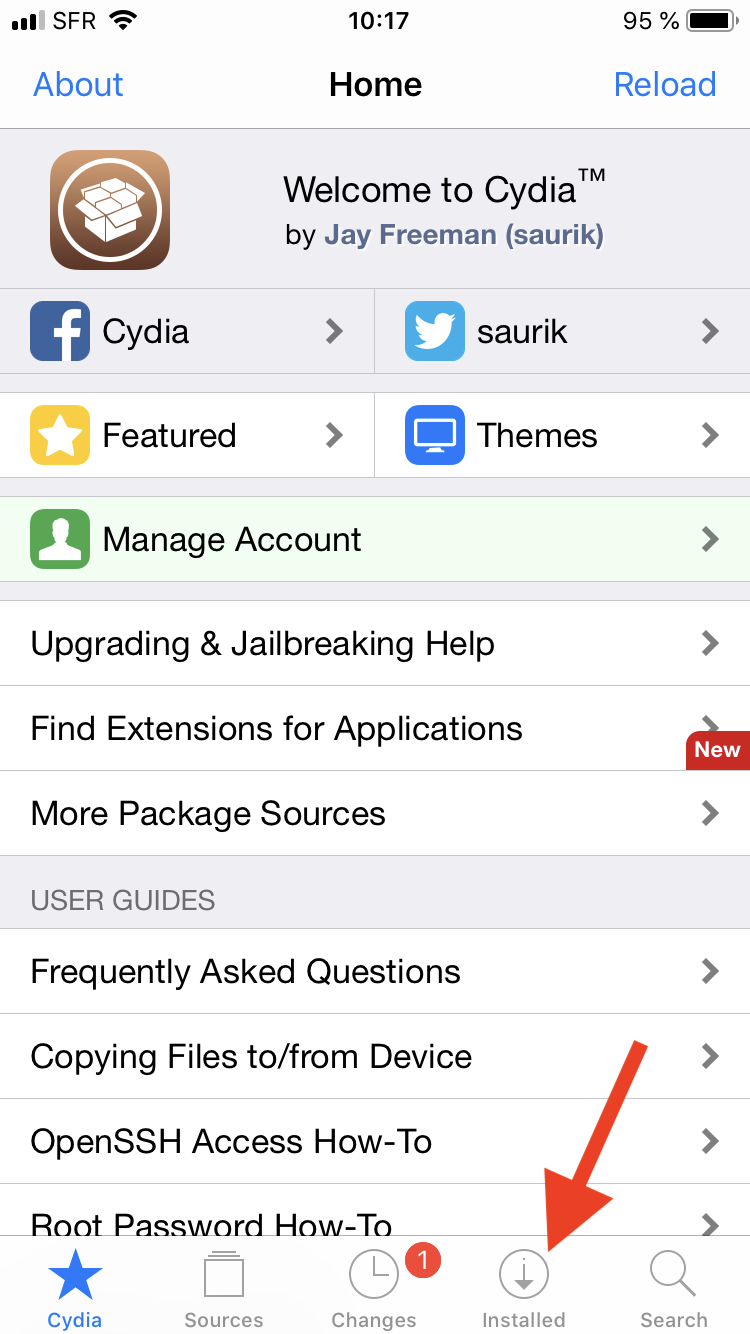 Step 2: Touch "Installed" tab.
 -
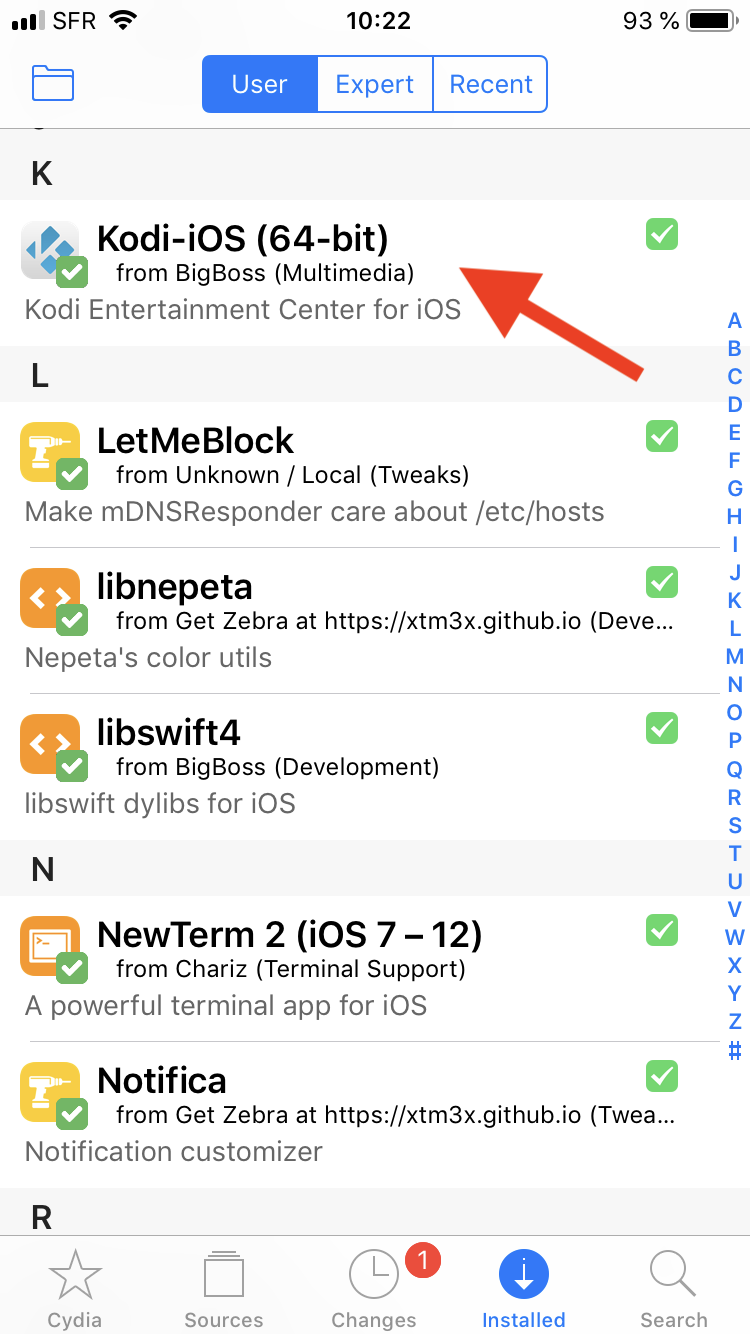 Step 3: Find Kodi in the list and touch it.
 -
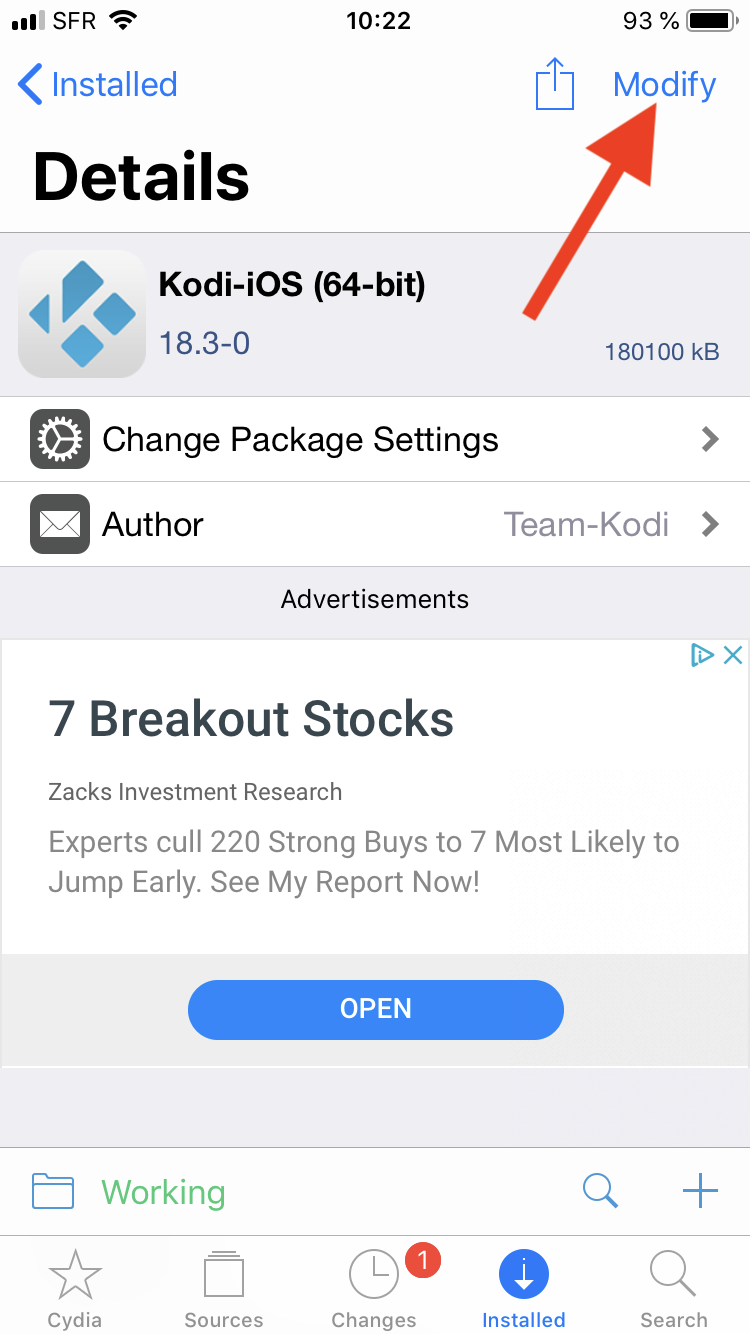 Step 4: Touch "Modify".
 -
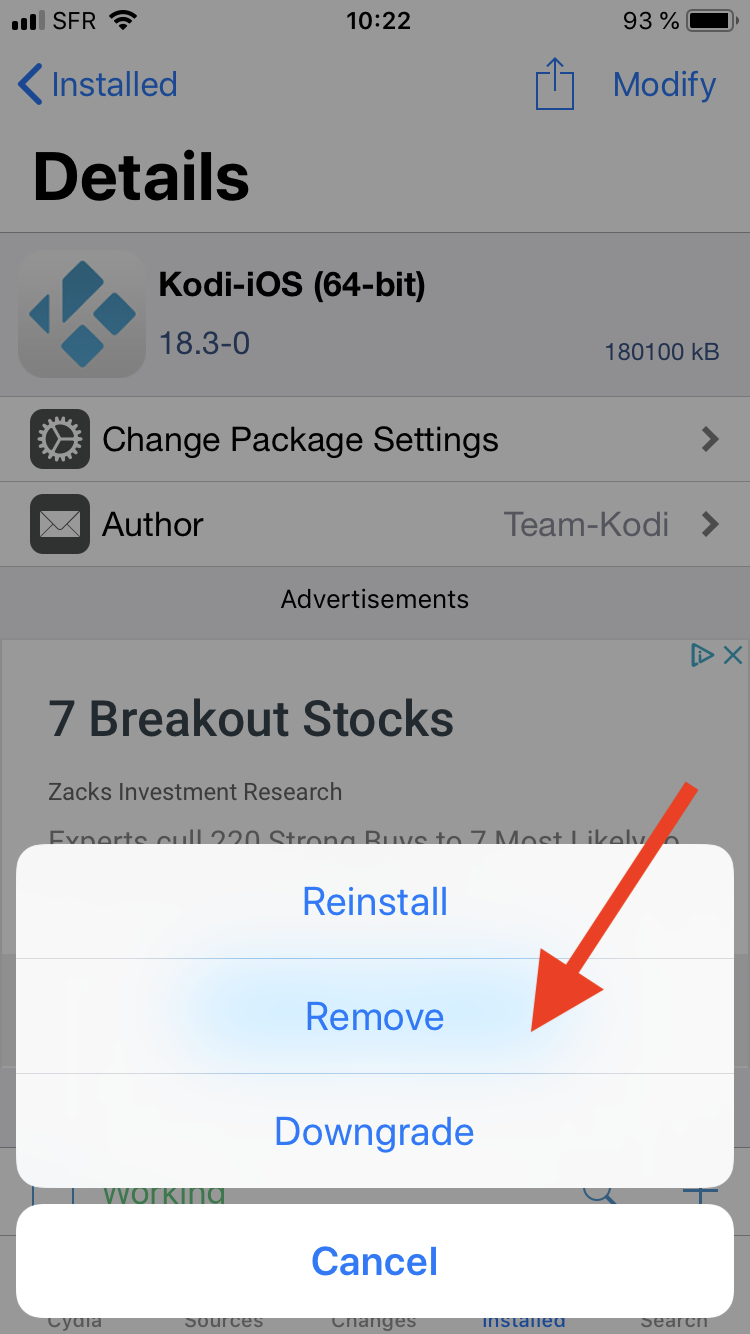 Step 5: Touch "Remove".
 -
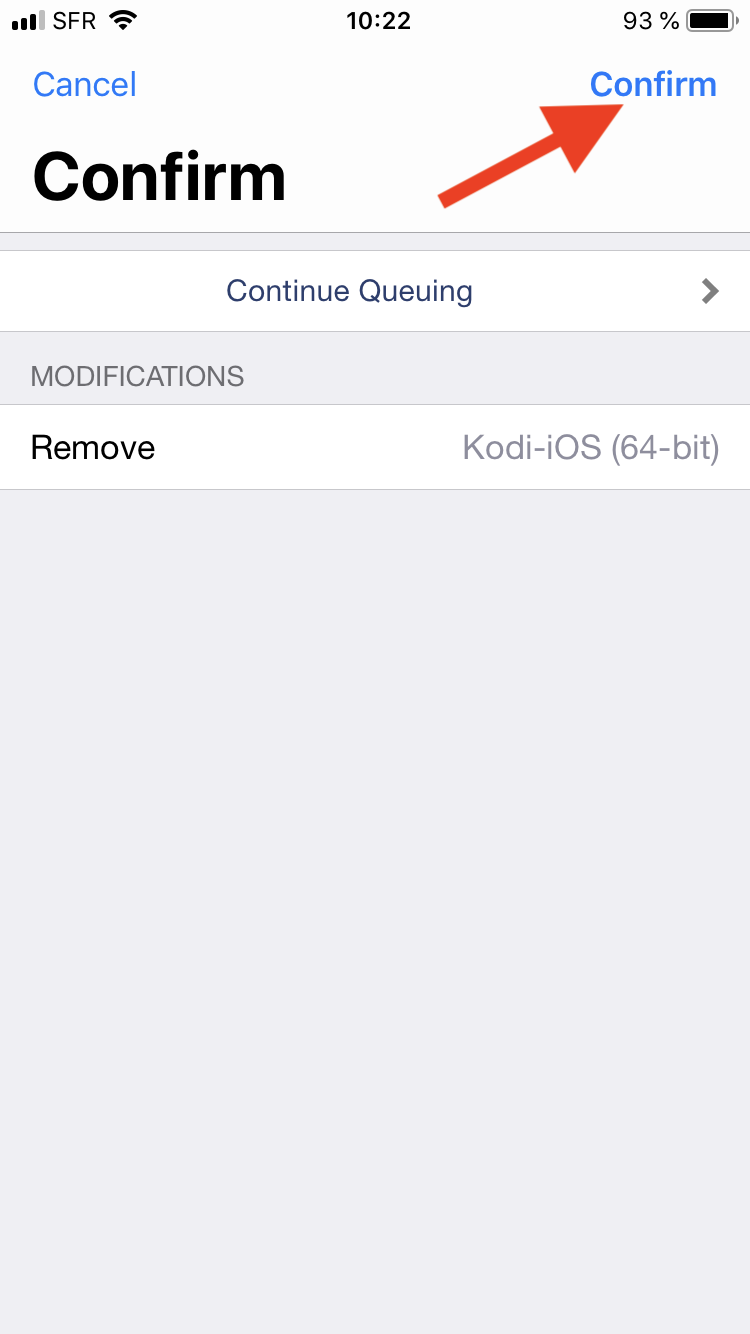 Step 6: Touch "Confirm".
 -
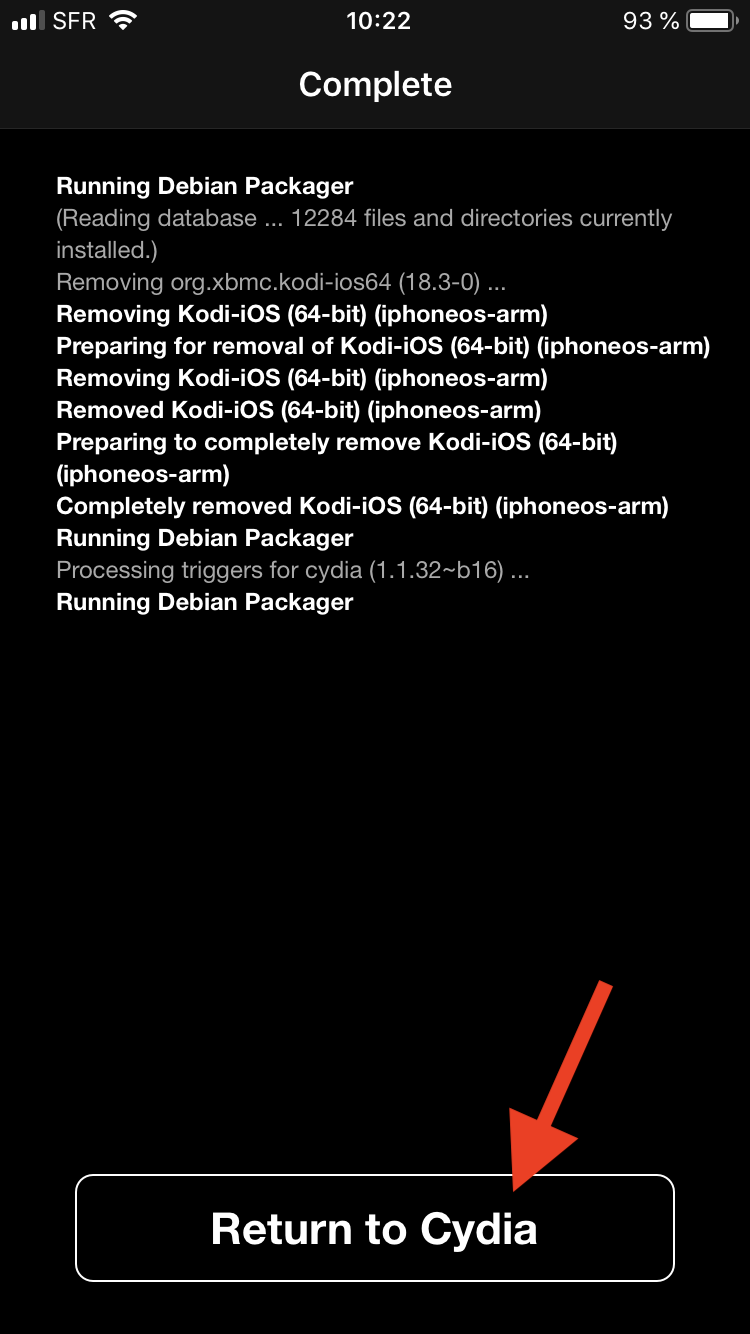 Step 7: Wait until "Return to Cydia" button appears and touch it.


You're all done.
Removing settings
Kodi will uninstall from your iDevice but will leave certain things (databases and everything in your userdata folder) behind to make it easier if you wanted to reinstall. To delete those:
- From the terminal, run
rm -Rf /private/var/mobile/Library/Preferences/XBMC/
rm -Rf /private/var/mobile/Library/Preferences/Kodi/
- Or
- From iFile or Filza
Delete /private/var/mobile/Library/Preferences/XBMC/
Delete /private/var/mobile/Library/Preferences/Kodi/
Development and custom builds
ALWAYS BACKUP YOUR USERDATA FOLDER WHEN USING DEVELOPMENT BUILDS!
| Build | Description | URL |
|---|---|---|
| Nightly build | Nightly builds are unstable test builds that have the latest bug fixes and feature additions. They are not fully tested, so anticipate issues and be sure to backup your userdata folder | Download the newest .deb file from: http://mirrors.kodi.tv/nightlies/darwin/ios/ |
| Monthly build | Monthly builds are more stable than nightly builds, but still contain lots of experimental new code. | Download the newest .deb file from: http://mirrors.kodi.tv/snapshots/darwin/ios/ |
| Betas and release candidates | Betas and release candidates are builds that are being tested to see if they have any bugs left before becoming a stable release. Most major bugs should be fixed in these builds. | Download the newest .deb file from: http://mirrors.kodi.tv/releases/darwin/ios |
| Older stable builds | If you wish to download an older version of XBMC/Kodi for whatever reason, you can do so with these same instructions below. | http://mirrors.kodi.tv/apt/ios/deb/ |
- Install iFile from Cydia if you don't already have it.
- In Mobile Safari (or any browser that can download files) open the
.debfile you wish to install, such as from the locations noted above.- EXAMPLE:
http://mirrors.kodi.tv/nightlies/darwin/ios/xbmc-20111202-6729214-master-ios.deb
- EXAMPLE:
- Wait for the download to complete.
- Note: Mobile Safari won't show a progress bar for downloads. Just wait a few minutes until the download is done, but don't close Safari.
- Select "Open in..."
- Select iFile from the available apps
- iFile will get a copy of the downloaded file and open an action menu. Select install. When iFile is complete you can tap done at the top.
- In iFile, swipe to delete the downloaded Kodi deb file as it is no longer needed.
See here to verify your Kodi version.
Note: To go back to a stable version of Kodi you might need to first uninstall Kodi and then use the normal install instructions, or manually download the stable release deb file and install using the dev build instructions.
Installing using Xcode and iOS App Signer
| This is considered and advanced and slightly-expirimental method. It is not for the faint of heart.
|
Prerequisites
- iOS App Signer
- Mac OS X 10.9 or higher
- Xcode 7 or higher
Downloads
| Build | Description |
|---|---|
| Stable builds | These are the current stable and recommended versions of Kodi to install on your device. |
| Nightly builds | Nightly builds are unstable test builds that have the latest bug fixes and feature additions. They are not fully tested, so anticipate issues and be sure to backup your userdata folder |
| Monthly builds | Monthly builds are more stable than nightly builds, but still contain lots of experimental new code. |
| Betas and release candidates | Betas and release candidates are builds that are being tested to see if they have any bugs left before becoming a stable release. Most major bugs should be fixed in these builds. |
Instructions
If you have a paid developer account with a wildcard (*) provisioning profile, you do not need to follow steps 1-6.
-
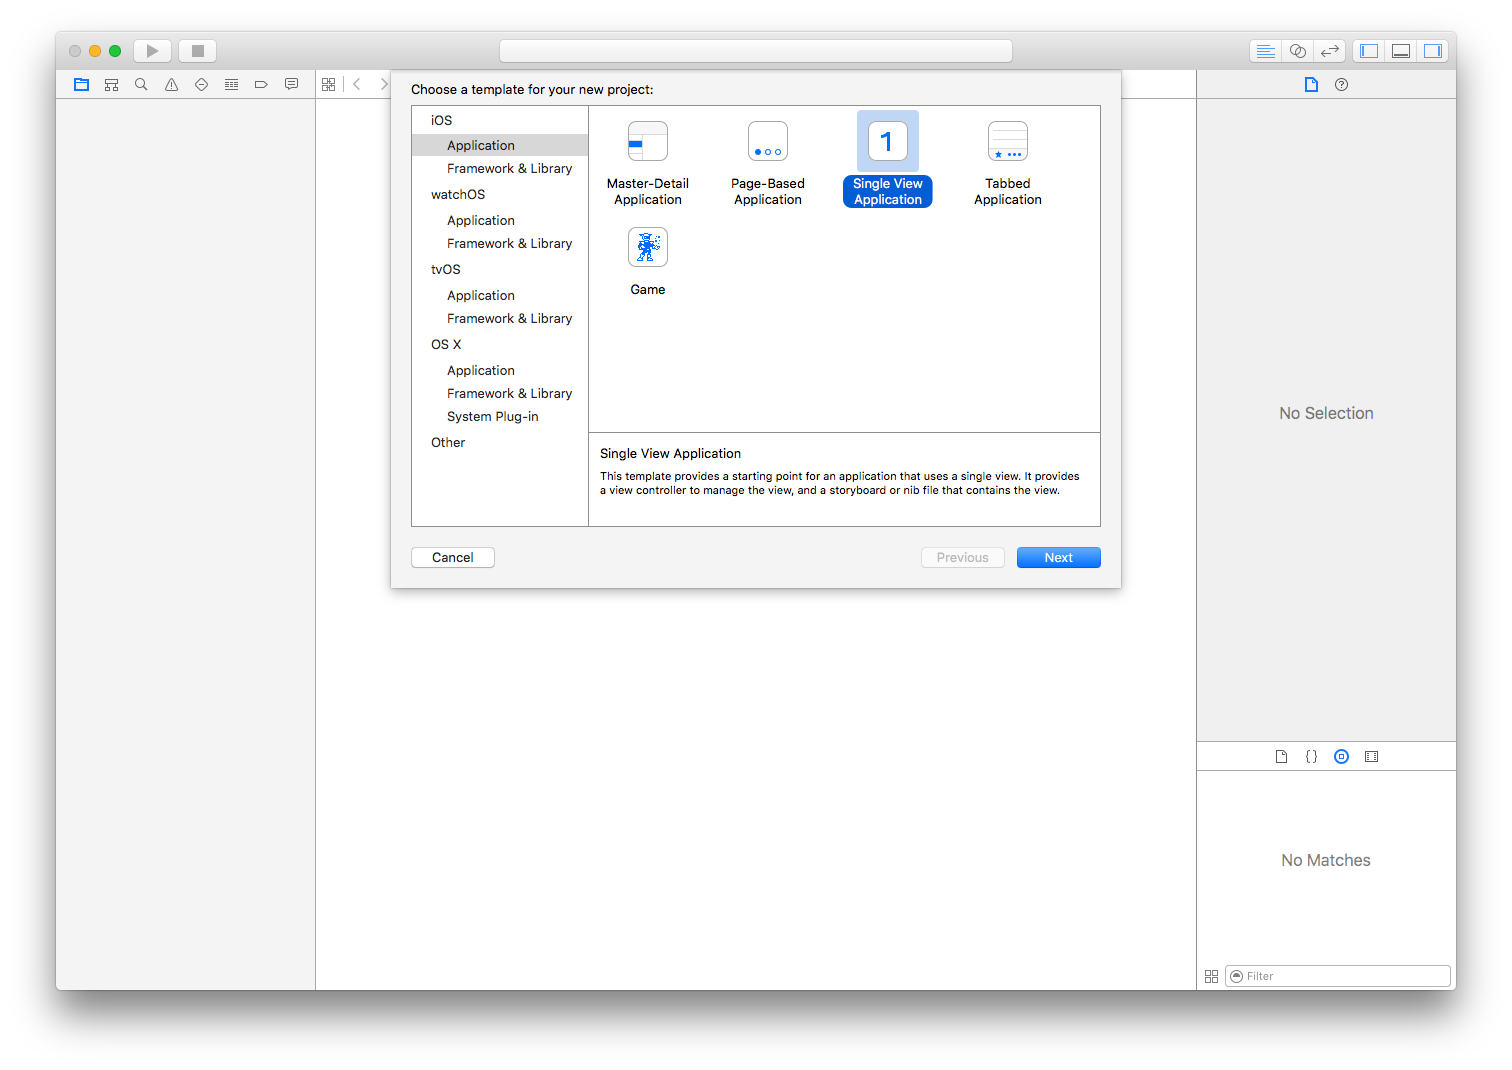 Step 1: Create a new iOS project in Xcode.
 -
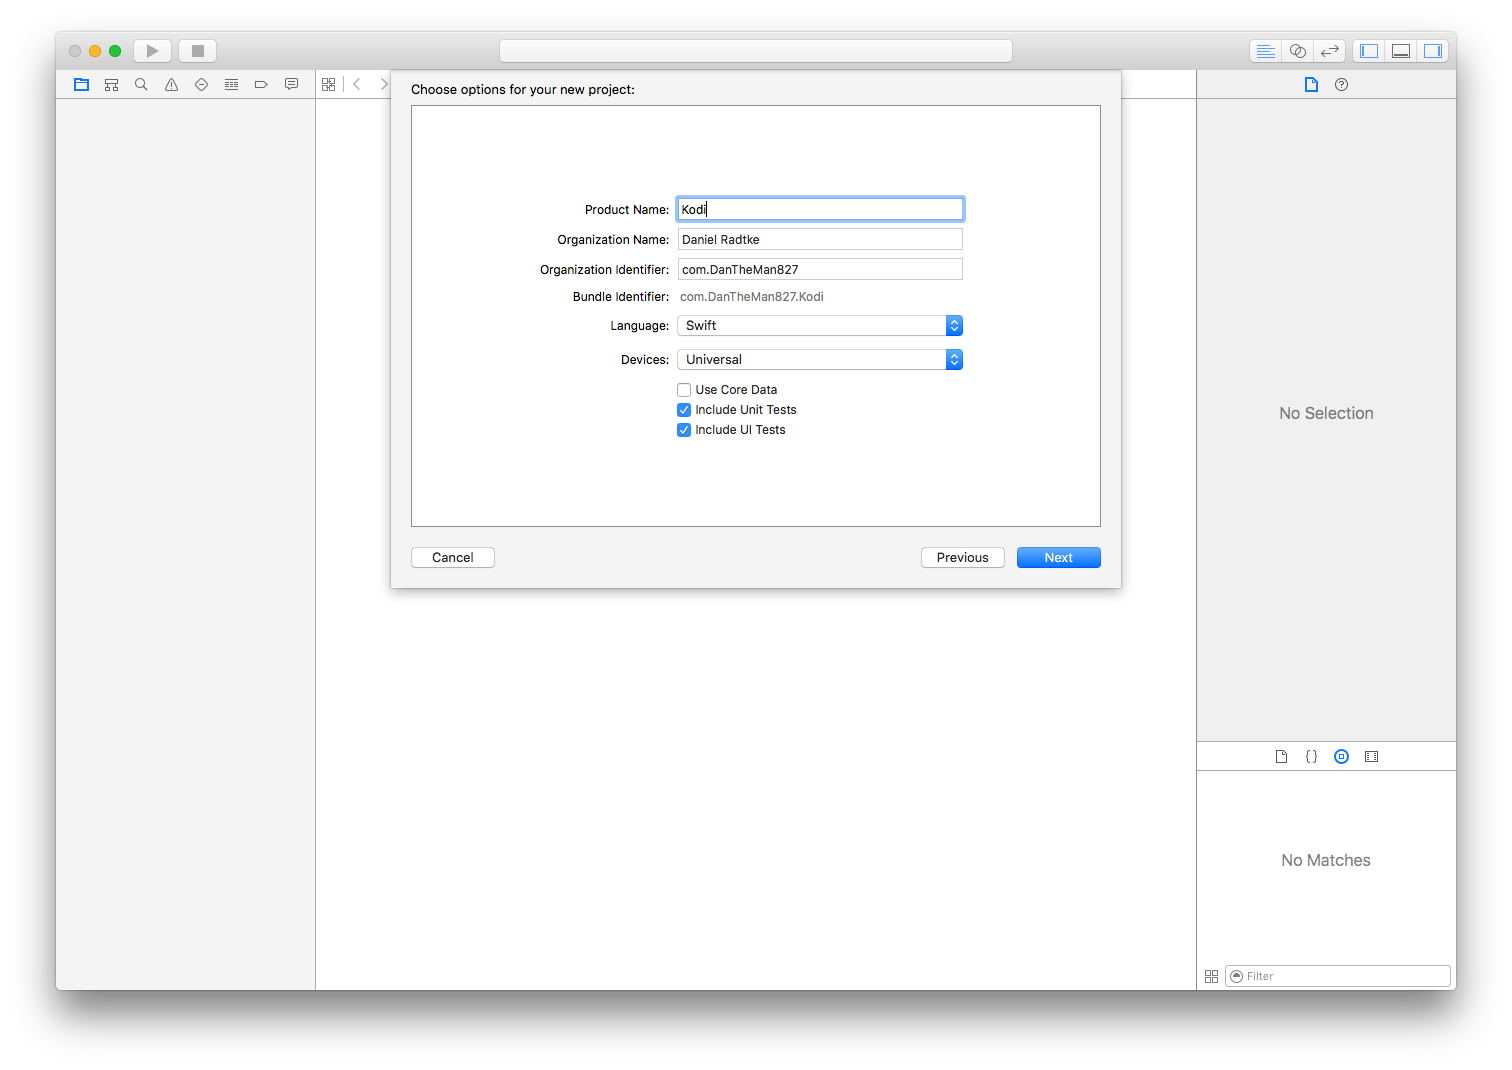 Step 2: Type in a name and unique identifier.
 -
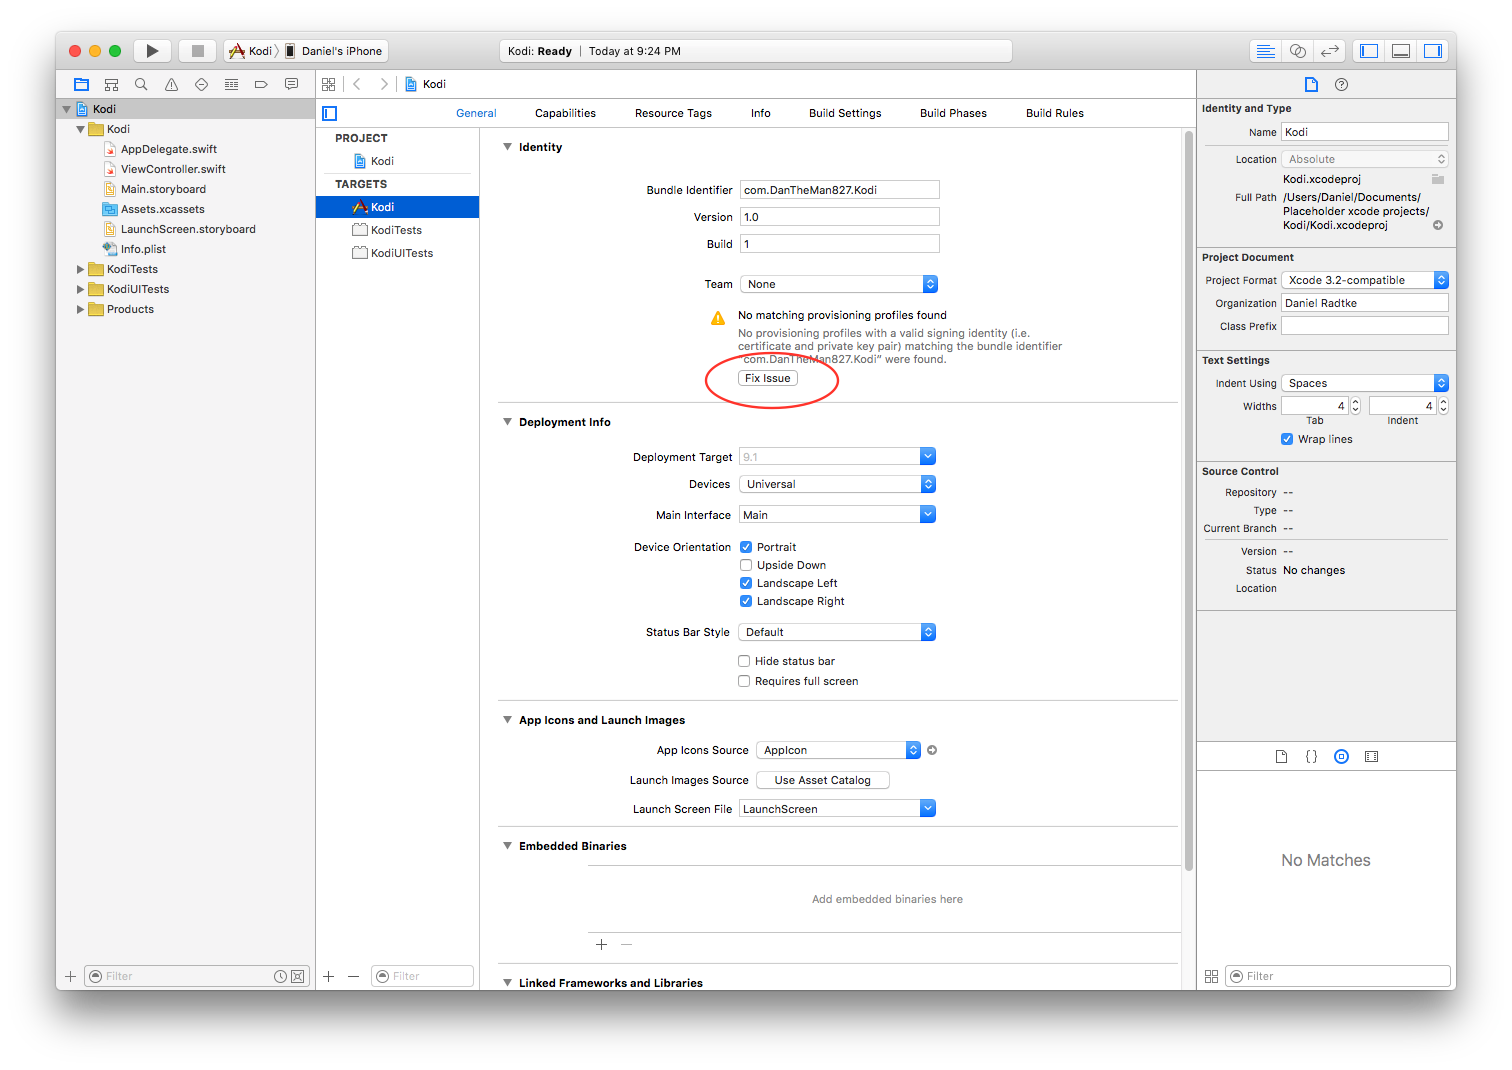 Step 3: After creating the project Xcode will probably complain about not having a provisioning profile, click Fix Issue.
 -
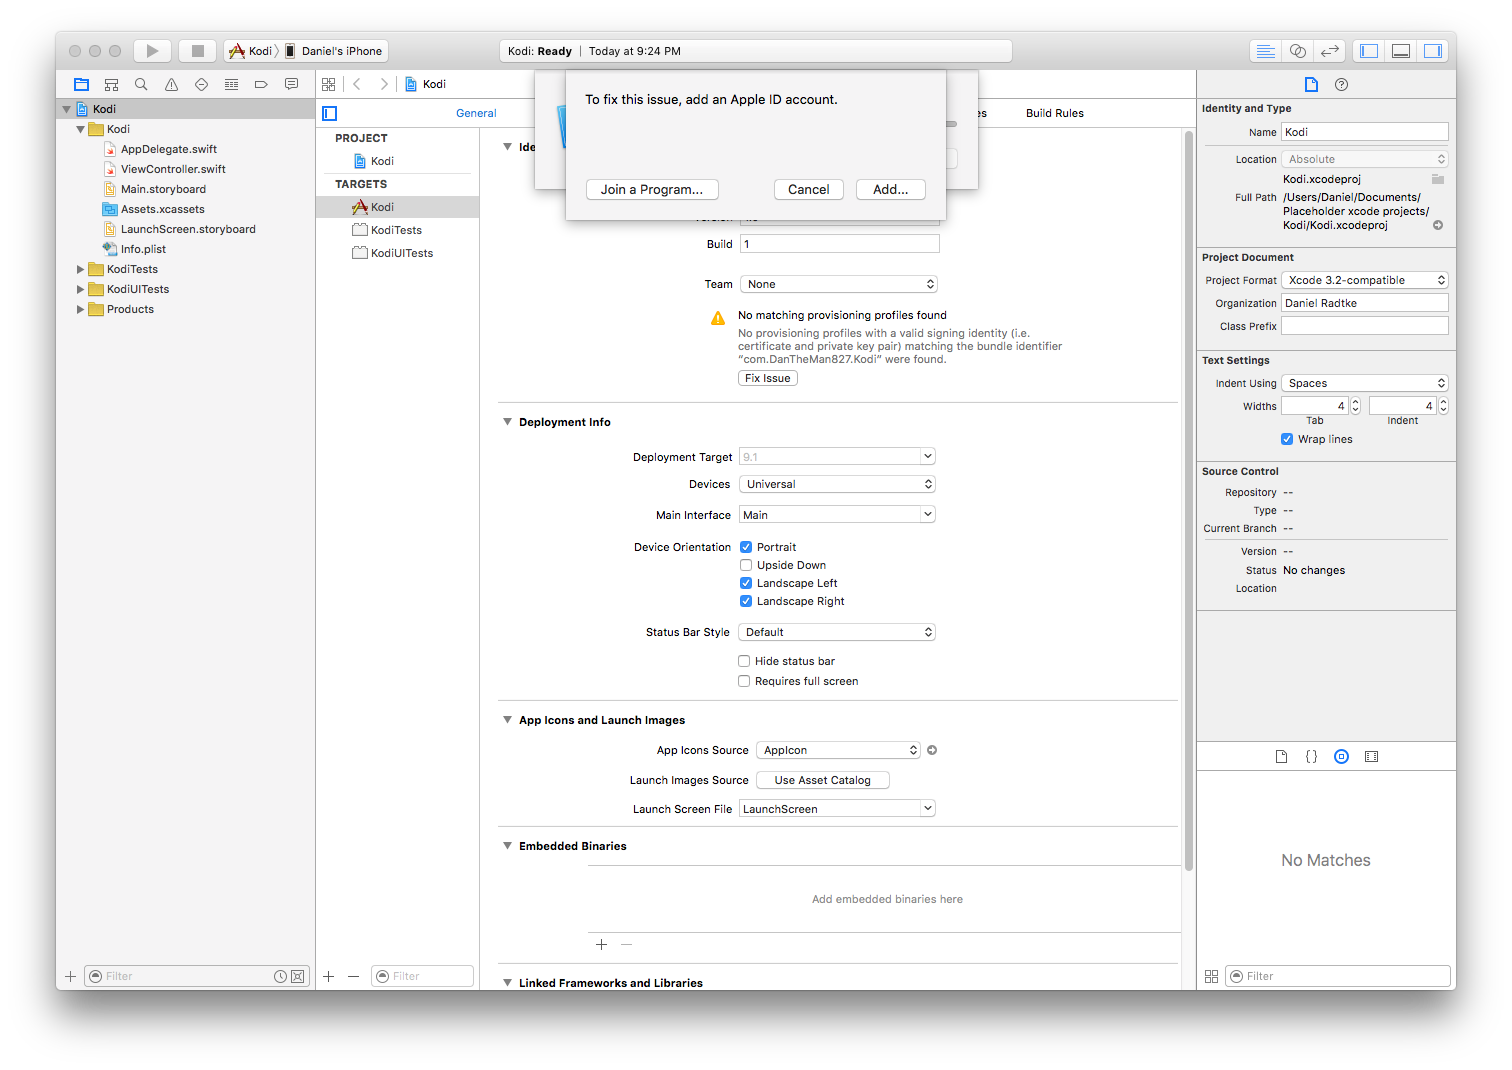 Step 4: Xcode may have you sign into or create your free developer account.
 -
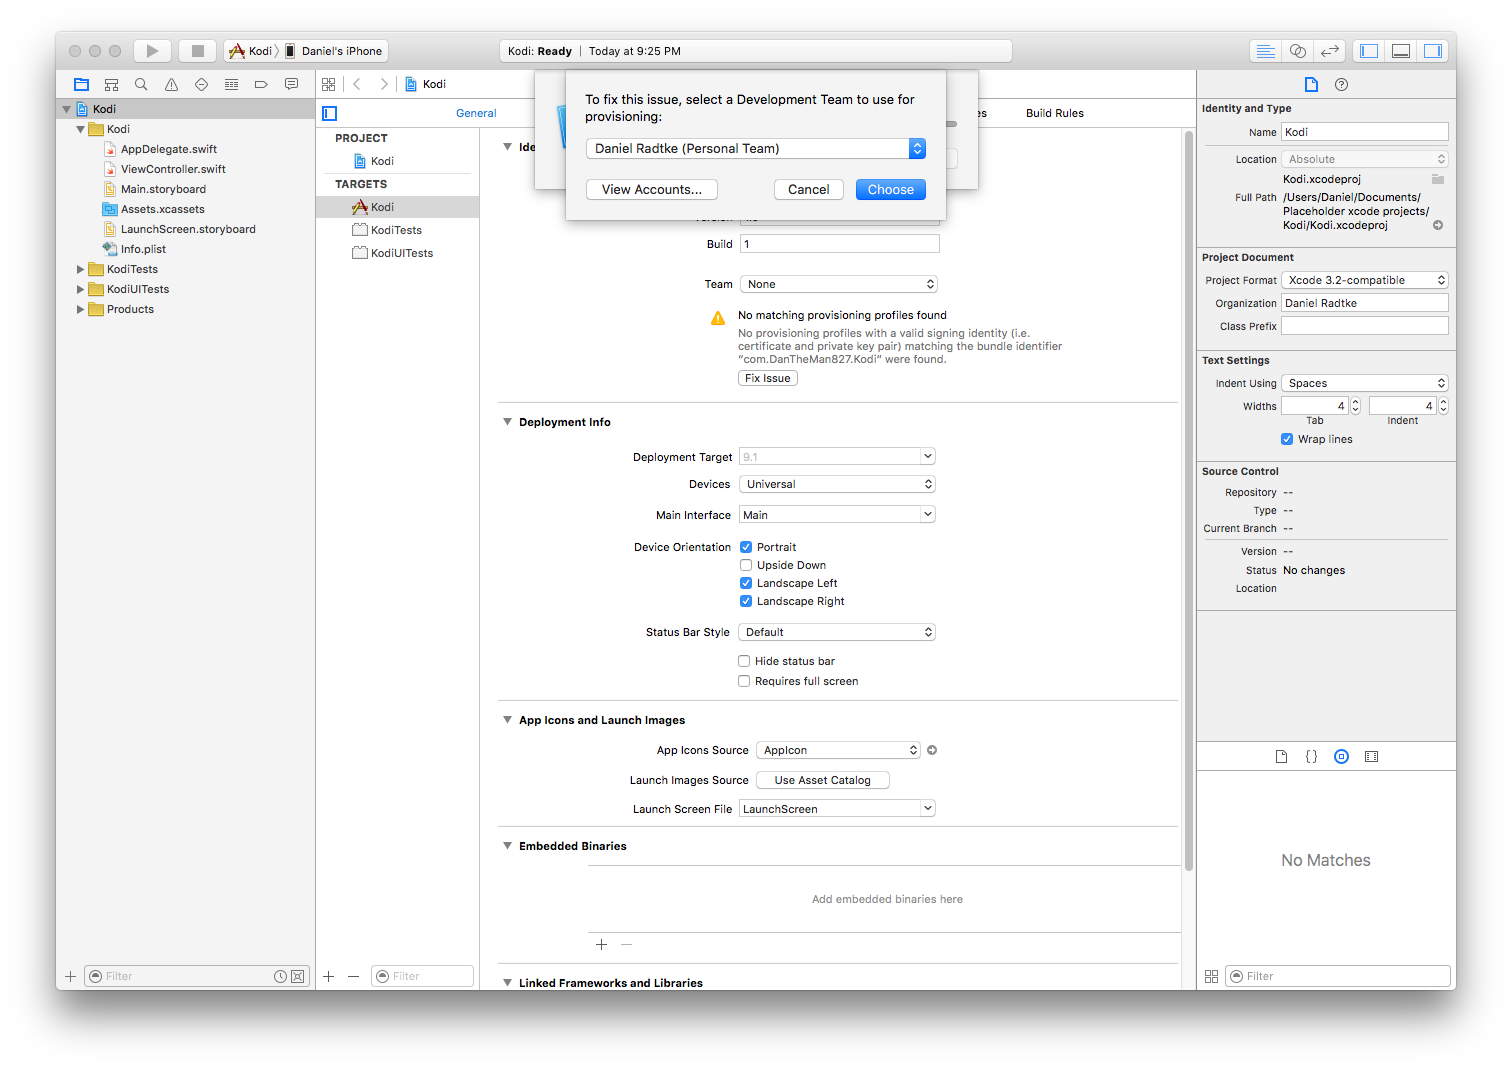 Step 5: Select your development team.
 -
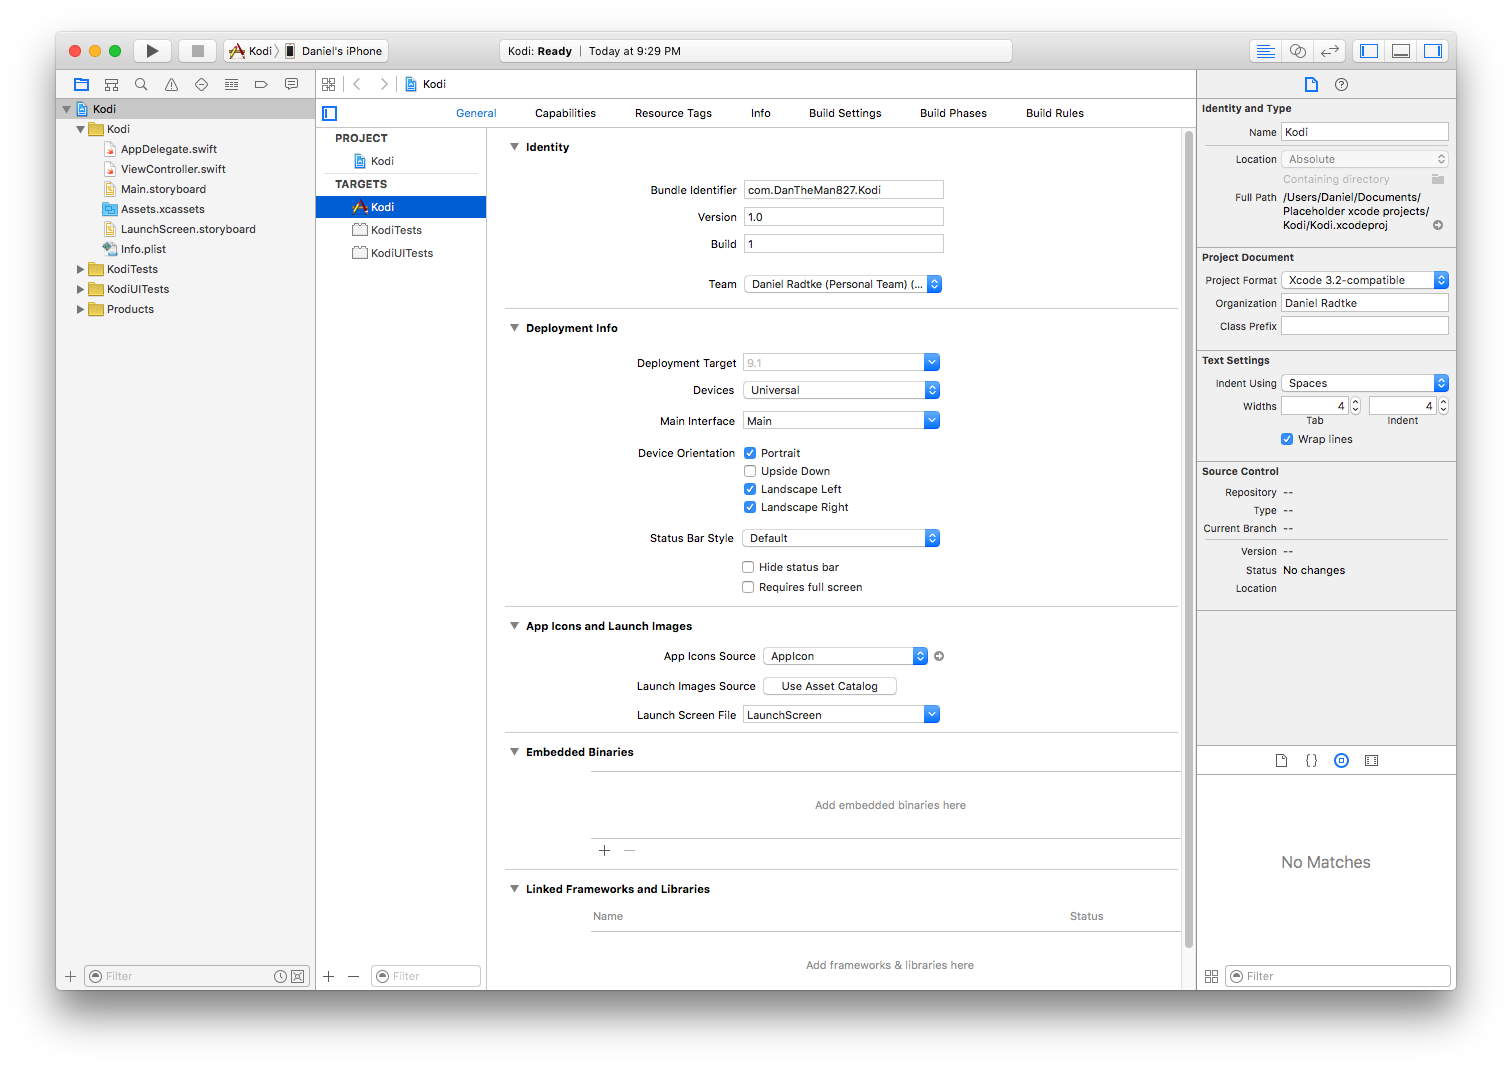 Step 6: After fixing the issue, Xcode shouldn't have any errors.
If you have additional devices- Plug in the device
- Go to the Product Menu
- Under Destination, select your device
- Repeat from step 3
-
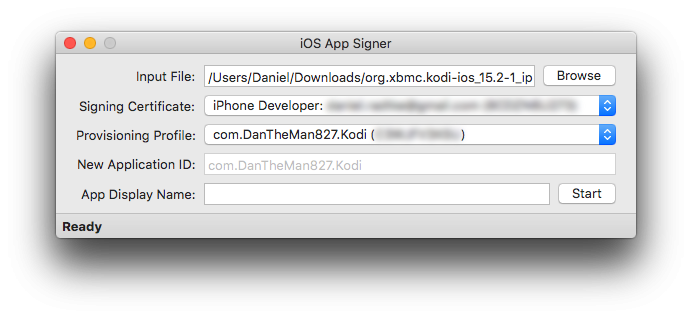 Step 7: Open iOS App Signer and select your signing certificate and provisioning profile, click start and choose a location to save the output.
 -
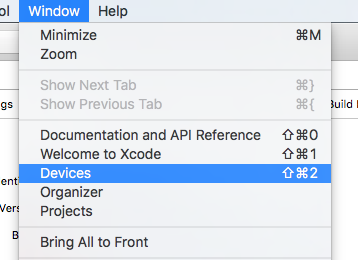 Step 8: In Xcode, click the Window menu and then Devices.
 -
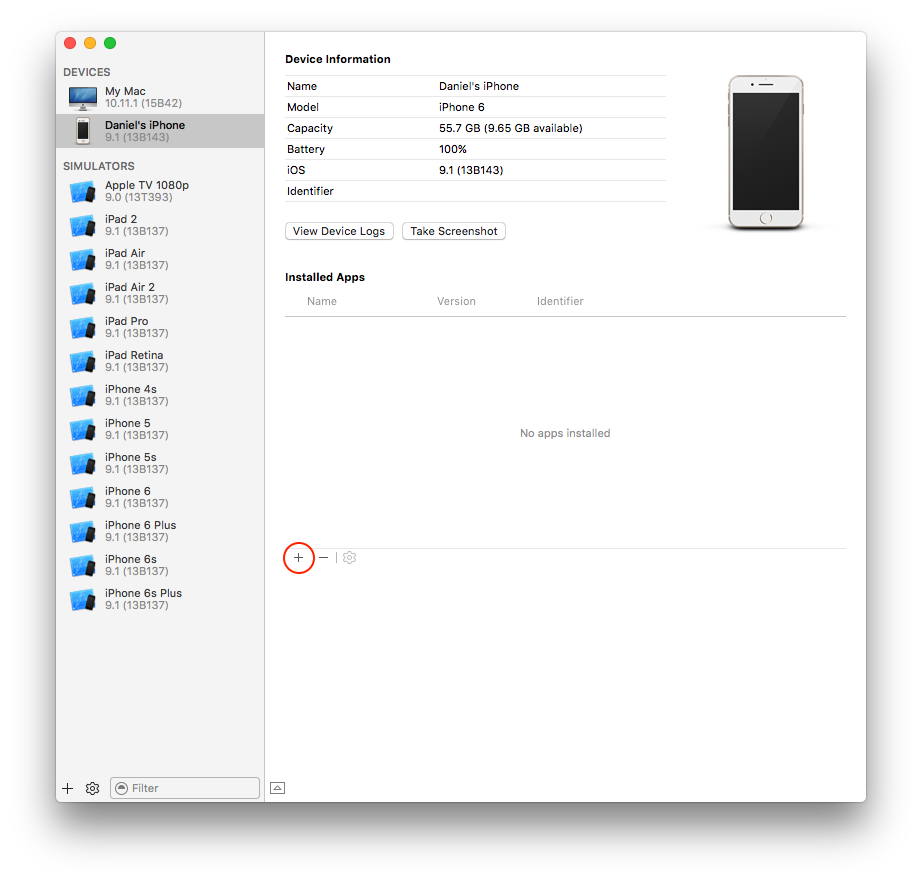 Step 9: Make sure that your device is selected and click the + and then choose the generated file


Updating Kodi
To update Kodi, run iOS App Signer and select the new deb file and the same provisioning profile that you used initially.
Modifying Kodi userdata
To modify the Kodi userdata, you can use any iOS file manager such as iFunbox
Help
If you are having trouble using iOS App Signer, please post in the forum topic
Installing using Cydia Impactor
| Cydia Impactor is still a work-in-progress, There might be some bugs that you face while installing Kodi. It is not for the faint of heart.
|
Prerequisites
- Cydia Impactor
- Windows 7 or Higher
- Latest version of iTunes
- Latest .deb file of Kodi from Stable builds
Downloads
I will suggest only stable builds but if you wish you can use other builds as you like.
| Build | Description |
|---|---|
| Stable builds | These are the current stable and recommended versions of Kodi to install on your device. |
| Nightly builds | Nightly builds are unstable test builds that have the latest bug fixes and feature additions. They are not fully tested, so anticipate issues and be sure to backup your userdata folder |
| Monthly builds | Monthly builds are more stable than nightly builds, but still contain lots of experimental new code. |
| Betas and release candidates | Betas and release candidates are builds that are being tested to see if they have any bugs left before becoming a stable release. Most major bugs should be fixed in these builds. |
Converting deb into ipa
Before beginning the installation, you have to convert .deb file of Kodi into .ipa. That is because Cydia Impactor only accepts .ipa files and not .deb files. If you already know how to convert .deb into .ipa, you skip to the installation below.
- You will need to Download 7-zip and install it in your PC
- Download required kodi build from the links given above in your PC
Follow the steps given below and you will be able to convert .deb file into .ipa file.
-
 Step 1: Right Click on .deb file of Kodi that you downloaded on your PC and Select 7-zip > Extract files. Click OK in the next Window.
 -
 Step 2: Open the resulting Folder and you will find data.tar file inside. Simply extract data.tar file with Right Click > 7-zip > Extract Files.
 -
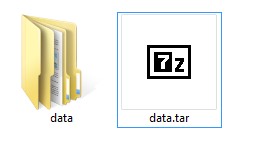 Step 3: Now you should have data folder and data.tar file in the folder.
 -
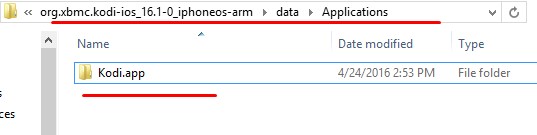 Step 4: Go inside the data folder and open Applications folder. Here you will find a folder named Kodi.app.
 -
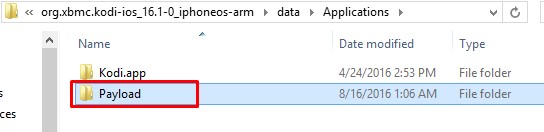 Step 5: Here create a new folder and name it “Payload” without quotes. Now you should have 2 folders. Payload and Kodi.app folder. Make sure that the P is capital in Payload.
 -
 Step 6: Now simply drag the Kodi.app folder and drop it on top of the Payload folder. In other words, copy kodi.app and paste it inside Payload folder.
 -
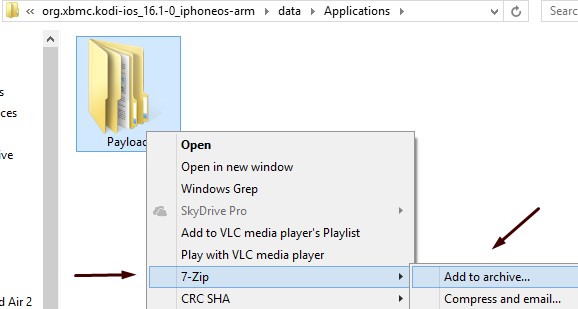 Step 7: Next you have to Right-click the Payload folder and Click 7-zip > Add to archive option.
 -
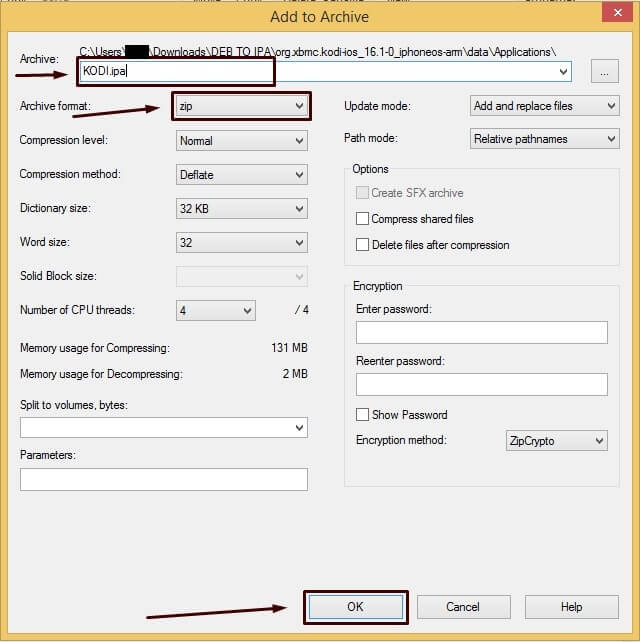 Step 8: A new window will pop up. Here you have to make sure that the Archive format is set to zip and name the archive ending with .ipa . Something like Kodi.ipa. After that click OK.
Now you should have your kodi.ipa file ready for installation.


Installing Kodi Using Cydia Impactor
-
 Step 1: Connect your iDevice with your computer, and make sure that it is turned ON. If iTunes or some other program pops up then close that first.
 -
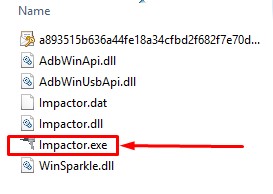 Step 2: Extract the Impactor zip file somewhere in your computer and Open Impactor.exe. Don’t select “Run as Administrator” for Cydia Impactor.
 -
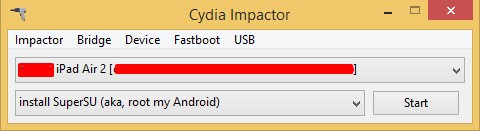 Step 3: Make sure that your iOS device is detected by Cydia Impactor. After that Drag and drop the Kodi.ipa file in Cydia Impactor.
 -
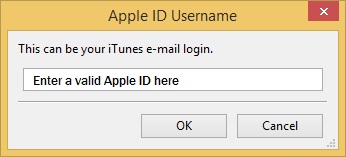 Step 4: Cydia Impactor will ask you to Enter your Apple ID. Enter a Valid Apple ID here and click OK Cydia Impactor will start installing Kodi on your iOS Device.
 -
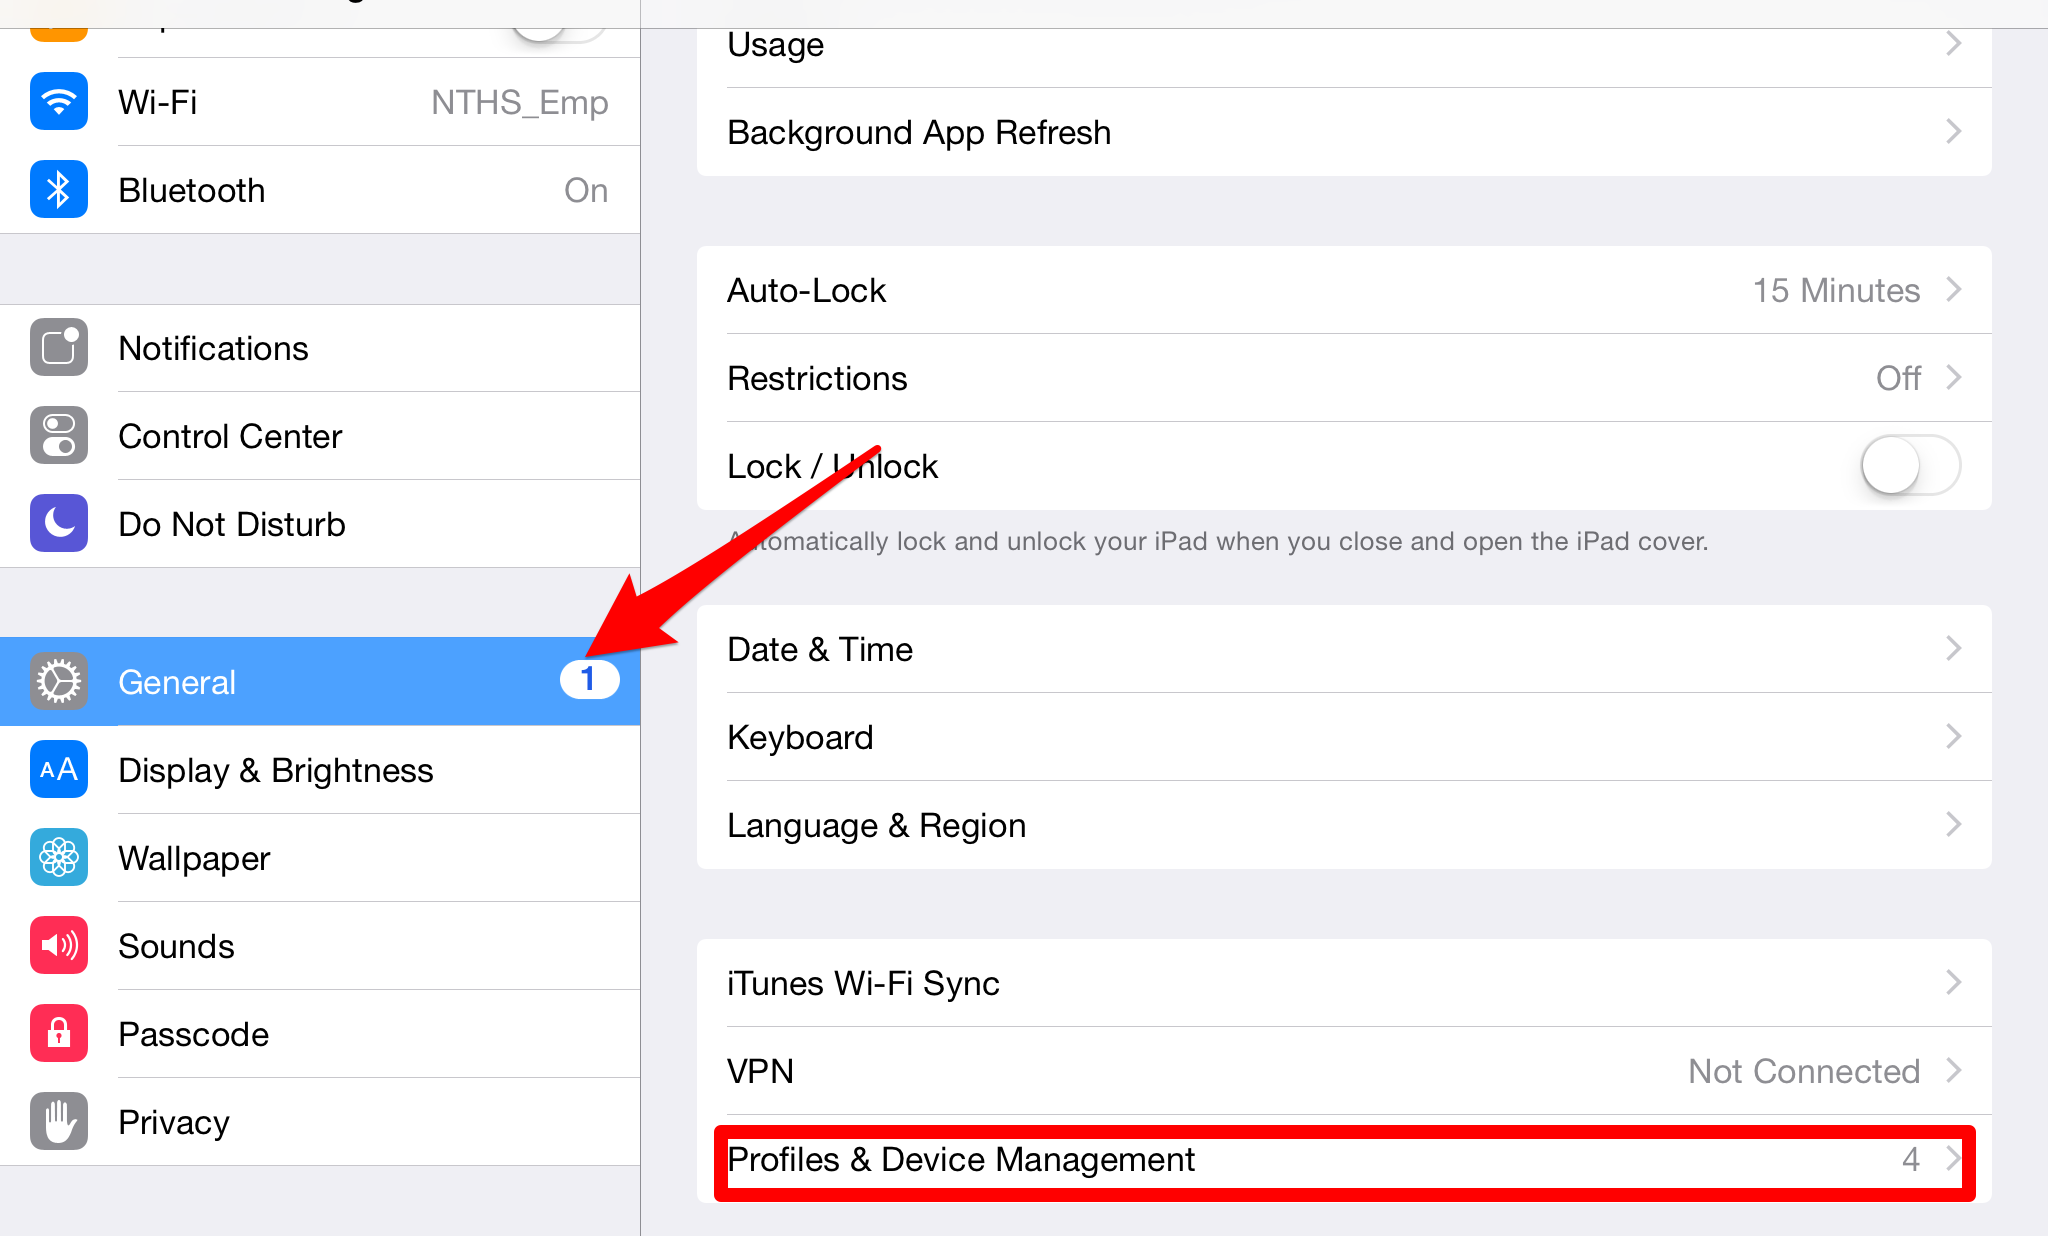 Step 5: Once you see Kodi icon in your iDevice, go in Settings > General > Profiles & Device management and Trust the Apple ID you used which installation.
 -
 Step 6: Now you should have kodi working on your iOS device.


