Settings/Media/Library: Difference between revisions
(Music Edits) |
(v21 Updates) |
||
| (8 intermediate revisions by 3 users not shown) | |||
| Line 1: | Line 1: | ||
{{ | {{mininav| [[Settings]] | [[Settings/Media|Media]] }} | ||
__TOC__ | __TOC__ | ||
[[File:Settings_media_library_manage_sources.jpg| | = Manage Sources = | ||
[[File:Settings_media_library_manage_sources.jpg|600px]] | |||
== Videos == | |||
{| | {| | ||
|- valign="top" | |- valign="top" | ||
| Line 11: | Line 16: | ||
|- valign="top" | |- valign="top" | ||
| '''Description:''' | | '''Description:''' | ||
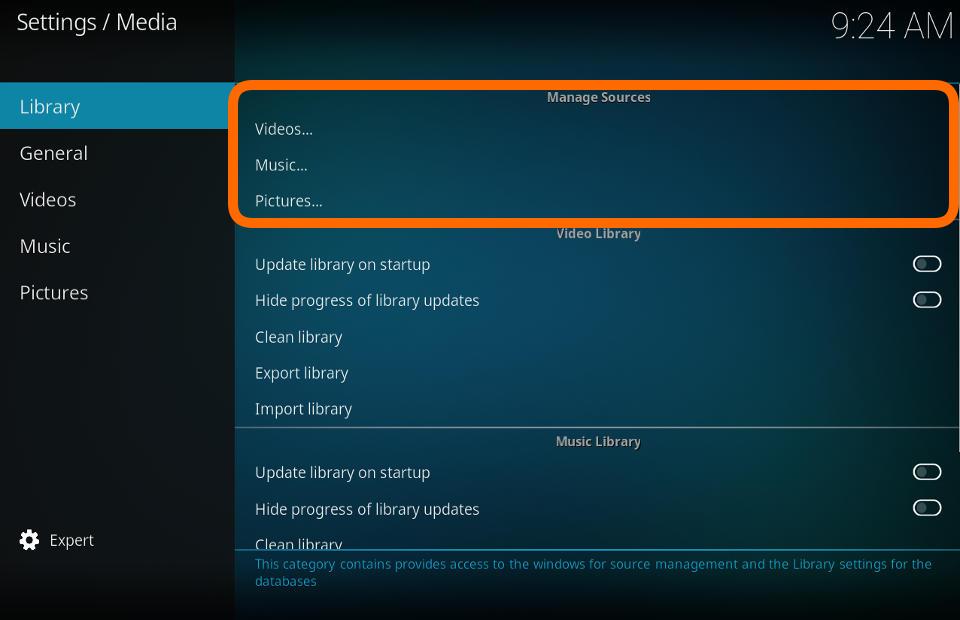
| This provides access to | | This provides access to the Video Sources. It is an alternate access to Videos>Files from the main menu.<br> | ||
See: '''[[HOW-TO:Create Video Library]]''' | |||
|} | |} | ||
== Music == | |||
{| | {| | ||
|- valign="top" | |- valign="top" | ||
| Line 22: | Line 28: | ||
|- valign="top" | |- valign="top" | ||
| '''Description:''' | | '''Description:''' | ||
| This provides access to | | This provides access to the Music Sources. It is an alternate access to Music>Files from the Music menu.<br> | ||
See: '''[[HOW-TO:Create Music Library]]''' | |||
|} | |} | ||
== Pictures == | |||
{| | {| | ||
|- valign="top" | |- valign="top" | ||
| Line 33: | Line 40: | ||
|- valign="top" | |- valign="top" | ||
| '''Description:''' | | '''Description:''' | ||
| This provides access to | | This provides access to the Picture Sources. It is an alternate access to Pictures from the Pictures menu.<br> | ||
See: '''[[Pictures]]''' | |||
|} | |} | ||
[[File: | = Video Library = | ||
[[File:Settings-Media-Library-VideoLibrary.jpg|600px]] | |||
== Update library on startup == | |||
{| | {| | ||
|- valign="top" | |- valign="top" | ||
| Line 46: | Line 57: | ||
|- valign="top" | |- valign="top" | ||
| '''Description:''' | | '''Description:''' | ||
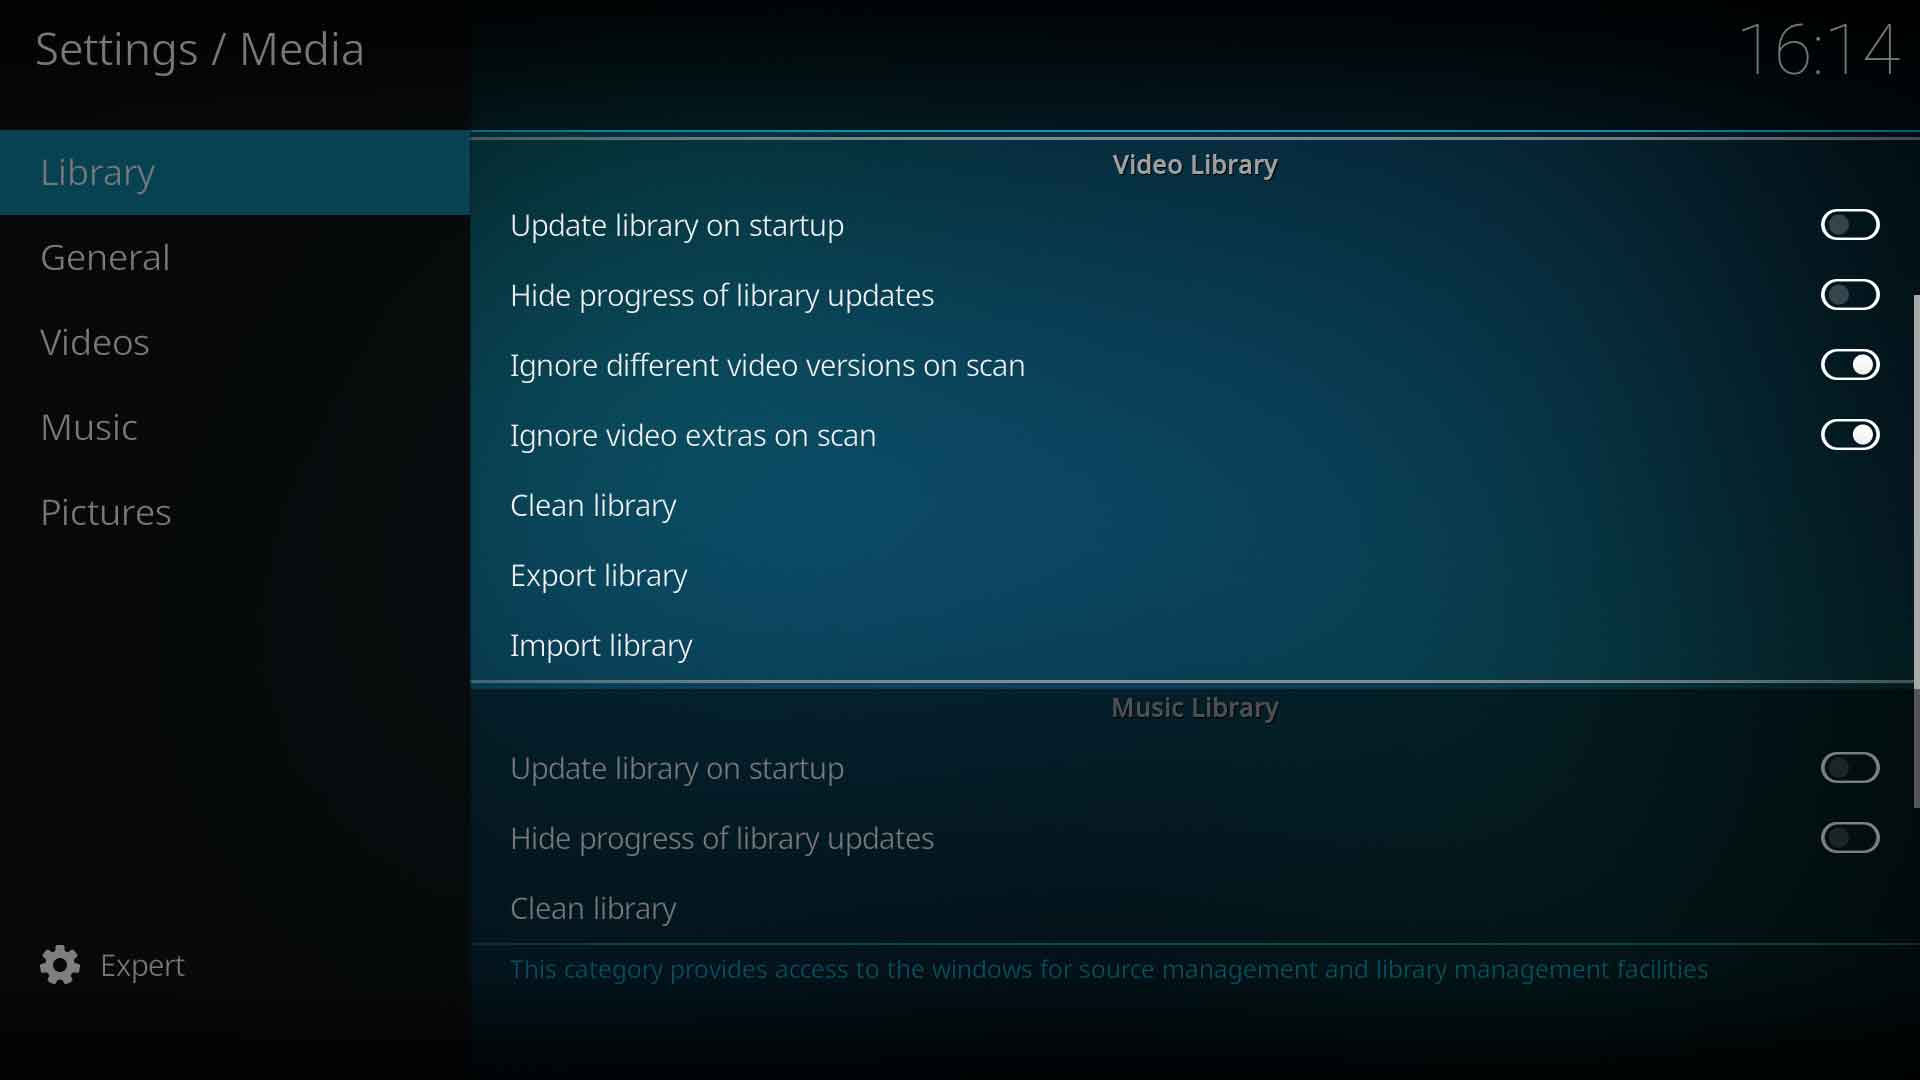
| Check for new | | Check for new video content every time {{kodi}} is started. | ||
'''Note: '''If your content does not change often, leave this disabled as it will be running and scanning for no benefit and possibly making internet API calls for unscrapable media.<br> | |||
See: '''[[Updating or removing videos]]''' | |||
|} | |} | ||
== Hide progress of library updates == | |||
{| | {| | ||
|- valign="top" | |- valign="top" | ||
| Line 57: | Line 70: | ||
|- valign="top" | |- valign="top" | ||
| '''Description:''' | | '''Description:''' | ||
| Hide the | | Hide the pop-up progress bar. | ||
|} | |} | ||
=== Clean library | == Ignore different video versions on scan == | ||
<section begin="IgnoreVideoVersionsScan" /> | |||
{| | |||
|- valign="top" | |||
| width=120px | {{nowrap|'''Settings level:'''}} | |||
| Basic | |||
|- valign="top" | |||
| '''Description:''' | |||
| | |||
Settings ► Media ► Library ► Video Library ► '''Ignore different video versions on scan''' | |||
* '''Disabled''' - When an Update Library is run and the scanner discovers a title that may be a duplicate of another title already scanned into the library, the Update Library will pause with a pop-up requesting confirmation on how to treat the duplicate. The Library Update will not continue until the pop-up is cleared. | |||
* '''Enabled''' - (default) When an Update Library is run, there are no interruptions to the scan and the various versions will be scanned or scraped into the library without a video version being created. Use the Versions Manager method described below to create a Video Version after scanning has ended. | |||
|}<section end="IgnoreVideoVersionsScan" /> | |||
== Ignore video extras on scan == | |||
<section begin="IgnoreVideoExtrasScan" /> | |||
{| | |||
|- valign="top" | |||
| width=120px | {{nowrap|'''Settings level:'''}} | |||
| Basic | |||
|- valign="top" | |||
| '''Description:''' | |||
| | |||
Settings ► Media ► Library ► Video Library ► '''Ignore video extras on scan''' | |||
* '''Disabled''' - When an Update Library is run, and if a folder named ''Extras'' exists, any video files in the folder will be added to the Extras listing for the movie.<br/>See: '''[[Video_extras|Video Extras]]''' | |||
* '''Enabled''' - (default) When an Update Library is run, any extras in the ''Extras'' folder will not be added to the Extras listing.<br/>Videos in the ''Extras'' folder will be treated like a movie file and added to the library. To avoid this ensure the advancedsettings.xml file has the correct ignore code.<br/>See: '''[[Add-on:Extras#Preventing_Extras_Being_Added_To_Library|Preventing Extras being added to the library]]''' | |||
|}<section end="IgnoreVideoExtrasScan" /> | |||
== Clean library == | |||
{| | {| | ||
|- valign="top" | |- valign="top" | ||
| Line 68: | Line 113: | ||
|- valign="top" | |- valign="top" | ||
| '''Description:''' | | '''Description:''' | ||
| | | Is used to clean orphaned entries in the library database. Not all tables are cleaned by this process. | ||
Removing content from disconnected sources<br/> | |||
If storage media are disconnected, using this function will not remove their contents from the library. This protects your library from accidental erasure in case a removable storage device is unplugged.<br/> | |||
To permanently remove titles from the library: | |||
# Use the correct method of removing titles from the library as detailed in the link below.<br> | |||
# After correctly deleting from the library first, ''then'' run a clean library to purge the database of unnecessary records.<br> | |||
See: '''[[Updating_or_removing_videos#Remove_From_Library|Removing content]]''' | |||
|} | |} | ||
== Export library == | |||
{| | {| | ||
|- valign="top" | |- valign="top" | ||
| Line 79: | Line 131: | ||
|- valign="top" | |- valign="top" | ||
| '''Description:''' | | '''Description:''' | ||
| Export the video library | | Export the contents of the video library. Used as a backup of your library, or to create a new {{kodi}} installation. | ||
{{note|For the Video library, we recommend using the Separate Files method.}}<br> | |||
See: '''[[Import-export_library/Video|Export Video Library]]''' | |||
|} | |} | ||
== Import library == | |||
{| | {| | ||
|- valign="top" | |- valign="top" | ||
| Line 89: | Line 144: | ||
|- valign="top" | |- valign="top" | ||
| '''Description:''' | | '''Description:''' | ||
| | | If you exported your library using the '''Single File''' method, use this to import the single file into the video library.<br> | ||
See: '''[[Import-export_library/Video#Import|Import Single File]]''' | |||
|} | |} | ||
[[File:Settings_media_library_music_library.jpg| | = Music Library = | ||
[[File:Settings_media_library_music_library.jpg|600px]] | |||
== Update library on startup == | |||
{| | {| | ||
|- valign="top" | |- valign="top" | ||
| Line 102: | Line 161: | ||
|- valign="top" | |- valign="top" | ||
| '''Description:''' | | '''Description:''' | ||
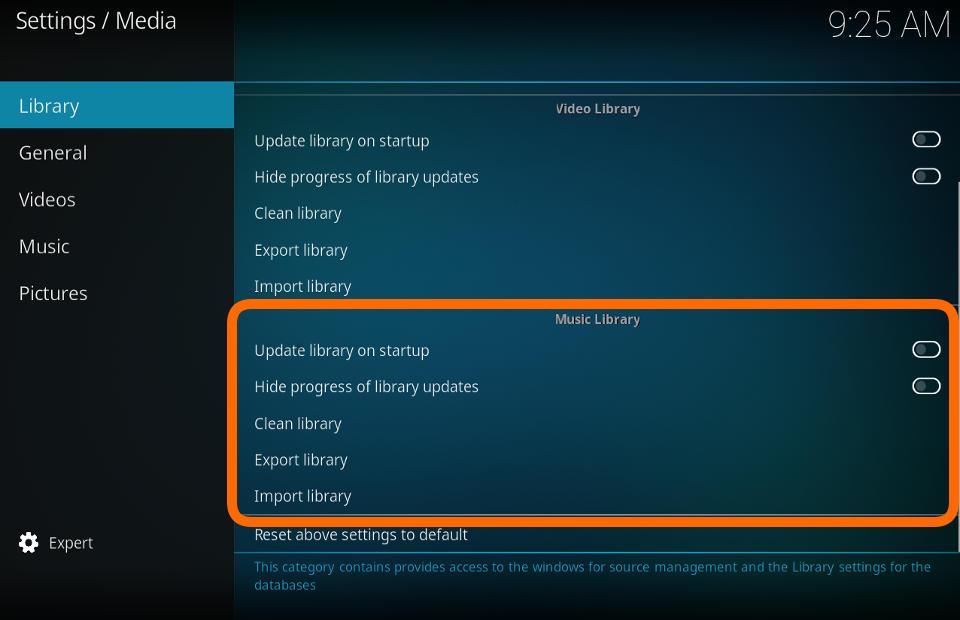
| Check for new media | | Check for new music content every time {{kodi}} is started. | ||
'''Note:''' If your content does not change often, leave this disabled as it will be running and scanning for no benefit and possibly making internet API calls for unscrapable media.<br> | |||
See: '''[[Update Music Library]]''' | |||
|} | |} | ||
== Hide progress of library updates == | |||
{| | {| | ||
|- valign="top" | |- valign="top" | ||
| Line 113: | Line 174: | ||
|- valign="top" | |- valign="top" | ||
| '''Description:''' | | '''Description:''' | ||
| Hide the library scanning progress bar during scans | | Hide the pop-up library scanning progress bar during scans. | ||
|} | |} | ||
== Clean library == | |||
{| | {| | ||
|- valign="top" | |- valign="top" | ||
| Line 124: | Line 185: | ||
|- valign="top" | |- valign="top" | ||
| '''Description:''' | | '''Description:''' | ||
| Performs cleanup tasks on the '''Music''' database. Used to de-clutter the database of unused records. Used | | Performs cleanup tasks on the '''Music''' database. Used to de-clutter the database of unused records. Used when you have moved, deleted or renamed files. To remove music from the library, delete the music files first then run the Clean library option.<br> | ||
If a source is located on removable storage that is not connected at the time of the Clean Library, you will be asked to choose to remove or keep the library entries from that drive. | |||
* Removes any songs with invalid paths | * Removes any songs with invalid paths | ||
* Removes any albums which have no references | * Removes any albums which have no references | ||
| Line 133: | Line 195: | ||
== Export library == | |||
{| | {| | ||
|- valign="top" | |- valign="top" | ||
| Line 140: | Line 202: | ||
|- valign="top" | |- valign="top" | ||
| '''Description:''' | | '''Description:''' | ||
| | | Music files are still required to have the correct embedded tags to be scanned into the library. This function will export the additional data that was scraped into the music library. | ||
For the Music library, we recommend using the Single Files method as this will also export play counts, user ratings and last played data.<br> | |||
See: '''[[Import-export_library/Music|Export Music Library]]''' | |||
|} | |} | ||
== Import library == | |||
{| | {| | ||
|- valign="top" | |- valign="top" | ||
| Line 152: | Line 215: | ||
|- valign="top" | |- valign="top" | ||
| '''Description:''' | | '''Description:''' | ||
| | | If you exported your library using the '''Single File''' method, use this to import the single file into the music library.<br> | ||
See: '''[[Import-export_library/Music#Import_-_Single_File|Import Single File]]''' | |||
|} | |} | ||
{{Top}} | {{Top}} | ||
{{updated|21}} | |||
[[Category:Settings]] | |||
[[Category: | |||
Latest revision as of 00:54, 1 May 2024
Manage Sources
Videos
| Settings level: | Standard |
| Description: | This provides access to the Video Sources. It is an alternate access to Videos>Files from the main menu. |
Music
| Settings level: | Standard |
| Description: | This provides access to the Music Sources. It is an alternate access to Music>Files from the Music menu. |
Pictures
| Settings level: | Standard |
| Description: | This provides access to the Picture Sources. It is an alternate access to Pictures from the Pictures menu. See: Pictures |
Video Library
Update library on startup
| Settings level: | Standard |
| Description: | Check for new video content every time Kodi is started.
Note: If your content does not change often, leave this disabled as it will be running and scanning for no benefit and possibly making internet API calls for unscrapable media. |
Hide progress of library updates
| Settings level: | Standard |
| Description: | Hide the pop-up progress bar. |
Ignore different video versions on scan
| Settings level: | Basic |
| Description: |
Settings ► Media ► Library ► Video Library ► Ignore different video versions on scan
|
Ignore video extras on scan
| Settings level: | Basic |
| Description: |
Settings ► Media ► Library ► Video Library ► Ignore video extras on scan
|
Clean library
| Settings level: | Advanced |
| Description: | Is used to clean orphaned entries in the library database. Not all tables are cleaned by this process.
Removing content from disconnected sources
See: Removing content |
Export library
| Settings level: | Advanced |
| Description: | Export the contents of the video library. Used as a backup of your library, or to create a new Kodi installation.
Note: For the Video library, we recommend using the Separate Files method. |
Import library
| Settings level: | Advanced |
| Description: | If you exported your library using the Single File method, use this to import the single file into the video library. See: Import Single File |
Music Library
Update library on startup
| Settings level: | Standard |
| Description: | Check for new music content every time Kodi is started.
Note: If your content does not change often, leave this disabled as it will be running and scanning for no benefit and possibly making internet API calls for unscrapable media. |
Hide progress of library updates
| Settings level: | Standard |
| Description: | Hide the pop-up library scanning progress bar during scans. |
Clean library
| Settings level: | Advanced |
| Description: | Performs cleanup tasks on the Music database. Used to de-clutter the database of unused records. Used when you have moved, deleted or renamed files. To remove music from the library, delete the music files first then run the Clean library option. If a source is located on removable storage that is not connected at the time of the Clean Library, you will be asked to choose to remove or keep the library entries from that drive.
|
Export library
| Settings level: | Advanced |
| Description: | Music files are still required to have the correct embedded tags to be scanned into the library. This function will export the additional data that was scraped into the music library.
For the Music library, we recommend using the Single Files method as this will also export play counts, user ratings and last played data. |
Import library
| Settings level: | Advanced |
| Description: | If you exported your library using the Single File method, use this to import the single file into the music library. See: Import Single File |
| Return to top |
|---|


