Git Usage Windows
Clone the Kodi main repository
XBMC now uses git for as its main scm. The main repo is located at github In this guide we're using msysgit and Tortoisegit as frontend.
Command line
For read only access
$ git clone git://github.com/xbmc/xbmc.git
For read/write access (Devs only) via ssh keys (your account needs to be added to the xbmc project on github)
$ git clone [email protected]:xbmc/xbmc.git
For read/write access (Devs only) via user/pass (yourname needs to be added to the xbmc project on github)
$ git https://[email protected]/xbmc/xbmc.git
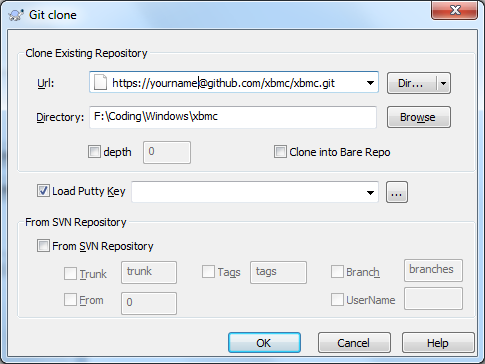
TortoiseGit
- right click in your directory tree
- choose "Git Clone"
- replace yourname with your github user account
- when asking for the password type in your github password.
- you can also use ssh keys for authentication.
Fetch old branches and extra history
The following is ONLY useful for developers who wish to see extended Kodi history. Everyone else should stop here. Run this command from your tree. It requires git 1.6.5 or higher:
$ git fetch origin refs/old/heads/*:refs/remotes/svn-migration/* refs/replace/*:refs/replace/*
(Is this possible in gui too?)
Platform Settings
Case Insensitive File Systems
Git wants to run under a case sensitive file system but under OSX and Windows, the file system might be case insensitive. Make sure that core.ignorecase is properly set. Check with:
$ git config --list
if not set:
$ git config --global core.ignorecase true
(true is the default value for msysgit)
Line Endings
Windows users MUST use the git autocrlf feature. This is set by default by tortoise if you don't change it during the installation process. If it's not set, you can do so manually:
$ git config --system core.autocrlf true
or via the gui:
- right click on you cloned xbmc directory
- TortoiseGit -> Settings
- navigate to Git -> Config
- check that AutoClrf is marked
while you are there you should enter your name and email in the fields above. Otherwise you'll be asked during the first push.
Updating
When updating from the main git repo (by default git will call this 'origin'), you should always rebase on top of your history, unless you know what you're doing.
git pull --rebase
A safe bet is to set this to be done automatically.
$ git config branch.master.rebase true
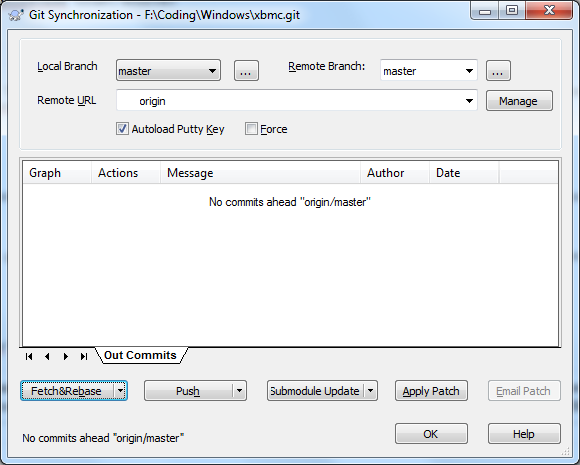
with the gui:
- right click on the xbmc repo
- choose Git Sync...
- go to the option field in the bottom left
- press the down arrow and choose Fetch&Rebase
- press Fetch&Rebase
- press rebase (fast fwd) in the newly appearing dialog
Committing
commit your local work to your local repository:
- right click on the xbmc repo
- choose Git Commit -> "master"...
- type in a commit message
- choose the files to commit
- press ok
Pushing
Pushes your work from the local repository to the xbmc main repository at github.
Please use
git log
to look at the log before committing. If there are merge commits that you don't understand, please ask for help before pushing.
Never EVER force a push (non-fast-forward commit) to mainline. Ever. Doing so will result in your push privileges being revoked.
- right click on the xbmc repo
- TortoiseGit -> Push...
- press Ok
Attention: this will push all your local committed changes to the xbmc main repo. I dunno if you can only choose certain commits via the gui.

