|
|
| (8 intermediate revisions by the same user not shown) |
| Line 2: |
Line 2: |
| {{MusicLibraryCreate}} | | {{MusicLibraryCreate}} |
| {{mininav|[[Music library]]}} | | {{mininav|[[Music library]]}} |
|
| |
|
| |
|
| = Introduction = | | = Introduction = |
| This page provides the following information: | | <section begin="intro"/>This page details the following: |
| | | *Adding and removing Sources |
| *How the Music section differs from the Video section of {{kodi}} | | *Scan (import) your music collection into the Music Library. |
| *The recommended method to organise your music files | | *Troubleshooting common problems <section end="intro"/> |
| *The recommended method for tagging your music files
| |
| *Explanation of some commonly misunderstood Music File Tags
| |
| *The Audio Files and Tags that {{kodi}} reads and uses | |
| | |
|
| |
|
| | A reminder of the following: |
| | *Ensure the setting ''[[Settings/Media/Music#Fetch_additional_information_during_updates|Fetch additional information during updates]]'' is disabled |
| | *Ensure you have taken care to correctly tag your music and set up your [[Artist information folder]] |
|
| |
|
| = Understanding the Music Library =
| |
| <section begin="understanding" />There is a fundamental differences between video library operation and the music library operation:
| |
| *The video library is based on using the filenames or folder names to obtain online data. If they are incorrectly named, then there are no scraper results and there will be no library entry.
| |
| *'''The music library is based on scanning tags embedded in the music files.''' It ignores the folder names and structure and file names. Proper tagging is essential to ensure the library is populated correctly. Having slight variations in the tags for artist and album names could mean duplicated and unwanted entries.<section end="understanding" />
| |
|
| |
|
|
| |
|
| | = Adding Music to Library = |
| | *'''Populating the music library is a two step process.''' |
| | **The first step reads the tags embedded in the music files. This is referred to as '''scanning'''. If there is any embedded artwork, this will also be scanned and cached. |
| | **The second optional step fetches additional artwork, artist and album information. This information and artwork can be downloaded from either online sources or fetched from local nfo files. This is referred to as '''scraping''' and is covered in detail in the next step of the guide. |
| | {{-}} |
|
| |
|
| = Folder and File Structure =
| |
| Although {{kodi}} ignores the folder structure and the names of the folders and files, the structure of your folders is important as it affects the operation of other functions such as Import/Export, nfo files and Artwork. For example, if you have all your music files in one folder (which is possible), then you lose the ability to use local nfo files, local artwork, and the import/export module will not function correctly.
| |
|
| |
|
| The following is {{kodi}} '''best practice'''. Remember use a layout that is nice for you, but '''tag accurately.'''
| | == Initial Set Source & Scan == |
| | <section begin="First Time Music Setup" /> |
| | This process achieves the following: |
| | *Sets your music '''source(s)''' in {{Kodi}}. Simply explained, this points {{kodi}} to your music files |
| | *Allows {{kodi}} to '''scan''' the tags in the music files and import that data into the library |
|
| |
|
|
| |
|
| |
| == Files ==
| |
| Song files require suitable tagging for use in {{kodi}}. While {{kodi}} can scan minimal tags into the library, it can lead to errors in the library and subsequent scraping. We recommend music files are tagged with MusicBrainz as detailed below.
| |
|
| |
| Remember that {{kodi}} does not extract any information from the filename, so the filename is your choice.
| |
|
| |
|
| |
|
| |
| == Folders ==
| |
| {{kodi}} is quite flexible with the folder structure. The diagram below is an '''example'''. You should group your albums in a manner that makes sense to you.
| |
|
| |
| To ensure {{kodi}} and other add-on processes can function efficently and correctly, the following is recommended.
| |
| *Songs from the same album should be in the one folder
| |
| *If there is more than one disk in the release, each disk should be in a sub-folder containing the songs from that disk
| |
|
| |
|
| |
| The following is a typical folder structure:
| |
|
| |
| f:\ ....................................(root)
| |
| |__Artist Information ..................(Artist Information Folder)
| |
| |
| |
| |__Artist Music .......................(source folder)
| |
| | |__ Madonna ........................(artist folder)
| |
| | | |__ Beautiful Stranger (1999) ..(album folder)
| |
| | | | |__ Song 1
| |
| | | | |__ Song 2
| |
| | | | |__ Song 3 etc
| |
| | | |__ Bedtime Stories (1994) .....(album folder)
| |
| | | | |__ Song 1
| |
| | | | |__ Song 2
| |
| | | | |__ Song 3 etc
| |
| | | |__ Like A Prayer (1989) .......(album folder)
| |
| | | | |__ Song 1
| |
| | | | |__ Song 2
| |
| | | | |__ Song 3 etc
| |
| | |__ Simply Red .....................(artist folder)
| |
| | |__ Picture Book (1985) ........(album folder)
| |
| | |__ Song 1
| |
| | |__ Song 2
| |
| | |__ Song 3 etc
| |
| |
| |
| |__Compilations .......................(Source)
| |
| | |__ Essential Eighties .............(album folder)
| |
| | | |__ Song 1
| |
| | | |__ Song 2
| |
| | | |__ Song 3 etc
| |
| | |__ 100% Hits- Best of 2005 ........(album folder)
| |
| | |__ Song 1
| |
| | |__ Song 2
| |
| | |__ Song 3 etc
| |
| |
| |
| |__Classical ..........................(Source)
| |
| |
| |
| |__Audiobooks .........................(Source)
| |
|
| |
|
| |
|
| |
| == Sources ==
| |
| A source folder contains your media collection- in this case Music. This folder is then set as a Source in {{kodi}} which enables {{kodi}} to access your Music.
| |
|
| |
| In the diagram from the previous section ''Artist Music, Compilations, Classical'' and ''Audiobooks'' are Sources.
| |
|
| |
| Setting and Scanning of Sources is covered in detail in the next step of the guide.
| |
|
| |
|
| |
|
| |
| = Tagging =
| |
| Most music files purchased or ripped by your favourite software have only minimal metadata embedded. Normally this is not a problem and works very well on simple music players.
| |
| <br /><br />
| |
| {{kodi}}, being an advanced and feature rich player, requires greater accuracy with the embedded tags. Any slight variance in, for example, the Album name between the tracks from the same album will see multiple entries in the library for that Album. It is not uncommon to have a single album split into three similarly named albums. Also true for Artists. It is for this reason that there is a separation of the Scanning and Scraping processes for Music. The initial scan allows you to find and correct errors in tagging, before scraping.
| |
| <br /><br />
| |
| This table has examples of errors in tagging, which will cause duplicated entries in the library...
| |
|
| |
| {|class="prettytable"
| |
| !Similar Name 1 || Similar Name 2 || Note
| |
| |-
| |
| |György Ligeti || Gyorgy Ligeti || Accented and unaccented names will create duplicate entries
| |
| |-
| |
| |The Best of || The Very Best Of || Inconsistent naming between songs of the same album and/or artist will cause duplicated entries
| |
| |-
| |
| |Madonna || Madonnna || Spelling mistakes will cause duplicated entries for albums and/or artists
| |
| |-
| |
| |Sting || Sting and The Police || Seen as two separate and unrelated Artists
| |
| |}
| |
|
| |
| As {{kodi}} scans your music collection, it copies the data contained in those tags into the {{kodi}} music database. The benefits of this are:
| |
| *Once the scan is complete, the tags are not accessed again
| |
| *All information is now obtained from the database. This has the benefit of dramatically increasing efficency and speed when navigating the library.
| |
| *Now that a database entry exists, you are able to scrape additional information from online sources. This is covered later in the guide.
| |
|
| |
|
| |
|
| |
| == MusicBrainz ==
| |
| '''{{kodi}} has strong support for MusicBrainz tagging. It is highly recommended that users tag their music files using MusicBrainz Picard.'''
| |
|
| |
| '''MusicBrainz Picard''' is the music file tagger software that can access the MusicBrainz database to locate metadata to embed into your music files. MBIDs are useful because names are not unique. The bigger and more diverse your music collection is, the more likely you will encounter Artists with the same name.
| |
|
| |
| The advantages of tagging with MusicBrainz are:
| |
| *They allow you to have different artists with the same name in your library e.g. "John Williams" the classical guitarist and "John Williams" the film music composer and conductor.
| |
| *They negate inconsistencies in artist naming e.g. having "Peter Tchaikovsky" on some albums and "Piotr Czajkowski" on others
| |
| *They allow you to have more than one release of an album in your library e.g. the normal and deluxe editions of an album
| |
| *They clearly identify the artist and album in ways that names alone can not. This can then be used to accurately scrape additional artist and album information and locate the correct artwork
| |
| *They allow the scraping process to be more efficient, otherwise an extra call is made to try and get an mbid first to use at the scraping sites, and each request from Musicbrainz must be throttled to 1 per sec which will slow the scraping process.
| |
|
| |
|
| |
| Below is a screenshot of the main screen of the Picard software. A brief description of the layout as follows.
| |
|
| |
| *Top Left Box- Folder listing of your music collection
| |
| *Top Centre Box- Albums are dragged and dropped here in preparation for matching and tagging. Pressing ''Lookup'' (greyed out) will commence the lookup process
| |
| *Top Right Box- Matching albums are displayed here and your songs are overlayed. In the screenshot, songs 01, 08 and 09 have been matched to the suggested album. If all songs match and you agree the correct album was located, simply pressing Save will tag the album with the tags displayed in the Bottom Tag Box.
| |
| *Bottom Tag Box - Selecting a song from the Top Right Box will display all available tag fields (left column), the current tags in the music file (Original Value column) and the MusicBrainz tags to be embedded in the music file (right column).
| |
|
| |
| The example in the image below shows the following:
| |
| *Most tags are missing (original value column)
| |
| *The top three yellow entries are incorrect (original value column) and the corrections are in the right column
| |
| *The green entries in the right column indicate new tags to be embedded
| |
| *The black entries at the bottom of the list indicate no change to the existing tags as they are correct or not used by MusicBrainz.
| |
|
| |
|
| |
| <gallery mode="packed" widths="1000px" heights="563px">
| |
| File:MusicBrainzPicard01.jpg
| |
| </gallery>
| |
|
| |
|
| |
| Although Picard is very easy to use, you must avoid blindly accepting everything offered by the software. It is important that you confirm the correct album was located. Due to the global nature of the database, there are many releases for a single album. These releases differ between countries, usually due to copyright requirements. This may lead you to inadvertendly select the incorrect release for your album, even though it is named exactly the same. The differences between releases may be as simple as different song ordering or the inclusion of additional bonus tracks.
| |
|
| |
| For the best tagging experience set the correct options in Picard, particularly the "Clear Existing Tags" option in settings. This option means that any old tags that may cause issues are wiped, preserving only the musicbrainz tagging. It will also be wise to tag using ID3v2.4 compatibility.
| |
|
| |
|
| <gallery mode="packed" widths="500px" heights="283px"> | | <gallery mode="packed" widths="500px" heights="283px"> |
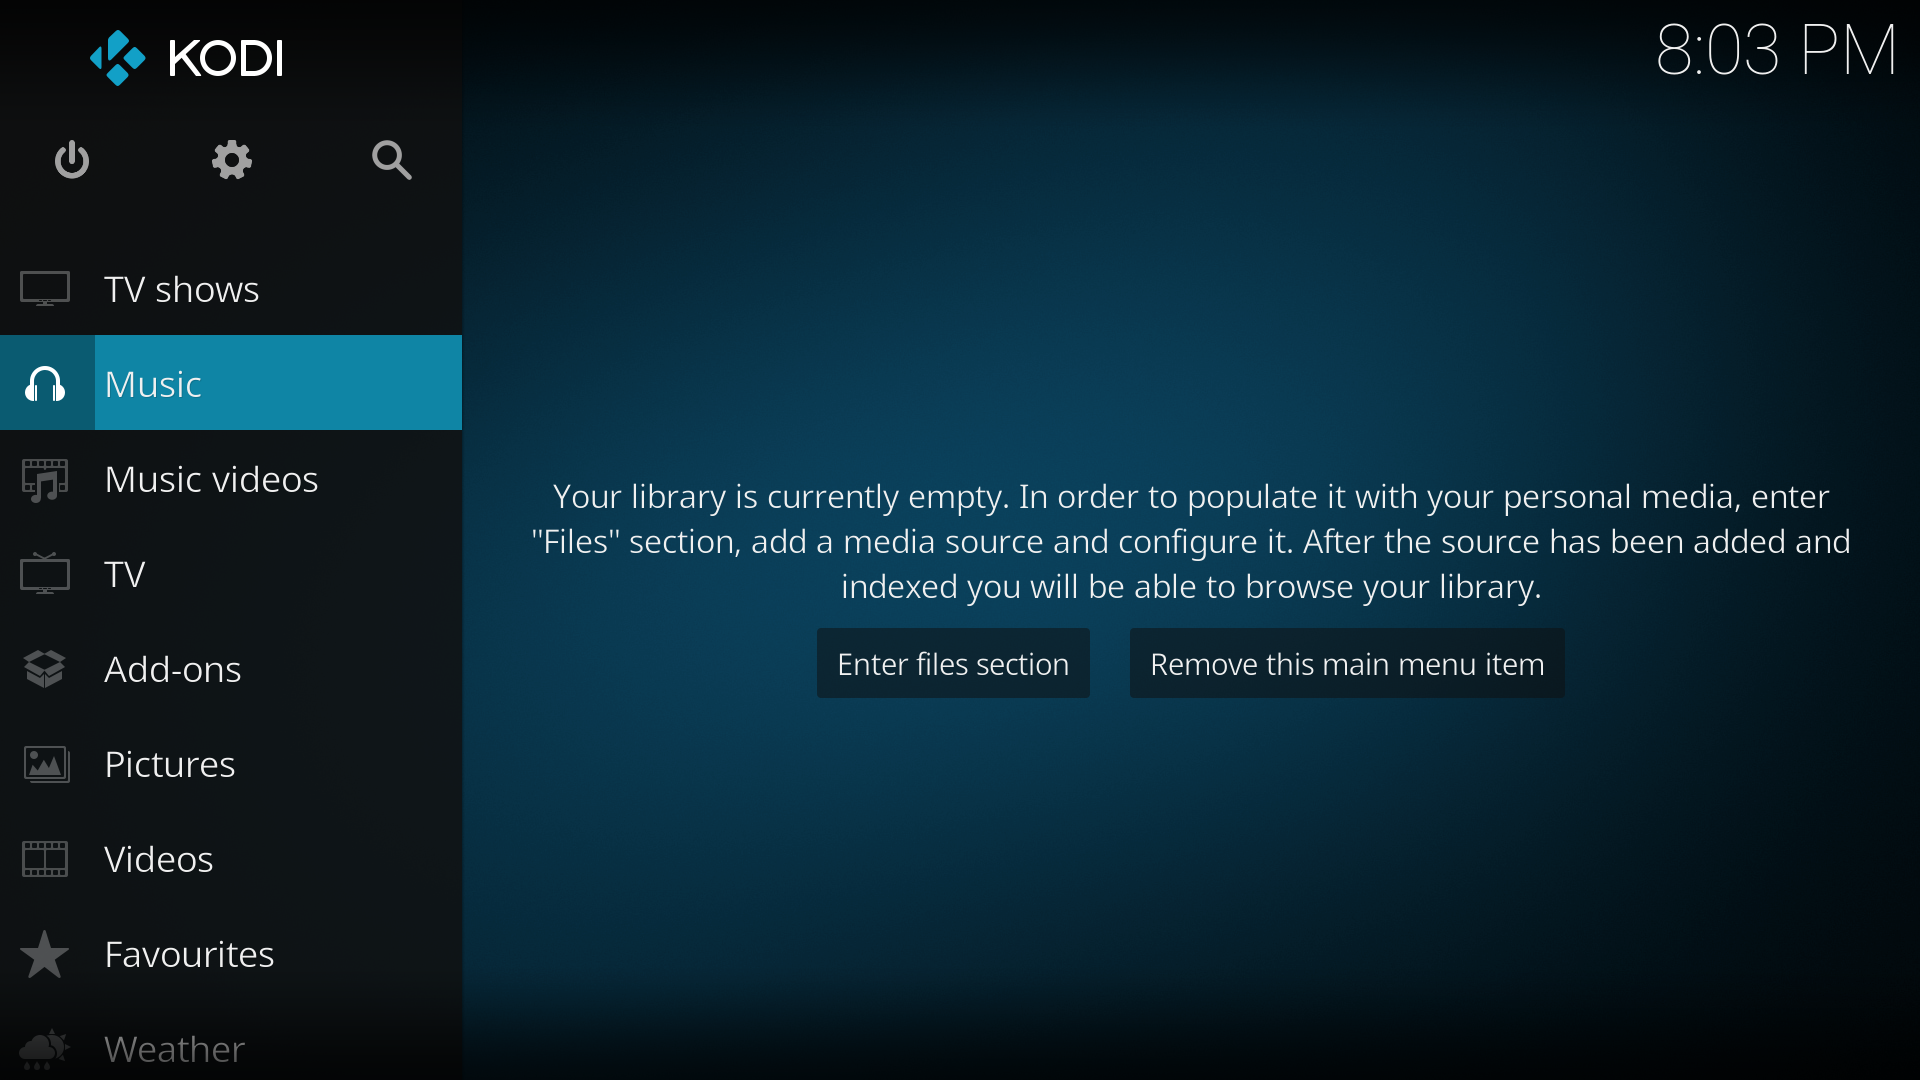
| File:Picard options.jpg | | File:Estuary_home_music.png|'''Step 1:''' On the Home menu select '''Music''' from the menu items. |
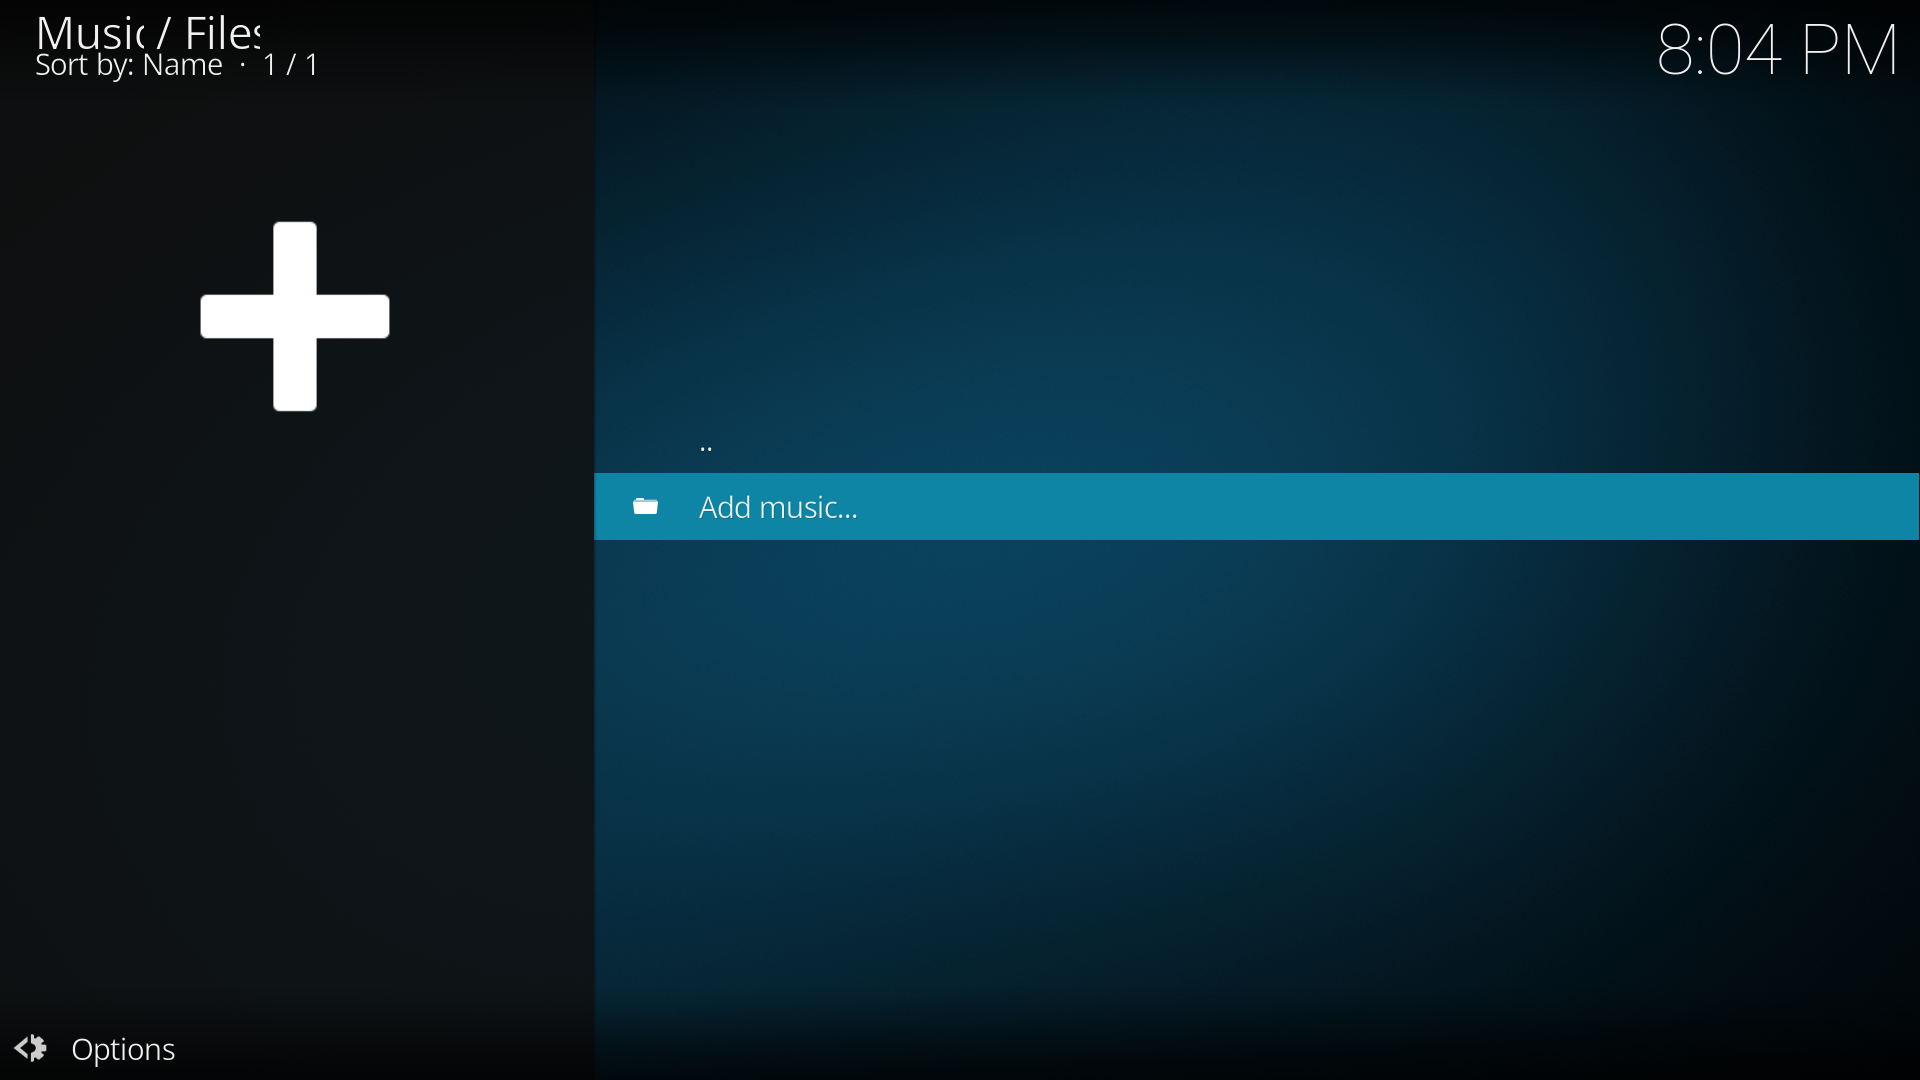
| | File:Estuary_music_file_browser.png|'''Step 2:''' In the '''Music File Browser''' select '''Add music'''. In some cases you may need to select '''Files''' to access this. |
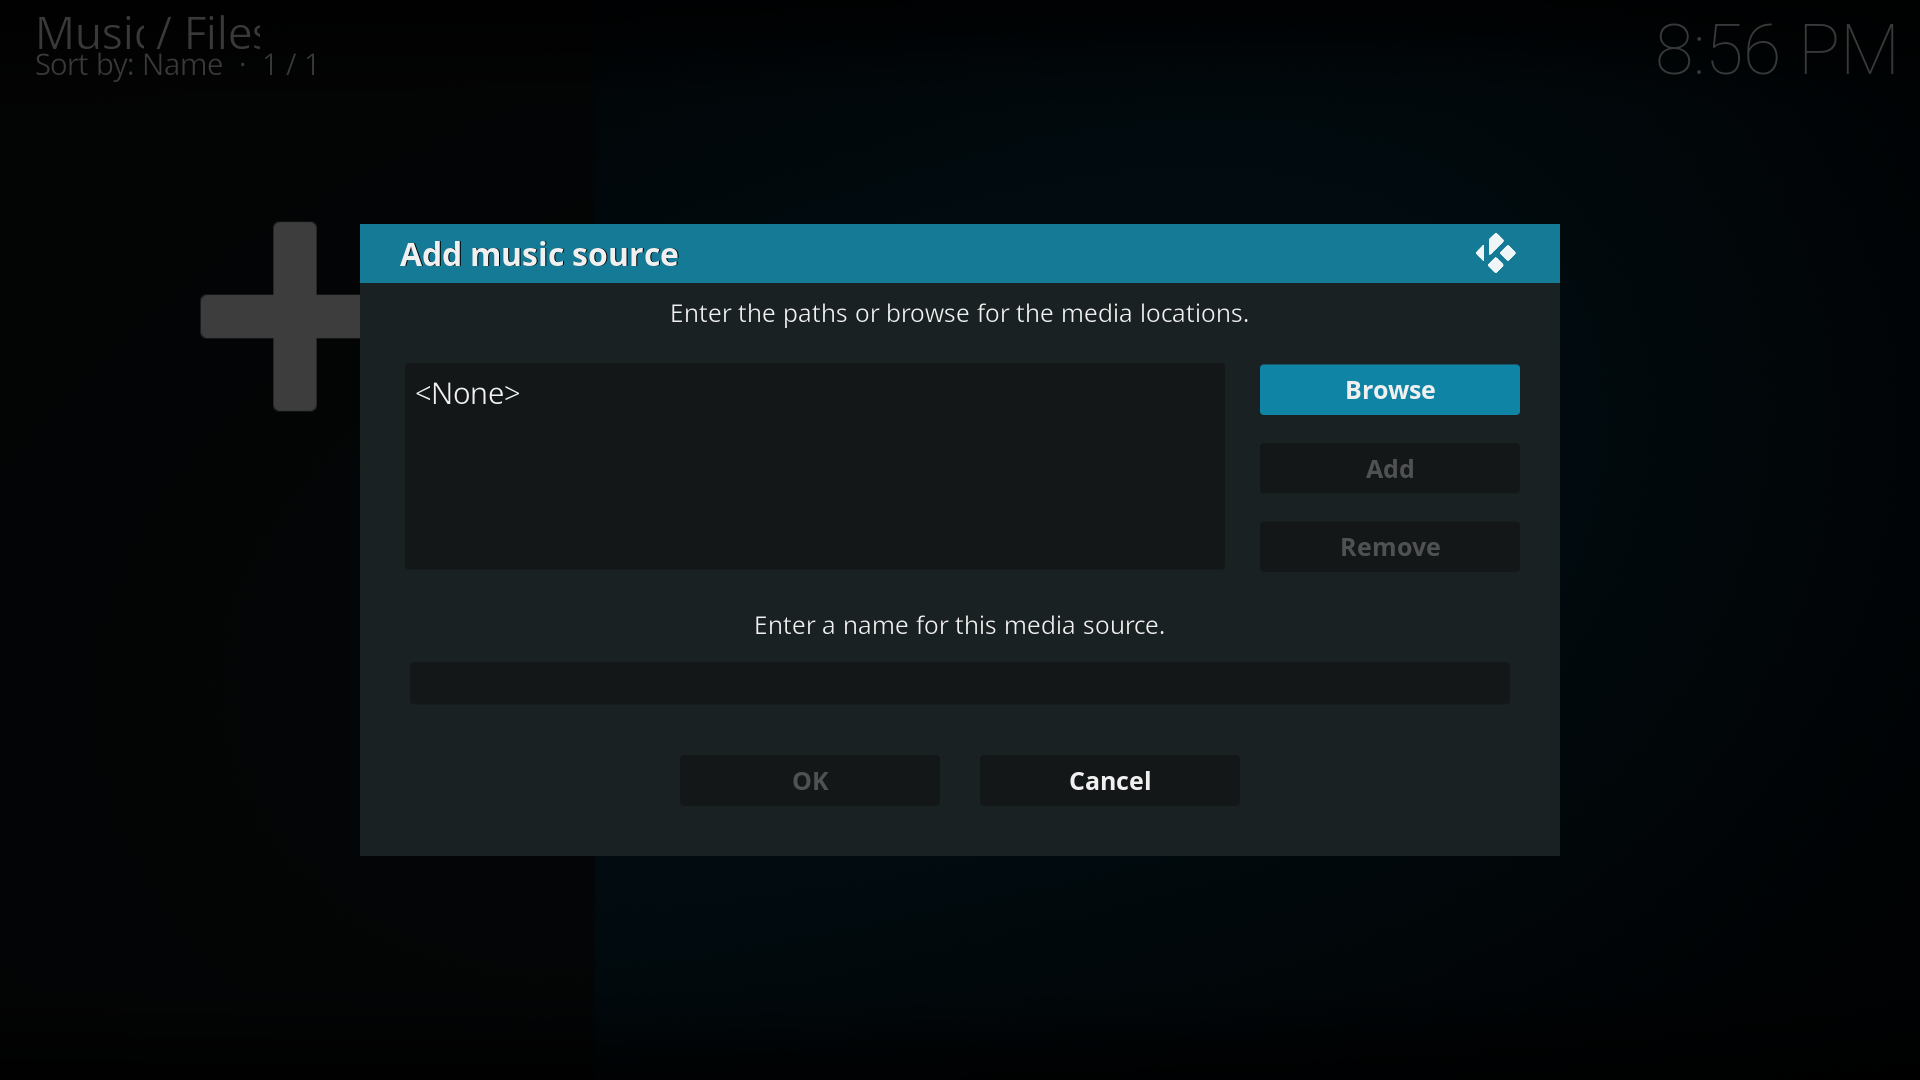
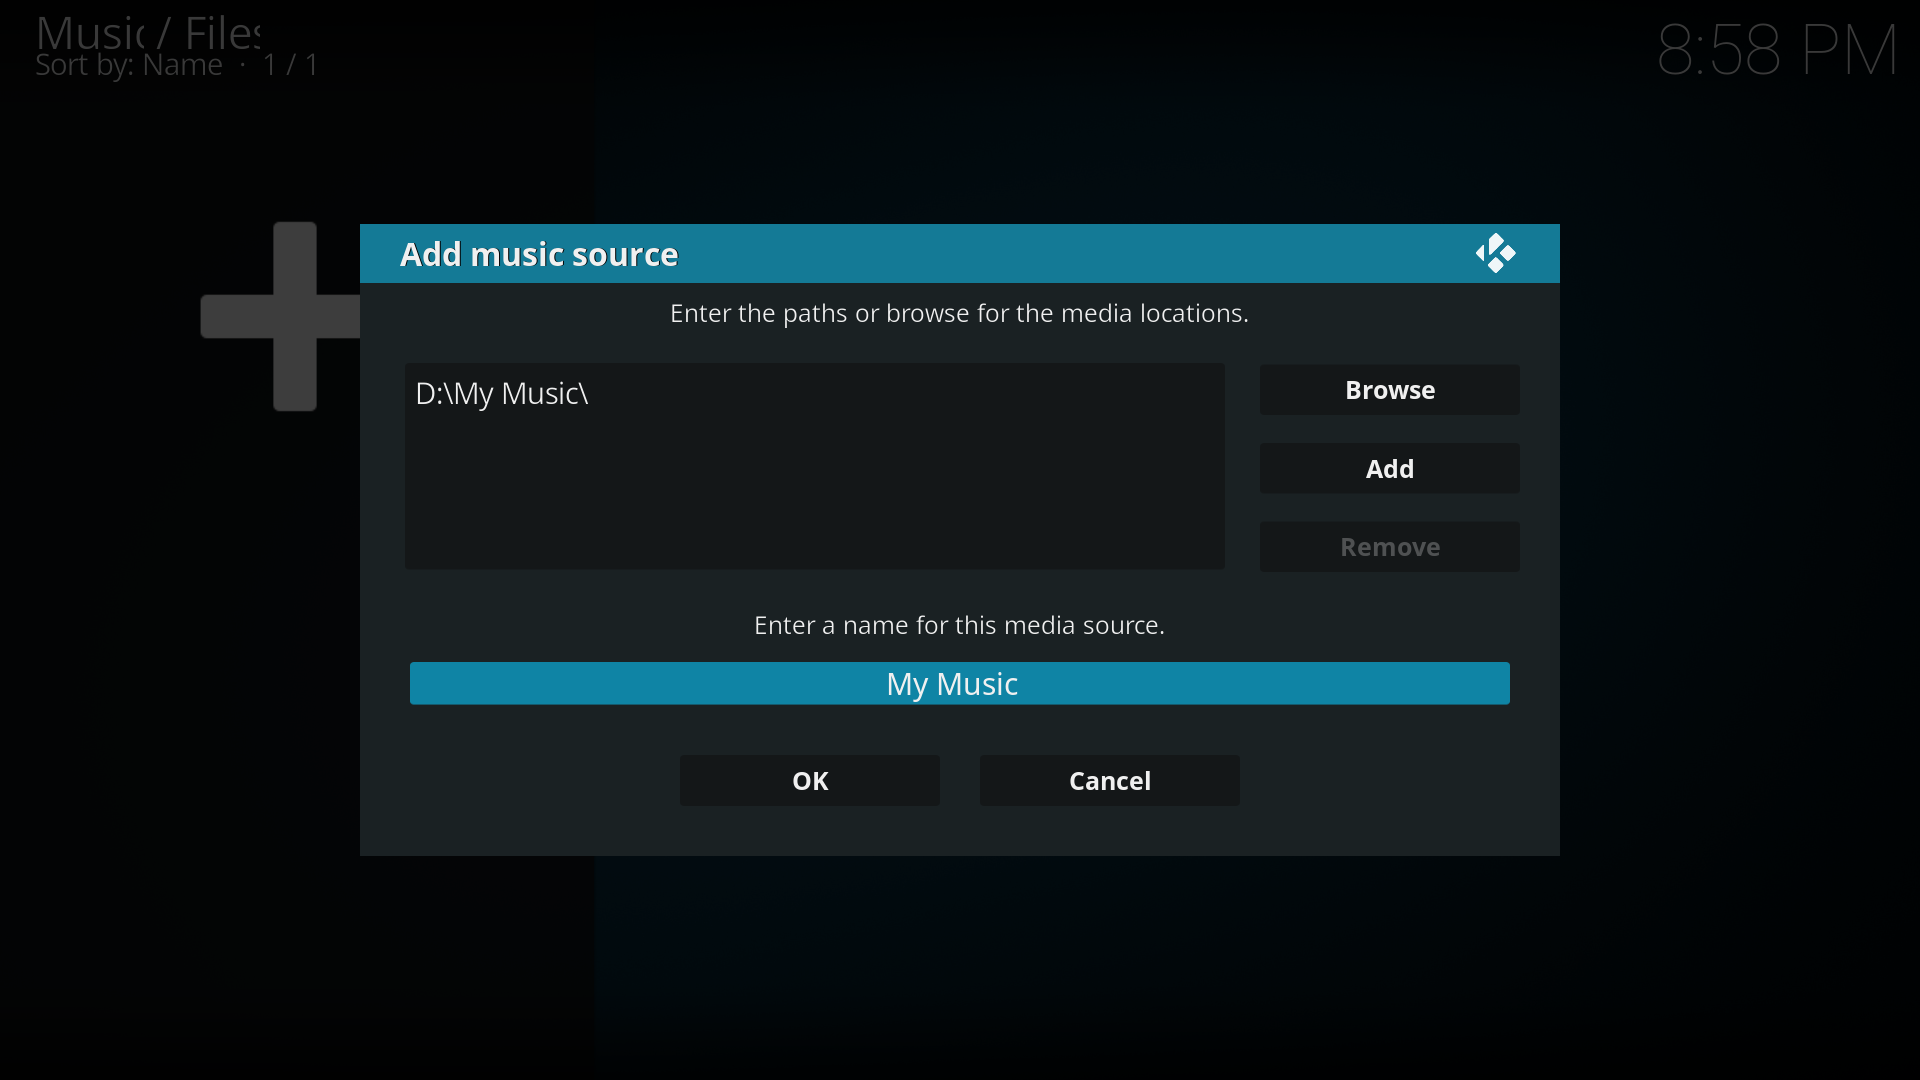
| | File:Estuary_add_music_source.png|'''Step 3:''' In the '''Add music source''' window select '''Browse'''. You can also manually add your source by selecting the box with '''<None>''' then typing in your path. If you chose to do it this way skip to '''Step 5''' |
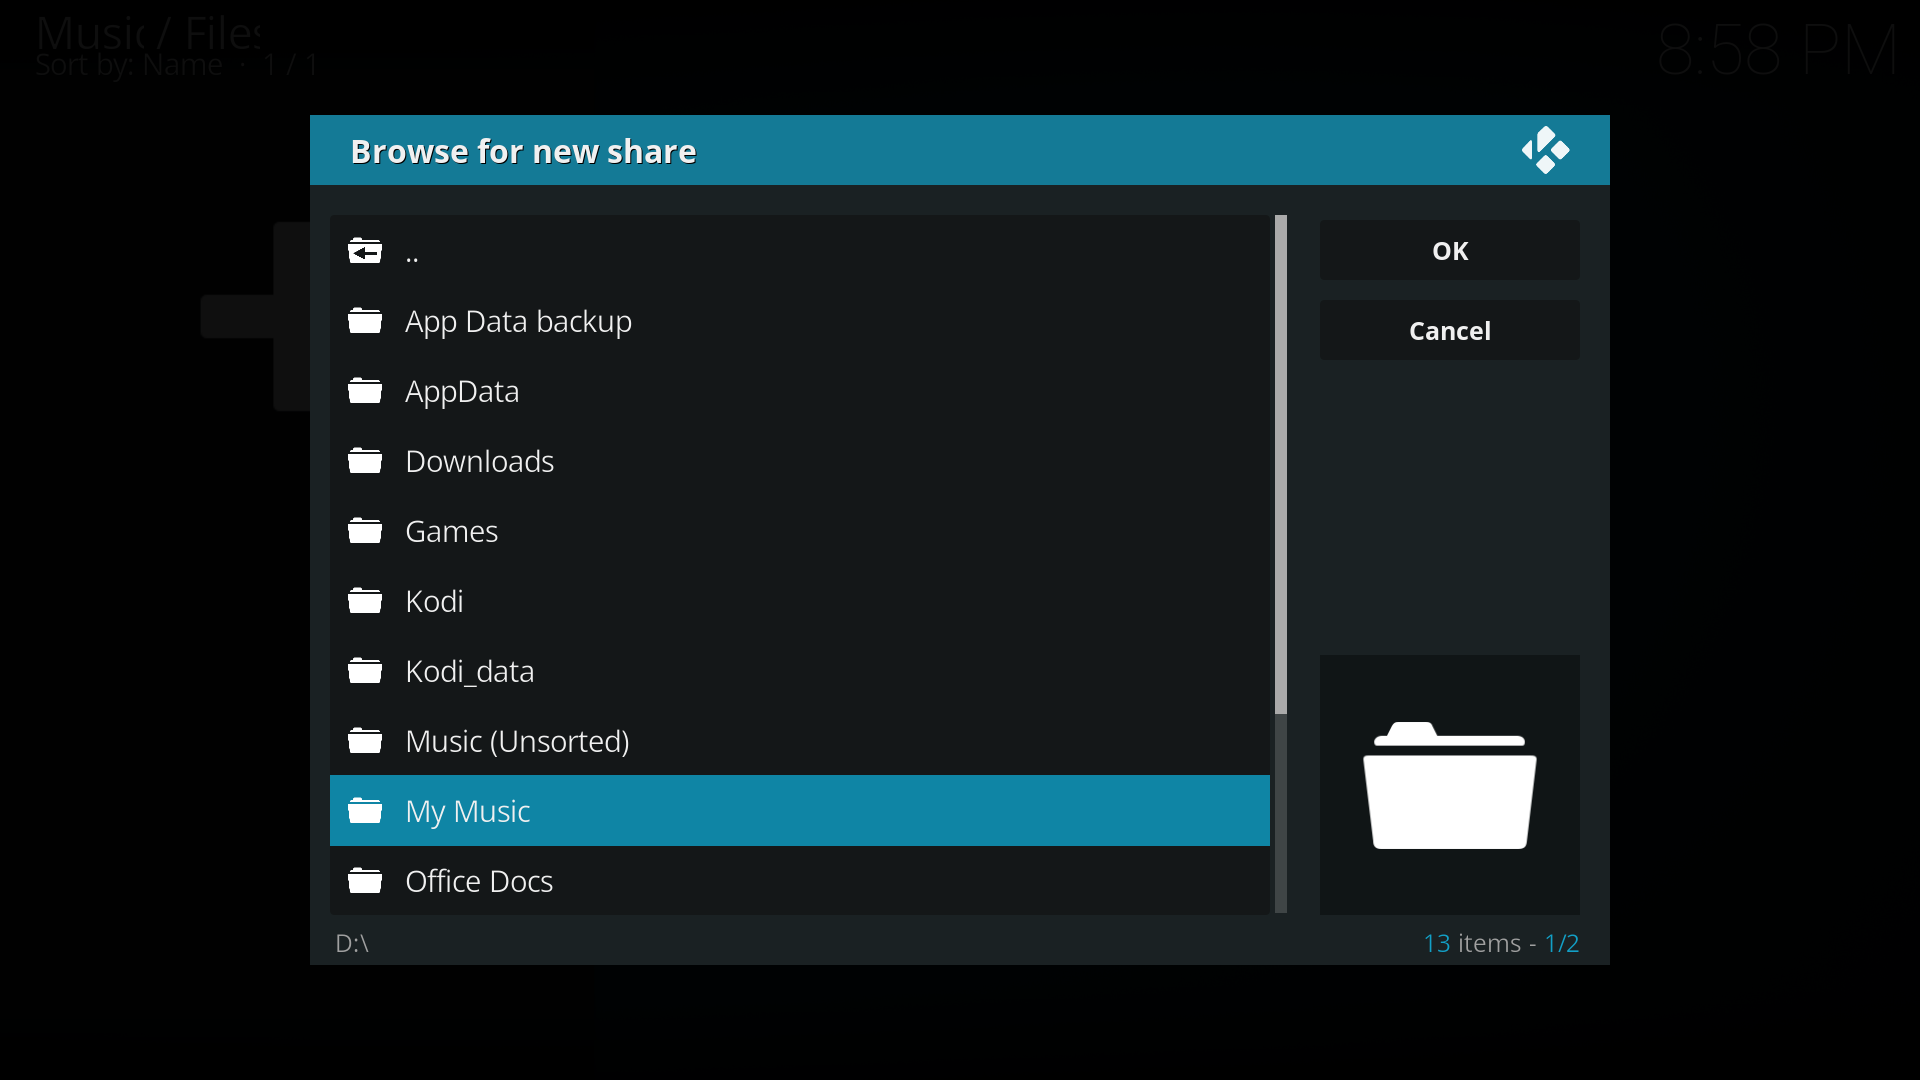
| | File:Estuary_music_browse_source.png|'''Step 4:''' In the '''Browse for new share''' window, navigate to where your music is stored, select the folder and then select '''OK'''. |
| | File:Estuary_music_name_source.png|'''Step 5:''' You will now be taken back to the '''Add music source''' window. Under '''Enter a name for this media source''' you can optionally name your media source to replace the suggested name. Select '''OK''' |
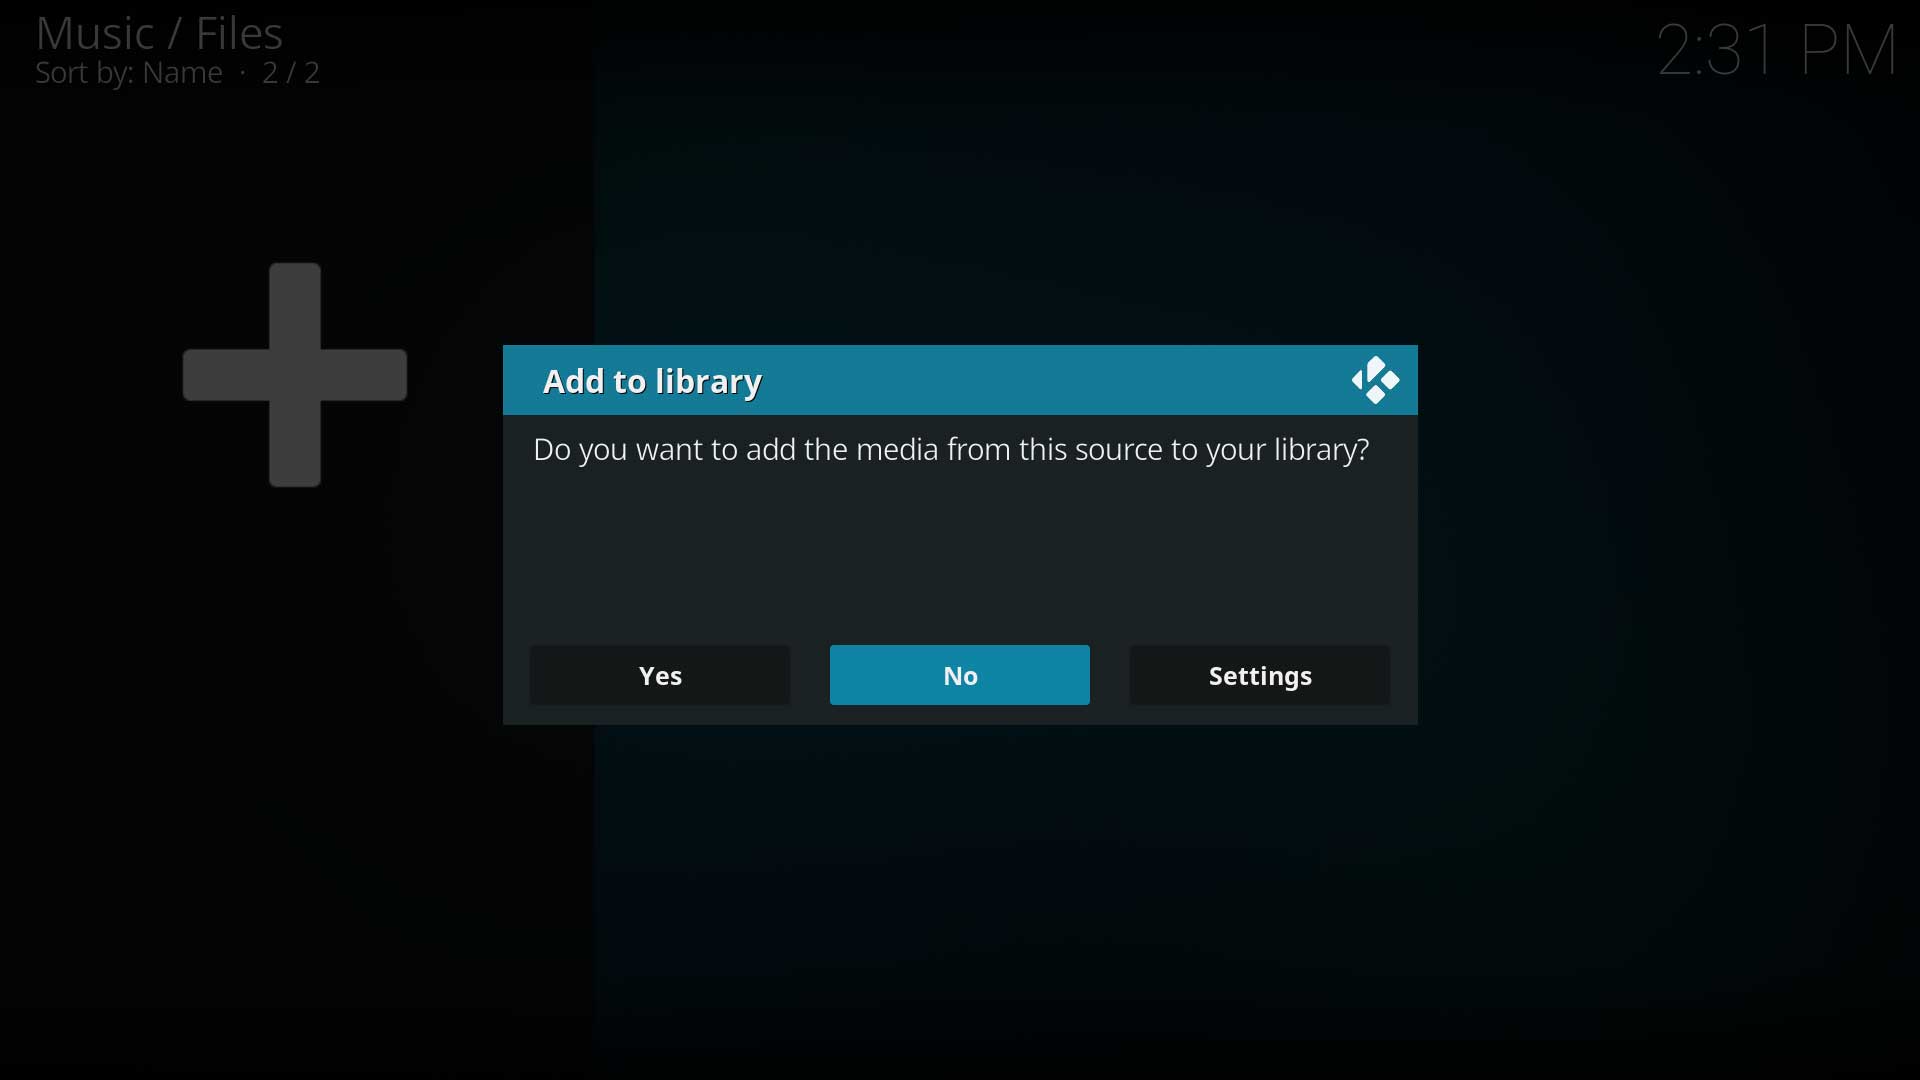
| | File:MusicScanSource01.jpg|'''Step 6:''' You will now be asked if you wish to add your media source to the library. If you do, then select '''Yes''', if you do not, then select '''No'''. By selecting '''No''' you will only have the option of accessing your media though the '''Music file browser''' |
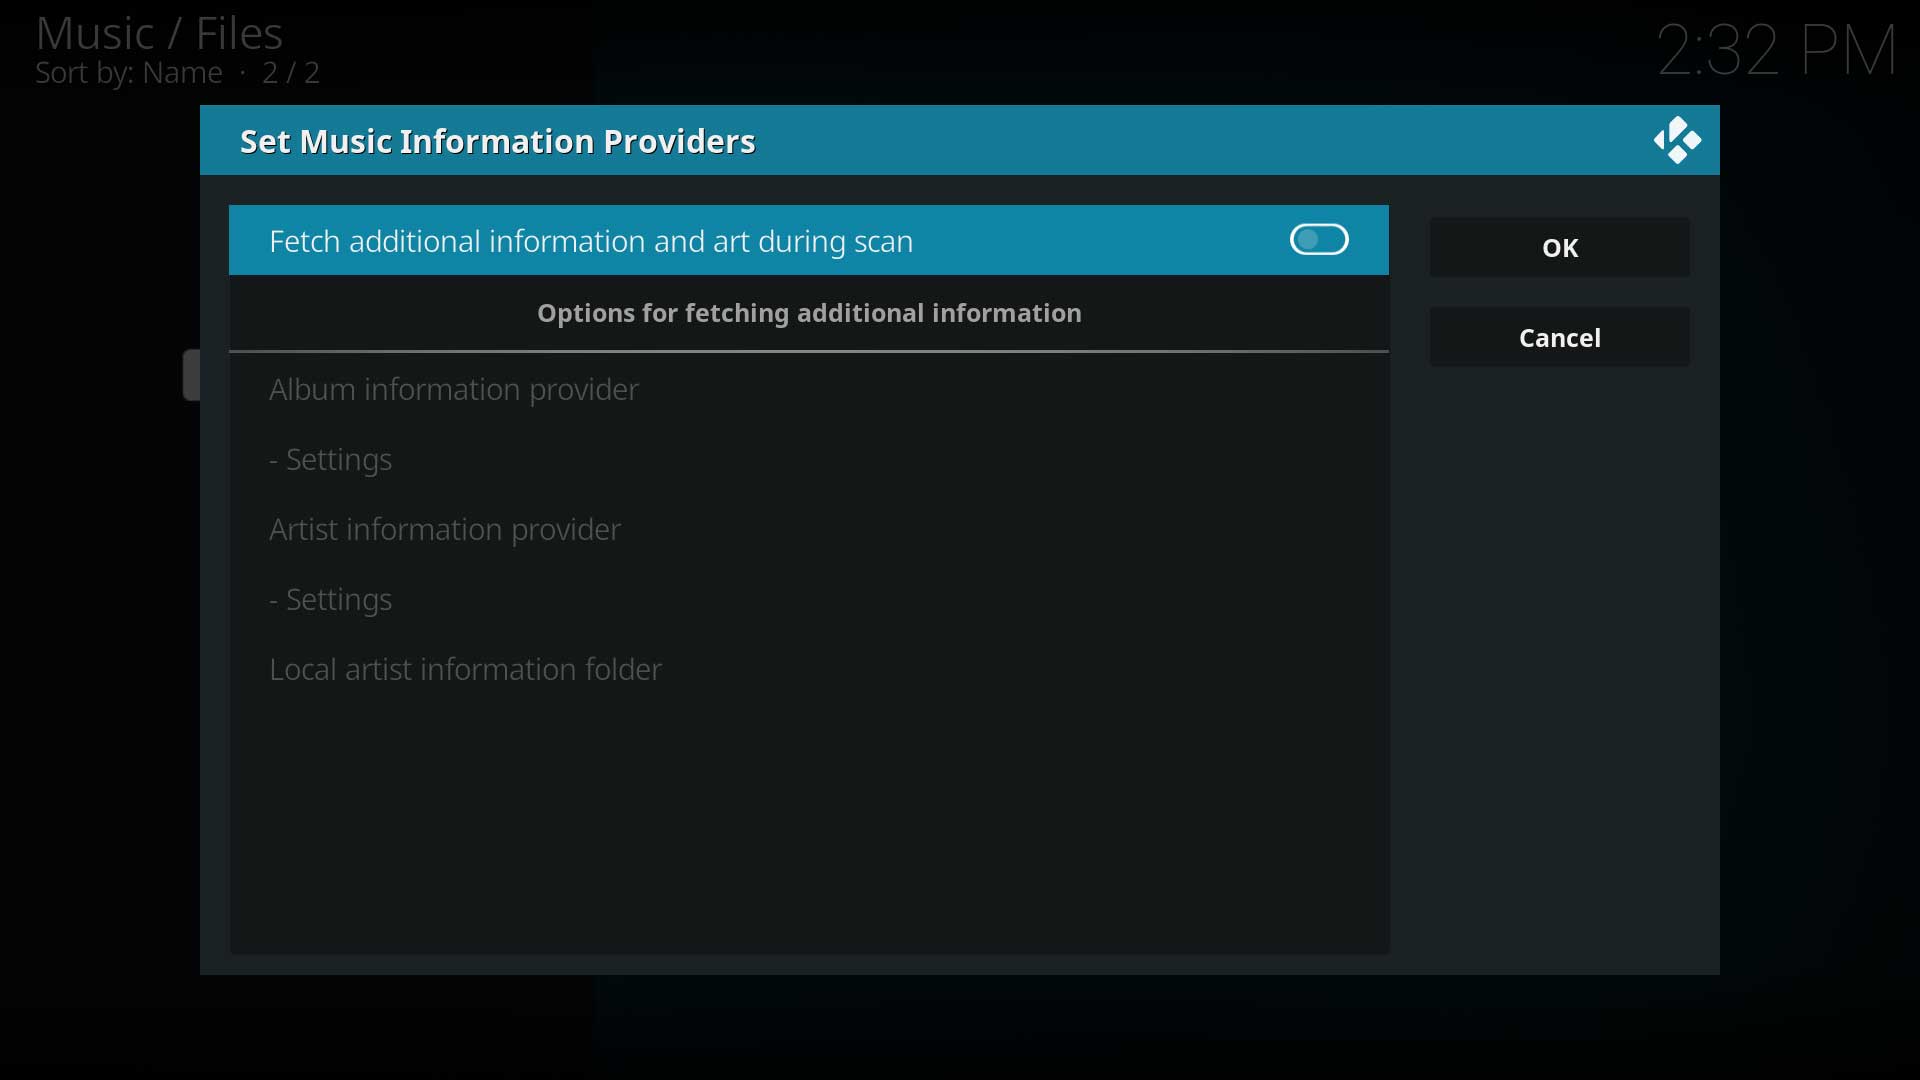
| | File:MusicScanSource02.jpg|'''Step 7:''' Choosing '''Settings''' in the previous step allows fetching additional info, setting up the scrapers and adding the Artist Information Folder if these have not been done yet. For the first scan, leave these disabled. |
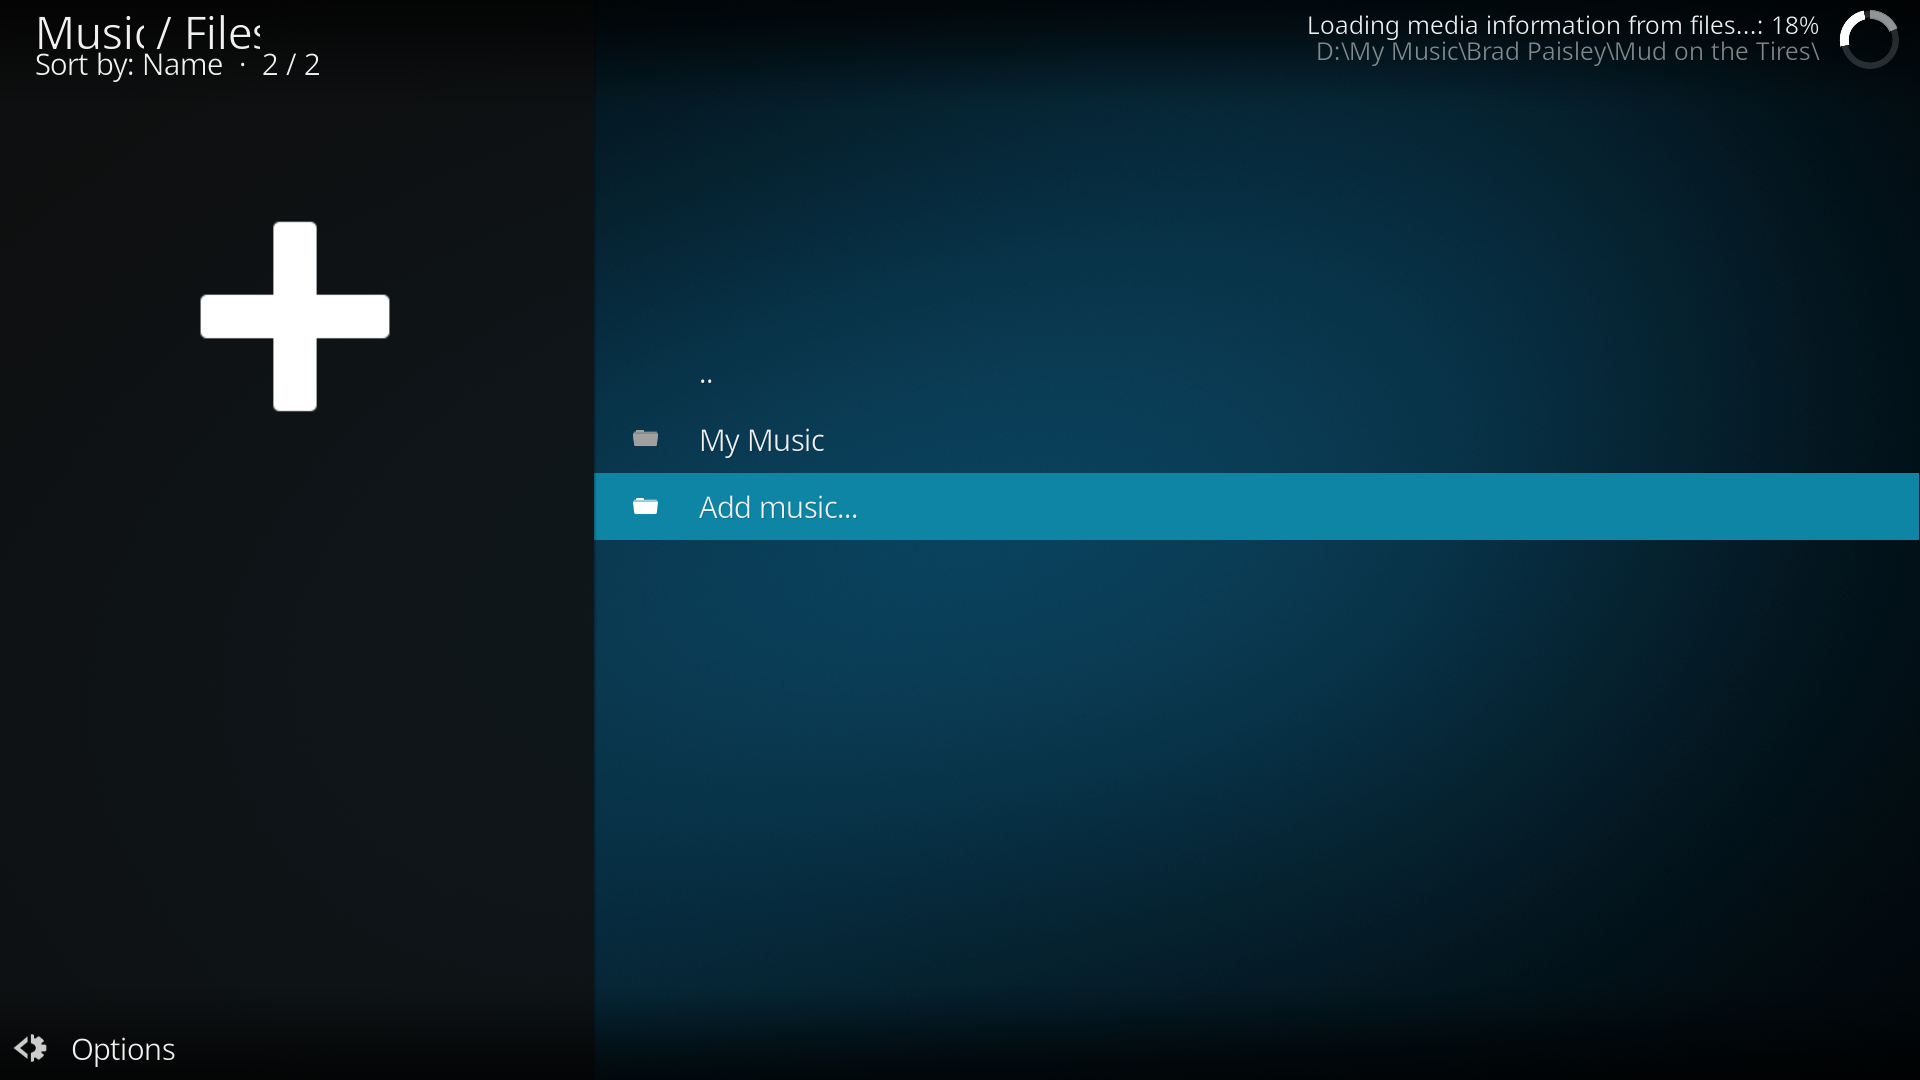
| | File:Estuary_music_scanning_library.png|'''Step 8:''' If you selected '''Yes''' in step 6, Kodi will begin scanning your source to the library. Once finished, you can back out to the Main Menu. There is no ability to queue processes so wait until the first scan is finished before adding more sources. |
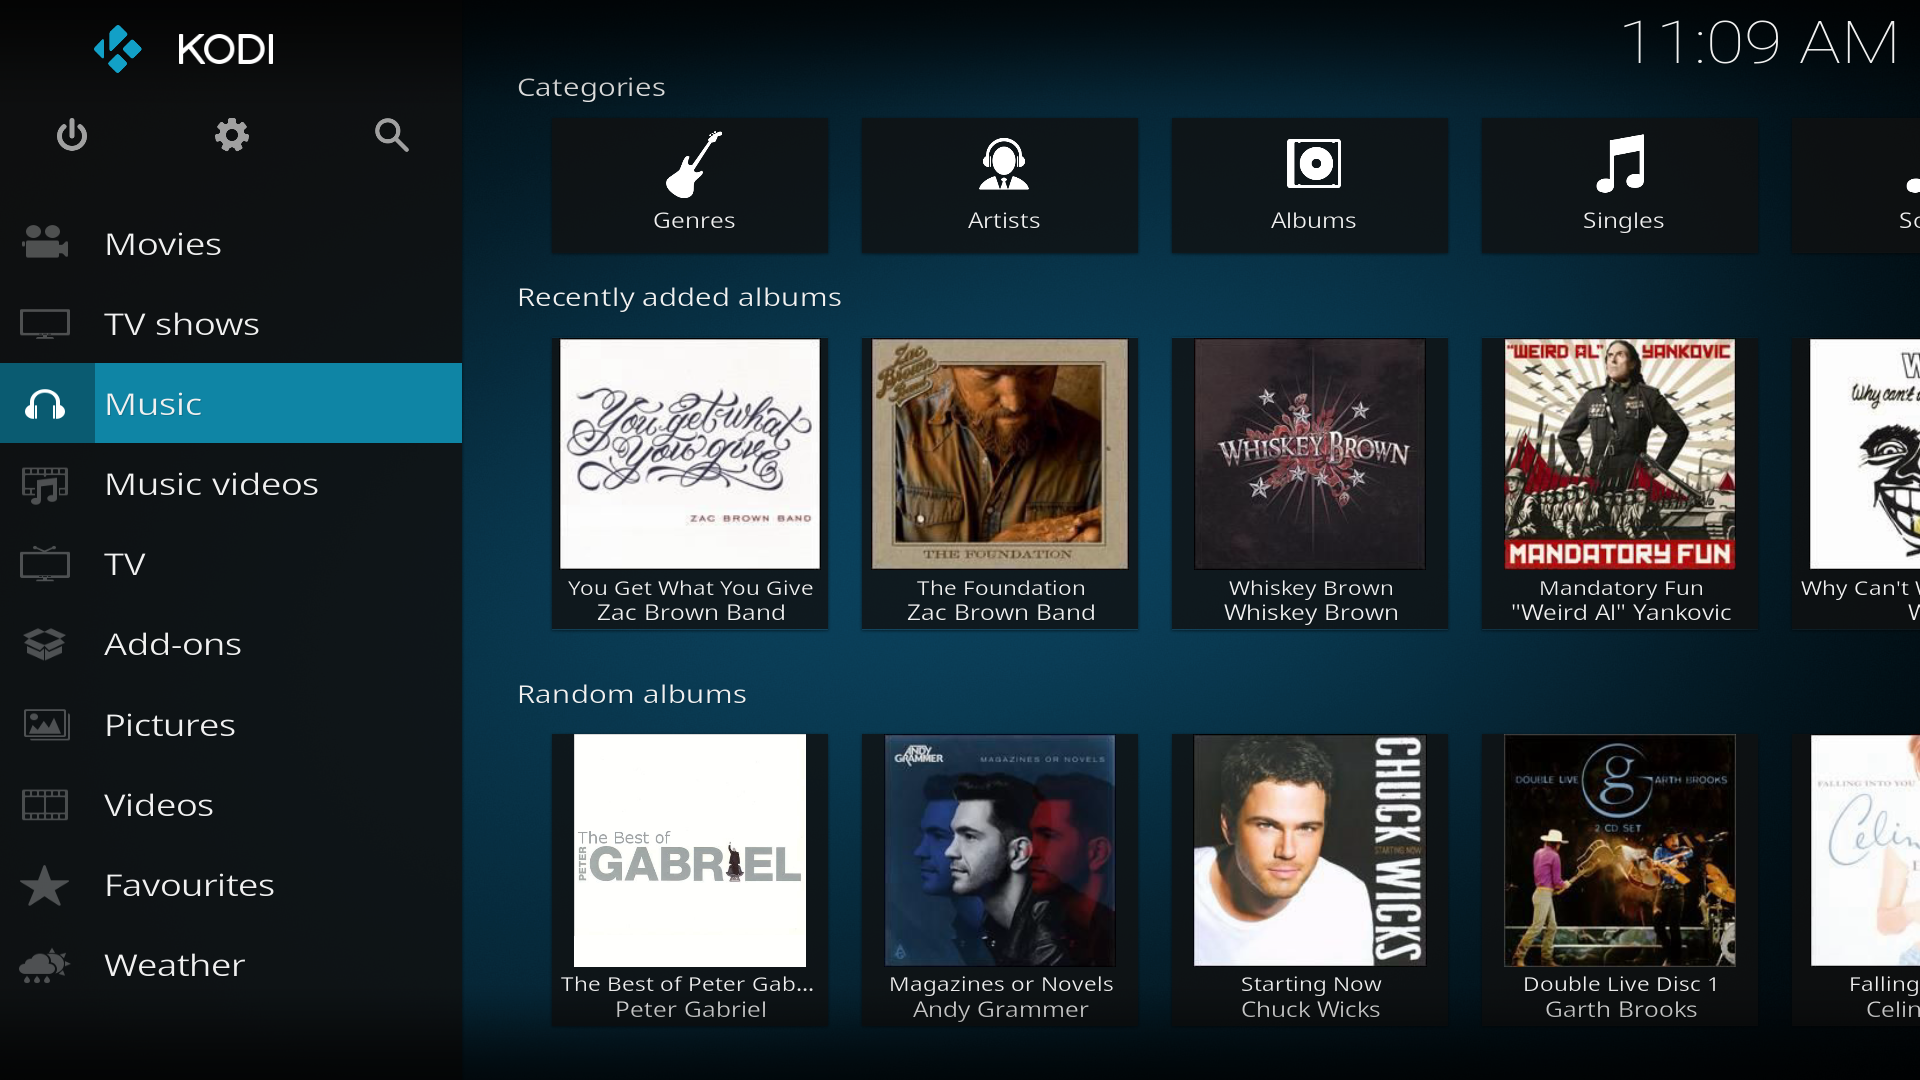
| | File:Estuary_home_music_library.png|'''Step 9:''' Once your library is scanned you will be able to see & access '''Recently added albums, Random albums, Random Artist & Unplayed albums''' on the Home menu. |
| </gallery> | | </gallery> |
| | <section end="First Time Music Setup" /> |
|
| |
|
| | <center>{{green|'''At this point you should have a functioning Music Library'''}}</center> |
|
| |
|
| == albumartists ==
| |
| {{Kodi}} requires the '''albumartists''' tag to correctly handle multiple album artists on the same album. This tag is not a default tag in MusicBrains Picard and other tagging software. <ref> https://forum.kodi.tv/showthread.php?tid=334729&pid=2760161#pid2760161 </ref>
| |
|
| |
| To include this tag add a new script under ''Options > Options > Scripting > Add new script'' and include the following code...
| |
| <syntaxhighlight lang="xml">
| |
| $setmulti(albumartists,%_albumartists%)
| |
| </syntaxhighlight>
| |
|
| |
|
| <gallery mode="packed" widths="500px" heights="283px"> | | == Adding Additional Music Sources == |
| File:Picard Script.JPG | | <gallery widths=500px heights=313px> |
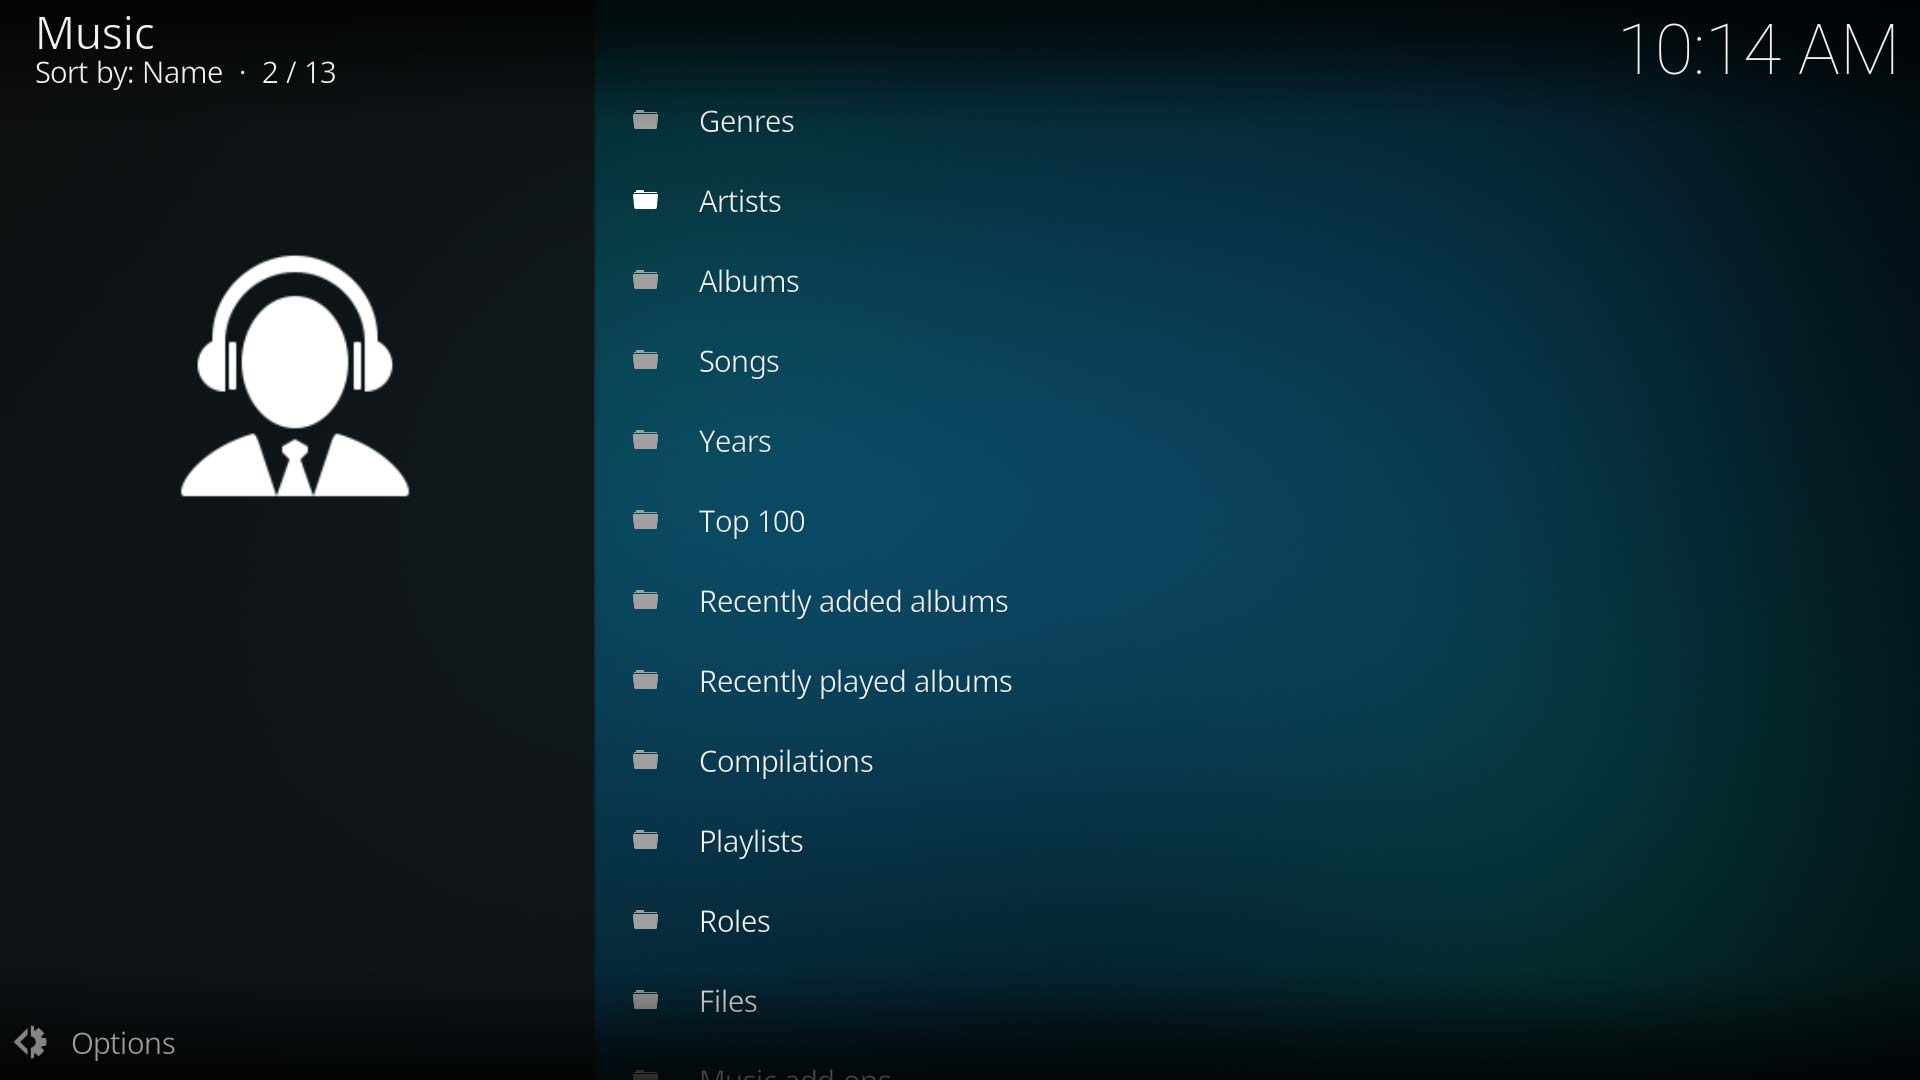
| | File:Music-CategoryList.jpg|To add additional sources to your library, from the Main Menu enter '''Music'''. Navigate to the to the bottom of the page and select '''Files'''. Then repeat the steps from '''Step 2''' in the previous section. |
| </gallery> | | </gallery> |
|
| |
|
|
| |
|
| Once the music files are tagged, avoid modifying the MusicBrainz tags unless you clearly understand the relationship of the MBID's and the other related tags. For example, embedding MBID tags, but then editing the Artist tag or Album Artist tag will result in incorrect entries in the library.
| |
|
| |
|
| For exampl:
| | == Scan to Library == |
| *If you need to change the artist or album artist tag you also have to edit the matching artist mbid tag and album artist mbid tag.
| | In step 6 above, you were asked ''Do you want to add the media from this source to your library?'' |
| *If Kodi finds a release mbid it will expect the artist mbid tags to also be present.
| |
|
| |
|
| | Click the below link if you selected '''No''' and would now like to add the music files into the library |
|
| |
|
| :'''''See: [https://musicbrainz.org/ MusicBrainz Website]''''' | | :'''See: [[Update_Music_Library#Scan_Source_to_Library|Scan Source to Library]]''' |
| :'''''See: [https://picard.musicbrainz.org/ MusicBrainz Picard Software]'''''
| |
|
| |
|
|
| |
|
|
| |
|
| ----
| | = Troubleshooting = |
| <center>{{red|'''The remainder of this page deals with special use cases or provides information for technical interest and reference only. It can be safely disregarded if these do not apply to you'''}}</center>
| | {| width="100%" |
| ---- | | {{FAQ| |
| | | | BGcolor=WhiteSmoke |
| | | | Question=Library contains random or duplicated entries |
| | | | Answer= This is a result of errors in tagging. |
| <div style="{{linear-gradient|left|#f5d3ff, #12b2e7}}">{{next|[[Scraping_Music|Scraping Music]]}} </div>
| | #Take note of the errors and correct them by following the recommended procedure in the previous step of the guide- Music Files and Tagging |
| | | #Once errors are corrected follow the steps detailed in '''Remove A Source''' |
| | | #Re-add the source using the '''Initial Set Source & Scan''' procedure detailed above |
| | }} |
| | |} |
|
| |
|
| = Ripping CD's =
| |
| {{main|Ripping CDs}}
| |
| {{#lst:Ripping CDs|intro}}
| |
|
| |
|
| There is no requirement to use the {{Kodi}} CD Ripper. If you are comfortable using other ripping software, then we recommend you continue using that software.
| |
|
| |
|
| | | = Network Sources = |
| | | Kodi gives you the ability to listen to music from a variety of sources. |
| = Cue Sheets = | |
| {{#lst:Cue_sheets|intro}}
| |
| | |
| {{kodi}} does provide basic support for using cue sheets to define individual tracks when an entire CD has been ripped into a single music file. However the information provided by the cue sheet standard is much more limited than that of standard tagging, hence to enjoy the full music library features it is recommended that tracks are ripped into separate files and fully tagged.
| |
| <br /> | | <br /> |
| {{red|If you do not use Cue Sheets you can safely move onto the next step.}}
| | Some examples of sources that allow you to easily access all your digital music collection: |
| | * On your computer or a NAS (Network Attached Storage) device/system, which supports [[SMB]] file sharing |
| | * Stored directly on the hard drive |
| | * On CDs/DVDs |
| | * Streamed from the Internet |
| <br /> | | <br /> |
| ;{{see also|Cue_sheets}}
| |
|
| |
|
| |
|
| |
| = Streams =
| |
| {{#lst:Internet_video_and_audio_streams|intro}}
| |
|
| |
| ;{{see also|Internet_video_and_audio_streams}}
| |
|
| |
|
| |
|
| |
| = Technical Explanation: File tags =
| |
| For many categories, such as genres and artists, {{kodi}} supports multiple values in the one field. By default it uses the character sequence " / " to divide the entry into multiple values. This divider may be changed via [[advancedsettings.xml]].
| |
|
| |
|
| |
| == Resolving Compilations and Multiple Artists ==
| |
| {{red|Applies to v17 and below. v18 introduced the [[Artist information folder]] which solved these problems. You are encouraged to update to v18}}
| |
|
| |
| {{kodi}} reads the ''Album Artist'' tag in ID3, Ogg, APE and MP4 tags and uses it if available to assign an artist to the album (independently of the track's artist information). This is the "Album Artist" tag (in ID3 this is represented by the "TPE2" tag; in vorbiscomment (ogg) files "ALBUMARTIST", "ALBUM ARTIST" and "ENSEMBLE" are all supported). Multiple artists for either a track or album artist can be specified in "Artist1 / Artist2 / Artist3" format.
| |
|
| |
| If no ''Album Artist'' tag exists, {{kodi}} will use the first (primary) artist from the tracks as the ''Album Artist''. Essentially we do a string comparison of all the track artists, and assign the common artists as the ''Album artist''. This is generally the TPE1 tag in ID3.
| |
|
| |
| As many users don't yet use the ''Album Artist'' tag, {{kodi}} has an additional filter system for identifying compilation albums, where each track normally has a different artist. As {{kodi}} scans a folder, it does the following:
| |
| # Identifies albums based on ''Album'' name alone in the folder and groups the songs that have the same ''Album'' name together as an album.
| |
| # Runs through each album's assigned songs. If there is 2 or more tracks with the same ''Track'' number, the group of songs must come from 2 or more albums, so the ''Album'' name is ruled out as a possible compilation.
| |
| # If any of the songs assigned to the ''Album'' name have an ''Album Artist'' tag, then {{kodi}} assumes the user knows what they're doing, and this album is also ruled out from being a compilation.
| |
| # If two or more songs assigned to the ''Album'' name then have different primary artists, then the ''Album'' name is considered to be a group of songs from a compilation, and the ''Various Artists''" tag is assigned as the album artist.
| |
| # Otherwise, if all the songs have the same primary artist but don't have the same full artist list (eg a song or two has an additional artist) then the album is assigned the primary artist as it's ''Album Artist'', and we assume the additional artists are guest artists.
| |
|
| |
|
| |
|
| |
| == Ratings in ID3 tags ==
| |
| Ratings in ID3 tags are read via the POPM field, and (if this doesn't exist) in a custom (TXXX) field named "RATING". For the RATING field, we accept 1-5 as valid ratings. For the POPM field things are more complicated, as there is no established standard in place. We currently most closely respect what Mediamonkey does, and also have some support for what Windows Media Player 11 does. The POPM tag takes a value from 0..255, with 0 meaning no rating, 1 the worst, and 255 the best. We currently map these as follows:
| |
|
| |
| {| class="prettytable"
| |
| |-
| |
| !'''POPM value''' || '''Star rating'''
| |
| |-
| |
| |0 ||
| |
| |-
| |
| |1 || '''*''' This is a special case for Windows Media Player
| |
| |-
| |
| | 2-8 ||
| |
| |-
| |
| |9-49 || '''*'''
| |
| |-
| |
| |50-113 ||'''**'''
| |
| |-
| |
| |114-167 || '''***'''
| |
| |-
| |
| |168-218 || '''****'''
| |
| |-
| |
| |219-255 ||'''*****'''
| |
| |}
| |
|
| |
|
| |
|
| |
| = Audio Formats & Tags =
| |
|
| |
|
| |
|
| |
| == Supported Audio Formats ==
| |
| Although the list of playable formats is quite comprehensive, it is not accurate to say that every {{kodi}} installation will play every format. The ability to play some of the more obscure formats will depend upon the version of {{kodi}} and the operating system in use. Some formats will require the installation of add-ons.
| |
|
| |
| {{#lst:Advancedsettings.xml|musicextensions}}
| |
|
| |
| ;{{See also|Advancedsettings.xml}}
| |
|
| |
|
| |
|
| |
| == Supported Metadata Containers ==
| |
| The following metadata containers are supported by {{kodi}}
| |
|
| |
| {| class="prettytable"
| |
| |-
| |
| ! Metadata Container || Note
| |
| |-
| |
| |[[wikipedia:APEv2 tag|APEv2 tag]] ||
| |
| |-
| |
| |[[wikipedia:Advanced_Systems_Format|ASF]] ||
| |
| |-
| |
| |Generic Tag || A generic tag for basic data from other odd file types
| |
| |-
| |
| |[[wikipedia:ID3|ID3]] || v1, v2.3 and v2.4
| |
| |-
| |
| |[[wikipedia:MPEG-4 Part 14#Metadata|MP4]] ||
| |
| |-
| |
| |[https://xiph.org/ Xiph.org] || Vorbis Comments
| |
| |}
| |
|
| |
|
| |
|
| |
| == Common File & Tag Combination ==
| |
| You will notice that not all the tags listed in the section ''Supported Audio Formats'' above are listed in the following table. Those formats that are ommitted do not have provision to support embedded tags. If your collection contains any of these unsupported formats, you will be unable to scan the music into the library. Your options are:
| |
| #Convert your audio file to a supported format and tag using MusicBrainz Picard. (recommended)
| |
| #Access your music via the File Manager or via File View
| |
|
| |
| {{kodi}} supports the following common Audio File and Tag Formats
| |
|
| |
| {| class="wikitable sortable" style="text-align:center;"
| |
| |-
| |
| !| Metadata container
| |
| !| Additional Filename extensions
| |
| |-
| |
| | [[wikipedia:APEv2 tag|APEv2 tag]] || ape, mp3, aac, wv, mpc
| |
| |-
| |
| | [[wikipedia:Advanced_Systems_Format|ASF]] || asf, wmv, wma
| |
| |-
| |
| | Generic Tag || it, mod, module, nst, wow, s3m, xm
| |
| |-
| |
| | [[wikipedia:ID3|ID3 v1]] || mp3, aac
| |
| |-
| |
| | [[wikipedia:ID3|ID3 v2]] || mp3, aac, tta, aif, aiff, wav, flac
| |
| |-
| |
| | iTunes [[wikipedia:MPEG-4 Part 14#Metadata|MP4]] || .3g2 .m4a .m4b .m4p .m4r .m4v .mp4
| |
| |-
| |
| |[https://xiph.org/ Xiph.org] || flac, oga, ogg, opus
| |
| |}
| |
|
| |
| Note:
| |
| *FLAC files- xiph tags override id3v2 tags
| |
| *mp3 files can have either id3 or APE tags
| |
| *mka, dsf, dff - ID3v2 format read but are handled by ffmpeg tag reader and it does not support all tags from IDE standard)
| |
|
| |
|
| |
|
| |
| == Tags {{kodi}} reads ==
| |
| {{kodi}} will scan the following tags embedded in the music file. The column ''{{kodi}} Version'' indicates the version of {{kodi}} that the tag was introduced, and will work in subsequent versions.
| |
|
| |
| <section begin="TagTable" />
| |
| {| class="wikitable sortable" style="text-align:center;"
| |
| |-
| |
| ! style="text-align:left;"| {{kodi}} Version
| |
| ! Vorbis (.Flac)
| |
| ! ID3v2 (.mp3)
| |
| ! APE
| |
| ! MP4
| |
| ! ASF
| |
| |-
| |
| |v16
| |
| |ARTIST
| |
| |TPE1
| |
| |ARTIST
| |
| |\251ART
| |
| |Author
| |
| |-
| |
| |v16
| |
| |ARTISTS
| |
| |ARTISTS
| |
| |ARTISTS
| |
| | ----:com.apple.iTunes:ARTISTS
| |
| |
| |
| |-
| |
| |v16
| |
| |ALBUMARTIST or ALBUM ARTIST
| |
| |TPE2 OR ALBUMARTIST or ALBUM ARTIST
| |
| |ALBUMARTIST or ALBUM ARTIST
| |
| |aART
| |
| |WM/AlbumArtist
| |
| |-
| |
| |v16
| |
| |ALBUMARTISTS or ALBUM ARTISTS
| |
| |ALBUMARTISTS or ALBUM ARTISTS
| |
| |ALBUMARTISTS or ALBUM ARTISTS
| |
| | ----:com.apple.iTunes:ALBUMARTISTS
| |
| |
| |
| |-
| |
| |v16
| |
| |ALBUM
| |
| |TALB
| |
| |ALBUM
| |
| |\251alb
| |
| |WM/AlbumTitle
| |
| |-
| |
| |v16
| |
| |TITLE
| |
| |TIT2
| |
| |TITLE
| |
| |\251nam
| |
| |
| |
| |-
| |
| |v16
| |
| |TRACKNUMBER
| |
| |TRCK
| |
| |TRACKNUMBER or TRACK
| |
| |trkn
| |
| |WM/TrackNumber or WM/Track
| |
| |-
| |
| |v16
| |
| |DISCNUMBER
| |
| |TPOS
| |
| |DISCNUMBER or DISC
| |
| |disk
| |
| |WM/PartOfSet
| |
| |-
| |
| |v16
| |
| |YEAR
| |
| |TYER
| |
| |YEAR
| |
| |\251day
| |
| |WM/Year
| |
| |-
| |
| |v16
| |
| |DATE
| |
| |TDRC, TDRL
| |
| |DATE
| |
| |
| |
| |
| |
| |-
| |
| |v16
| |
| |GENRE
| |
| |TCON
| |
| |GENRE
| |
| |\251gen
| |
| |WM/Genre
| |
| |-
| |
| |v16
| |
| |MOOD
| |
| |TMOO OR TXXX:MOOD
| |
| |MOOD
| |
| | ----:com.apple.iTunes:MOOD
| |
| |WM/Mood
| |
| |-
| |
| |v16
| |
| |COMMENT
| |
| |COMM
| |
| |COMMENT
| |
| |\251cmt
| |
| |(COMMENT)
| |
| |-
| |
| |v16
| |
| |CUESHEET
| |
| |
| |
| |CUESHEET
| |
| |
| |
| |
| |
| |-
| |
| |v16
| |
| |COMPILATION
| |
| |TCMP
| |
| |COMPILATION
| |
| |cpil
| |
| |
| |
| |-
| |
| |v16
| |
| |LYRICS
| |
| |USLT
| |
| |LYRICS
| |
| |
| |
| |
| |
| |-
| |
| |v16
| |
| |REPLAYGAIN_TRACK_GAIN
| |
| |REPLAYGAIN_TRACK_GAIN
| |
| |REPLAYGAIN_TRACK_GAIN
| |
| | ----:com.apple.iTunes:replaygain_track_gain
| |
| |replaygain_track_gain
| |
| |-
| |
| |v16
| |
| |REPLAYGAIN_ALBUM_GAIN
| |
| |REPLAYGAIN_ALBUM_GAIN
| |
| |REPLAYGAIN_ALBUM_GAIN
| |
| | ----:com.apple.iTunes:replaygain_album_gain
| |
| |replaygain_album_gain
| |
| |-
| |
| |v16
| |
| |REPLAYGAIN_TRACK_PEAK
| |
| |REPLAYGAIN_TRACK_PEAK
| |
| |REPLAYGAIN_TRACK_PEAK
| |
| | ----:com.apple.iTunes:replaygain_track_peak
| |
| |replaygain_track_peak
| |
| |-
| |
| |v16
| |
| |REPLAYGAIN_ALBUM_PEAK
| |
| |REPLAYGAIN_ALBUM_PEAK
| |
| |REPLAYGAIN_ALBUM_PEAK
| |
| | ----:com.apple.iTunes:replaygain_album_peak
| |
| |replaygain_album_peak
| |
| |-
| |
| |v16
| |
| |REPLAYGAIN_ALBUM_PEAK
| |
| |REPLAYGAIN_ALBUM_PEAK
| |
| |REPLAYGAIN_ALBUM_PEAK
| |
| | ----:com.apple.iTunes:replaygain_album_peak
| |
| |replaygain_album_peak
| |
| |-
| |
| |v16
| |
| |MUSICBRAINZ_ARTISTID
| |
| |MUSICBRAINZ ARTIST ID
| |
| |MUSICBRAINZ_ARTISTID
| |
| | ----:com.apple.iTunes:MusicBrainz Artist Id
| |
| |MusicBrainz/Artist Id
| |
| |-
| |
| |v16
| |
| |MUSICBRAINZ_ALBUMARTISTID
| |
| |MUSICBRAINZ ALBUM ARTIST ID
| |
| |MUSICBRAINZ_ALBUMARTISTID
| |
| | ----:com.apple.iTunes:MusicBrainz Album Artist Id
| |
| |MusicBrainz/Album Artist Id
| |
| |-
| |
| |v16
| |
| |MUSICBRAINZ_ALBUMARTIST
| |
| |MUSICBRAINZ ALBUM ARTIST
| |
| |MUSICBRAINZ_ALBUMARTIST
| |
| | ----:com.apple.iTunes:MusicBrainz Album Artist
| |
| |MusicBrainz/Album Artist
| |
| |-
| |
| |v16
| |
| |MUSICBRAINZ_ALBUMID
| |
| |MUSICBRAINZ ALBUM ID
| |
| |MUSICBRAINZ_ALBUMID
| |
| | ----:com.apple.iTunes:MusicBrainz Album Id
| |
| |MusicBrainz/Album Id
| |
| |-
| |
| |v16
| |
| |MUSICBRAINZ_TRACKID
| |
| |UFID
| |
| |MUSICBRAINZ_TRACKID
| |
| | ----:com.apple.iTunes:MusicBrainz Track Id
| |
| |
| |
| |-
| |
| |v16
| |
| |RATING
| |
| |POPM
| |
| |
| |
| |
| |
| |
| |
| |-
| |
| |v16
| |
| |METADATA_BLOCK_PICTURE or COVERART or COVERARTMIME
| |
| |APIC
| |
| |
| |
| |covr
| |
| |WM/Picture
| |
| |-
| |
| |v17
| |
| |COMPOSER
| |
| |TCOM
| |
| |COMPOSER
| |
| |\251wrt
| |
| |WM/Composer
| |
| |-
| |
| |v17
| |
| |CONDUCTOR
| |
| |TPE3
| |
| |CONDUCTOR
| |
| | ----:com.apple.iTunes:CONDUCTOR
| |
| |WM/Conductor
| |
| |-
| |
| |v17
| |
| |LYRICIST
| |
| |TEXT
| |
| |LYRICIST
| |
| | ----:com.apple.iTunes:LYRICIST
| |
| |WM/Writer
| |
| |-
| |
| |v17
| |
| |REMIXER or MIXARTIST
| |
| |TPE4
| |
| |REMIXER or MIXARTIST
| |
| | ----:com.apple.iTunes:REMIXER
| |
| |WM/ModifiedBy
| |
| |-
| |
| |v17
| |
| |ENSEMBLE
| |
| |(TIPL) or TXXX:Ensemble
| |
| |ENSEMBLE
| |
| |
| |
| |
| |
| |-
| |
| |v17
| |
| |ARRANGER
| |
| |(TIPL)
| |
| |ARRANGER
| |
| |
| |
| |
| |
| |-
| |
| |v17
| |
| |ENGINEER
| |
| |(TIPL)
| |
| |ENGINEER
| |
| | ----:com.apple.iTunes:ENGINEER
| |
| |WM/Engineer
| |
| |-
| |
| |v17
| |
| |PRODUCER
| |
| |(TIPL)
| |
| |PRODUCER
| |
| | ----:com.apple.iTunes:PRODUCER
| |
| |WM/Producer
| |
| |-
| |
| |v17
| |
| |DJMIXER
| |
| |(TIPL)
| |
| |DJMIXER
| |
| | ----:com.apple.iTunes:DJMIXER
| |
| |WM/DJMixer
| |
| |-
| |
| |v17
| |
| |MIXER
| |
| |(TIPL)
| |
| |MIXER
| |
| | ----:com.apple.iTunes:MIXER
| |
| |WM/Mixer
| |
| |-
| |
| |v17
| |
| |PERFORMER
| |
| |TMCL
| |
| |PERFORMER
| |
| |
| |
| |
| |
| |
| |
| |-
| |
| |v17
| |
| |LABEL
| |
| |TPUB
| |
| |LABEL
| |
| | ----:com.apple.iTunes:LABEL
| |
| |WM/Publisher
| |
| |-
| |
| |v17
| |
| |RELEASETYPE
| |
| |MUSICBRAINZ ALBUM TYPE
| |
| |MUSICBRAINZ_ALBUMTYPE
| |
| | ---:com.apple.iTunes:MusicBrainz Album Type
| |
| |MusicBrainz/Album Type
| |
| |}
| |
| <section end="TagTable" />
| |
|
| |
|
| |
|
| |
| = References =
| |
| <references />
| |
|
| |
|
| |
|
| |
|
| {{Top}} | | {{Top}} |
|
| |
|
| <div style="{{linear-gradient|left|#f5d3ff, #12b2e7}}">{{next|[[Scraping_Music|Scraping Music]]}} </div> | | <div style="{{linear-gradient|left|#f5d3ff, #12b2e7}}">{{next|[[Artist_information_folder|Artist Information Folder]]}} </div> |
|
| |
|
|
| |
|
| {{updated|18}} | | {{updated|18}} |
| [[Category:FAQ]]
| |
| [[Category:Index]] | | [[Category:Index]] |
| [[Category:Guides]] | | [[Category:Guides]] |
| [[Category:Manual]] | | [[Category:Manual]] |
| | [[Category:Karellen]] |
| [[Category:First time user]] | | [[Category:First time user]] |
| [[Category:Music library]] | | [[Category:Music library]] |
| [[Category:Advanced topics]]
| |
| [[Category:Quick Start Guide]] | | [[Category:Quick Start Guide]] |