Adding video sources: Difference between revisions
(Add ommitted data) |
No edit summary |
||
| Line 185: | Line 185: | ||
[[Category:Guides]] | [[Category:Guides]] | ||
[[Category:Manual]] | [[Category:Manual]] | ||
[[Category:Karellen]] | |||
[[Category:Video library]] | [[Category:Video library]] | ||
[[Category:General topics]] | [[Category:General topics]] | ||
[[Category:First time user]] | [[Category:First time user]] | ||
[[Category:Quick Start Guide]] | [[Category:Quick Start Guide]] | ||
Revision as of 09:19, 6 March 2018
| Create Video Libraries |
| 1. The Basics |
| 2. Source Folder |
| 3. Movie Setup |
| 4a. TV Show Setup |
| 4b. Seasons Setup |
| 4c. Episodes Setup |
| 5. Music Videos Setup |
| 6. Add Source & Scrape |
| 7. Scraping Problems |
Introduction
The Source is the main folder on your hard drive which contains your collection of Movies or TV Shows or Music Videos or Music. These four classes of media cannot be mixed in the one Source. Once Kodi is pointed to the Source, it can perform the appropriate actions to display your media. There is no limit to the number of Sources that can be added to Kodi for each media class.
This module of the guide will enable you to complete the following actions:
- Adding Sources - Add the Source folder to Kodi
- Set Media Type - Advise Kodi what type of media is in the Source
- Scraper Settings - Advise Kodi which Information Provider (Scraper) to use and adjust the settings to your preferences
- Add to Library - Scrape (import) the media into the library
Each section is a direct continuation of the previous section, and only separated for clarity. Although the page looks complex, it is not. It is possible to perform the steps on this page in less than one minute once familiar with the process.
If you have come directly to this page without following the guide and are unsure of how to set up your Sources on your computer/NAS, skip back to Naming Video Files at the start of the guide.
UPnP does not work with the library features of Kodi (scanning data in like summaries and movie covers). It is recommended that you share your media using another protocol such as SMB
Adding Sources
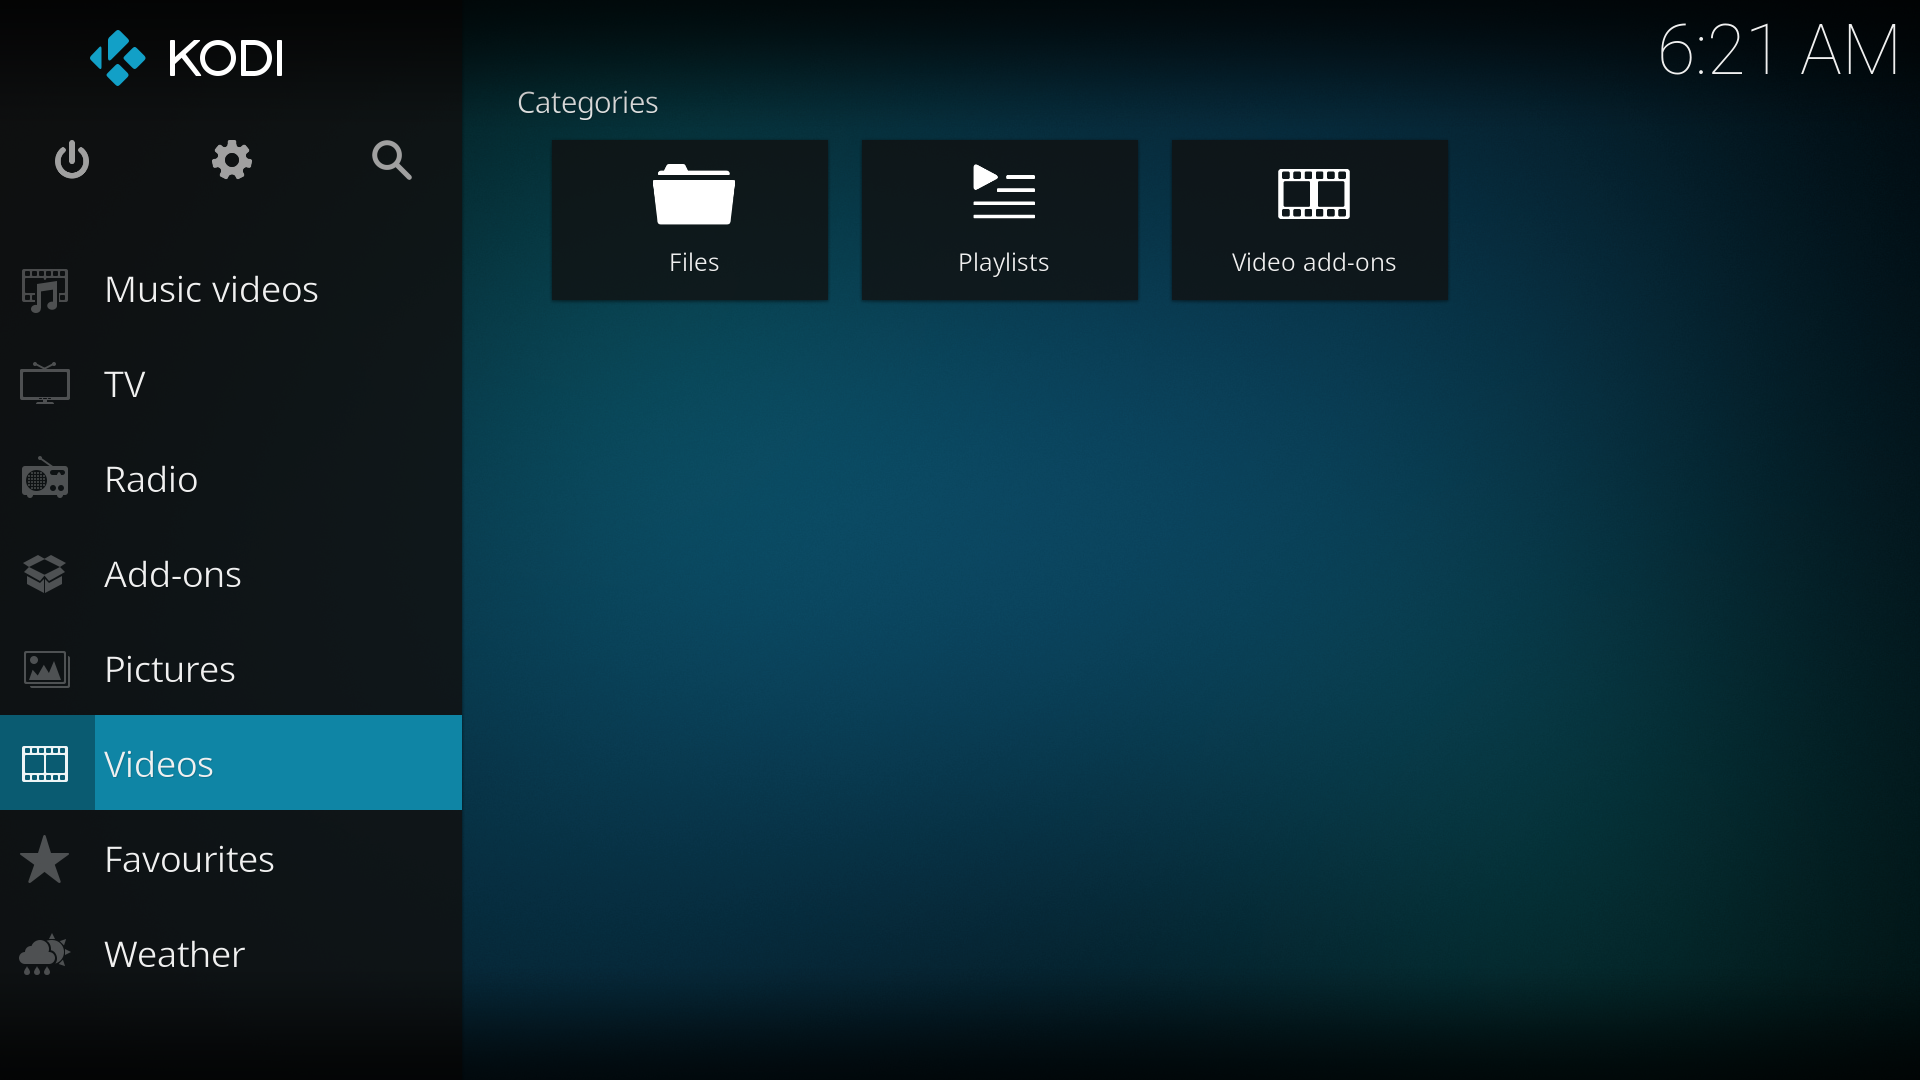
Step 1: Select VIDEOS in the home screen menu.
(Or select Enter files section if that button is visible)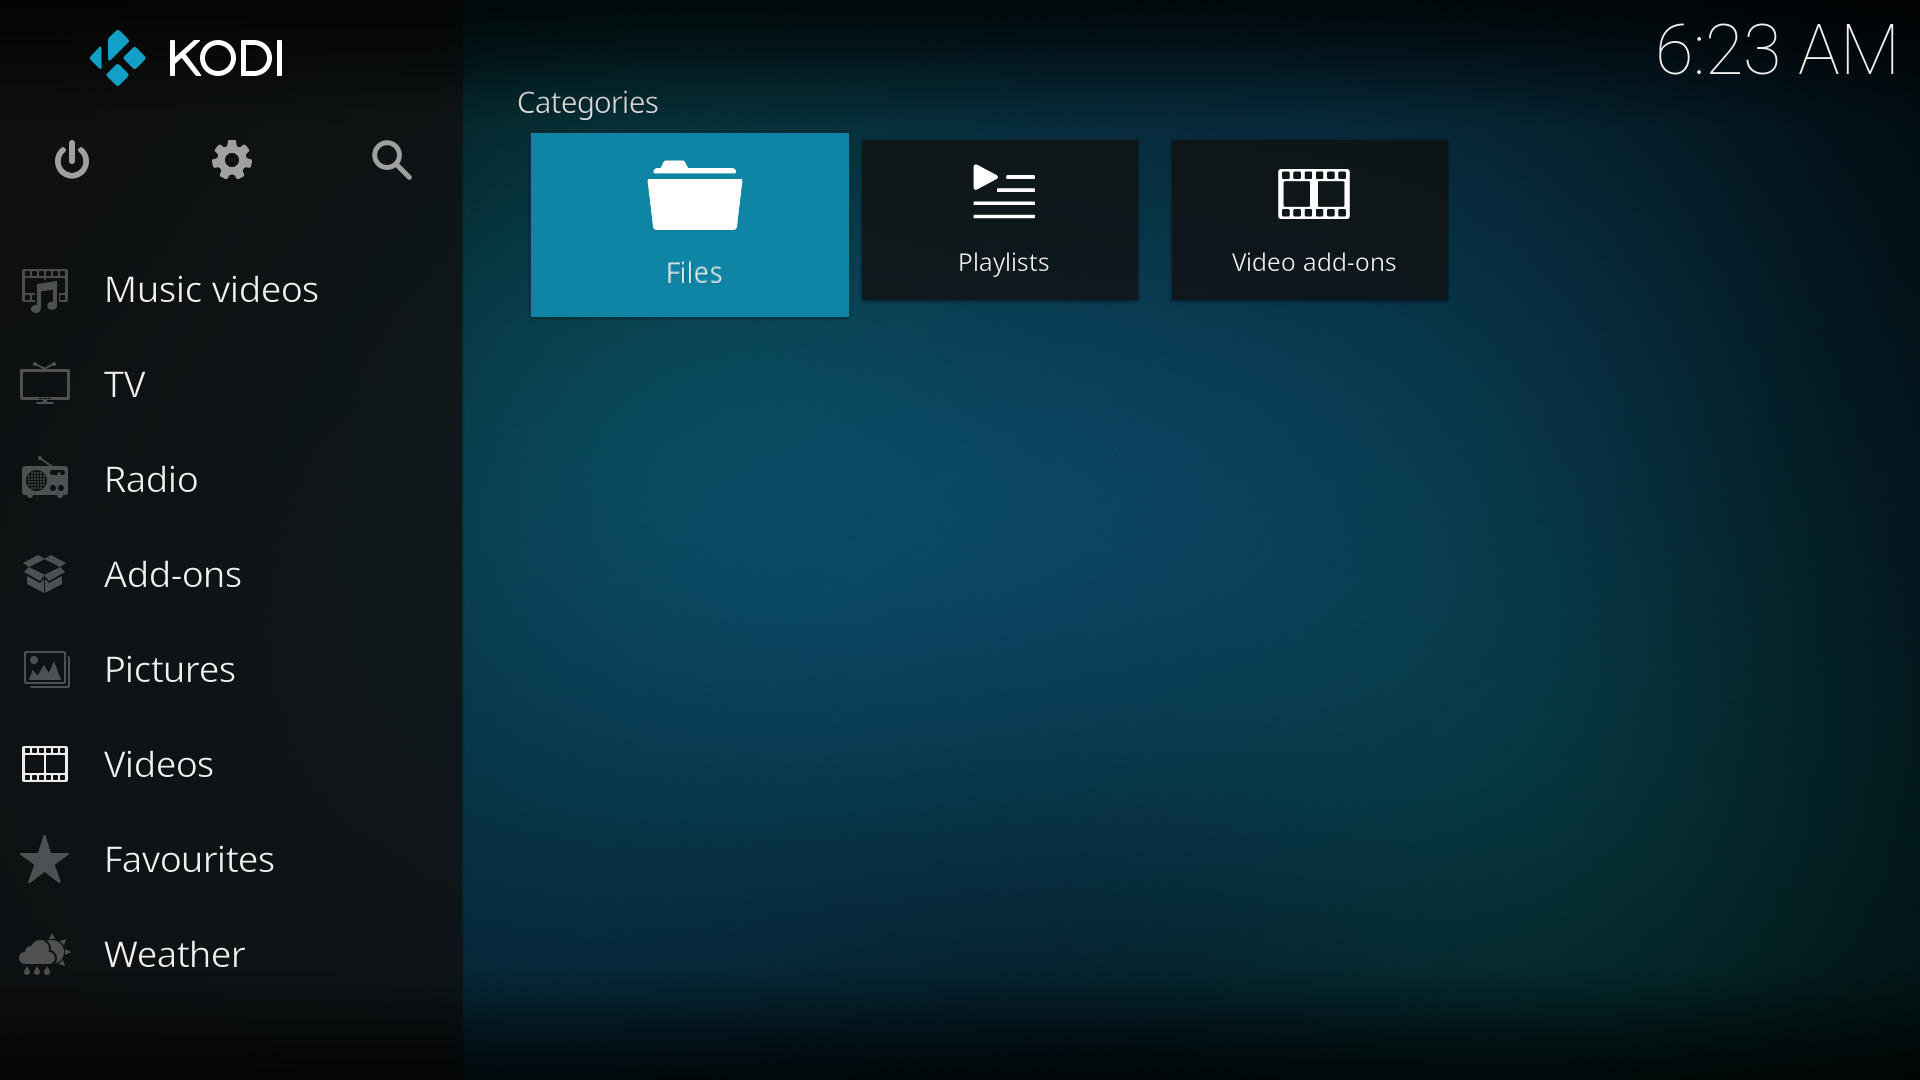
Step 2: Select FILES
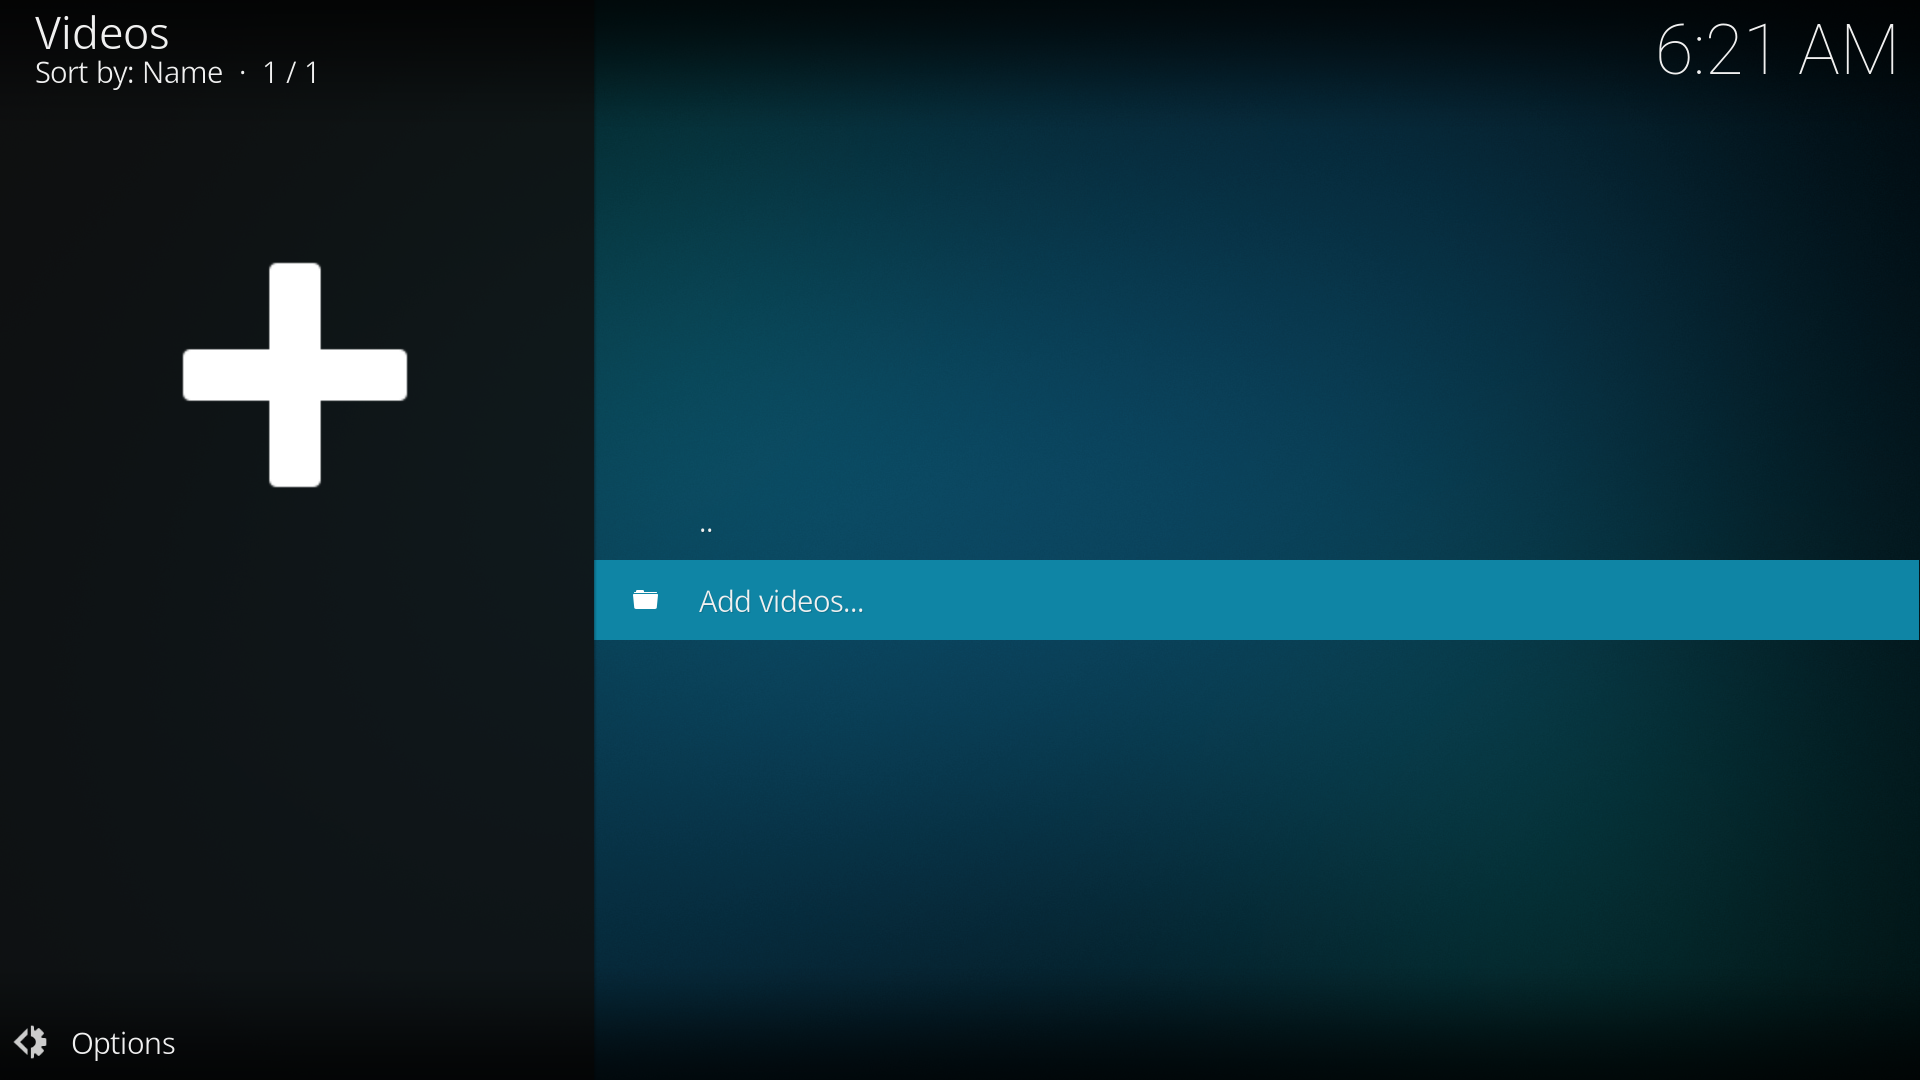
Step 3: Select ADD VIDEOS....
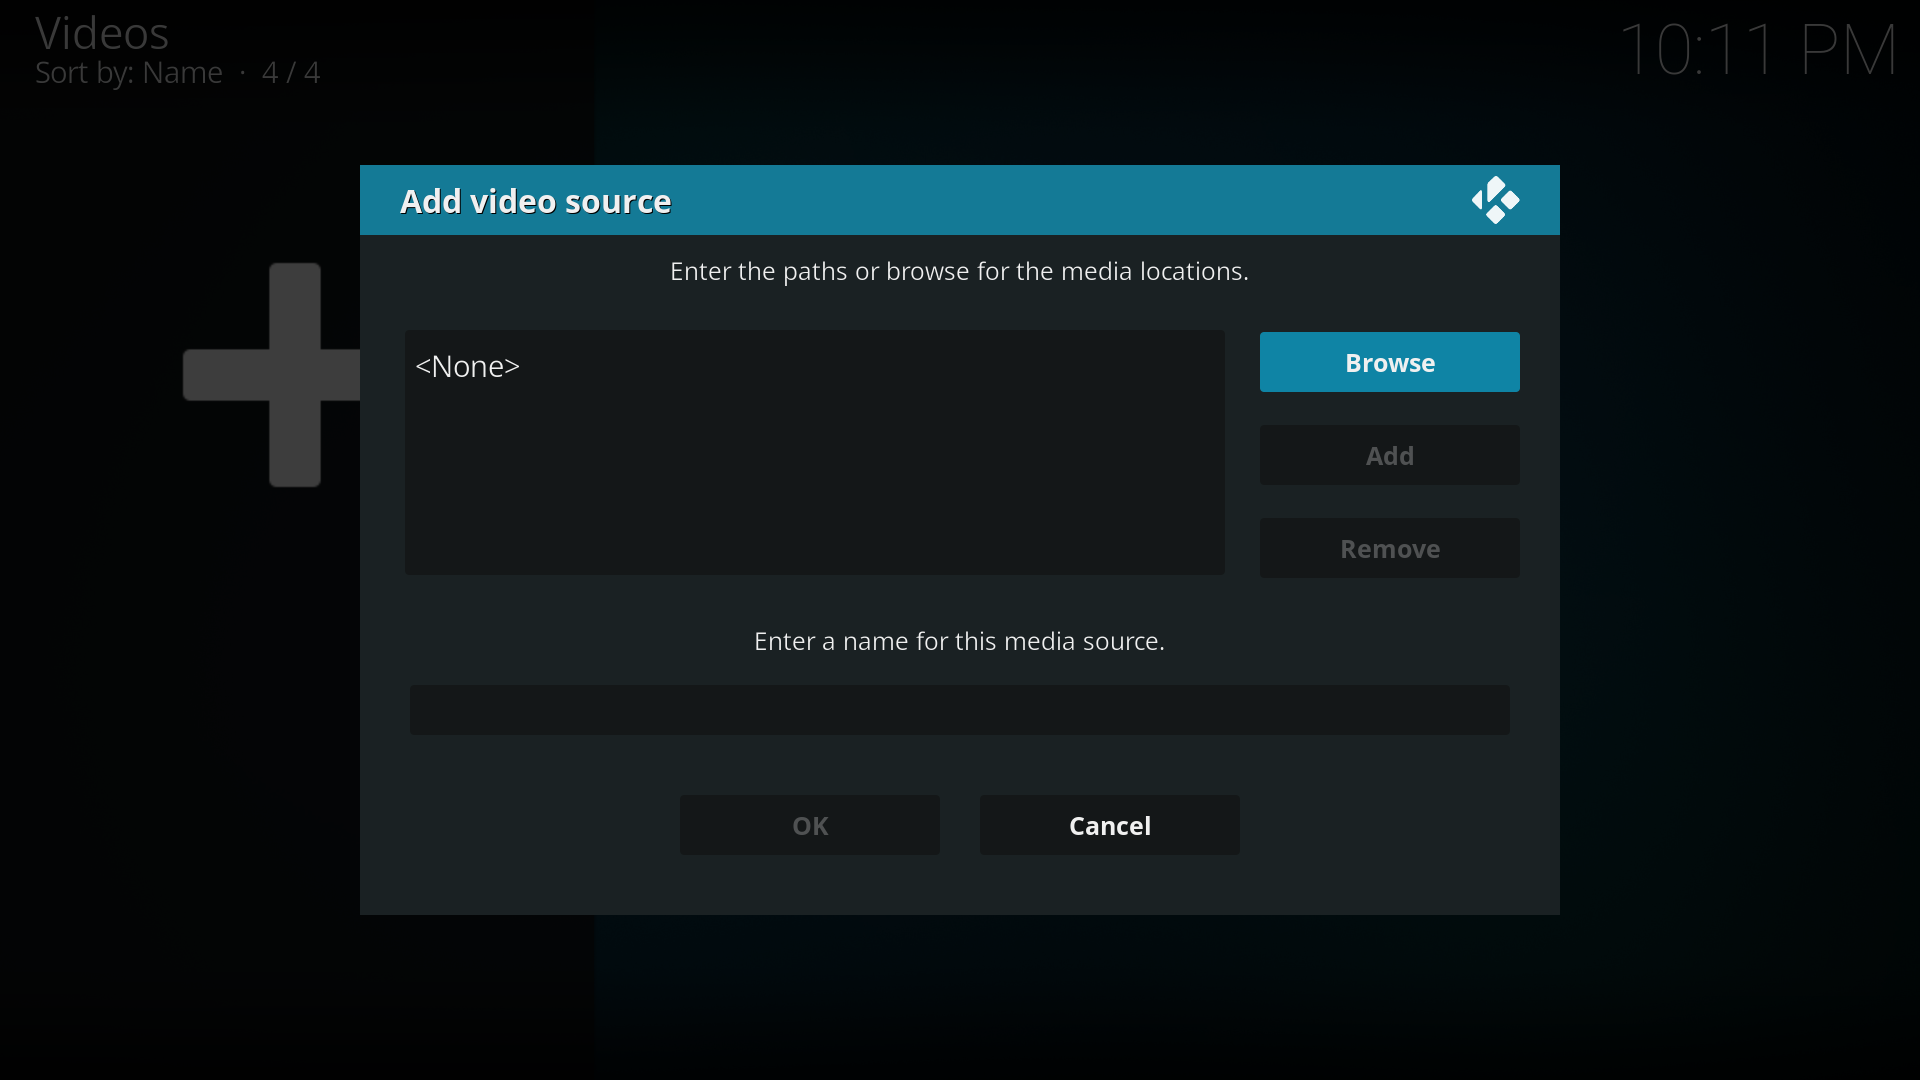
Step 4: Select the BROWSE button from the ADD VIDEO SOURCE window.
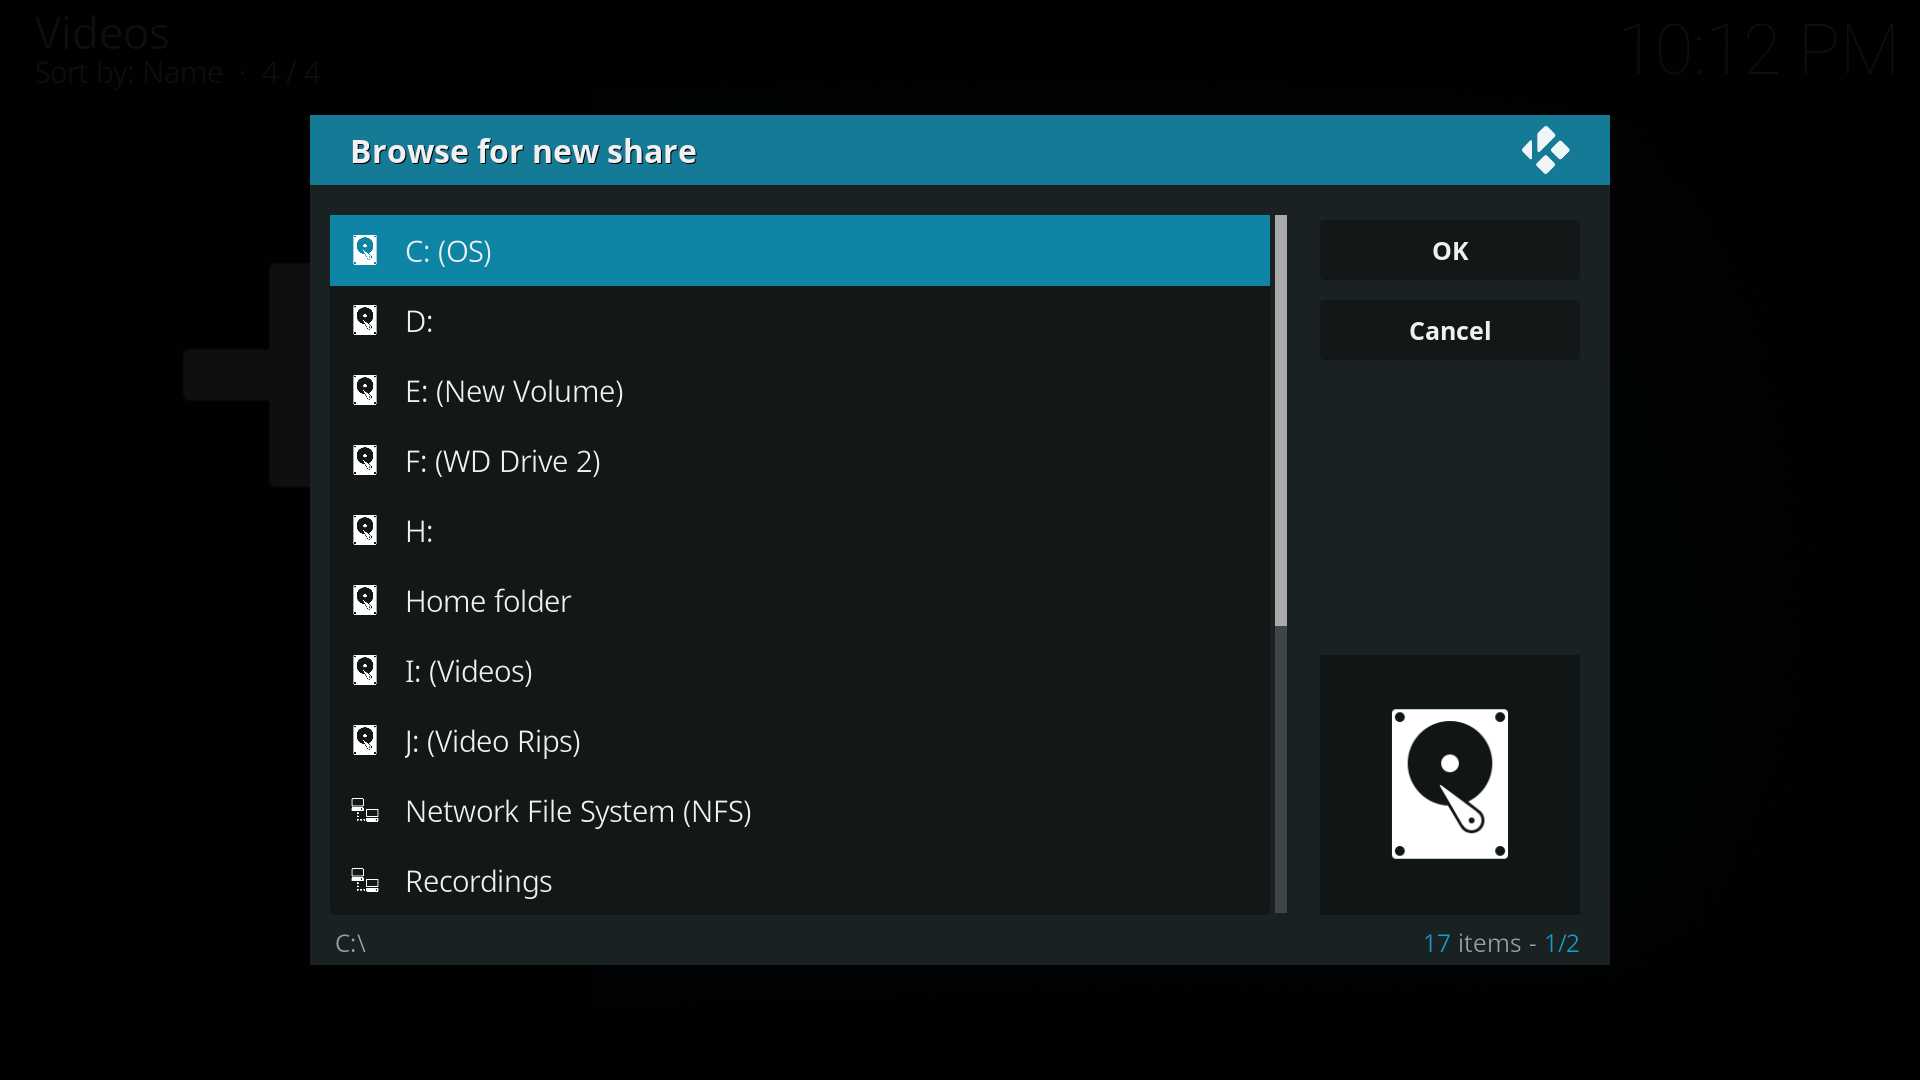
Step 5: Locate your Source folder and Enter that folder. Select OK
Note: You must Enter the source/folder for the correct path to be added.
To add Network Sources, see Section 6- Adding Remote Sources below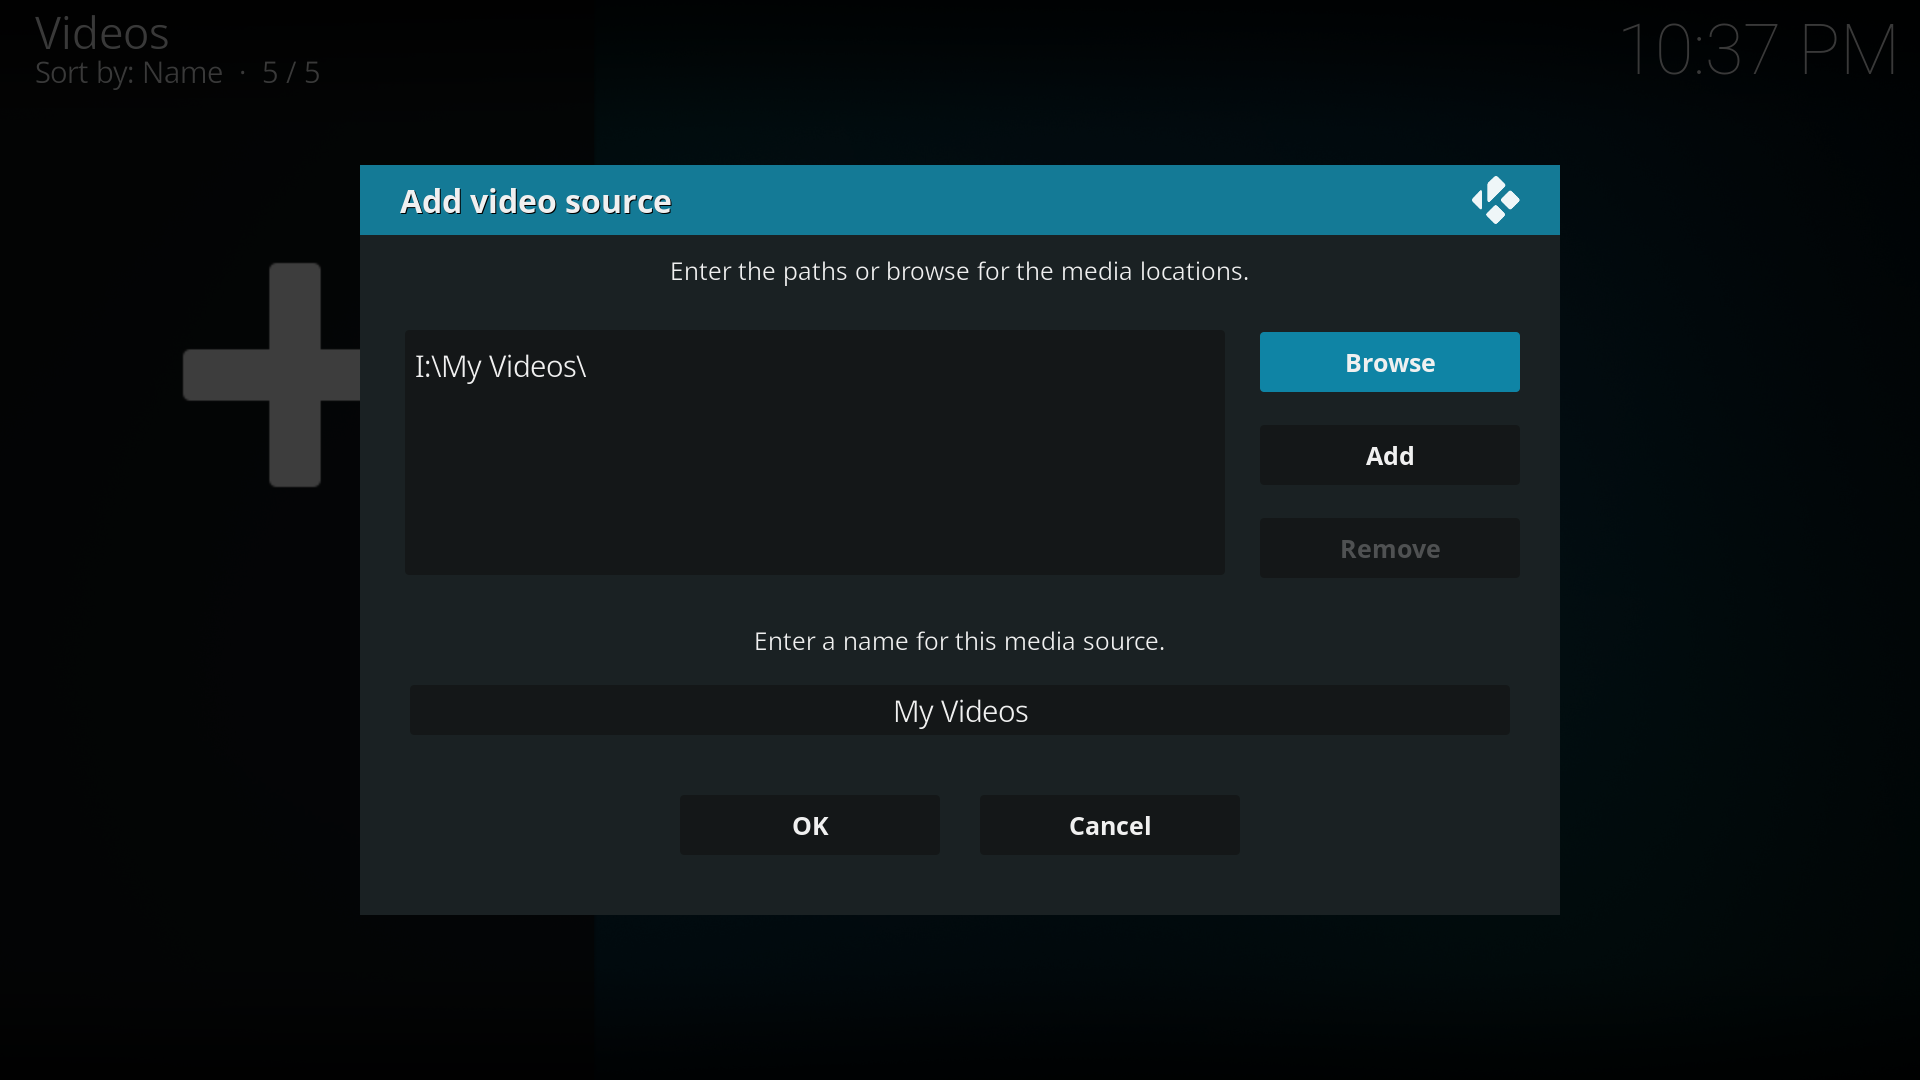
Step 6: Either use the default name or rename the Source. The name doesn't matter to Kodi, but keep the names unique for ease of maintenance. Then select OK.


Set Media Type
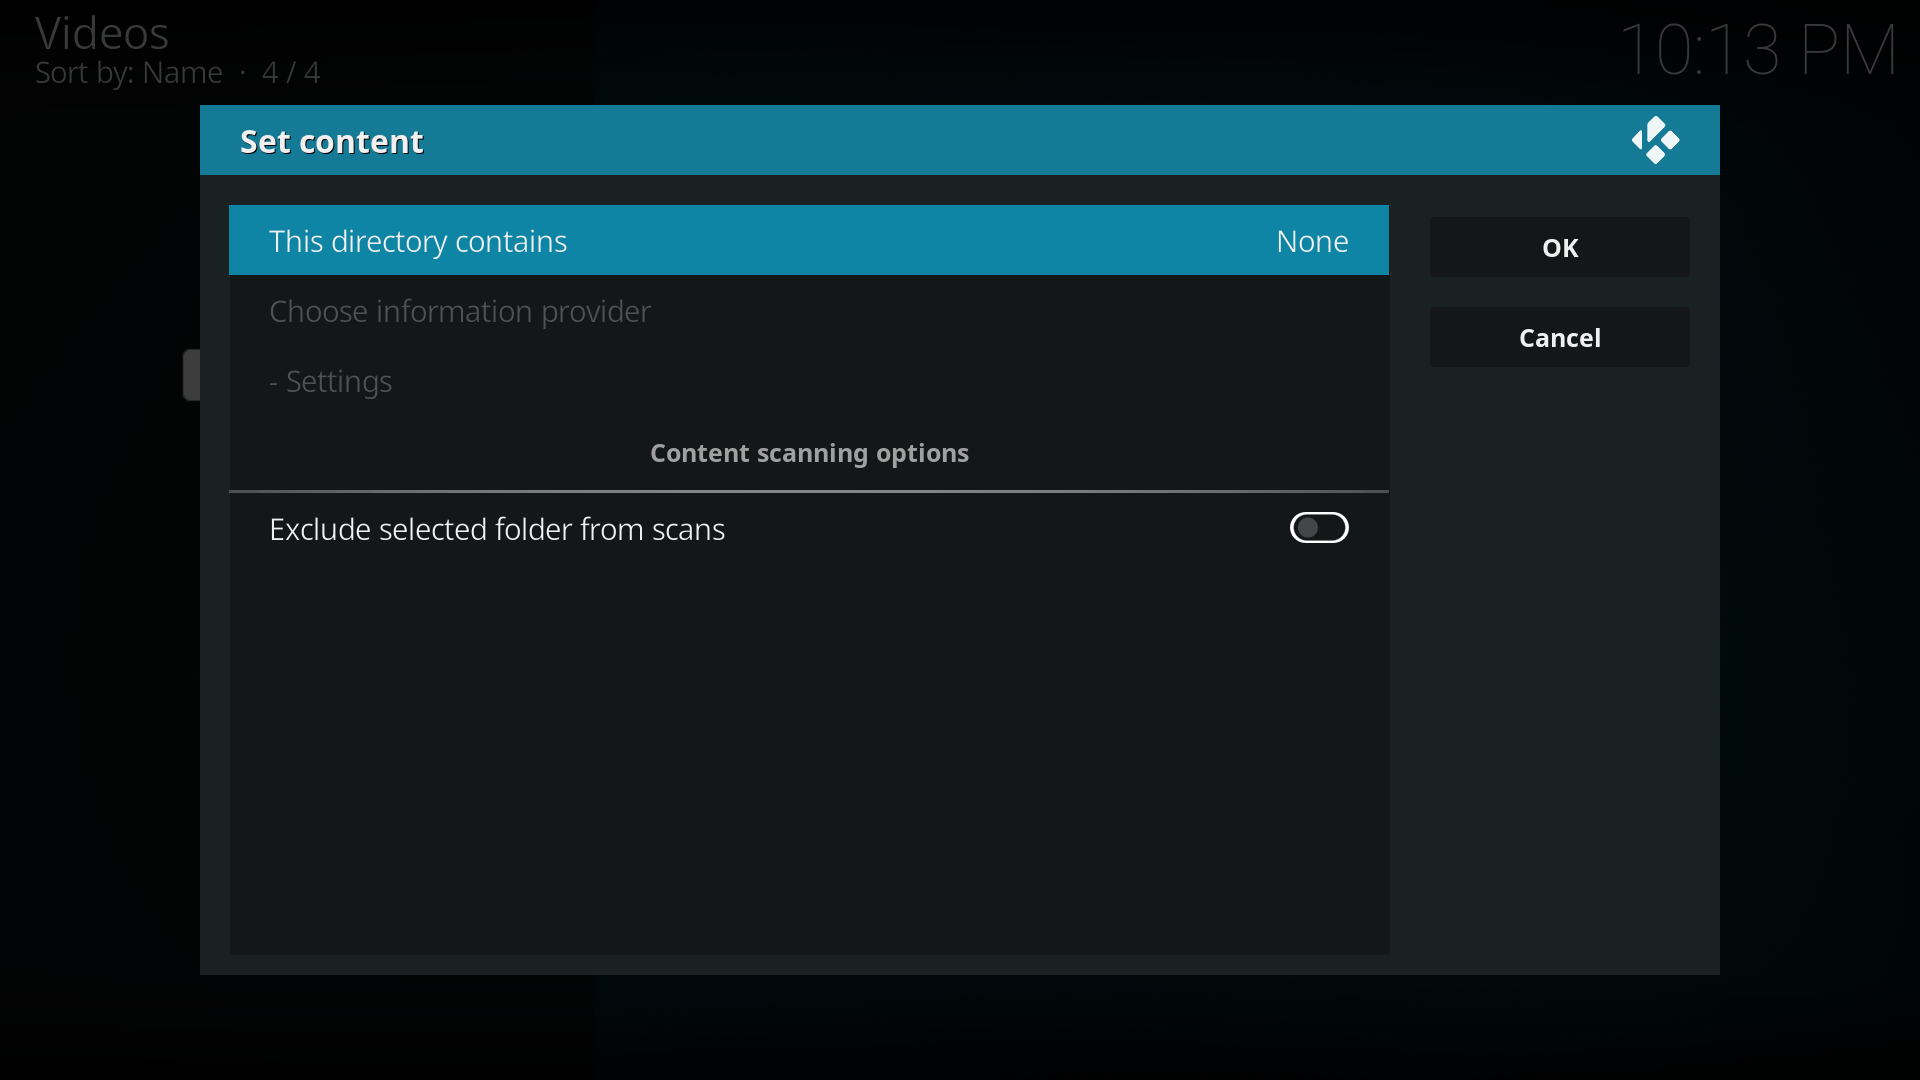
Step 7: The set content window will display. This is where the media type is set. Select This directory contains.

Step 8: Select the type of media that is in the Source that is to be added to the library.


Scraper Settings
The left image is the Set Content screen for Movies. The right image is the Set Content screen for TV Shows. Select the appropriate one, not both.
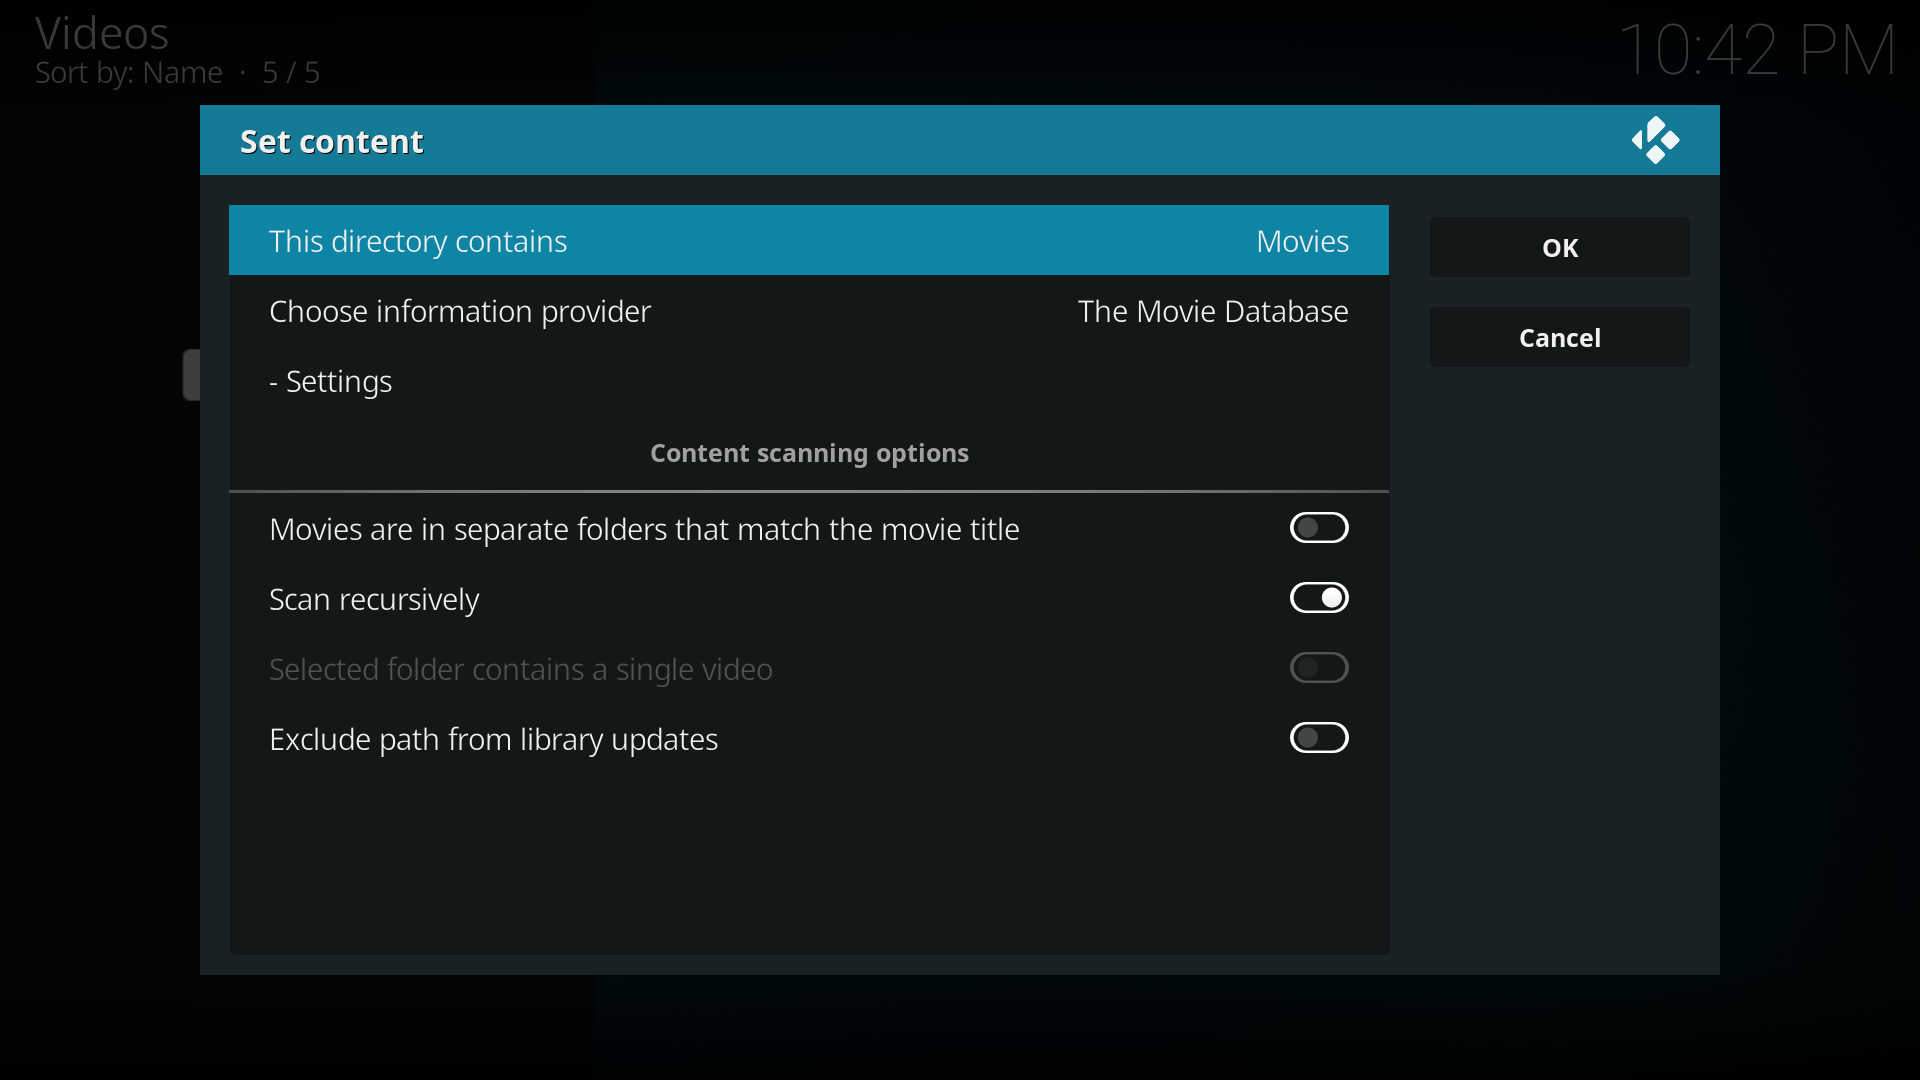
Step 9a: Select Choose information provider.
Use The Movie Database for movies (automatically selected)
For the remaining settings see Movies- Content scanning options below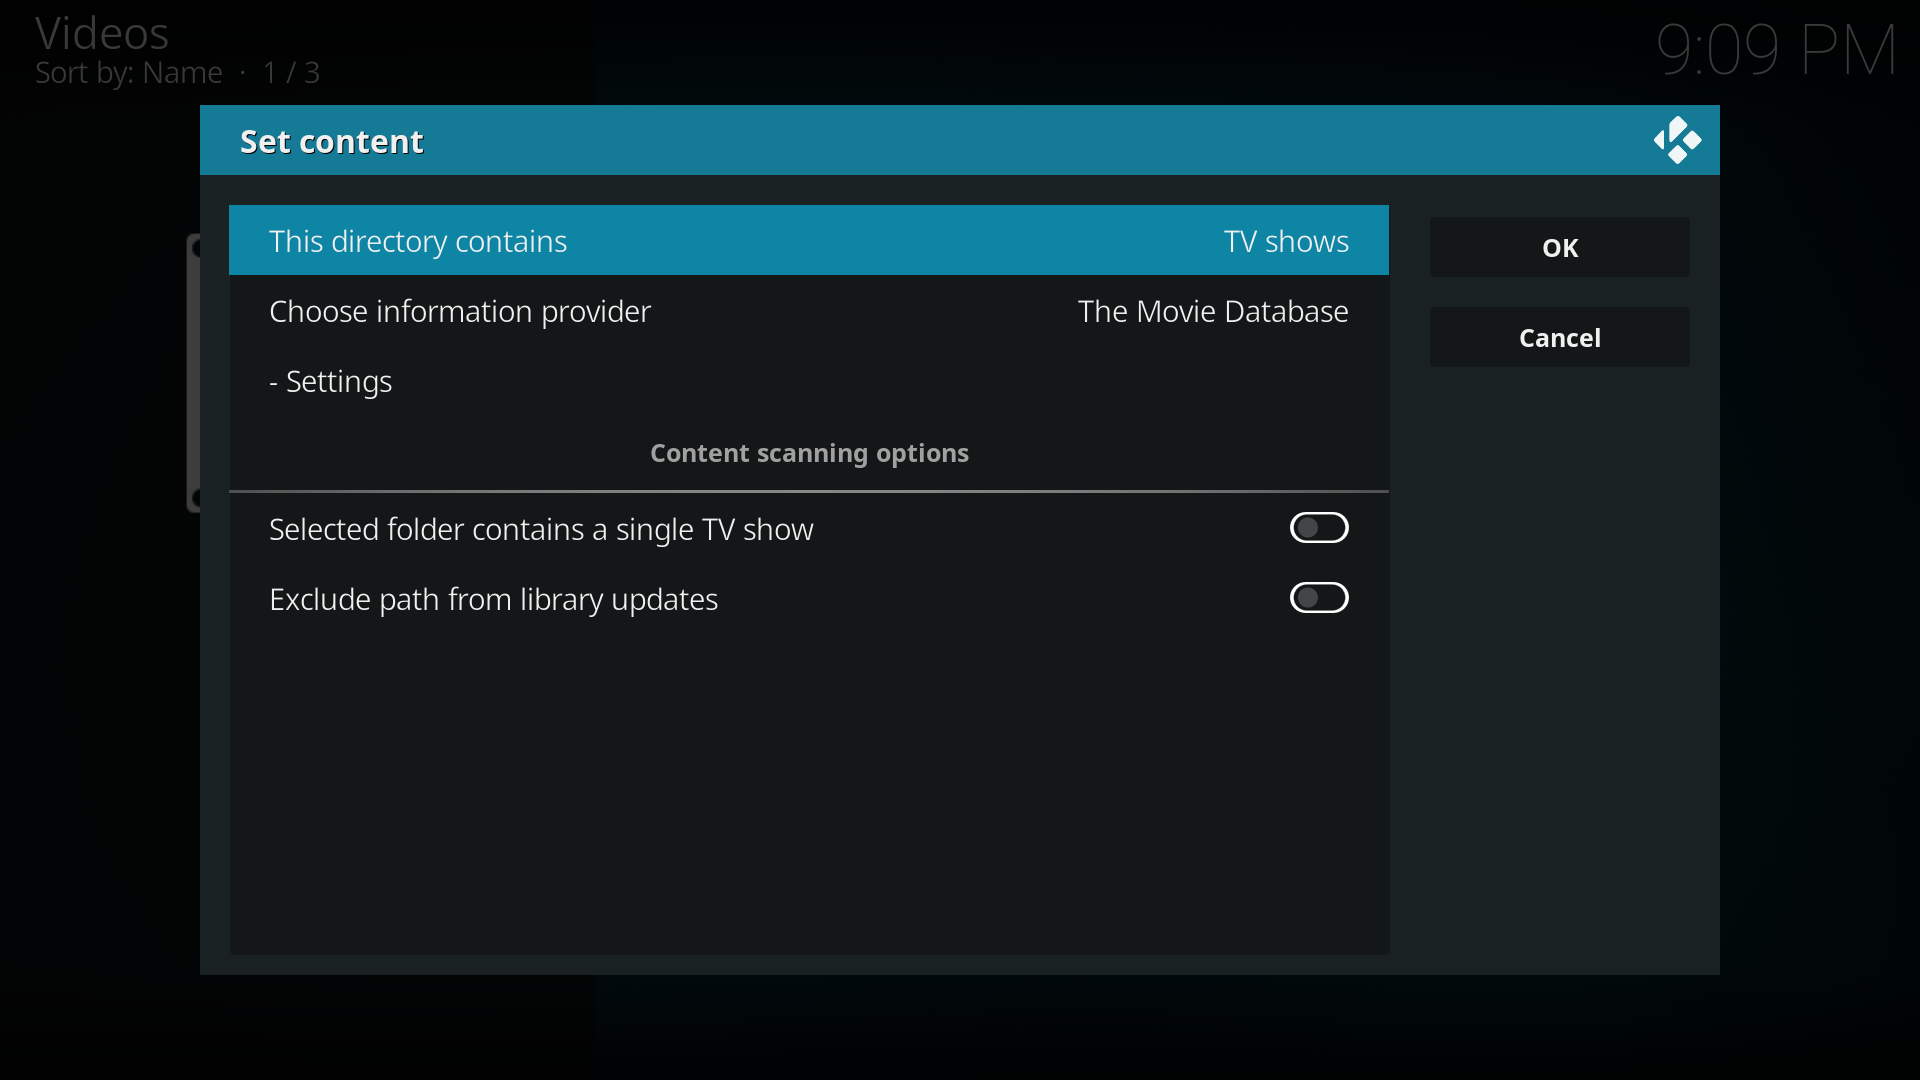
Step 9b: Select Choose information provider.
Use The TVDB for TV Shows (automatically selected)
For the remaining settings see TV Show- Content scanning options below


- Movies- Content scanning options
- Movies are in separate folders that match the movie title
- If Enabled Kodi will use the folder name to scrape the movie
- If Disabled Kodi will use the filename to scrape the movie
- Scan Recursively
- Used for deep folder structures such as when additional Genre or Movie Set folders are used. Will allow the video scanner to search deeper to find the playable file
- Selected folder contains a single video
- Normally greyed out unless you have selected a single movie folder within an existing source. It allows you to change the Content settings for a particular movie without affecting the entire Source
- Exclude path from library updates
- Prevents the Source from being scanned when an Update Library is running
- TV Show- Content scanning options
- Selected folder contains a single TV show
- Allows you to change the Content settings for a particular TV Show without affecting the entire Source
- Exclude path from library updates
- Prevents the Source from being scanned when an Update Library is running
Alternate scrapers are available, and can be installed using the Get More button from the Choose information provider screen in Step 9 (not pictured). Only change the default scraper if you have a particular reason to.
Movies
From Step 9a above select Settings to access the settings page for the scraper
Add-on:The MovieDB
Press OK to accept the changes. The screen in Step 10 will be offered
TV Shows
From Step 9b above select Settings to access the settings page for the scraper

Note: When DVD Order and Absolute Order are disabled, Aired Order will be used.
- Use DVD order
- Uses the episode order on the DVD/Bluray instead of the Aired Order.
- Note: If no DVD Order details exist for the TV Show, the scraper will fall back to using Aired Order.
- Use absolute ordering (single season)
- Treat show as having only one season so that file names only require episode numbers. Often used for single series and anime. S
- Note: The Absolute Order data for the TV Show must exist at the TVDB in order to use this. There is no fallback when using this option and missing data means this show will not scrape.
- Enable fanart
- Download Fanart or not.
- Language
- Language to use for summaries and other metadata.
Press OK to accept the changes. The screen in Step 10 will be offered
Add to Library
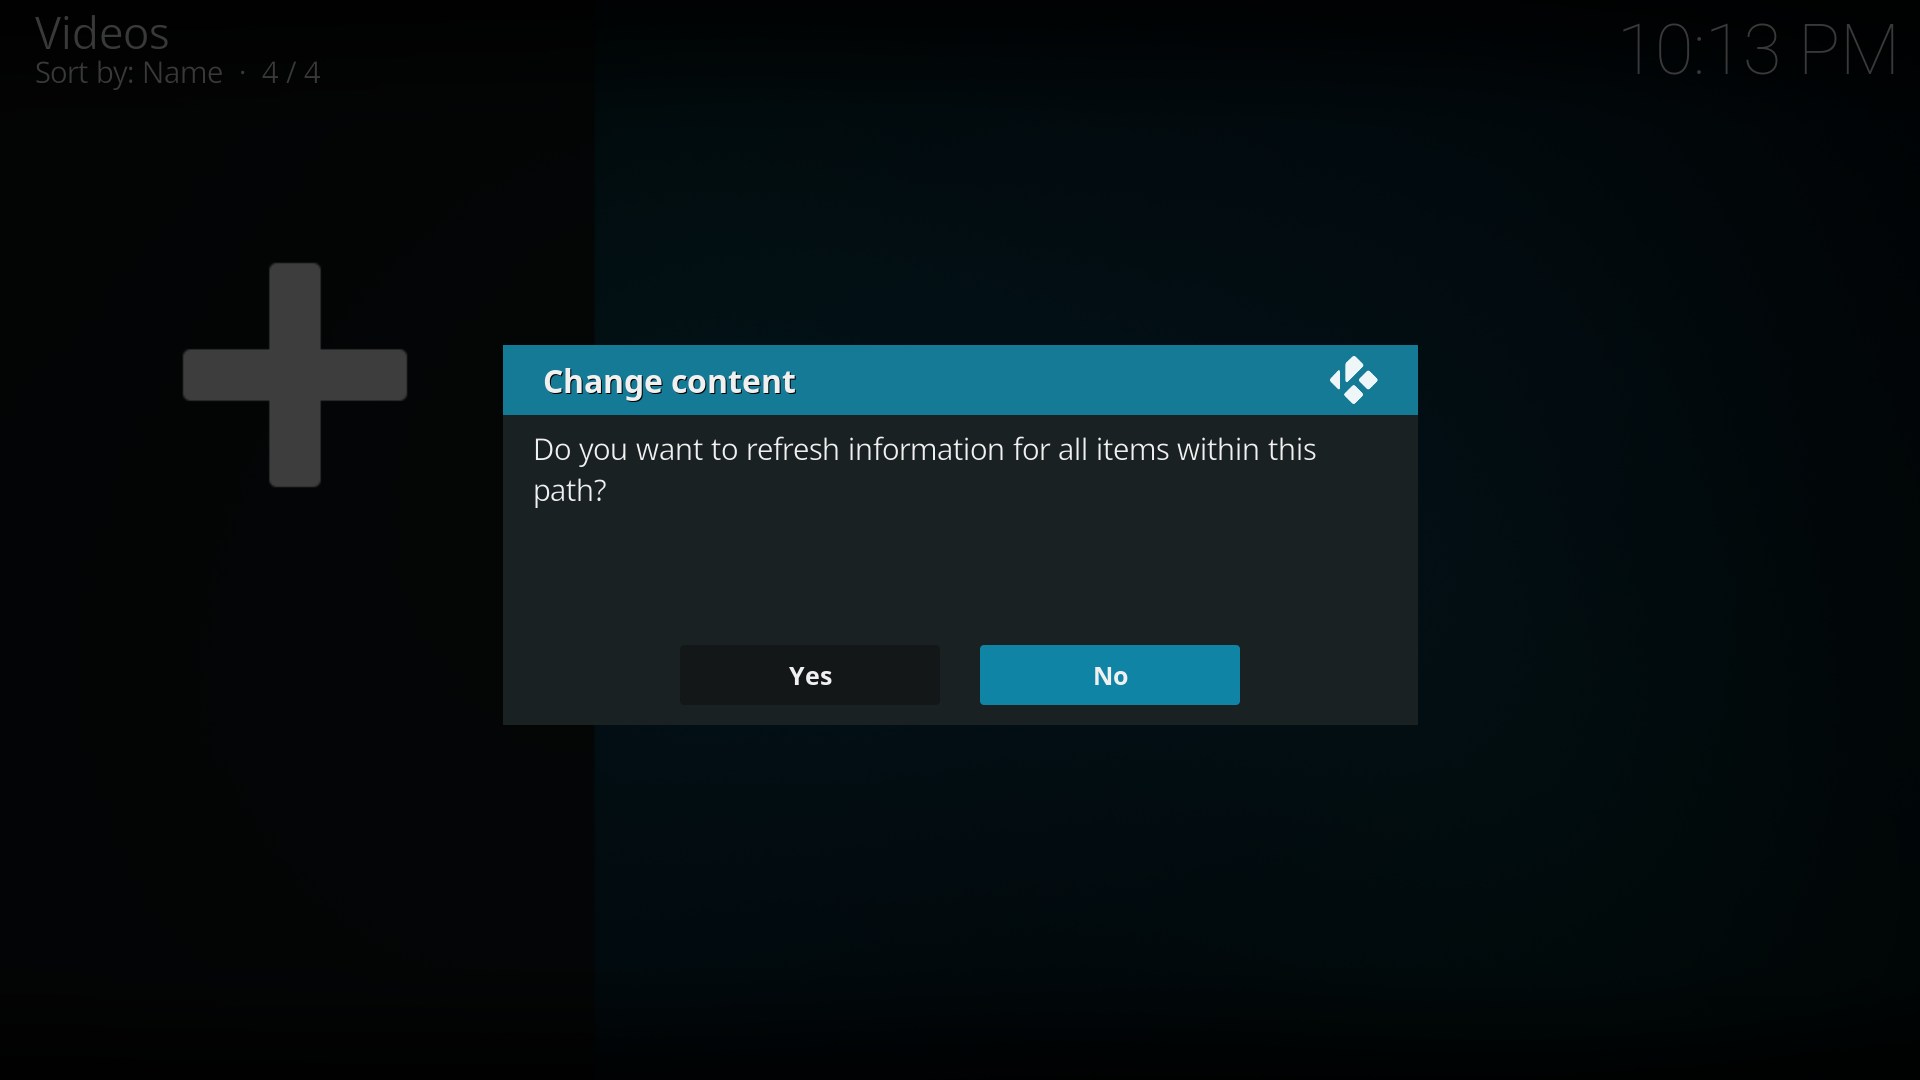
Step 10: Press Yes to scrape the content to the library
(if No is pressed, it can be scanned later via the Source Context Menu).

Once you press Yes, Kodi will scan your library and attempt to match each title in your library to the title at the site of the Information Provider. If a match is found, the metadata and artwork is downloaded and used for the library display. Depending upon the size of your library, this could take some time. A single movie could take approx 30 seconds, a library of 400 movies could take over an hour.
When the scraping process is complete, be sure to check the Event Log to view any titles that were not added to the library, which is normally due to incorrect naming. See... Scraping Problems
The remainder of this page deals with Special Use cases and can be safely ignored.
| Return to top |
|---|
Adding Remote sources
For details on the supported protocols and configuration
- See: File sharing
Follow the steps (above) for adding a source, but when you get to the 'browse' section (step 4 & 5), you need to do one of the following:
If your remote device is visible from one of the existing choices (e.g 'Network File system' , 'UPnP Devices' etc)
- Select a remote location, and you should be able to browse to the remote server.
If the device is not visible, or
- It is a remote NAS
- It is an SMB server
You will need to add a new network location:
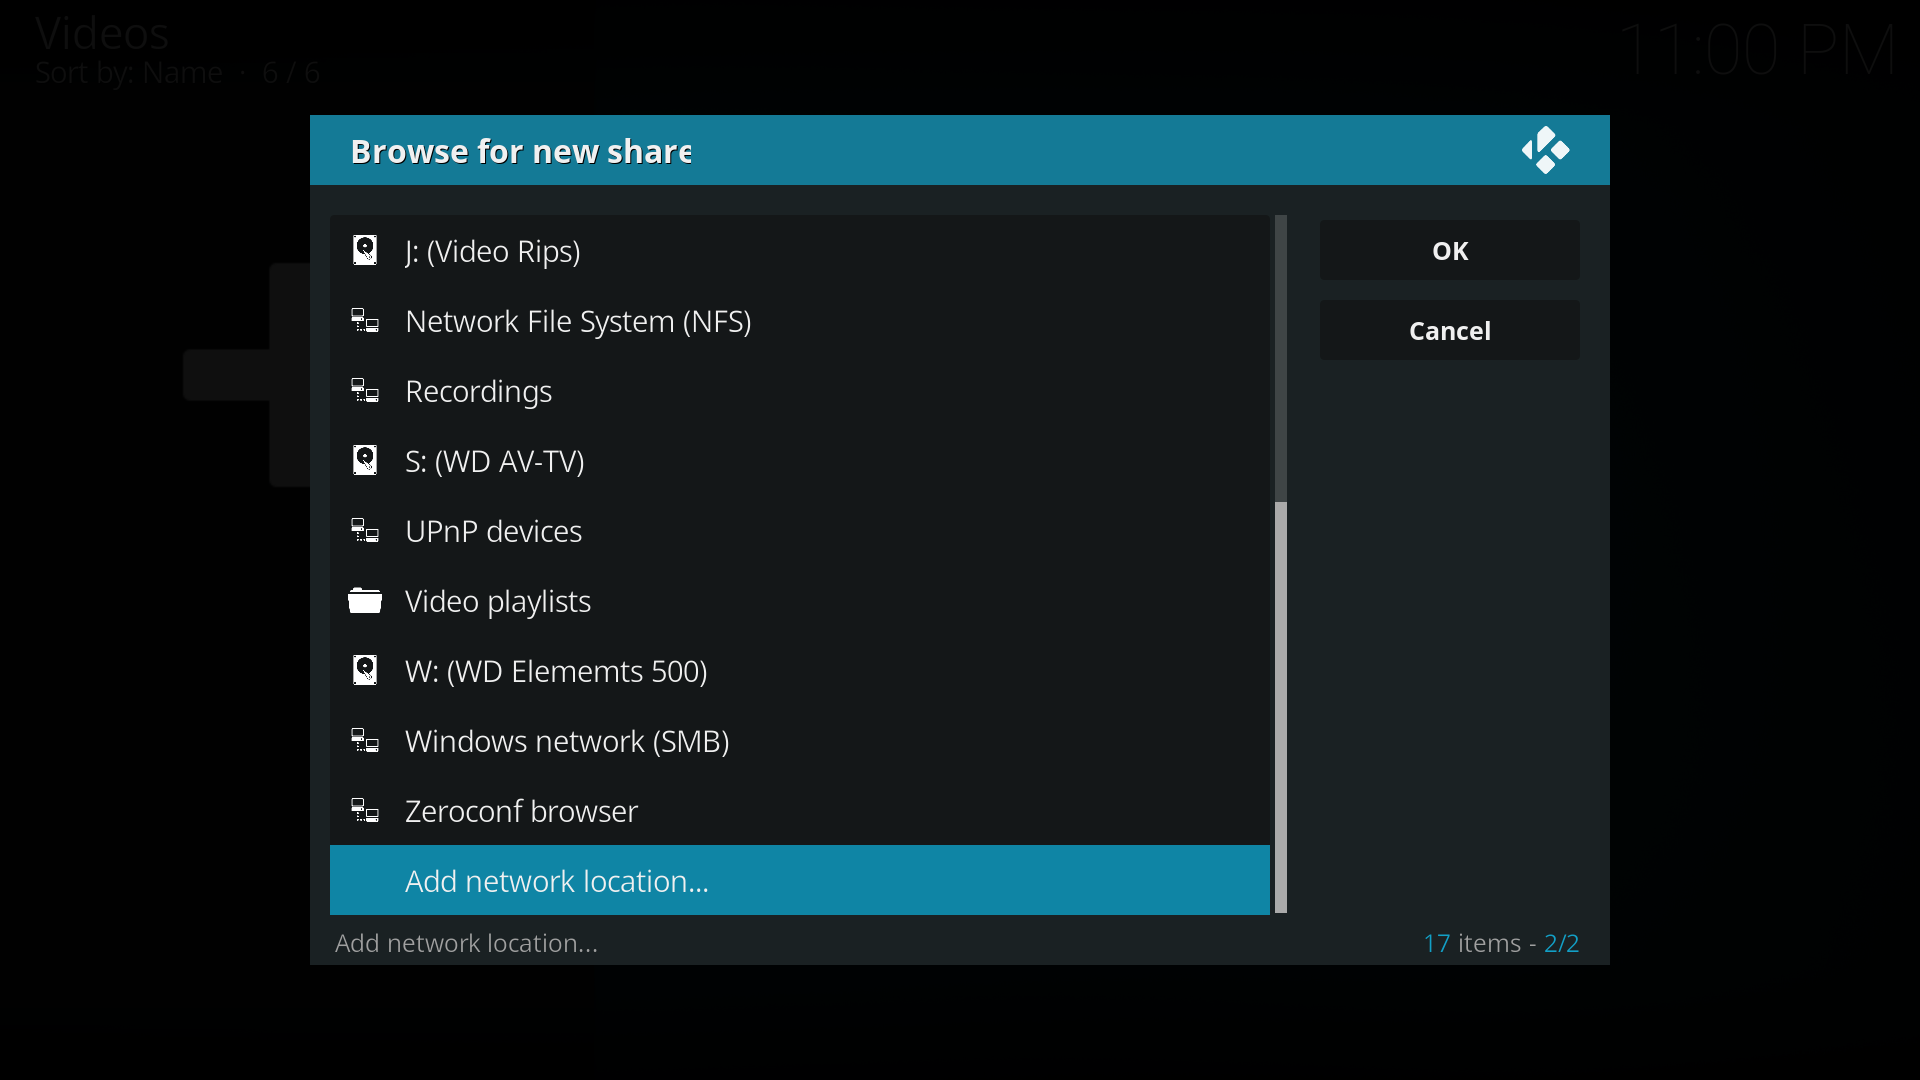
Select Add network location... from the Browse for new shares' list.

In the new window select the correct Protocol for your Network Share, then select Server Name.
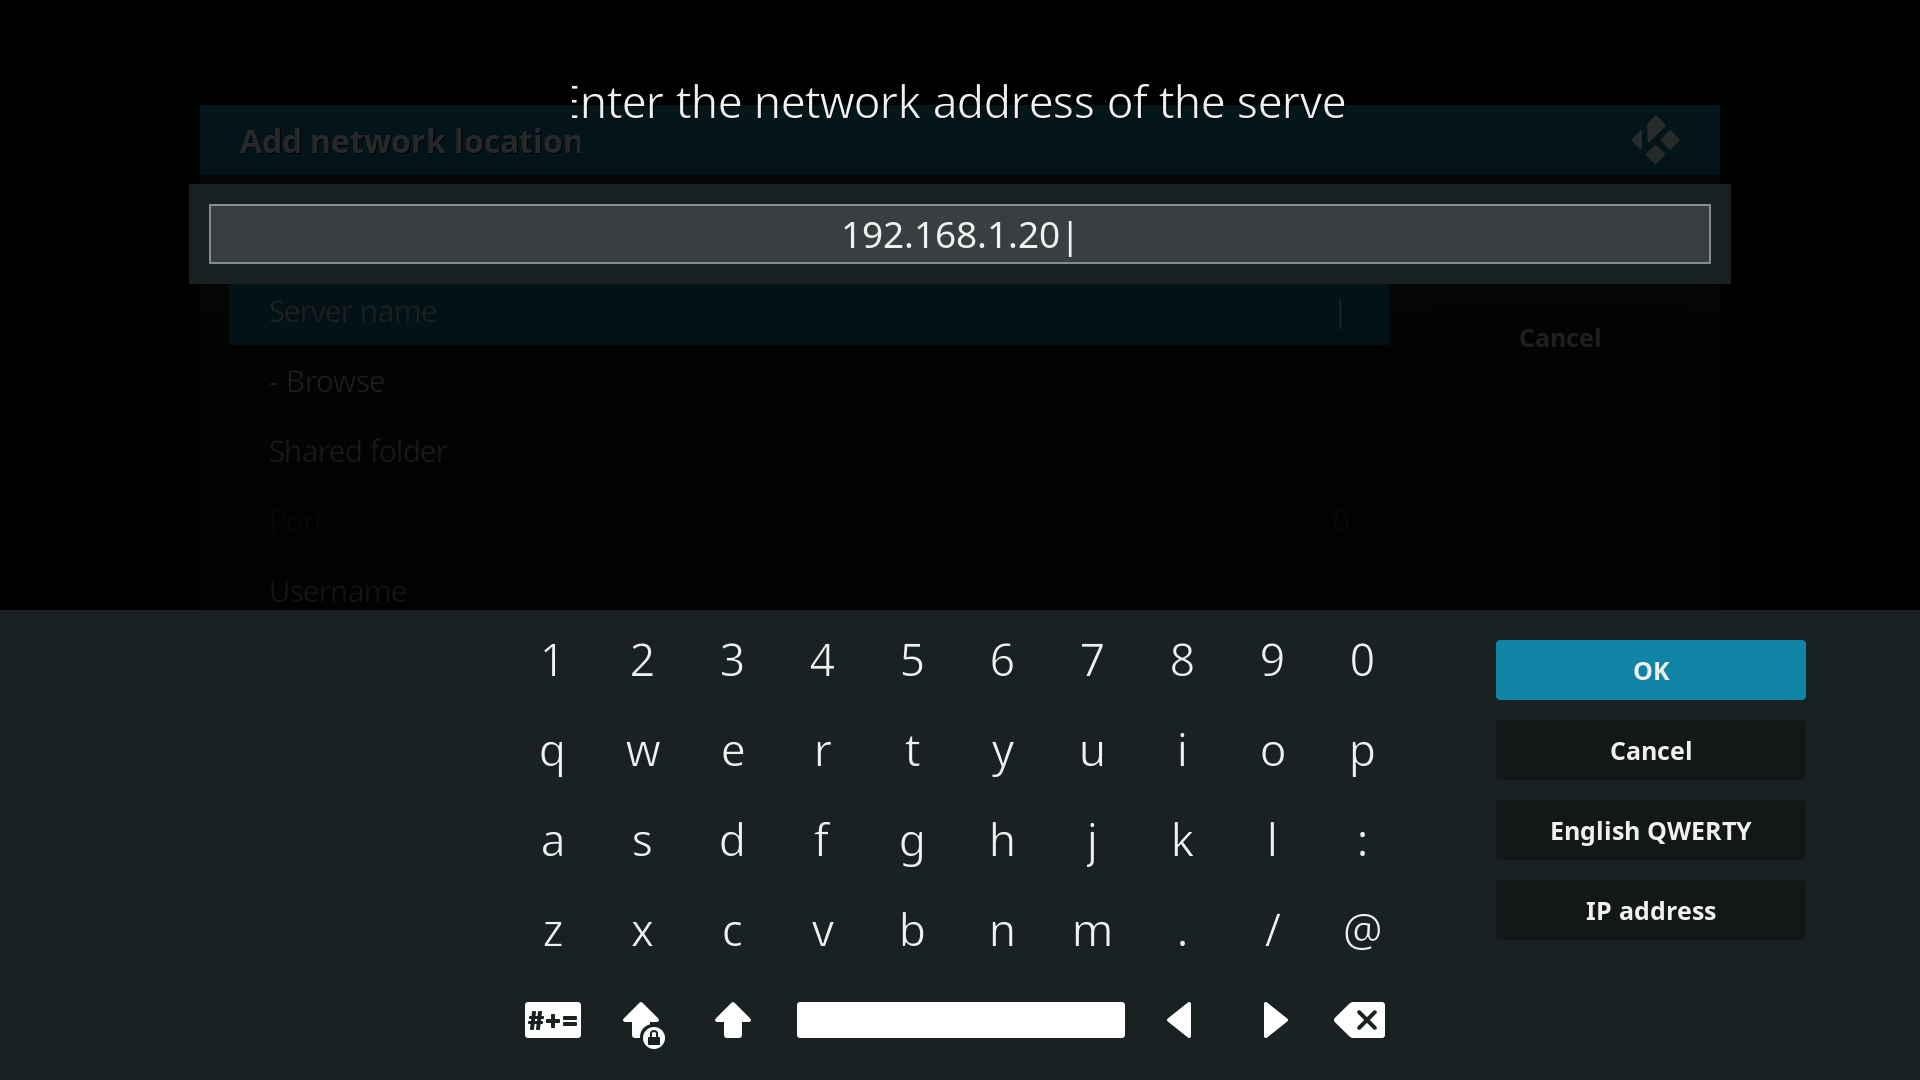
Type in either the IP Address or the Device name of your server. Note: if you use a dynamic IP for your NAS you could lose access to your shares if the IP changes. It is recommended that you use a static IP if adding your share this way.
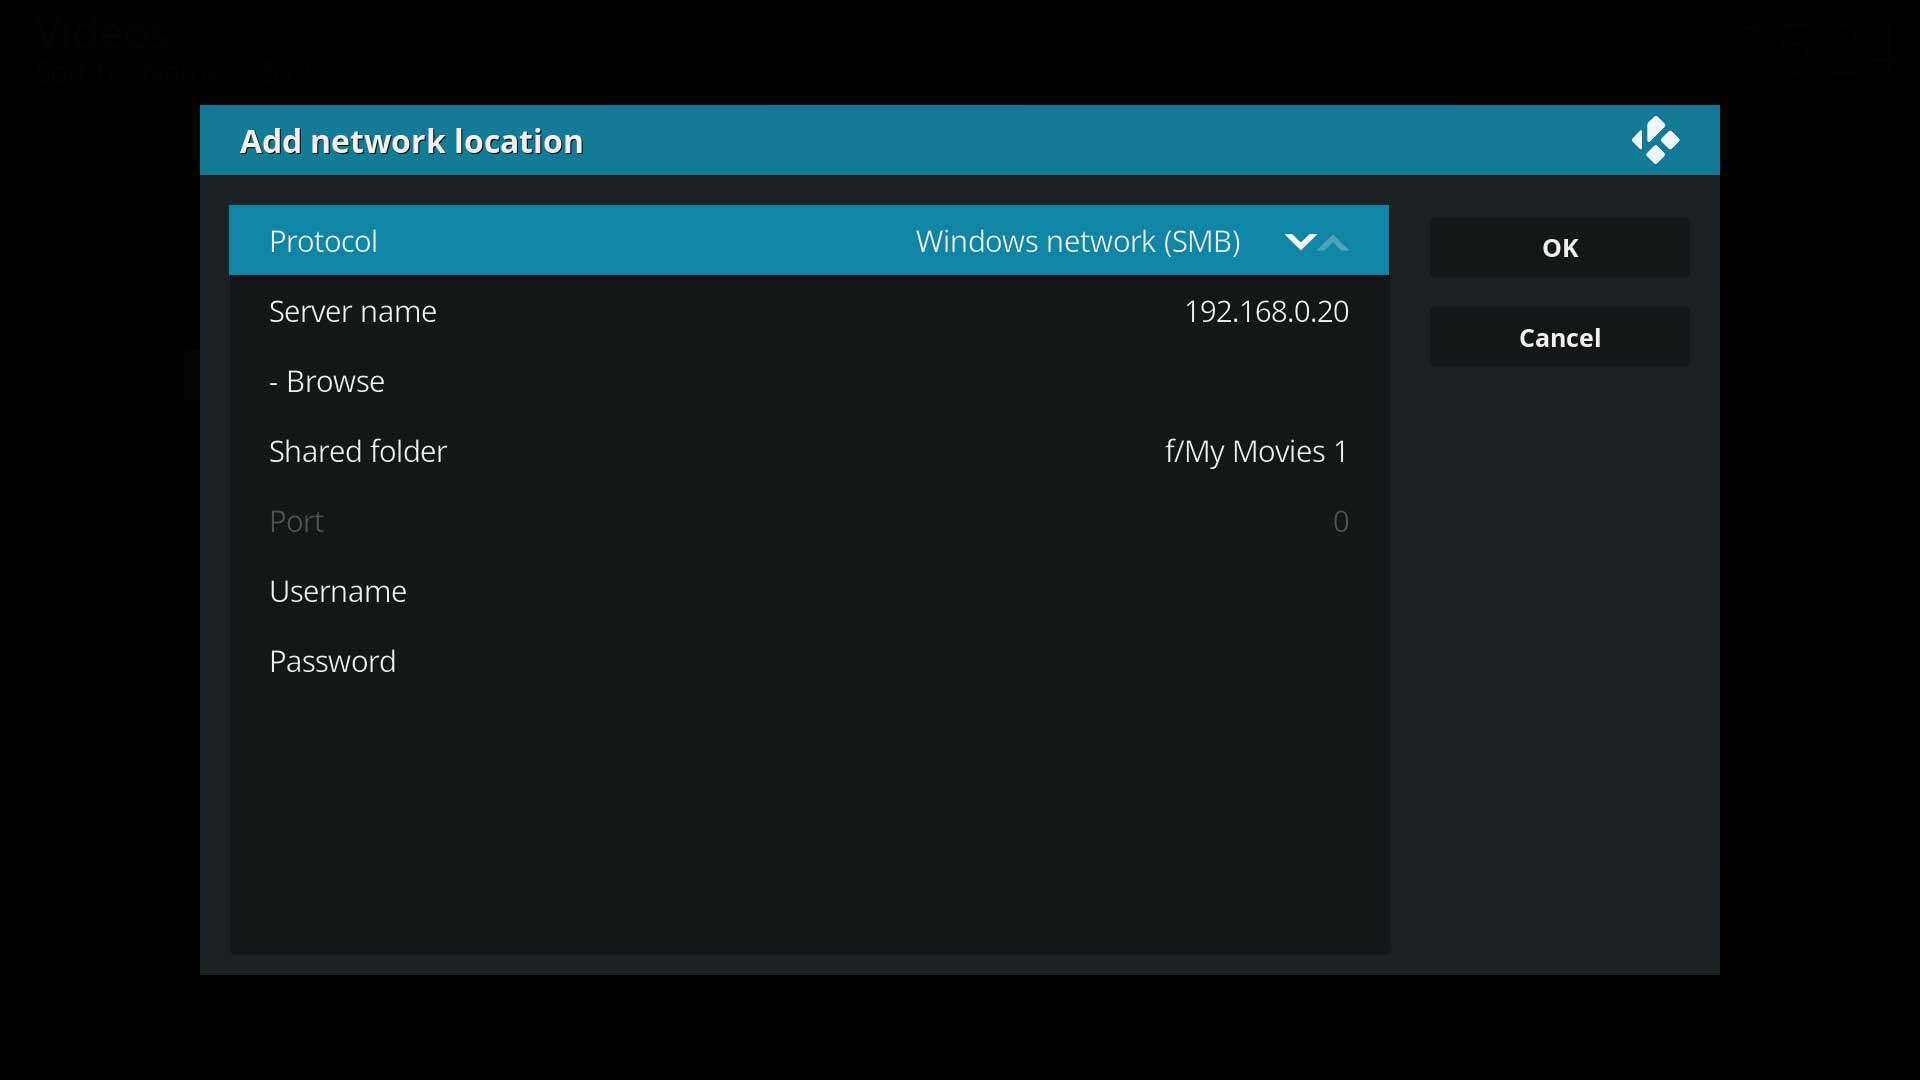
In the Share folder section, type in the name of the folder you wish to add. Then if your share requires a Username and Password enter them in the appropriate sections. Then select OK and your share should appear in the Browse for new share list.


Making one source from multiple locations

You might notice that Kodi has an "ADD" button in addition to a "BROWSE" button when you are adding a source. After you add your first location, you can add a second location (network or local. you can even mix them) and Kodi will show both folders as a single folder/source.
Kodi will also combine the subfolders within the source/locations. For example, if you had a hard drive for TV shows, but ran out of space, you could make a second hard drive with the same folder paths and Kodi would merge them together to a single directory path. Such as
Hard drive 1/TV shows/Hard drive 2/TV shows/
and the same is true for an additional nested folder with the same way:
Hard drive 1/TV shows/American Dad/Hard drive 2/TV shows/American Dad/
You could have half of a show on one hard drive, half on another, and Kodi will show it to you as if it was in a single location by using multiple locations in a single source.
Note: This only impacts the basic "Files view". The default Library nodes will combine things by show even if their files are spread across multiple drives. Most users will not really benefit from using multiple paths in a single source.
Password protected sources
| Return to top |
|---|
| Next step: | Scraping Problems |