Video nodes: Difference between revisions
No edit summary |
>DjSlash (Putting things a bit more in the right place) |
||
| Line 5: | Line 5: | ||
== The default Nodes == | == The default Nodes == | ||
XBMC ships with default nodes that are located in the XBMC main filesystem | [[File:defaultnodes.jpg|right|500px|frame|The standard XBMC video nodes]] | ||
XBMC ships with default nodes that are located in the XBMC main filesystem: | |||
{| border="1" cellpadding="4" class="wikitable" | {| border="1" cellpadding="4" class="wikitable" | ||
| Line 24: | Line 25: | ||
|} | |} | ||
To understand | To understand nodes a little better, lets take a look at one of the defaults. As an example take a quick look at the ''video/movies/years.xml'' node in its simplest form: | ||
<?xml version="1.0" encoding="UTF-8" standalone="yes" ?> | |||
<node order="3" type="folder"> | <node order="3" type="folder"> | ||
<label>562</label> | <label>562</label> | ||
| Line 33: | Line 35: | ||
As you can see we are using standard xml format here so nothing too complicated. | As you can see we are using standard xml format here so nothing too complicated. | ||
== XML node components == | == XML node components == | ||
| Line 45: | Line 41: | ||
'''Label''' = This is the text that will show for the node. In this case it is pointing to an ID in the strings.xml file (for transltion purposes) It can also just be any String you want, just type some text instead of the id number. | '''Label''' = This is the text that will show for the node. In this case it is pointing to an ID in the strings.xml file (for transltion purposes) It can also just be any String you want, just type some text instead of the id number. | ||
'''Path''' = This can be any valid XBMC path | '''Path''' = This can be any valid XBMC path <br/> NOTE: For an explanation of what "''<path>videodb://1/3</path>''" means, along with similar statements, see [[Opening Windows and Dialogs]]. | ||
'''Icon''' = Pretty self explanatory really, this is the icon that will show when the node is navigated over | '''Icon''' = Pretty self explanatory really, this is the icon that will show when the node is navigated over. | ||
| Line 53: | Line 49: | ||
So now we understand how the default nodes work, lets have a look at making a custom node. Custom nodes live inside your [[Userdata]] folder. To create custom nodes, the first step is to copy the whole of the default node file structure from the default library folder to a new folder called ''library'' inside your [[Userdata]] folder. | So now we understand how the default nodes work, lets have a look at making a custom node. Custom nodes live inside your [[Userdata]] folder. To create custom nodes, the first step is to copy the whole of the default node file structure from the default library folder to a new folder called ''library'' inside your [[Userdata]] folder. | ||
So, in the case of | So, in the case of Windows, copy the 'video' and the 'video_flat' folders from ''C:\Program Files (x86)\XBMC\system\library'' to ''%appdata%\XBMC\userdata\library''. | ||
Why the whole lot? Well, currently it seems that when you have a custom video node in your userdata folder, it's assumed that you are customising the node structure, and that therefore any nodes that are missing are missing intentionally. | Why the whole lot? Well, currently it seems that when you have a custom video node in your userdata folder, it's assumed that you are customising the node structure, and that therefore any nodes that are missing are missing intentionally. | ||
| Line 71: | Line 67: | ||
Let's call it Custom_Motor_dvds.xml | Let's call it Custom_Motor_dvds.xml | ||
<?xml version="1.0" encoding="UTF-8" standalone="yes" ?> | |||
<node order="10" type="filter"> | <node order="10" type="filter"> | ||
<label>(Custom) Motor DVDs</label> | <label>(Custom) Motor DVDs</label> | ||
| Line 92: | Line 89: | ||
[[File:motordvds.jpg|500px | [[File:motordvds.jpg|500px|Custom node in action]] | ||
So there you have it, a simple path filter for our Motor DVDs. One thing that you may want to do now is edit your "Title" xml file to remove the motor dvds from the main movie library. You can do this by using the DoesNotContain operator: | So there you have it, a simple path filter for our Motor DVDs. One thing that you may want to do now is edit your "Title" xml file to remove the motor dvds from the main movie library. You can do this by using the DoesNotContain operator: | ||
<?xml version="1.0" encoding="UTF-8" standalone="yes" ?> | |||
<node order="2" type="filter"> | <node order="2" type="filter"> | ||
<label>Movies</label> | <label>Movies</label> | ||
| Line 109: | Line 105: | ||
There are many other rules you can apply, a simple way to find them is to have a go with the smart playlist editor and copy the rule from the resulting xml playlist. There are many possibilities, you could create a rule for any of the database fields such as genre or year, use paths or combine rules together. | There are many other rules you can apply, a simple way to find them is to have a go with the smart playlist editor and copy the rule from the resulting xml playlist. There are many possibilities, you could create a rule for any of the database fields such as genre or year, use paths or combine rules together. | ||
[[File:customnodes.jpg|500px | [[File:customnodes.jpg|500px|Various custom video nodes]] | ||
== Creating a Custom parent node == | == Creating a Custom parent node == | ||
Revision as of 08:20, 7 July 2013
Video nodes are defined views that are used to organize your media from the videos menu. In the past XBMC has had a number of standard nodes such as Title, Director, Year, Studios, Countries, Genres that were hard coded. As of v12 Frodo, XBMC introduces the ability to customize these nodes using an XML file. Using XML files really gives great flexibility in how you display your media. Don't want your screaming kids stuff in your main movie node... exclude it. Want documentaries in a separate node, create it. Don't like how recently added is presented, change it.
To get full functionality from custom nodes, you need to use a skin that allows you to deploy them as you would like (e.g. latest builds of Aeon Nox). Confluence will show your nodes, but doesn't allow you to decide exactly where.
The default Nodes
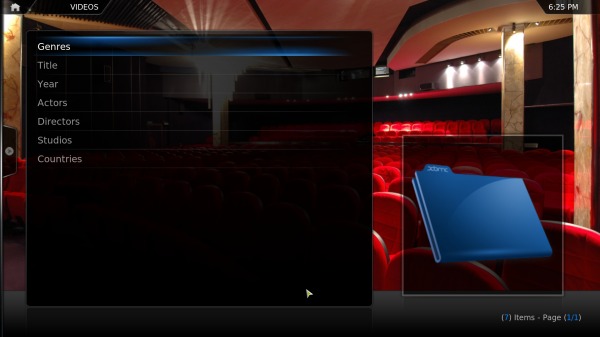
XBMC ships with default nodes that are located in the XBMC main filesystem:
| Operative system | default nodes paths |
|---|---|
| Android | ? |
| iOS - Varied | /Applications/XBMC.frappliance/XBMCData/XBMCHome/system/library/ /Applications/XBMC.app/XBMCData/XBMCHome/system/library/ |
| Linux | /usr/share/xbmc/system/library/ |
| Mac OS X | /Applications/XBMC.app/Contents/Resources/XBMC/system/library/ |
| Windows (32bit) | C:\Program Files\XBMC\system\library\ |
| Windows (64bit) | C:\Program Files (x86)\XBMC\system\library\ |
To understand nodes a little better, lets take a look at one of the defaults. As an example take a quick look at the video/movies/years.xml node in its simplest form:
<?xml version="1.0" encoding="UTF-8" standalone="yes" ?>
<node order="3" type="folder">
 <label>562</label>
 <path>videodb://1/3</path>
 <icon>DefaultYear.png</icon>
</node>
As you can see we are using standard xml format here so nothing too complicated.
XML node components
Order = This is the order that you want to show the nodes. Starts at 1 for the top and goes sequentially so 2 will be the next node down.
Label = This is the text that will show for the node. In this case it is pointing to an ID in the strings.xml file (for transltion purposes) It can also just be any String you want, just type some text instead of the id number.
Path = This can be any valid XBMC path
NOTE: For an explanation of what "<path>videodb://1/3</path>" means, along with similar statements, see Opening Windows and Dialogs.
Icon = Pretty self explanatory really, this is the icon that will show when the node is navigated over.
Creating a Custom node
So now we understand how the default nodes work, lets have a look at making a custom node. Custom nodes live inside your Userdata folder. To create custom nodes, the first step is to copy the whole of the default node file structure from the default library folder to a new folder called library inside your Userdata folder.
So, in the case of Windows, copy the 'video' and the 'video_flat' folders from C:\Program Files (x86)\XBMC\system\library to %appdata%\XBMC\userdata\library.
Why the whole lot? Well, currently it seems that when you have a custom video node in your userdata folder, it's assumed that you are customising the node structure, and that therefore any nodes that are missing are missing intentionally.
Having copied the node structure, we can now create a new xml file under the relevant directory.
In a vanilla install with the confluence skin, custom nodes in /video will appear in the sub-list of the Video main menu item.
Custom nodes in the /video/movies will appear in the sub-list of 'Movies' which in turn appears in the sub-list of Video. NOTE: it will not appear in the sub-list of 'Movies' as, in the confluence skin at least, this is set to list all the video source content marked as 'movies'.
In other skins (notably, Aeon Nox), custom main-menu items can be set to a custom video node, meaning that you can use your custom video nodes to have a main-menu item for your collection of post-modern european arthouse anime, if you so wish.
For now, we're going to place our node under
/userdata/library/video/
Let's call it Custom_Motor_dvds.xml
<?xml version="1.0" encoding="UTF-8" standalone="yes" ?>
<node order="10" type="filter">
 <label>(Custom) Motor DVDs</label>
 <path>videodb://1/3</path>
 <content>movies</content>
 <match>all</match>
 <icon>DefaultCars.png</icon>
 <limit>20</limit>
 <rule field="path" operator="contains">//nas1/Videos/ExtremeSports/Cars</rule>
</node>
As you can see as well as changing the order, we have a few more xml tags this time:
Type = Can be folder or filter, folder requires path to be set.
Match = Specifies how many rules should match. In this case we are matching all rules.
Rule = Any rule created with the smart playlist editor. (See Smart Playlists)
Limit = Limit the number of results returned
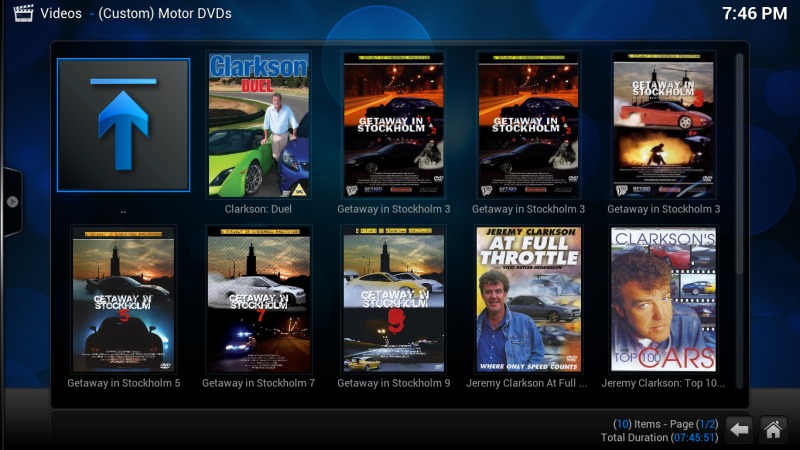
So there you have it, a simple path filter for our Motor DVDs. One thing that you may want to do now is edit your "Title" xml file to remove the motor dvds from the main movie library. You can do this by using the DoesNotContain operator:
<?xml version="1.0" encoding="UTF-8" standalone="yes" ?>
<node order="2" type="filter">
 <label>Movies</label>
 <path>videodb://1/3</path>
 <content>movies</content>
 <icon>DefaultMovieTitle.png</icon>
 <match>all</match>
 <rule field="path" operator="doesnotcontain">//NAS1/Videos/ExtremeSports/Cars/</rule>
</node>
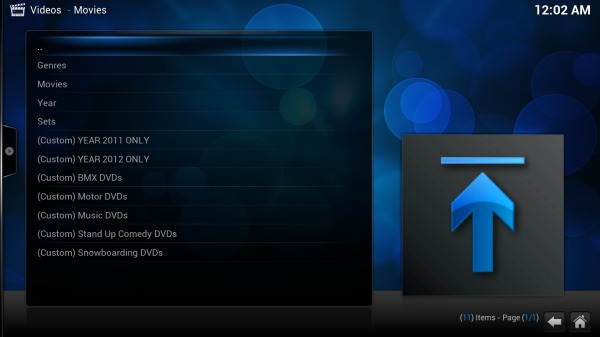
There are many other rules you can apply, a simple way to find them is to have a go with the smart playlist editor and copy the rule from the resulting xml playlist. There are many possibilities, you could create a rule for any of the database fields such as genre or year, use paths or combine rules together.
Creating a Custom parent node
You can also create a nested node structure as can be observed in the "unflattened" default structure from above (under video). Then you simply create a folder containing valid xml node files and also include a "index.xml" file that looks like this (which of course can be adapted to the type of media required):
<?xml version="1.0" encoding="UTF-8" standalone="yes" ?>
<node order="1" visible="Library.HasContent(Movies)">
  <label>342</label>
  <icon>DefaultMovies.png</icon>
</node>


