Settings/System/Display: Difference between revisions
No edit summary |
|||
| (6 intermediate revisions by 2 users not shown) | |||
| Line 1: | Line 1: | ||
{{mininav| [[Settings]] | [[Settings/System|System]] }} | {{mininav| [[Settings]] | [[Settings/System|System]] }} | ||
__TOC__ | |||
= General = | |||
<gallery mode="packed" widths="700px" heights="394px"> | |||
File:Settings-System-Display-01.jpg | |||
</gallery> | |||
== Monitor == | |||
{| | {| | ||
|- valign="top" | |- valign="top" | ||
| Line 22: | Line 21: | ||
== Display mode == | |||
{| | {| | ||
|- valign="top" | |- valign="top" | ||
| Line 29: | Line 28: | ||
|- valign="top" | |- valign="top" | ||
| '''Description:''' | | '''Description:''' | ||
| Changes the way Kodi is displayed on the selected screen. Either in a window or fullscreen. | | Changes the way Kodi is displayed on the selected screen. Either in a window or fullscreen.<br> | ||
|} | |} | ||
== Resolution == | |||
{| | {| | ||
|- valign="top" | |- valign="top" | ||
| Line 51: | Line 39: | ||
|- valign="top" | |- valign="top" | ||
| '''Description:''' | | '''Description:''' | ||
| Changes the resolution of the '''User Interface'''. Has no effect | | Changes the resolution of the '''User Interface'''. Has no effect on playback.<br> | ||
The ideal setting is the highest resolution your hardware supports and/or what the TV/Monitor is capable of.<br> | |||
Be aware that reducing the resolution will pixelate the interface but it will not reduce the display size as the TV will always zoom the image to fill the screen.<br> | |||
This setting is not available if you selected "Window" in ''Display mode'' above. | |||
|} | |} | ||
== Use fullscreen window == | |||
{| | {| | ||
|- valign="top" | |- valign="top" | ||
| Line 64: | Line 54: | ||
| '''Description:''' | | '''Description:''' | ||
| If enabled, fullscreen mode will be applied by using a window instead of the real fullscreen mode. This mode uses more resources so playback may be less smooth on lower powered hardware.<br> | | If enabled, fullscreen mode will be applied by using a window instead of the real fullscreen mode. This mode uses more resources so playback may be less smooth on lower powered hardware.<br> | ||
This setting is available when {{kodi}} is installed on MS Windows. The main benefit is for multi-screen configurations, so that other applications can be used at the same time more easily. It does not use the DirectX fullscreen mode and prevents automatic minimising of the screen when {{kodi}} loses focus. | This setting is available when {{kodi}} is installed on MS Windows.<br> | ||
The main benefit is for multi-screen configurations, so that other applications can be used at the same time more easily. It does not use the DirectX fullscreen mode and prevents automatic minimising of the screen when {{kodi}} loses focus. | |||
|} | |} | ||
== Blank other displays == | |||
{| | {| | ||
|- valign="top" | |- valign="top" | ||
| Line 80: | Line 70: | ||
== Delay after change of refresh rate == | |||
{| | {| | ||
|- valign="top" | |- valign="top" | ||
| Line 94: | Line 83: | ||
This setting allows you to delay the reset event and is useful for momentay refresh rate changes that then return to the previous refresh rate. This is not normally an issue with normal video playback, but can be experienced on multi-screen configurations where other work is being conducted on the second screen.<br> | This setting allows you to delay the reset event and is useful for momentay refresh rate changes that then return to the previous refresh rate. This is not normally an issue with normal video playback, but can be experienced on multi-screen configurations where other work is being conducted on the second screen.<br> | ||
This setting works in conjunction with '''''[[Settings/Player/Videos#Adjust_display_refresh_rate|Adjust display refresh rate]]'''''<br> | This setting works in conjunction with '''''[[Settings/Player/Videos#Adjust_display_refresh_rate|Adjust display refresh rate]]'''''<br> | ||
'''Note:''' All | '''Note:''' All TVs will pause and blank when there is a change of Refresh Rate. This is not a problem with your TV or attached hardware. | ||
|} | |} | ||
<!-- https://forum.kodi.tv/showthread.php?tid=288184 --> | <!-- https://forum.kodi.tv/showthread.php?tid=288184 --> | ||
=== Dithering | == GUI peak luminance in HDR PQ mode == | ||
{| | |||
|- valign="top" | |||
| width=120px | {{nowrap|'''Settings level:'''}} | |||
| Expert | |||
|- valign="top" | |||
| '''Description:''' | |||
| '''MS Windows only setting'''<br>Allows adjustment of the brightness of GUI elements while the display is in HDR PQ mode. This affects all OSD, subtitles and graphics that are SDR in origin. <ref>https://github.com/xbmc/xbmc/pull/21973</ref> | |||
|} | |||
== Use 10 bit for SDR == | |||
{| | |||
|- valign="top" | |||
| width=120px | {{nowrap|'''Settings level:'''}} | |||
| Expert | |||
|- valign="top" | |||
| '''Description:''' | |||
| '''MS Windows only setting'''<br>Improves the video quality by using 10-bit video surfaces for Standard Dynamic Range video streams. <ref>https://github.com/xbmc/xbmc/pull/20014</ref> | |||
Available options: | |||
* ''Auto detect'' - Enables 10-bit for SDR only if the connected display supports HDR. It does not changes the current behavior where the 10-bit swapchain is used (also for SDR content) if an HDR display is detected. This indirectly ensures that Windows 10 or higher is being used and with more or less current video drivers. | |||
* ''Always'' - Enable the use of 10-bit swapchain regardless of whether or not there is an HDR display. It is the equivalent setting value that replaces advanced setting <code><try10bitoutput></try10bitoutput></code> advancedsettings.xml tag. It can also be used with Windows 8, etc. with DirectX feature level v11.0 and higher. It will not be activated effectively if the system does not support it in any way. | |||
* ''Never'' - Never enable 10-bit swapchain for SDR content. Users with an HDR display can use this option for testing purposes or if for some reason they do not want to use 10-bit for SDR content. Even with this setting, 10 bits will still be used when playing content in HDR pass-through mode. | |||
'''Note:''' HDR passthrough mode always uses 10-bit regardless of this setting<br> | |||
This setting replaces the advancedsettings.xml tag <code><try10bitoutput></try10bitoutput></code> which has been removed. | |||
|} | |||
== Dithering == | |||
{| | {| | ||
|- valign="top" | |- valign="top" | ||
| Line 110: | Line 126: | ||
== Colour management == | |||
{| | {| | ||
|- valign="top" | |- valign="top" | ||
| Line 121: | Line 137: | ||
== Use limited colour range (16-235) == | |||
{| | {| | ||
|- valign="top" | |- valign="top" | ||
| Line 128: | Line 144: | ||
|- valign="top" | |- valign="top" | ||
| '''Description:''' | | '''Description:''' | ||
| Use limited colour range (16-235) instead of full colour range (0-255). Limited range should be used if your display is a regular HDMI TV and does not have a PC or other mode to display full range colour, however if your display is a PC monitor, then this setting should be disabled for correct | | Use limited colour range (16-235) instead of full colour range (0-255). Limited range should be used if your display is a regular HDMI TV and does not have a PC or other mode to display full range colour, however if your display is a PC monitor, then this setting should be disabled for correct blacks.<br> | ||
If blacks are more like grey, there is a Colour Space error in the '''Kodi -> Hardware -> TV''' display chain. Read the following guides to help understand and locate the incorrect setting. | If blacks are more like grey, there is a Colour Space error in the '''Kodi -> Hardware -> TV''' display chain. Read the following guides to help understand and locate the incorrect setting. | ||
|- | |- | ||
| Line 140: | Line 156: | ||
== | = Whitelist = | ||
<gallery mode="packed" widths="700px" heights="394px"> | |||
File:Settings-System-Display-02.jpg | |||
</gallery> | |||
== Whitelist == | |||
{| | |||
|- valign="top" | |||
| width=120px | {{nowrap|'''Settings level:'''}} | |||
| Expert | |||
|- valign="top" | |||
| '''Description:''' | |||
| From the pop-up box, select the resolutions that {{kodi}} is allowed to switch to when a resolution or refresh rate change is required by the content being played. | |||
Whitelisted modes depend on the connected screen/monitor/TV and hardware in use.<br> | |||
When a whitelist is set {{Kodi}} will only switch if the exact resolution and refresh rate is matched to a selected entry in the whitelist, otherwise it will match the desktop resolution (and refresh rate).<br> | |||
: ''Example- | |||
:: {{Kodi}} or desktop is set to 3840x2160 at 60 Hz | |||
:: Content is 1920x1080p at 24 Hz | |||
:: If "1920x1080p at 24 Hz" is whitelisted, {{Kodi}} will switch to 1920x1080p at 24 Hz | |||
:: If "1920x1080p at 24 Hz" is not whitelisted, {{Kodi}} will play at 3840x2160 at 60 Hz.'' | |||
|} | |||
=== Stereoscopic 3D mode / Current | |||
== Allow 3:2 pulldown refresh rates == | |||
{| | |||
|- valign="top" | |||
| width=120px | {{nowrap|'''Settings level:'''}} | |||
| Expert | |||
|- valign="top" | |||
| '''Description:''' | |||
| Allow using 3:2 pulldown refresh rates. | |||
''Example-'' | |||
: When playing 23.976fps video on a 59.94Hz monitor, or when playing 24fps video on a 60Hz monitor, use this setting if the monitor does not support 23.976Hz or 24Hz | |||
|} | |||
== Allow double refresh rates == | |||
{| | |||
|- valign="top" | |||
| width=120px | {{nowrap|'''Settings level:'''}} | |||
| Expert | |||
|- valign="top" | |||
| '''Description:''' | |||
| Select this option to allow double refresh rates | |||
''Example-'' | |||
: When playing 29.97fps content on a 59.94Hz monitor, or playing 30fps on a 60Hz monitor, enable this option if the monitor does not have 29.97Hz or 30Hz mode.<ref>https://github.com/xbmc/xbmc/pull/19353</ref> | |||
|} | |||
= Stereoscopic 3D = | |||
<gallery mode="packed" widths="700px" heights="394px"> | |||
File:Settings-System-Display-03.jpg | |||
</gallery> | |||
== Stereoscopic 3D mode / Current == | |||
{| | {| | ||
|- valign="top" | |- valign="top" | ||
| Line 168: | Line 236: | ||
== Preferred mode == | |||
{| | {| | ||
|- valign="top" | |- valign="top" | ||
| Line 176: | Line 243: | ||
|- valign="top" | |- valign="top" | ||
| '''Description:''' | | '''Description:''' | ||
| Set the preferred for when stereoscopic 3D media is played. Available options are: | | Set the preferred mode for when stereoscopic 3D media is played. Available options are: | ||
* Same as movie | * Same as movie | ||
* Over / Under | * Over / Under | ||
| Line 192: | Line 259: | ||
== | = Calibration = | ||
<gallery mode="packed" widths="700px" heights="394px"> | |||
File:Settings-System-Display-04.jpg | |||
</gallery> | |||
This section provides basic tools that allow you to check and calibrate your display. As the topic of calibration is a complex issue and affects the Screen display and not {{kodi}} it is outside the scope of this wiki. If you are unsure how to use these tools, then an online search should return numerous guides. | This section provides basic tools that allow you to check and calibrate your display. As the topic of calibration is a complex issue and affects the Screen display and not {{kodi}} it is outside the scope of this wiki. If you are unsure how to use these tools, then an online search should return numerous guides. | ||
== Number of buffers used by graphics driver == | |||
{| | {| | ||
|- valign="top" | |- valign="top" | ||
| Line 215: | Line 284: | ||
== Video calibration == | |||
{| | {| | ||
|- valign="top" | |- valign="top" | ||
| Line 234: | Line 302: | ||
Press '''ENTER''' on your keyboard / remote for the next section of the calibration. Use the {{keypress|up|down|left|right}} keys to make adjustments. Press {{keypress|Esc}} or {{keypress|back}} to return to the Settings page. | Press '''ENTER''' on your keyboard / remote for the next section of the calibration. Use the {{keypress|up|down|left|right}} keys to make adjustments. Press {{keypress|Esc}} or {{keypress|back}} to return to the Settings page. | ||
|} | |||
<gallery mode="packed" widths="300px" heights="170px"> | |||
<gallery widths= | |||
File:Estuary_settings_system_display_calibration_1.png|Upper left corner | File:Estuary_settings_system_display_calibration_1.png|Upper left corner | ||
File:Estuary_settings_system_display_calibration_2.png|Lower right corner | File:Estuary_settings_system_display_calibration_2.png|Lower right corner | ||
| Line 242: | Line 310: | ||
File:Estuary_settings_system_display_calibration_4.png|Aspect ratio | File:Estuary_settings_system_display_calibration_4.png|Aspect ratio | ||
</gallery> | </gallery> | ||
= References = | |||
<references /> | |||
{{ | {{top}} | ||
{{updated|20}} | |||
[[Category:Settings]] | |||
[[Category: | |||
Latest revision as of 23:58, 20 February 2024
General

Monitor
| Settings level: | Basic |
| Description: | Select which screen Kodi is displayed on (for multi-screen setups). |
Display mode
| Settings level: | Basic |
| Description: | Changes the way Kodi is displayed on the selected screen. Either in a window or fullscreen. |
Resolution
| Settings level: | Basic |
| Description: | Changes the resolution of the User Interface. Has no effect on playback. The ideal setting is the highest resolution your hardware supports and/or what the TV/Monitor is capable of. |
Use fullscreen window
| Settings level: | Basic |
| Description: | If enabled, fullscreen mode will be applied by using a window instead of the real fullscreen mode. This mode uses more resources so playback may be less smooth on lower powered hardware. This setting is available when Kodi is installed on MS Windows. |
Blank other displays
| Settings level: | Standard |
| Description: | In a multi-screen configuration, enable this setting to black-out the monitor that is not displaying Kodi. Occurs on Kodi startup and requires a restart of Kodi when changing the setting. |
Delay after change of refresh rate
| Settings level: | Advanced |
| Description: | Delay a reset event after a change of refresh rate. Available options are:
When a Refresh Rate change occurs, there is a period of time when there is no video and audio available. This is defined by the video driver and display device and affects VideoPlayer and PictureViewer and other components. |
GUI peak luminance in HDR PQ mode
| Settings level: | Expert |
| Description: | MS Windows only setting Allows adjustment of the brightness of GUI elements while the display is in HDR PQ mode. This affects all OSD, subtitles and graphics that are SDR in origin. [1] |
Use 10 bit for SDR
| Settings level: | Expert |
| Description: | MS Windows only setting Improves the video quality by using 10-bit video surfaces for Standard Dynamic Range video streams. [2] Available options:
Note: HDR passthrough mode always uses 10-bit regardless of this setting |
Dithering
| Settings level: | Expert |
| Description: | Eliminate banding caused by RGB level conversion or other processing by adding a small amount of noise to the picture. This can be disabled for slower systems, or when Kodi is set to limited range RGB output and no video processing is needed. |
Colour management
| Settings level: | Expert |
| Description: | Reproduce video colours accurately using a display profile or a 3D lookup table. |
Use limited colour range (16-235)
| Settings level: | Expert |
| Description: | Use limited colour range (16-235) instead of full colour range (0-255). Limited range should be used if your display is a regular HDMI TV and does not have a PC or other mode to display full range colour, however if your display is a PC monitor, then this setting should be disabled for correct blacks. If blacks are more like grey, there is a Colour Space error in the Kodi -> Hardware -> TV display chain. Read the following guides to help understand and locate the incorrect setting. |
| See Also: | Setting Correct Colour Space |
| See Also: | Colour Spaces Explained |
Whitelist

Whitelist
| Settings level: | Expert |
| Description: | From the pop-up box, select the resolutions that Kodi is allowed to switch to when a resolution or refresh rate change is required by the content being played.
Whitelisted modes depend on the connected screen/monitor/TV and hardware in use.
|
Allow 3:2 pulldown refresh rates
| Settings level: | Expert |
| Description: | Allow using 3:2 pulldown refresh rates.
Example-
|
Allow double refresh rates
| Settings level: | Expert |
| Description: | Select this option to allow double refresh rates
Example-
|
Stereoscopic 3D

Stereoscopic 3D mode / Current
| Settings level: | Advanced |
| Description: | Set the preferred 3D mode for the User Interface. Available options are:
|
| See Also: | Kodi and 3D |
Preferred mode
| Settings level: | Advanced |
| Description: | Set the preferred mode for when stereoscopic 3D media is played. Available options are:
|
| See Also: | Kodi and 3D |
Calibration

This section provides basic tools that allow you to check and calibrate your display. As the topic of calibration is a complex issue and affects the Screen display and not Kodi it is outside the scope of this wiki. If you are unsure how to use these tools, then an online search should return numerous guides.
Number of buffers used by graphics driver
| Settings level: | Advanced |
| Description: | Defines the number of presentation buffers used by the graphics driver. Select 2 if the driver uses double buffering or 3 for triple buffering. You should consult the vendor for information on which buffering method your system uses. The default setting is 3. If tearing is visible in the display, adjust this setting. Triple buffering is termed Fast Sync by Nvidia. Other vendors may refer to it as Page Flip and Render Ahead |
| See Also: | Graphic Driver Buffers |
| See Also: | Double & Triple Buffering |
Video calibration
| Settings level: | Expert |
| Description: | Calibrate the user interface by adjusting the overscan. Use this tool if the image being displayed is too large or small for your display. Note: Always adjust the TV display settings first. Most issues are due to overscan and similar settings being enabled on the TV/monitor. Trying to adjust this setting in Kodi while these settings on the TV are enabled will have you running in circles and never being able to fix the issue. It offers the ability to adjust:
|
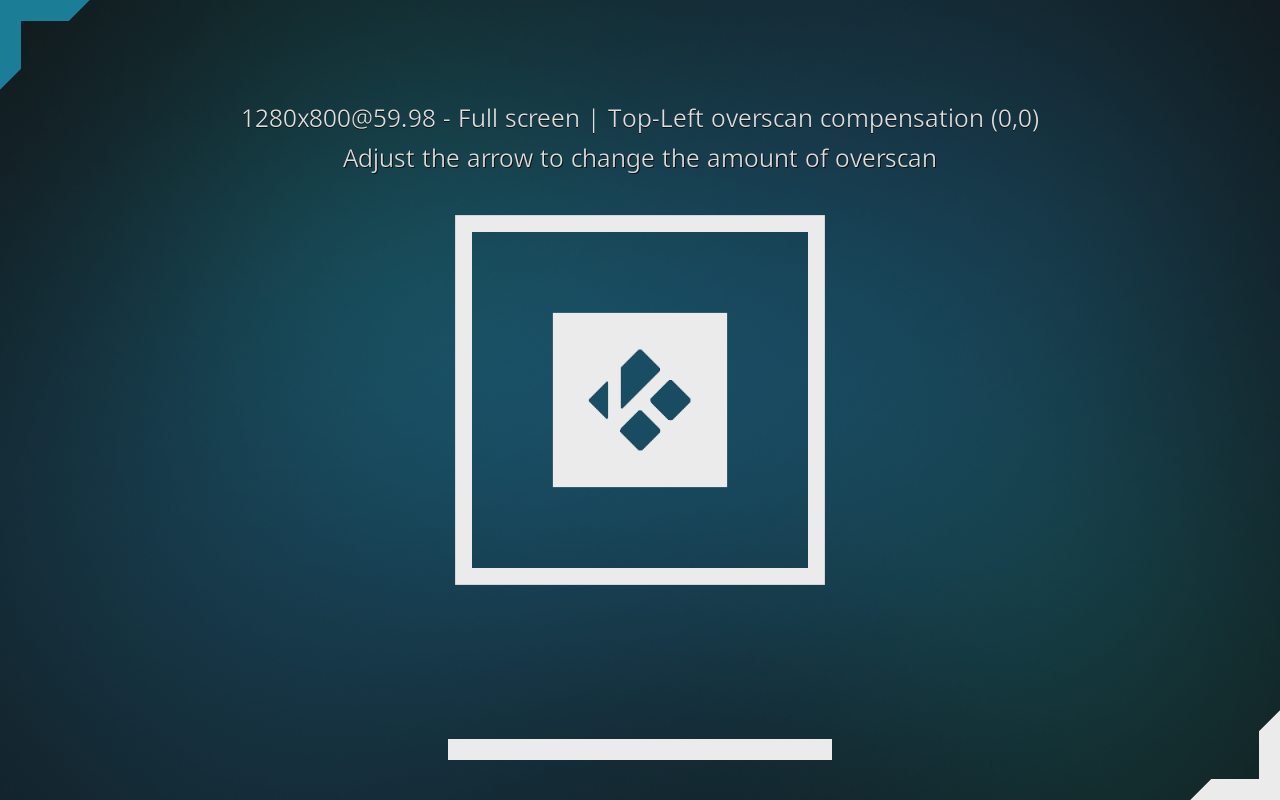
Upper left corner
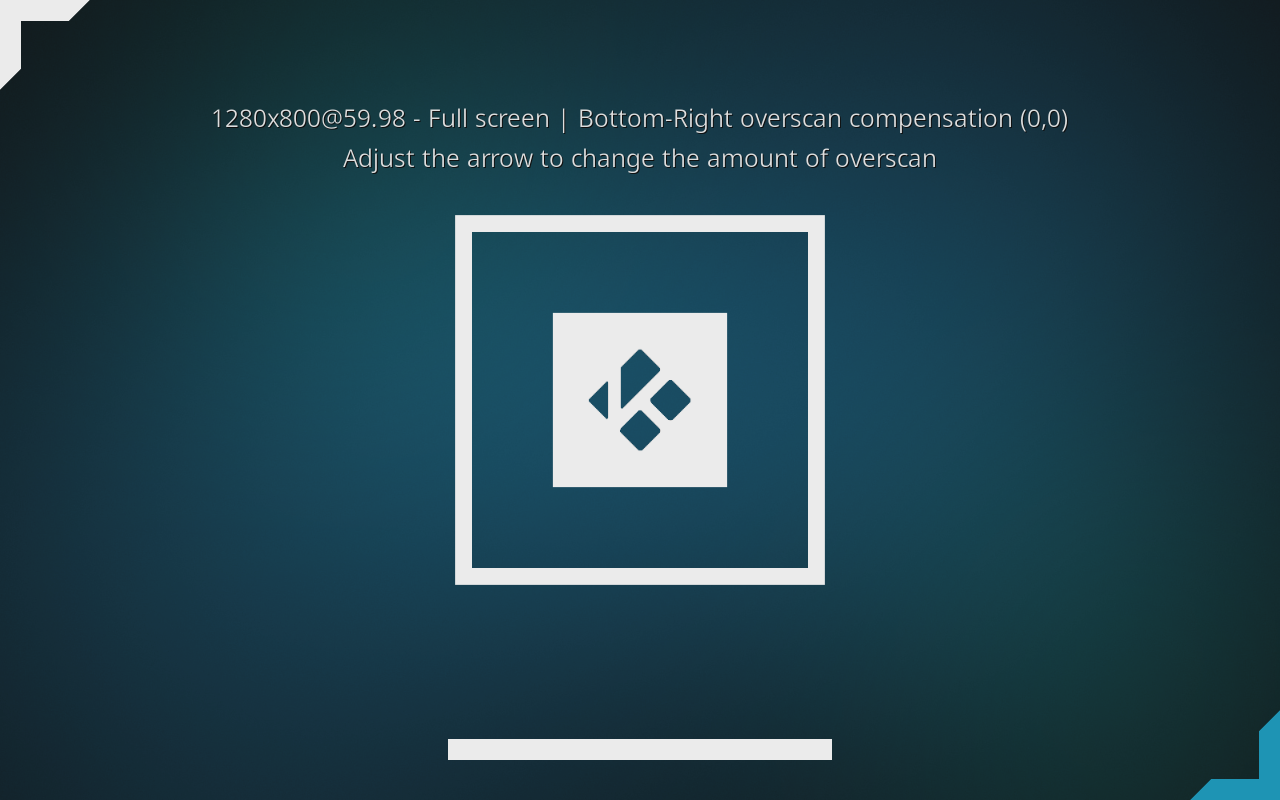
Lower right corner
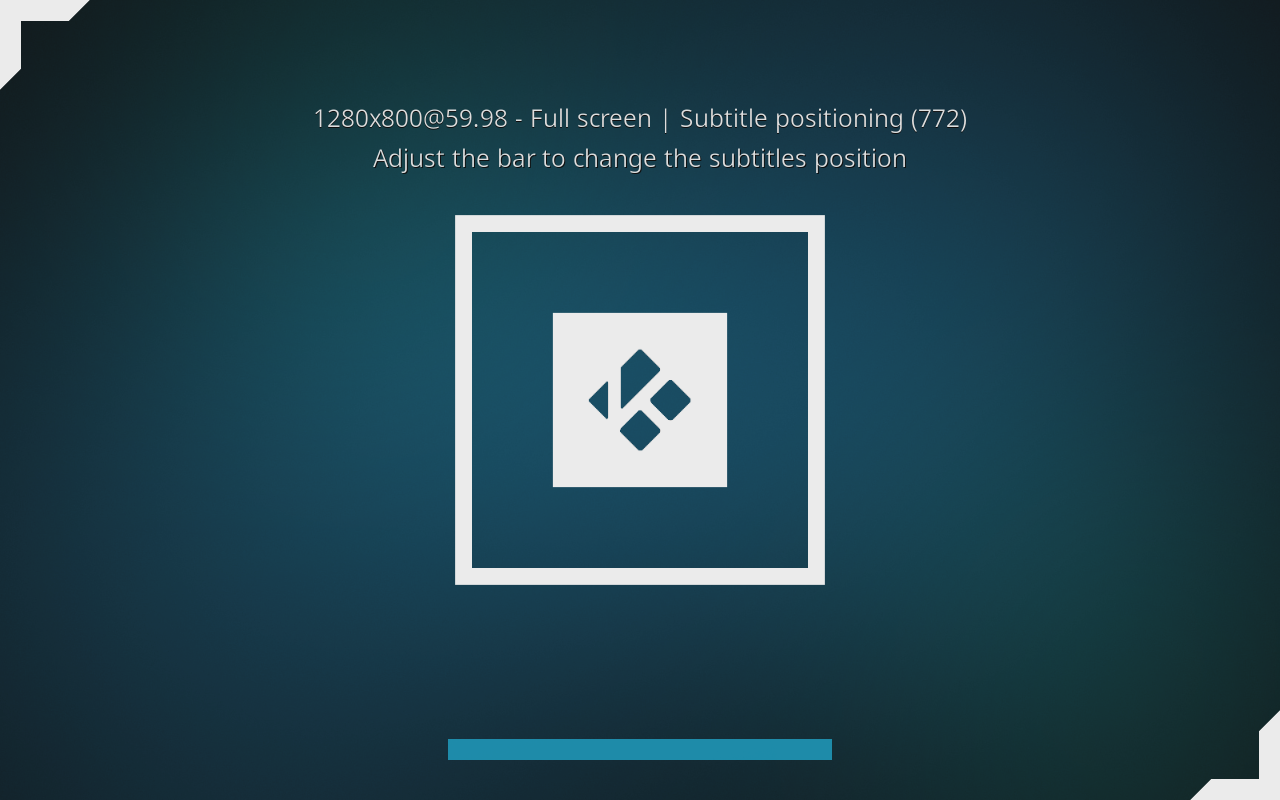
Subtitles position
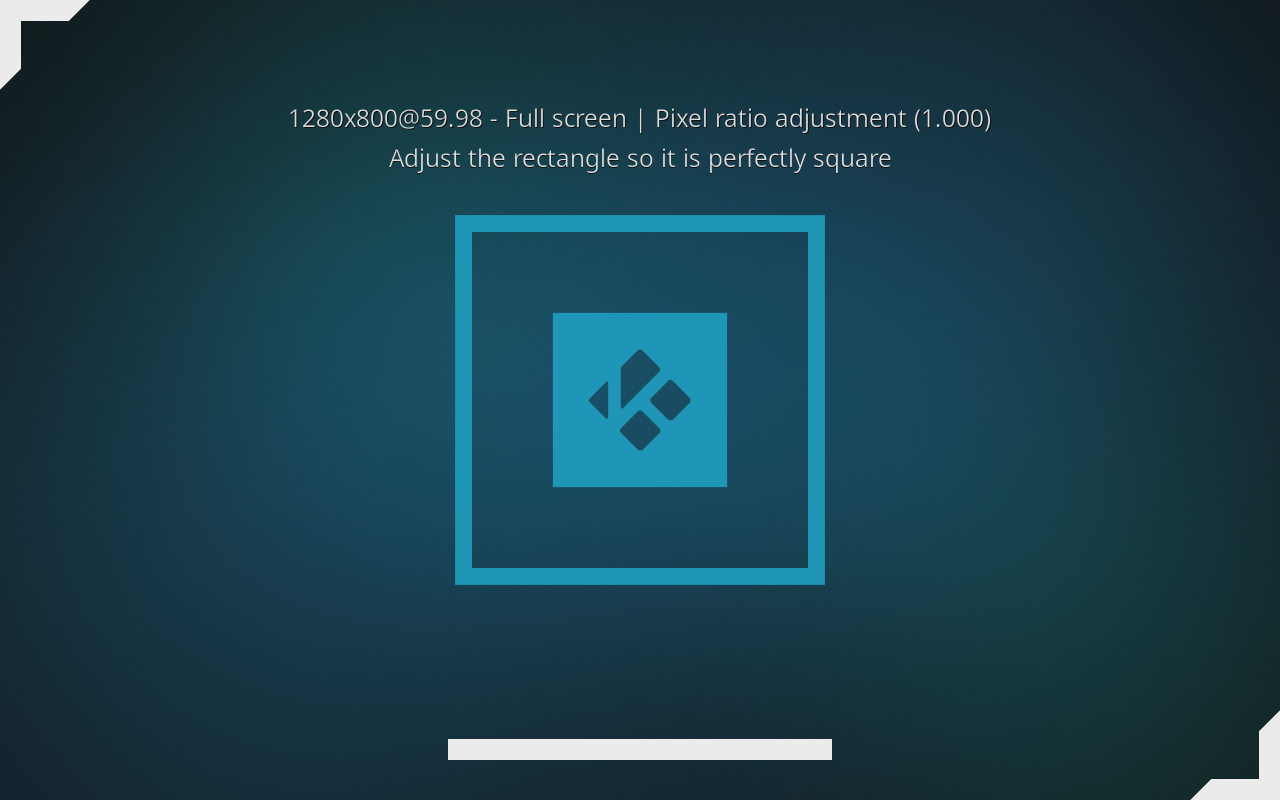
Aspect ratio


References
| Return to top |
|---|