SMB: Difference between revisions
m (Page rewritten) |
|||
| Line 1: | Line 1: | ||
{{mininav | {{mininav| [[File sharing]] }} | ||
{|class="infobox" style="width:210px" | |||
|- | |||
| | |||
Return to: | |||
* '''[[HOW-TO:Create_Music_Library|Music Library Guide]]''' | |||
* '''[[HOW-TO:Create_Video_Library|Video Library Guide]]''' | |||
|} | |||
__TOC__ | |||
= Introduction = | |||
<section begin="intro"/>Windows File Sharing, aka Server Message Block (SMB), is the standard client-server protocol used by Windows to share resources over a network. SMB is available on all Windows computers and can be easily setup by the home user. SMB can also be accessed by other operating systems, which makes SMB the most commonly used network protocol by {{kodi}} users to access content on a NAS or other hardware.<section end="intro"/> | |||
'''Note:''' SMB v1 is not supported in {{kodi}}. SMB v2 or higher must be used. | |||
This page will detail how to add a network source to {{kodi}} using SMB. It assumes you have already correctly set up your SMB network. If you have not set up your SMB network, a Google search will return numerous online guides. The following links may help also. | |||
* Android : [https://www.howtogeek.com/191378/how-to-access-shared-windows-folders-on-android-ipad-and-iphone/ How-To Geek] | |||
* | * Linux : [http://www.samba.org SAMBA]. | ||
* Mac : [https://support.apple.com/en-au/guide/mac-help/mh17131/10.15 macOS User Guide site] | |||
* Windows : Multiple guides available via Google. | |||
== | = Method = | ||
SMB (aka remote or network) server locations can be accessed with either of the following methods: | |||
; IP address | |||
: If using the IP Address method, ensure you reserve a DHCP address (static IP) for your NAS or other hardware. This ensures that your router will always allocate the same IP address to the server. If you choose not to do this, then you may find that the router has allocated a different address to your NAS and {{kodi}} will no longer be able to access the media files. | |||
: To reserve a static IP address, log into your router and add the MAC address of the hardware to the Reservation list in your Router. If you do not know the MAC address, you should see it in the list of connected clients. | |||
; Device Name | |||
: If using Windows PC's you can use the Device Name of the PC. | |||
: The Device Name can be found in ''Settings > System > About'' on your Windows PC. | |||
= Adding Remote Sources = | |||
The images will guide you through the process of adding an SMB Source to {{kodi}}. | |||
<gallery mode="packed" widths="500px" heights="283px"> | |||
File:Add-Network-Location.png |Image 1- Select '''Add network location...''' from the '''Browse for new shares''' list. | |||
File:Add-Network-Location_2.png|Image 2- Select '''Windows network (SMB)''' for '''Protocol'''.<br>Then select '''Server Name'''. | |||
File:Add-Network-Location_3.png|Image 3- Type in either the '''IP Address''' or the '''Device name''' of your server. | |||
File:Add-Network-Location_4.png|Image 4- Using '''IP Address'''<br> '''4.1''' In the '''Shared folder''' section, type in the name of the folder to add.<br> Add the drive letter ''eg f/Movies''.<br>'''4.2''' If your share requires a '''Username''' and '''Password''' enter them in the appropriate sections.<br>'''4.3''' Select '''OK''' and your share should appear in the '''Browse for new share''' list shown in image 1. | |||
File:Add-Network-Location_5.jpg|Image 5- Using '''Device Name'''<br>'''5.1''' In the '''Shared folder''' section, type in the name of the folder to add <br>The drive letter is not required.<br>'''5.2''' If your share requires a '''Username''' and '''Password''' enter them in the appropriate sections.<br>'''5.3''' Select '''OK''' and your share should appear in the '''Browse for new share''' list shown in image 1. | |||
</gallery> | |||
{{top}} | |||
{{updated|18}} | |||
[[Category:Karellen]] | |||
[[Category:File sharing]] | [[Category:File sharing]] | ||
Revision as of 03:34, 22 August 2020
|
Return to: |
Introduction
Windows File Sharing, aka Server Message Block (SMB), is the standard client-server protocol used by Windows to share resources over a network. SMB is available on all Windows computers and can be easily setup by the home user. SMB can also be accessed by other operating systems, which makes SMB the most commonly used network protocol by Kodi users to access content on a NAS or other hardware.
Note: SMB v1 is not supported in Kodi. SMB v2 or higher must be used.
This page will detail how to add a network source to Kodi using SMB. It assumes you have already correctly set up your SMB network. If you have not set up your SMB network, a Google search will return numerous online guides. The following links may help also.
- Android : How-To Geek
- Linux : SAMBA.
- Mac : macOS User Guide site
- Windows : Multiple guides available via Google.
Method
SMB (aka remote or network) server locations can be accessed with either of the following methods:
- IP address
- If using the IP Address method, ensure you reserve a DHCP address (static IP) for your NAS or other hardware. This ensures that your router will always allocate the same IP address to the server. If you choose not to do this, then you may find that the router has allocated a different address to your NAS and Kodi will no longer be able to access the media files.
- To reserve a static IP address, log into your router and add the MAC address of the hardware to the Reservation list in your Router. If you do not know the MAC address, you should see it in the list of connected clients.
- Device Name
- If using Windows PC's you can use the Device Name of the PC.
- The Device Name can be found in Settings > System > About on your Windows PC.
Adding Remote Sources
The images will guide you through the process of adding an SMB Source to Kodi.
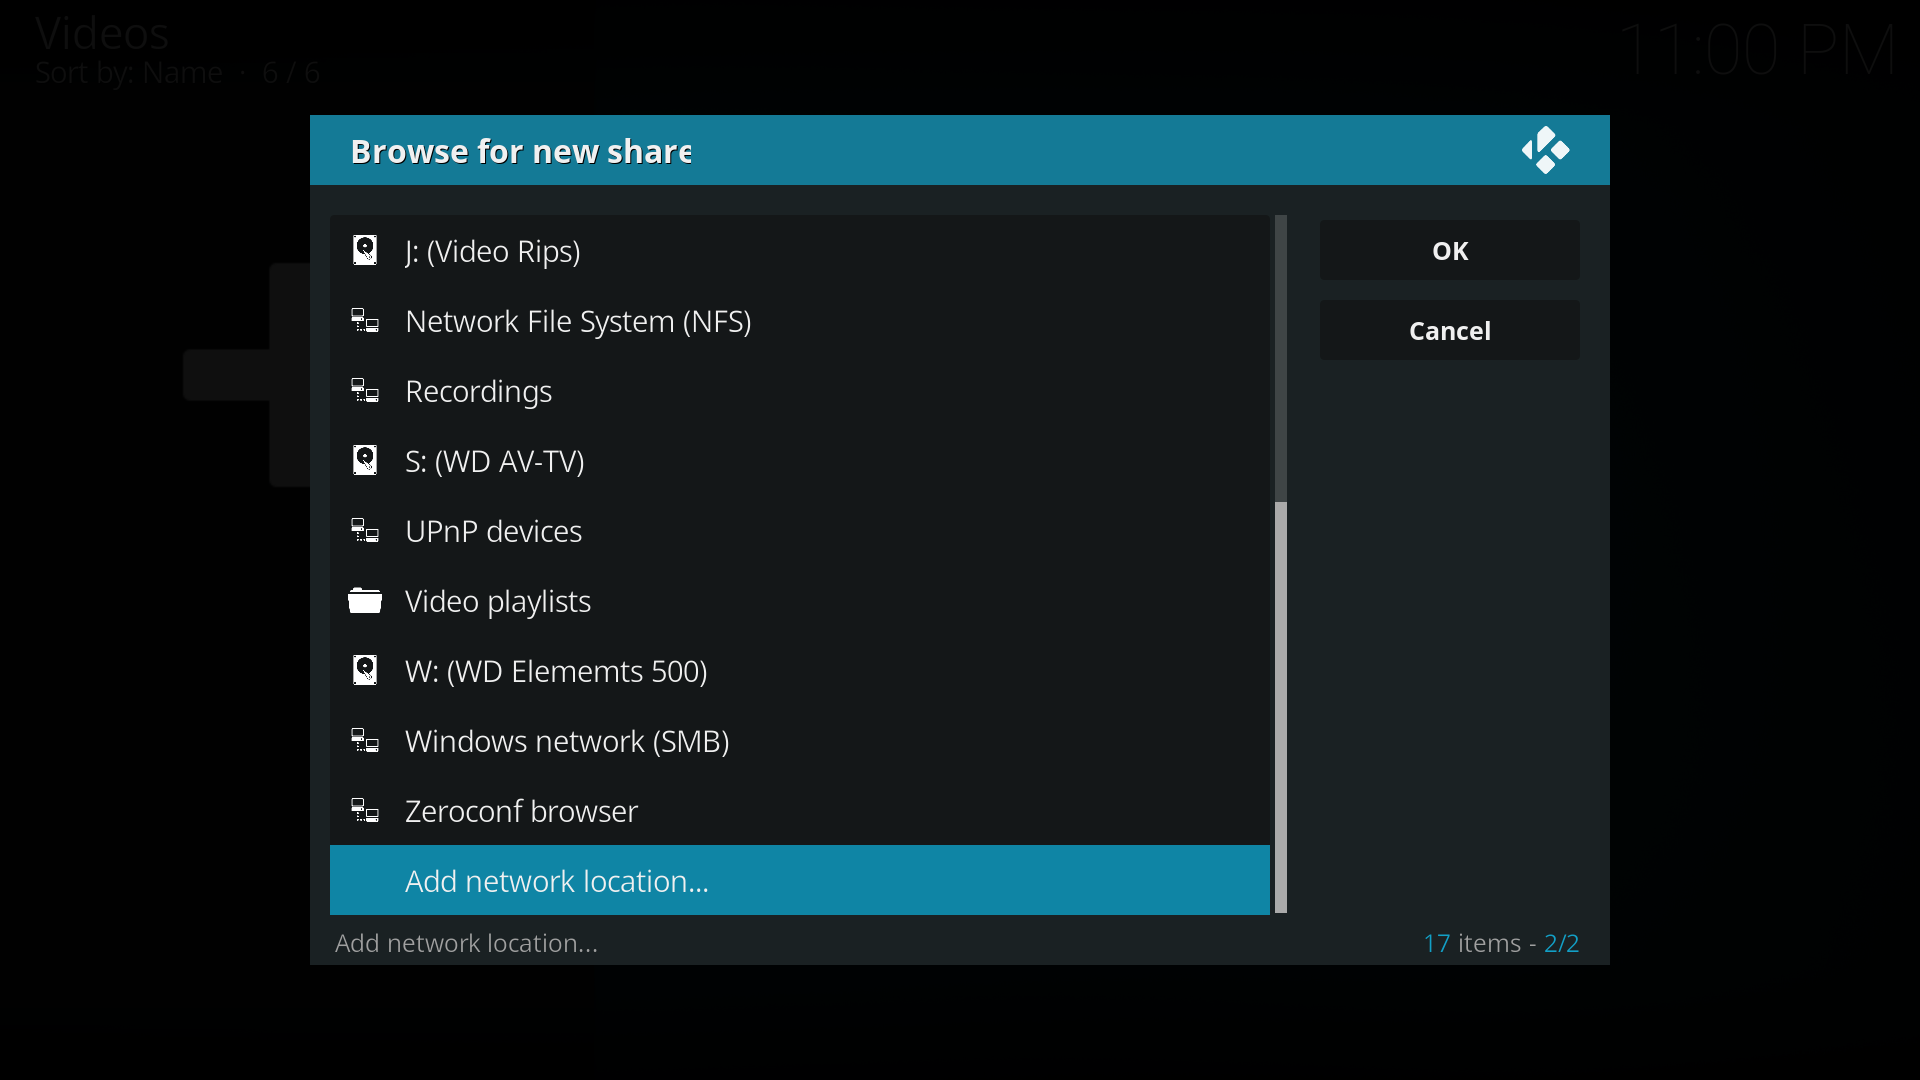
Image 1- Select Add network location... from the Browse for new shares list.

Image 2- Select Windows network (SMB) for Protocol.
Then select Server Name.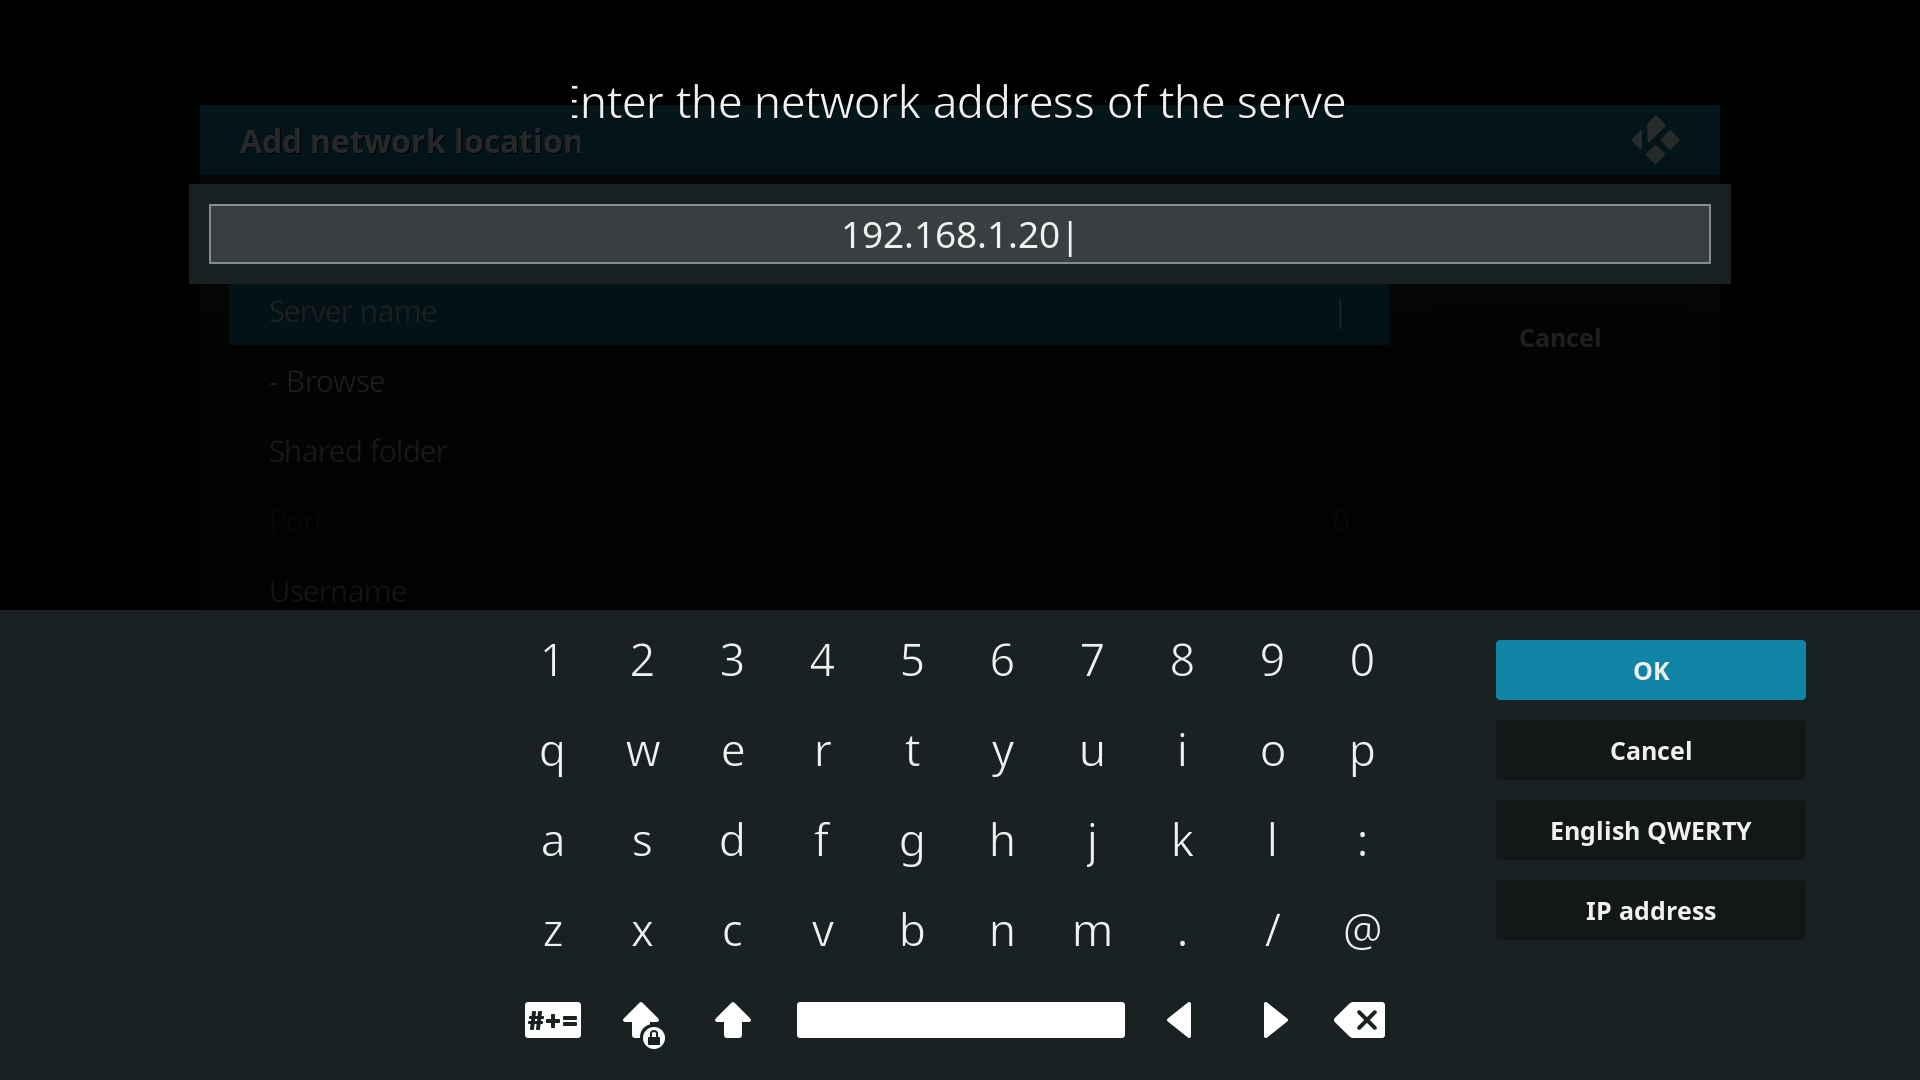
Image 3- Type in either the IP Address or the Device name of your server.
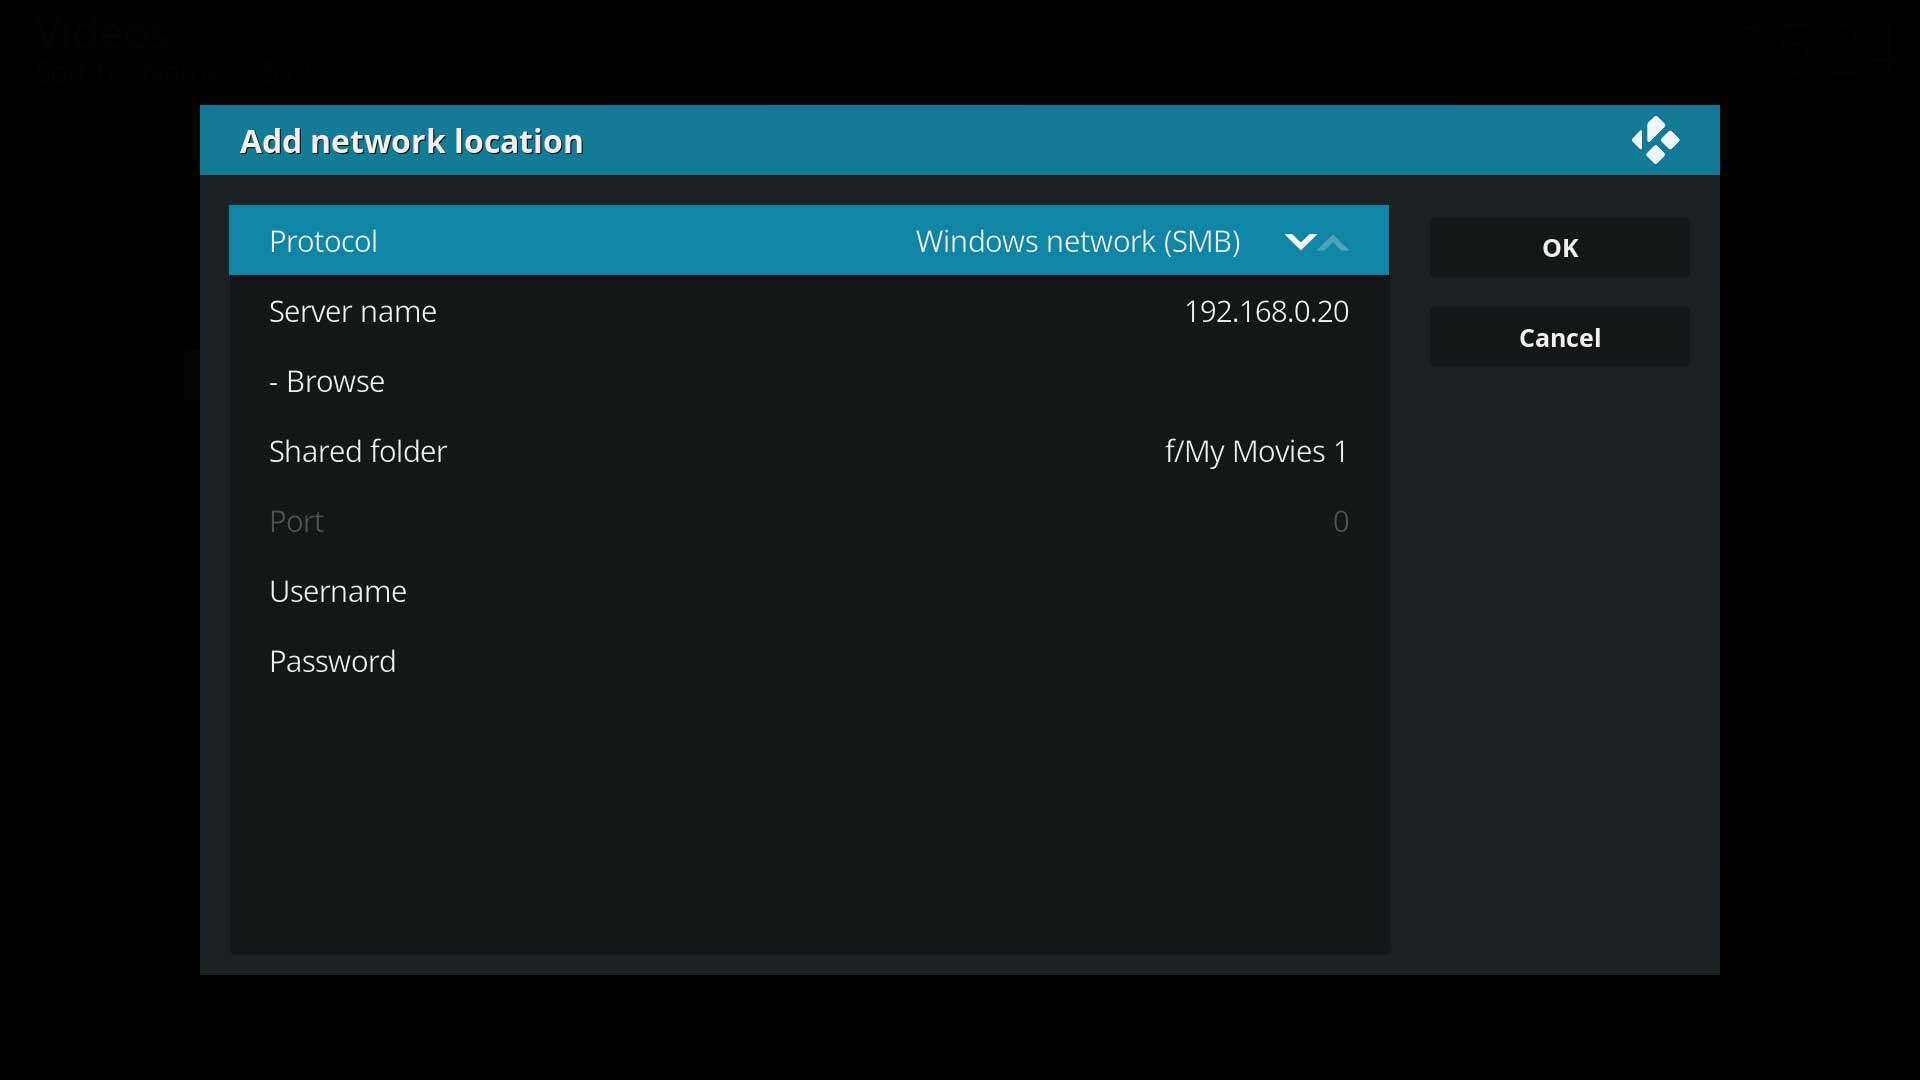
Image 4- Using IP Address
4.1 In the Shared folder section, type in the name of the folder to add.
Add the drive letter eg f/Movies.
4.2 If your share requires a Username and Password enter them in the appropriate sections.
4.3 Select OK and your share should appear in the Browse for new share list shown in image 1.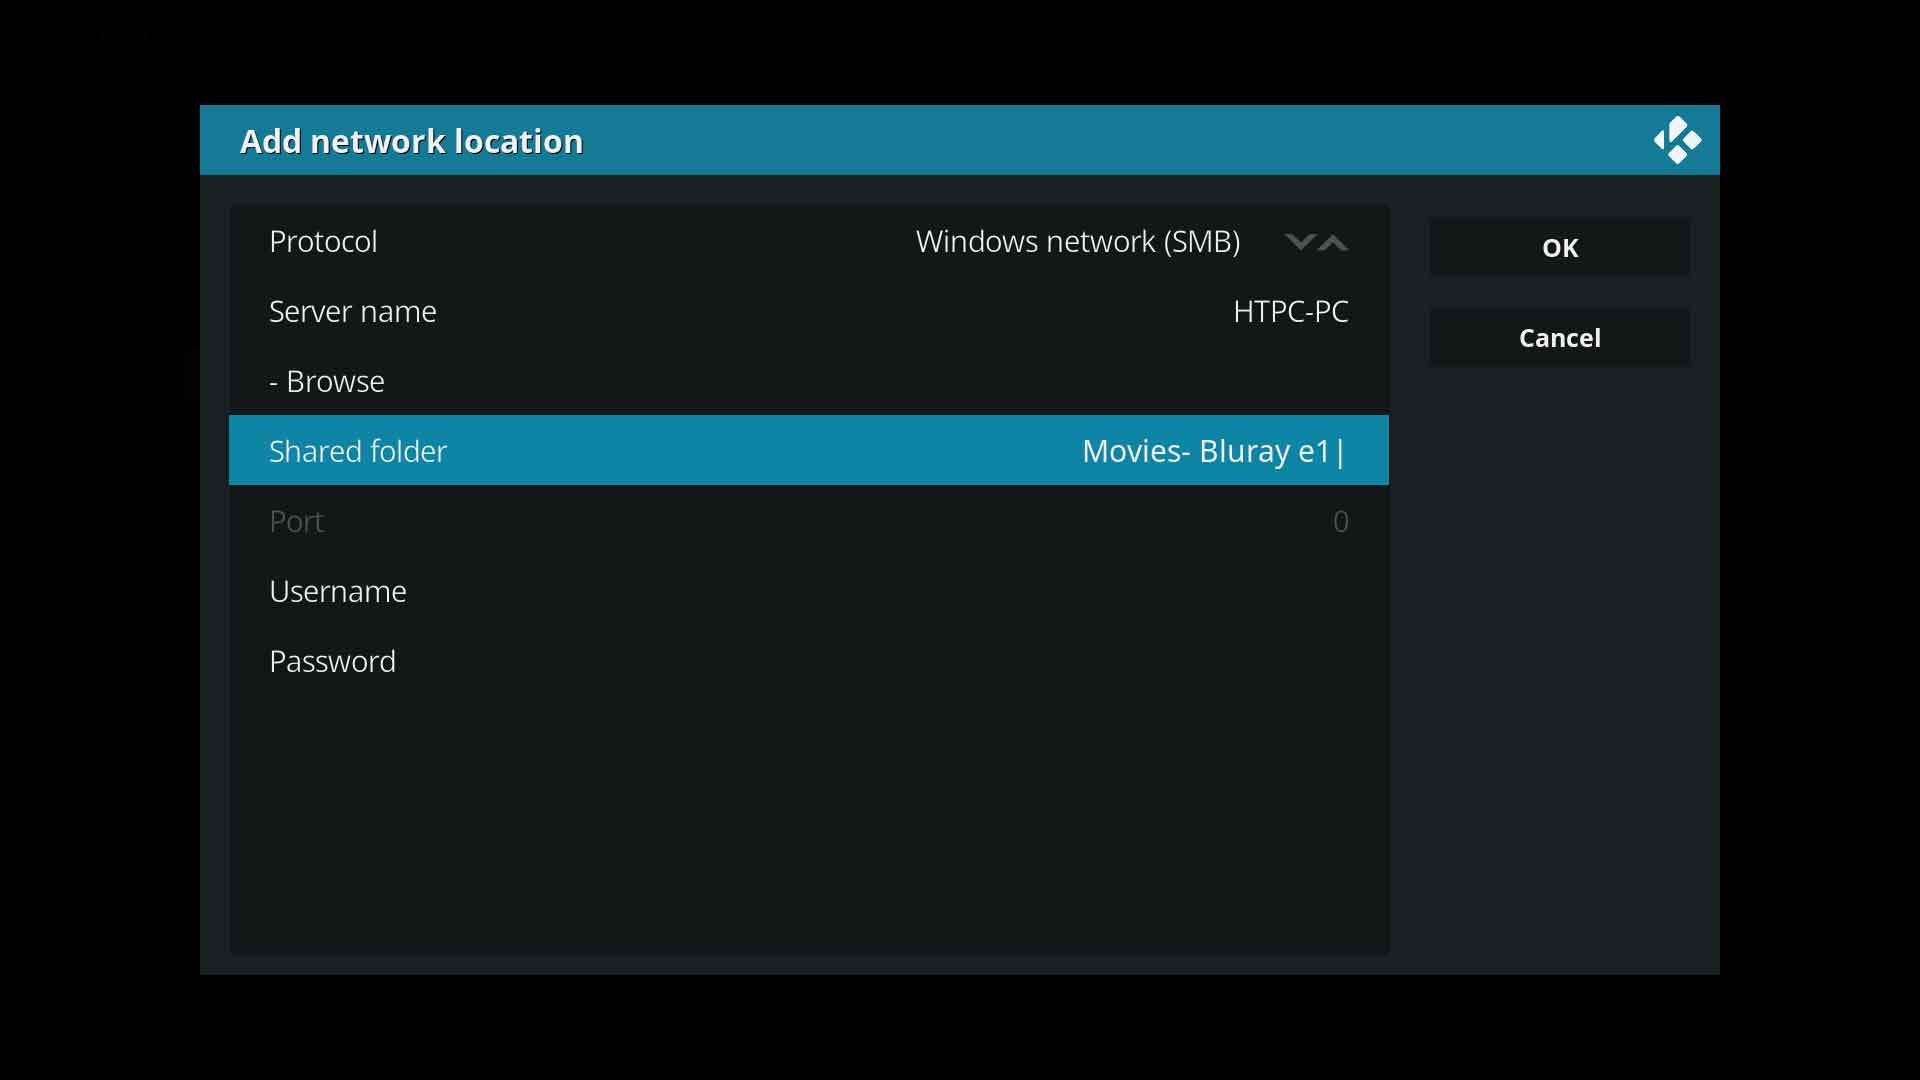
Image 5- Using Device Name
5.1 In the Shared folder section, type in the name of the folder to add
The drive letter is not required.
5.2 If your share requires a Username and Password enter them in the appropriate sections.
5.3 Select OK and your share should appear in the Browse for new share list shown in image 1.


| Return to top |
|---|