Live TV Artwork: Difference between revisions
(Page Creation) |
(Updated for v20) |
||
| (12 intermediate revisions by 2 users not shown) | |||
| Line 1: | Line 1: | ||
{{Artwork_Contents}} | {{Artwork_Contents}} | ||
{{mininav|[[Artwork]]}} | {{PVR guide}} | ||
{{mininav|[[Artwork]] {{l2|[[PVR]]}} }} | |||
= Introduction = | = Introduction = | ||
The Live TV section of {{kodi}} provides the facility to view | The Live TV section of {{kodi}} provides the facility to view terrestrial TV through {{kodi}}. This allows you to view your local TV stations as though you were using a standalone Television or a TIVO type device. You are able to view '''Live TV''', Freeview type '''Program Guides''', '''Record''' programs through Timer Rules and '''watch''' the recorded programs all without ever leaving {{kodi}}. | ||
<section begin="intro" />{{Kodi}} provides the ability to insert the Logo of your TV Stations which then becomes visible in the program guide, on-screen displays and all channel listings, making it easy to distinguish each channel.<section end="intro" /> | <section begin="intro" />{{Kodi}} provides the ability to insert the Logo of your TV Stations which then becomes visible in the program guide, on-screen displays and all channel listings, making it easy to distinguish each channel.<section end="intro" /> | ||
The two following images show some of the uses of the TV | The two following images show some of the uses of the TV Logos. | ||
<gallery widths=500px heights= | <gallery mode="packed" widths="500px" heights="283px"> | ||
File:Artwork-TVLogo01.jpg| | File:Artwork-TVLogo01.jpg| | ||
File:Artwork-TVLogo02.jpg| | File:Artwork-TVLogo02.jpg| | ||
| Line 16: | Line 17: | ||
The following are the two methods for sourcing and applying | The following are the two methods for sourcing and applying logos in {{kodi}}. | ||
= | = Source Logos = | ||
Sourcing TV Station Logos is relatively simple. Some commonly used methods to source logos are: | |||
Sourcing TV Station | |||
*Google Image search | *Google Image search | ||
*Download from the official site of the TV Station | *Download from the official site of the TV Station | ||
*Create your own logos | |||
*Create your own | |||
= Saving Logos = | |||
Once you have sourced your | Once you have sourced your logos, save them to a dedicated channel icon folder that is accessible at all times by {{kodi}}. The images should conform to the image requirements detailed in the following two tables. | ||
'''Note:''' The Aspect Ratios should be maintained as the image fields within skins are not adjustable. Using incorrect ratios may lead to stretching, squashing or cropping of your logos. | |||
| Line 74: | Line 51: | ||
|- valign="top" | |- valign="top" | ||
| width=150px | {{nowrap|*.png}} | | width=150px | {{nowrap|*.png}} | ||
| width=200px | {{nowrap|1 | | width=200px | {{nowrap|1:1}} | ||
| width=200px | {{nowrap|450x450}} | | width=200px | {{nowrap|450x450}} | ||
|} | |} | ||
| Line 80: | Line 57: | ||
<div style="{{linear-gradient|top|#d8ffe2, #76c6f5}}"> | <div style="{{linear-gradient|top|#d8ffe2, #76c6f5}}"> | ||
'''''Naming and Saving conventions for your own manually sourced | '''''Naming and Saving conventions for your own manually sourced logos:''''' | ||
{| | |||
|- valign="top" | |||
| width=300px |'''''Channel Name''''' | |||
| width=250px |'''''File Name''''' | |||
| width=600px |'''''Save name & location example''''' | |||
|- valign="top" | |||
| width=300px |Exactly as displayed in the channel guide | |||
| width=250px |TEN HD.png | |||
| width=600px |A location that is accessible to Kodi | |||
|} | |||
</div> | |||
== Loading Logos- Auto == | |||
{{red|The following is based on NextPVR}} | |||
Kodi can scan your nominated Channel Logo folder for logos. If the logo filenames correctly match the TV channel, Kodi will automatically apply the logo. | |||
</ | :1. In the {{kodi}} settings menu, specify the channel icon folder in {{Highlight|[[Settings/Live_TV/Channels#Folder_with_channel_icons|Settings ▶ PVR & Live TV ▶ Channels]]|bordered=yes}} | ||
:2. Then run the ''Scan for missing icons'' setting | |||
<gallery mode="packed" widths="500px" heights="283px"> | |||
File:Artwork-TVLogo03.jpg|Filenames must match the channel names | |||
File:Settings-PVR-Channels-01.jpg|Set the ''Folder with channel icons''<br>Run ''Scan for missing icons'' | |||
</gallery> | |||
== Loading | == Loading Logos- Manual == | ||
{{red|The following is based on NextPVR}} | {{red|The following is based on NextPVR}} | ||
If the automatic scan did not apply all logos, from within {{kodi}} it is possible to manually add or remove logos by following these directions: | |||
<gallery widths= | <gallery mode="packed" widths="500px" heights="283px"> | ||
File:Artwork- | File:Artwork-TVLogo10.jpg|Image 1- Enable "Show Icons" option | ||
File: | File:Settings-PVR-Channels-01.jpg|Image 2- Set the Logo folder | ||
</gallery> | </gallery> | ||
:1. In the [[Settings/ | :1. From the Sideblade menu in the PVR Homescreen, ensure ''Show Icons'' is enabled (image 1) | ||
: | :2. In the {{kodi}} settings menu, specify the channel icon folder in {{Highlight|[[Settings/Live_TV/Channels#Folder_with_channel_icons|Settings ▶ PVR &Live TV ▶ Channels]]|bordered=yes}} as shown in image 2 | ||
:3. Still in the Settings page shown above, select '''[[Settings/Live_TV/Channel_manager|Channel manager]]''' | |||
<gallery widths= | <gallery mode="packed" widths="500px" heights="283px"> | ||
File: | File:Settings-PVR-ChannelManager-01.jpg|Image 3- Select '''Channel icon''' | ||
File:Artwork- | File:Artwork-TVLogo07.jpg|Image 4- Select '''Browse''' | ||
File:Artwork- | File:Artwork-TVLogo08.jpg|Image 5- Select '''Channel icons''' | ||
</gallery> | </gallery> | ||
: | :4. From the '''Channel manager''' page, scroll to the desired channel. Once the channel is highlighted, move to the right column and select '''Channel icon:''' (image 3) | ||
: | :5. From the '''Browse for icon''' page, select '''Browse''' or other appropriate option (image 4) | ||
: | :6. From the '''Browse for icon''' page, select channel icons folder which is the folder set in the Settings page in image 2 above (image 5) | ||
:7. Select the appropriate icon and press '''OK''' | |||
If loading multiple logos, repeat from Step 6. '''Remeber to save the changes by pressing ''Apply changes now'' then ''OK'' to exit the page. | |||
== TVheadend == | |||
If you are using TVHeadend as your TV server, then it is possible to add logos using it's web admin interface. | |||
You will need to host the logos somewhere on an internal web server or external. | |||
Then you can add the logos in the "User Icon" field manager (TVHeadend web page >> Configuration >> Channel / EPG): | |||
<gallery mode="packed" widths="500px" heights="283px"> | |||
File:TVHeadend_logo.png | |||
</gallery> | |||
| Line 135: | Line 135: | ||
<div style="{{linear-gradient|right|#d8ffe2, #76c6f5}}">{{next|[[PVR|Live TV Guide]]}} </div> | <div style="{{linear-gradient|right|#d8ffe2, #76c6f5}}">{{next|[[PVR|Live TV Guide]]}} </div> | ||
{{updated|20}} | |||
[[Category:PVR]] | [[Category:PVR]] | ||
[[Category: | [[Category:Karellen]] | ||
Latest revision as of 05:43, 25 January 2023
| Artwork contents |
|---|
See also: Return to: |
| Live TV, PVR & Radio Contents |
|---|
|
|
| Related Pages: |
Introduction
The Live TV section of Kodi provides the facility to view terrestrial TV through Kodi. This allows you to view your local TV stations as though you were using a standalone Television or a TIVO type device. You are able to view Live TV, Freeview type Program Guides, Record programs through Timer Rules and watch the recorded programs all without ever leaving Kodi.
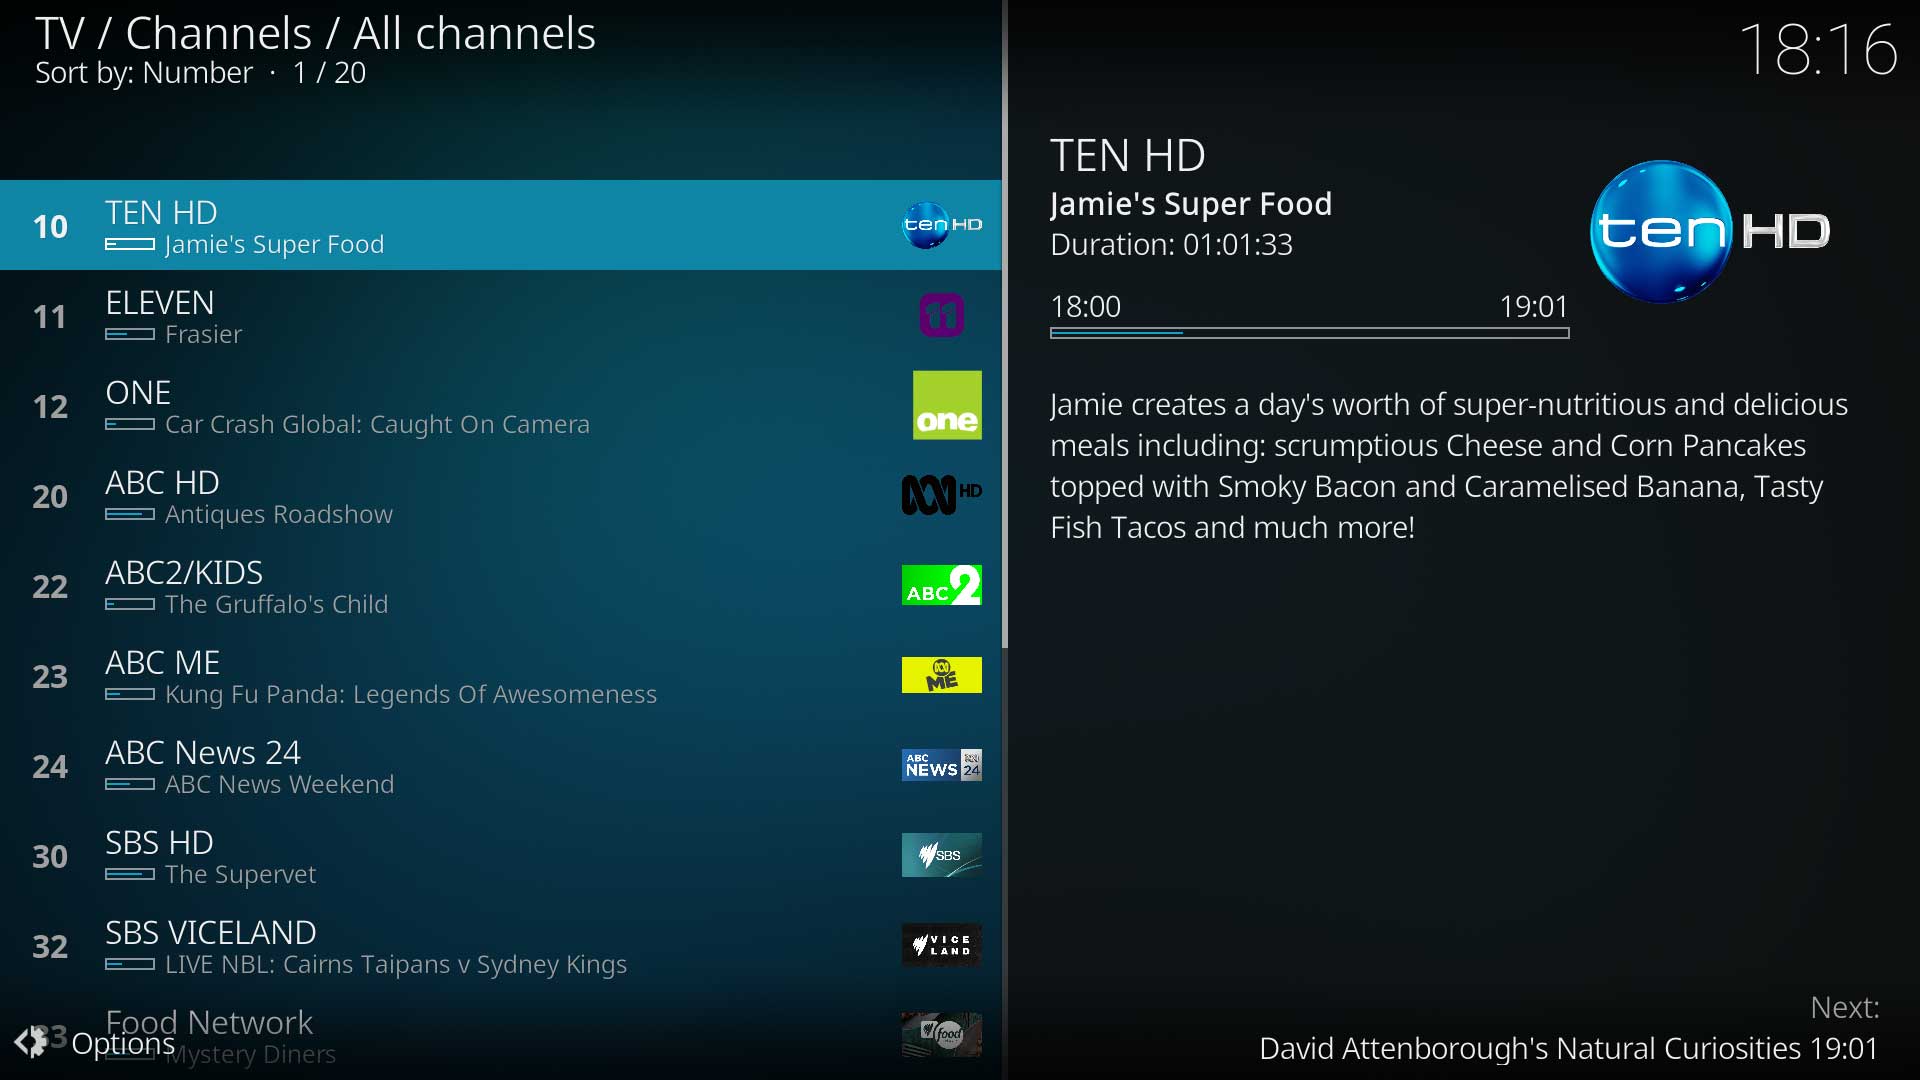
Kodi provides the ability to insert the Logo of your TV Stations which then becomes visible in the program guide, on-screen displays and all channel listings, making it easy to distinguish each channel.
The two following images show some of the uses of the TV Logos.


The following are the two methods for sourcing and applying logos in Kodi.
Source Logos
Sourcing TV Station Logos is relatively simple. Some commonly used methods to source logos are:
- Google Image search
- Download from the official site of the TV Station
- Create your own logos
Saving Logos
Once you have sourced your logos, save them to a dedicated channel icon folder that is accessible at all times by Kodi. The images should conform to the image requirements detailed in the following two tables.
Note: The Aspect Ratios should be maintained as the image fields within skins are not adjustable. Using incorrect ratios may lead to stretching, squashing or cropping of your logos.
Required file properties:
Note: The resolution may be increased but ensure the aspect ratio is maintained
| File Type | Aspect Ratio | Resolution- recommended |
| *.png | 1.78:1 | 800x450 |
| or | ||
| *.png | 1:1 | 450x450 |
Naming and Saving conventions for your own manually sourced logos:
| Channel Name | File Name | Save name & location example |
| Exactly as displayed in the channel guide | TEN HD.png | A location that is accessible to Kodi |
Loading Logos- Auto
The following is based on NextPVR
Kodi can scan your nominated Channel Logo folder for logos. If the logo filenames correctly match the TV channel, Kodi will automatically apply the logo.
- 1. In the Kodi settings menu, specify the channel icon folder in Settings ▶ PVR & Live TV ▶ Channels
- 2. Then run the Scan for missing icons setting
Filenames must match the channel names

Set the Folder with channel icons
Run Scan for missing icons


Loading Logos- Manual
The following is based on NextPVR
If the automatic scan did not apply all logos, from within Kodi it is possible to manually add or remove logos by following these directions:
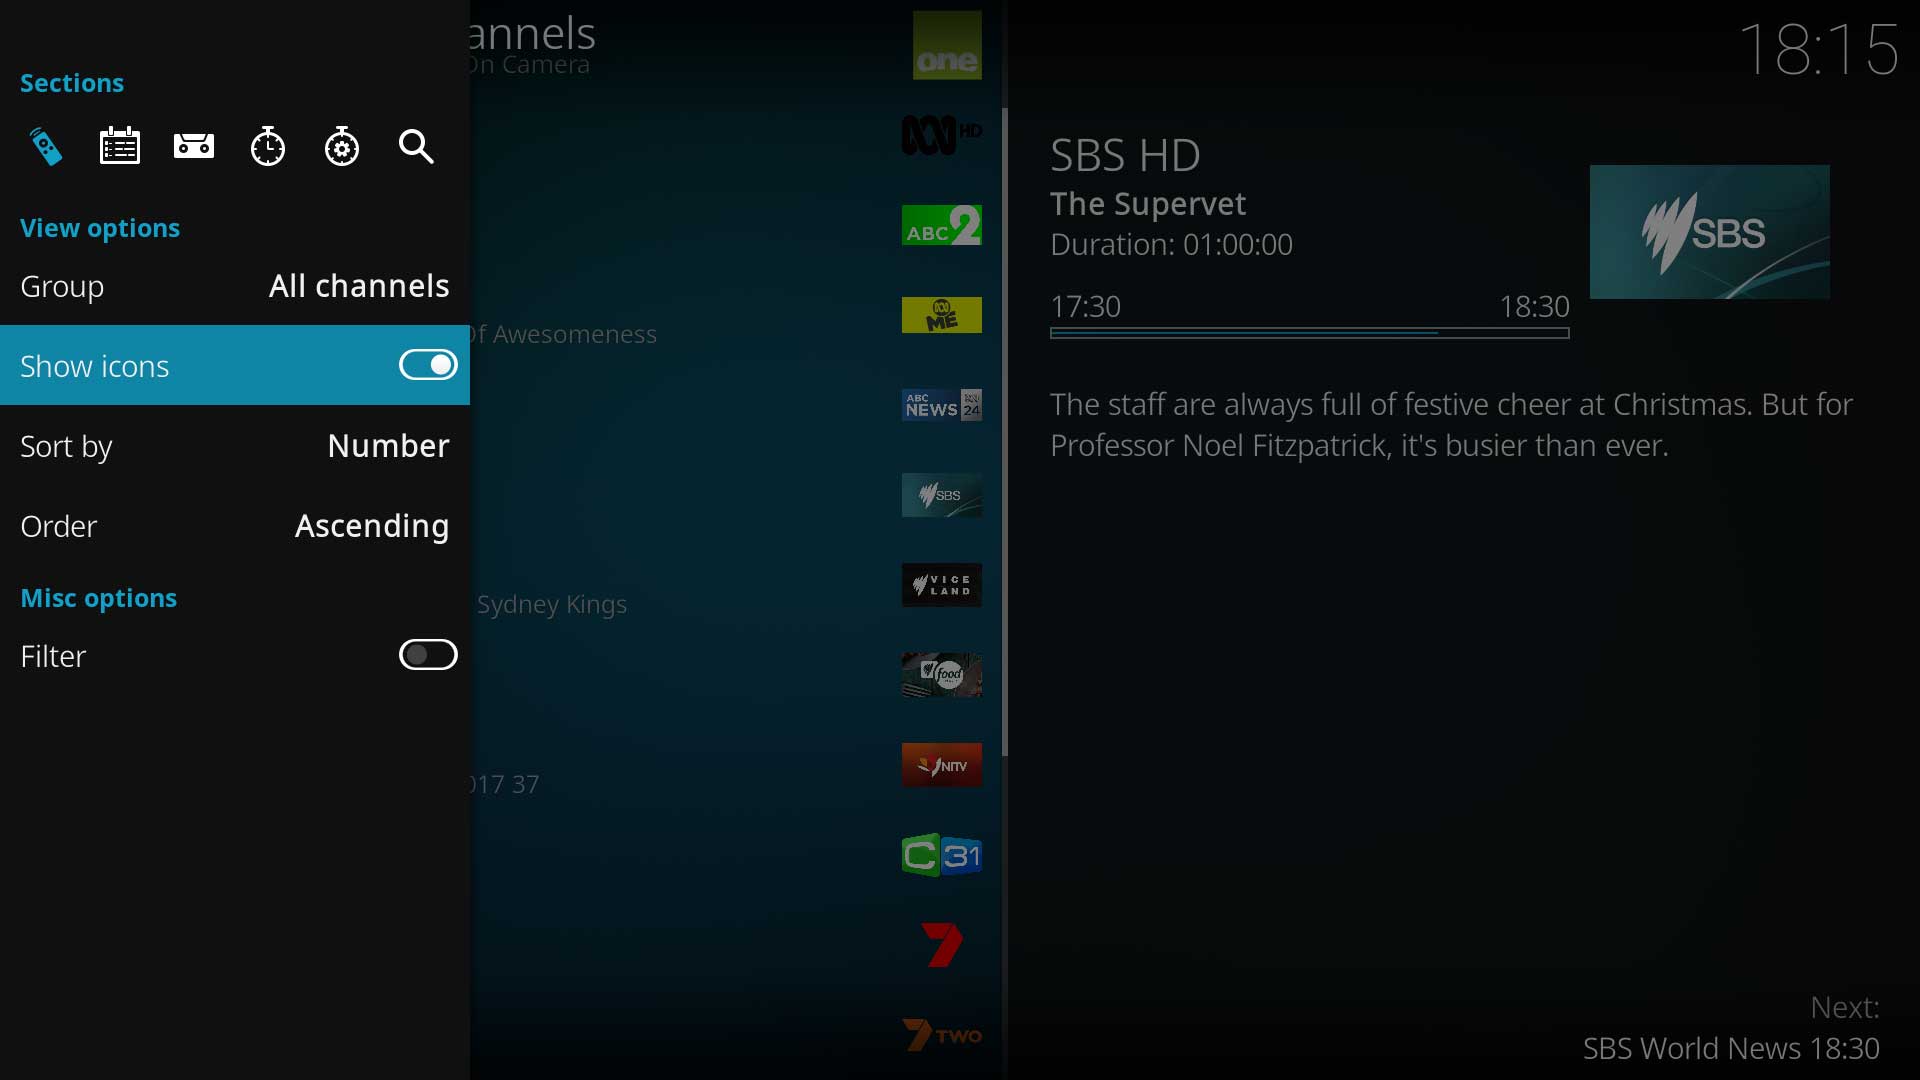
Image 1- Enable "Show Icons" option
Image 2- Set the Logo folder

- 1. From the Sideblade menu in the PVR Homescreen, ensure Show Icons is enabled (image 1)
- 2. In the Kodi settings menu, specify the channel icon folder in Settings ▶ PVR &Live TV ▶ Channels as shown in image 2
- 3. Still in the Settings page shown above, select Channel manager
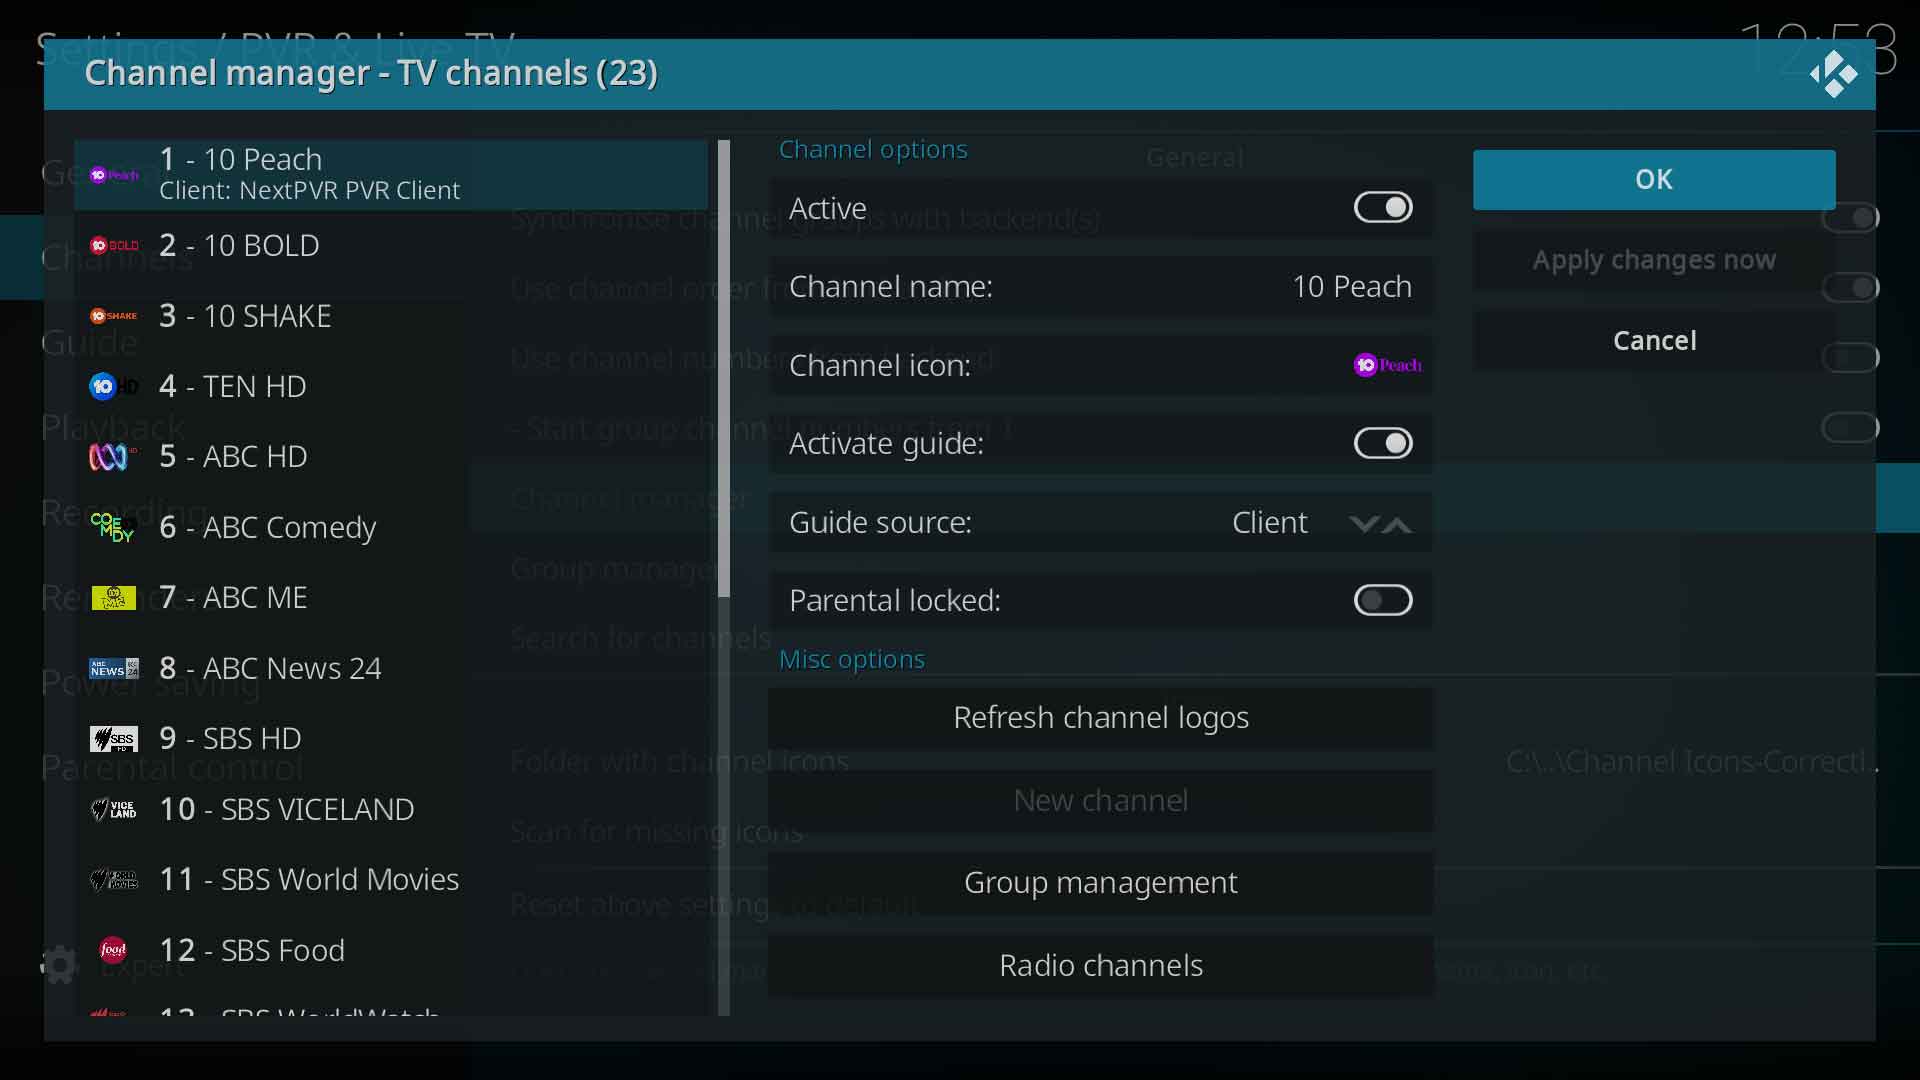
Image 3- Select Channel icon
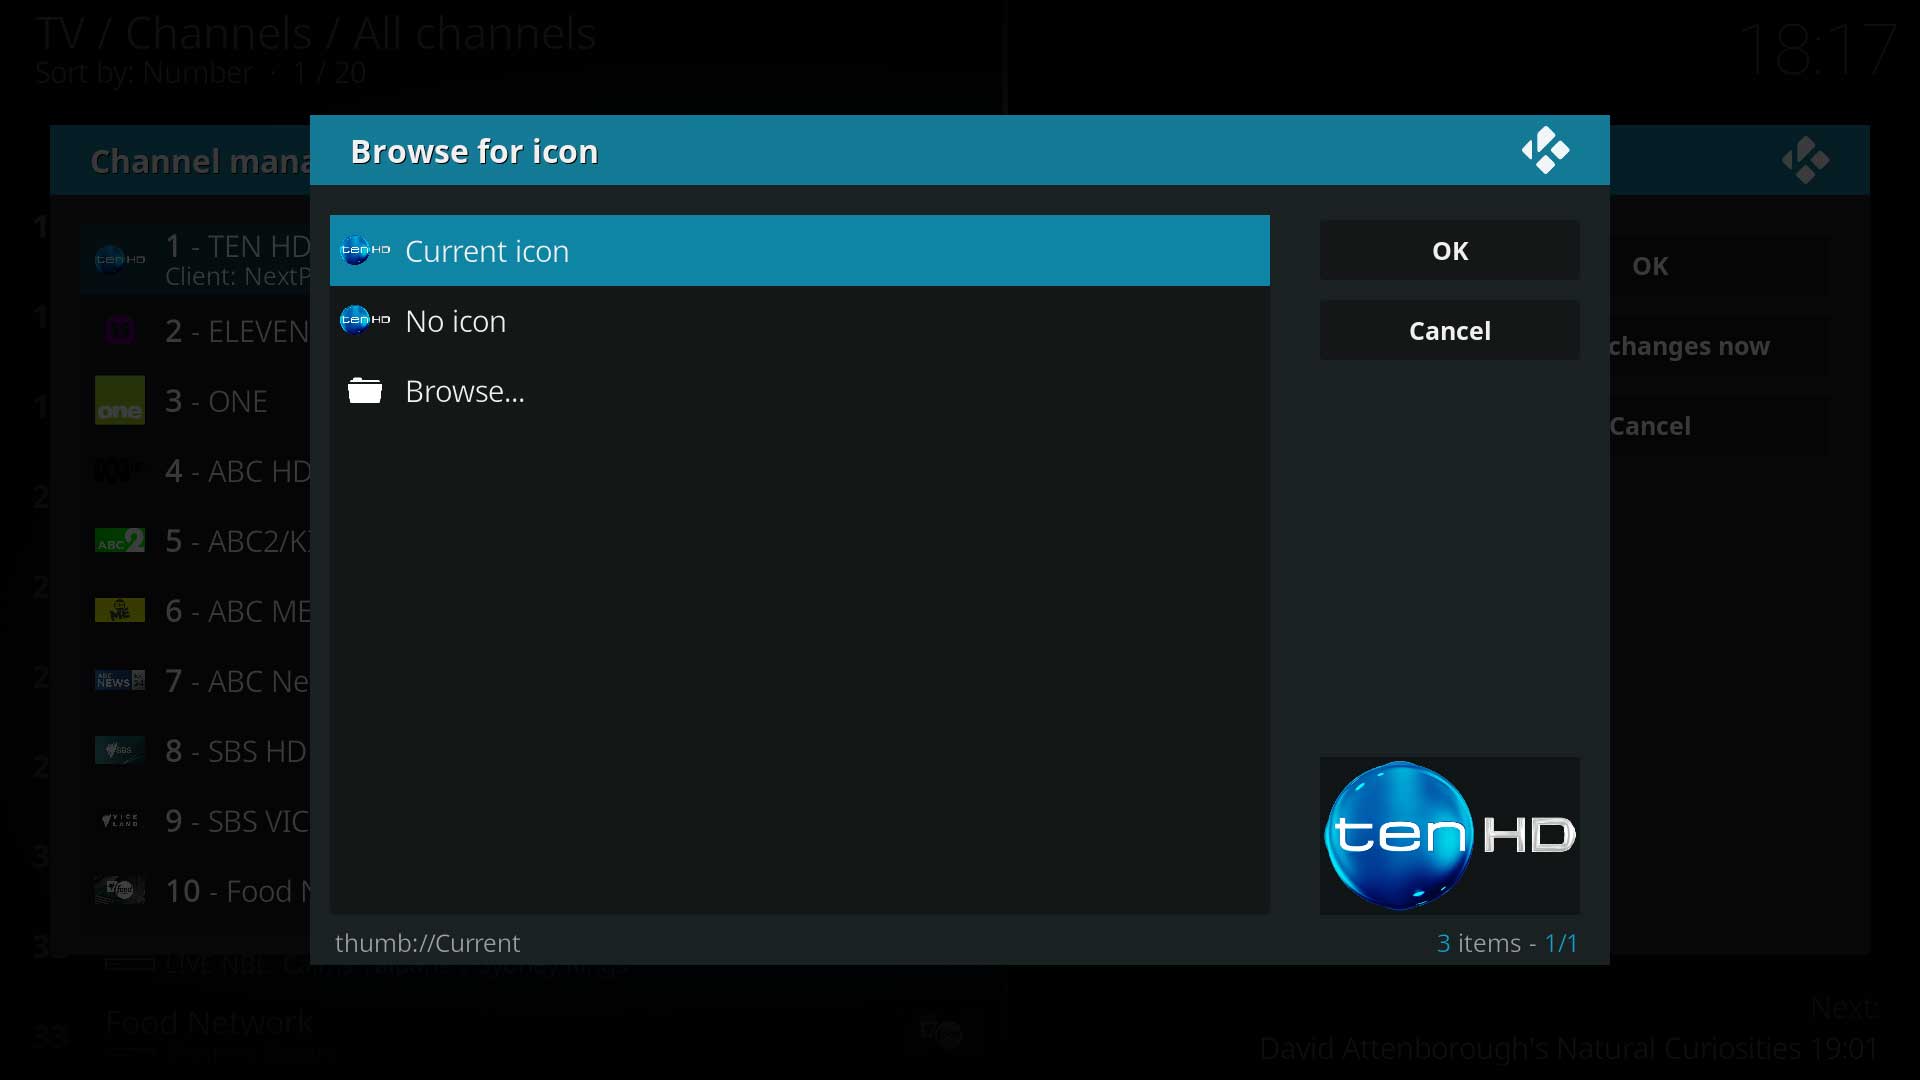
Image 4- Select Browse
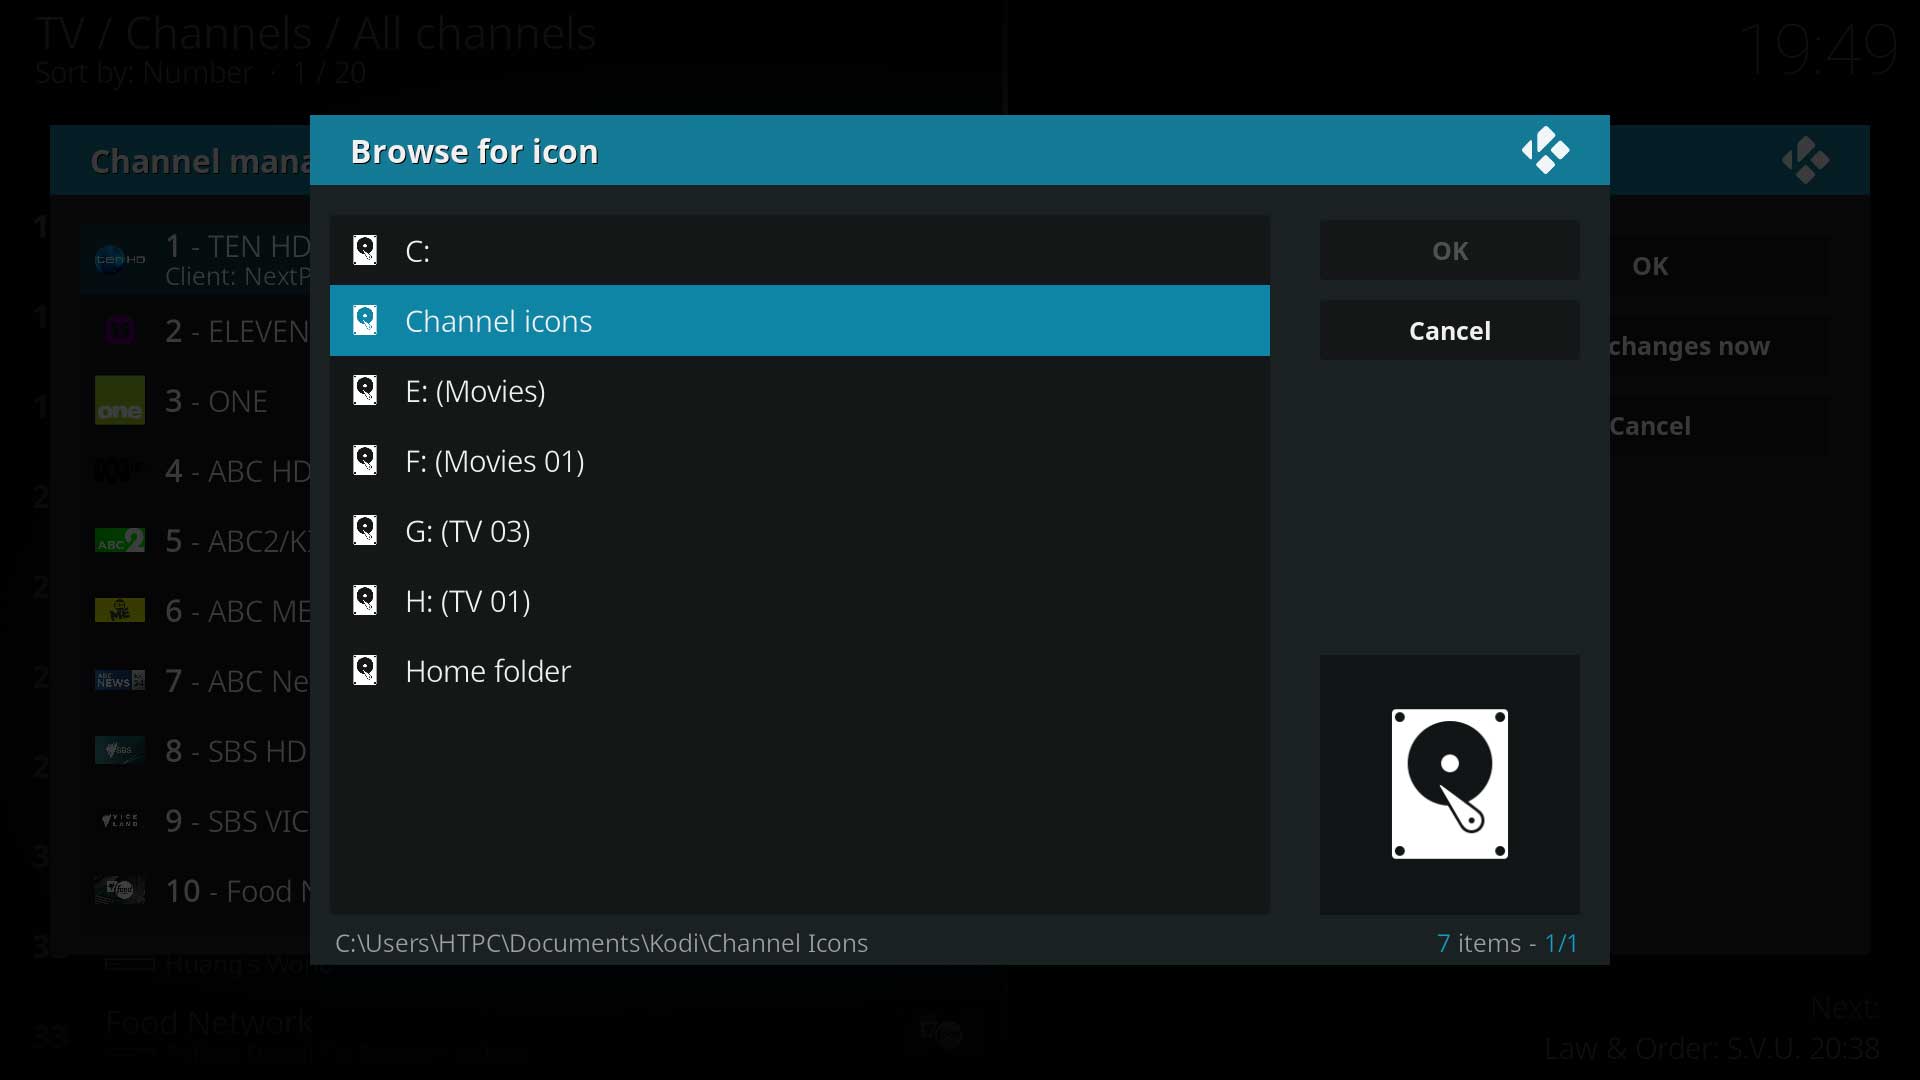
Image 5- Select Channel icons


- 4. From the Channel manager page, scroll to the desired channel. Once the channel is highlighted, move to the right column and select Channel icon: (image 3)
- 5. From the Browse for icon page, select Browse or other appropriate option (image 4)
- 6. From the Browse for icon page, select channel icons folder which is the folder set in the Settings page in image 2 above (image 5)
- 7. Select the appropriate icon and press OK
If loading multiple logos, repeat from Step 6. Remeber to save the changes by pressing Apply changes now then OK to exit the page.
TVheadend
If you are using TVHeadend as your TV server, then it is possible to add logos using it's web admin interface.
You will need to host the logos somewhere on an internal web server or external.
Then you can add the logos in the "User Icon" field manager (TVHeadend web page >> Configuration >> Channel / EPG):
| Return to top |
|---|
| Next step: | Live TV Guide |