|
|
| (114 intermediate revisions by 12 users not shown) |
| Line 1: |
Line 1: |
| {{mininav|[[General topics]]{{l2|[[Devices]]}}|[[Installing]]{{l2|[[Linux]]}}}} | | {{outdated}} |
| {{wiki revamp}}
| |
|
| |
|
| <big>{{notice|'''Test builds''' are available, - you wont need AMD/Nvidia/Intel specific iso, its a generic '''64bit''' XBMCbuntu iso '''Download now''' from '''<code>[[forum:189553|[beta] Xbmcbuntu 13 Testing Thread]]</code>'''|XBMCBuntu V13 testing builds}}</big>
| | {{divbox|red||'''Note:''' This Wiki page is outdated and Kodibuntu is not supported anymore. Therefore Kodibuntu is not available anymore at the download page}} |
|
| |
|
| <section begin="intro" />XBMCbuntu is a boot-USB drive/LiveCD image with [[XBMC]] pre-configured to work directly out-of-the-box for a dedicated set-top-box style installation of XBMC. Users can either demo XBMC without touching the internal HDD, or use it to install XBMCbuntu on the HDD, without any pre-installed operating systems. XBMCbuntu is based on a light weight version of Ubuntu.<section end="intro" /> | | <section begin="intro" />Kodibuntu is a combination Kodi/operating system for use on PCs that are mainly just running Kodi. It is an alternative to installing Windows or a larger (and sometimes more complicated) Linux-based OS.<section end="intro" /> |
|
| |
|
| XBMCbuntu currently supports MCE (Media Center Edition) Remotes with USB IR-receiver receivers directly out-of-the-box. Installation only requires 8GB (or larger) USB drive or internal HDD.
| | == Hardware requirements == |
| | {{see also|Supported hardware}} |
|
| |
|
| When installed onto a USB flash drive or hard disk drive XBMCbuntu has the ability to save settings and make updates to XBMC Media Center and the operating-system back onto the USB flash drive or hard disk drive that it is installed onto, this is not possible when running XBMCbuntu from a Live CD booting from a CD-ROM disc as they are read-only and any changes settings are only temporarily saved until the system is rebooted.
| | Kodibuntu should work with the general hardware requirements for Linux: |
| | {{Collapse top|Click to show hardware requirements -->}} |
| | {{#lst:Supported hardware|Linux}} |
| | {{Collapse bottom}} |
|
| |
|
| == XBMCbuntu FAQ == | | == Installing == |
| :''See also: '''[[XBMCbuntu FAQ]]'''''
| | Kodibuntu comes in an ISO form that can be written to a USB drive or burned to an optical disc. |
|
| |
|
| === Connect to XBMCbuntu via SFTP/SSH ===
| | Download the current stable Kodibuntu image from: '''<code>http://kodi.tv/download/</code>''' |
|
| |
|
| :''See also:'' [[SFTP|Connecting to XBMCbuntu via SFTP]] and [[SSH|Connecting to XBMCbuntu via SSH]] | | The Complete installation guide can be found here: [http://howtouselinux.net/kodi-linux-part-1/ Kodi Linux - The Complete Guide] |
| | |
| | {{note| |
| | * Kodibuntu has only one iso image file for all x86 computers, regardless of GPU. |
| | * Currently, only a '''64-bit''' version is available, but this should cover the vast majority of users. |
| | * A pre release 32bit exists in mirrors with unstable ppa and RC candidate Kodi, which can be upgraded to stable kodi |
| | * There will be no separate Kodibuntu release for Kodi 15.x as it's based on the same OS. To get Kodi 15.x on Kodibuntu, just upgrade the software as suggested below}} |
|
| |
|
| == XBMCbuntu minimum and recommended hardware requirements == | | == Updating == |
| XBMCbuntu starting with v13 is only available as a 64bit base.
| | Current Kodibuntu is based on a LTS release (long term release) which is supported for 5 years, this means that it isn't required to upgrade the OS base in order to obtain updated or upgraded application packages. |
|
| |
|
| {| class="wikitable" style="text-align: center; color:#000000;"
| | === How to upgrade Kodi === |
| !colspan="20" style="background-color:#D1F0FF;"|'''Minimum Required Hardware for XBMCbuntu'''
| | {{main|HOW-TO:Install Kodi for Linux#Upgrading}} |
| |-
| | {{#lst:HOW-TO:Install Kodi for Linux|Ubuntu upgrade}} |
| !colspan="3" |'''CPU'''
| |
| !colspan="3" |'''GPU'''
| |
| !colspan="1" |'''RAM'''
| |
| !colspan="1" |'''OpenGL'''
| |
| !colspan="1" |'''SSE'''
| |
| !colspan="1" |'''HDD/SSD/USB'''
| |
| !colspan="1" |'''Optical Drive'''
| |
| |- | |
| |[http://en.wikipedia.org/wiki/Pentium_4 Intel Pentium 4] <nowiki>|</nowiki> [http://en.wikipedia.org/wiki/Pentium_M Intel Pentium M]
| |
| |[http://en.wikipedia.org/wiki/Athlon_64 AMD Athlon XP/64]
| |
| |[http://en.wikipedia.org/wiki/Opteron AMD Opteron]
| |
| |[http://en.wikipedia.org/wiki/Radeon ATI/AMD]
| |
| |[http://en.wikipedia.org/wiki/Intel_GMA Intel]
| |
| |[http://en.wikipedia.org/wiki/GeForce NVIDIA]
| |
| !rowspan="2" | 1GB
| |
| |rowspan="2" | [[XBMC for Linux specific FAQ|OpenGL 1.4<br/> or newer <br/>(2.0 recommended)]]
| |
| |rowspan="2" {{Yes}}<br/>[http://en.wikipedia.org/wiki/Streaming_SIMD_Extensions SSE]
| |
| |rowspan="2" | '''Internal''' <br/> or '''External''' <br/> '''8GB''' or larger
| |
| |rowspan="2" | '''Optional'''
| |
| |-
| |
| |colspan="3"|Fast modern dual-core processor is required<br />to decode H.264 videos in FullHD (1080p)<br/>Where GPU acceleration isn't supported.
| |
| |HD 4300/4500 Series supported <br/>[http://en.wikipedia.org/wiki/Radeon ATI Radeon R700 (HD 5000)]<br/> supported and recommended
| |
| |style="text-align:left;" |[http://en.wikipedia.org/wiki/Intel_GMA Intel GMA 950 (945G)]<br/> or newer supported<br />[http://en.wikipedia.org/wiki/Intel_GMA Intel GMA X4500HD (G45)]<br/> or newer recommended.
| |
| |style="text-align:left;" |[http://en.wikipedia.org/wiki/GeForce NVIDIA GeForce 6-Series]<br/> and newer supported<br/>[http://en.wikipedia.org/wiki/GeForce GeForce 8-Series]<br/>and newer recommended.
| |
| |-
| |
| |} | |
|
| |
|
| * x86_64 (Intel/AMD) processor computer capable of booting from CD-ROM/USB drive.
| | === When to upgrade the OS === |
| * Optional is to install to a 8GB (or larger) [http://en.wikipedia.org/wiki/USB_flash_drive USB-flash-drive] or internal harddrive.
| |
| * Larger than 8GB is required, if you have a lot of media as thumbs and art are cached on it.
| |
| {{note| If you like to install '''XBMCbuntu''' to '''USB''' and it [http://www.u3.com/uninstall/default.aspx <code>still has U3 software on it (uninstall that first)].</code>}}
| |
| <br/>
| |
| {{note|<code>[http://en.wikipedia.org/wiki/Unified_Video_Decoder#UVD_enabled_GPUs ATI Radeon cards lower than UVD2.2]</code>, '''are not supported''' with Ubuntu & variants 12.10 base system, using fglrx, due to changes in ATI's drivers. Legacy cards that support the minimum OpenGL requirements still can be installed, but you wont get any hardware acceleration playback in XBMC with fglrx and must remain at a specific version to work without bugs..}}
| |
|
| |
|
| == Get and Install XBMCbuntu ==
| | See [https://wiki.ubuntu.com/Releases Current Ubuntu releases] if your current distro is listed under End of life table, you will need to upgrade your OS to a supported release. |
| Download from http://xbmc.org/download/
| |
|
| |
|
| {{note|XBMCbuntu v13 will not have flavours its a generic 64bit ISO}}
| |
|
| |
|
| XBMCbuntu comes in an ISO form that can be burned to an optical disc. It can also be formatted to a USB drive, as mentioned in the next section.
| | == Basic use == |
|
| |
|
| === Via USB drive === | | === Desktop mode === |
|
| |
|
| For instructions on how to acquire, create a bootable usb flash drive, boot or install to/from
| | Kodibuntu can boot directly into Kodi or it can also boot into a desktop mode for using applications such as a web browser. |
|
| |
|
| <big>'''''See: ''[[Create and install from/to a bootable USB flash drive]]'''</big> | | In order to enter desktop mode, follow those steps below: |
| {{cleanup}}
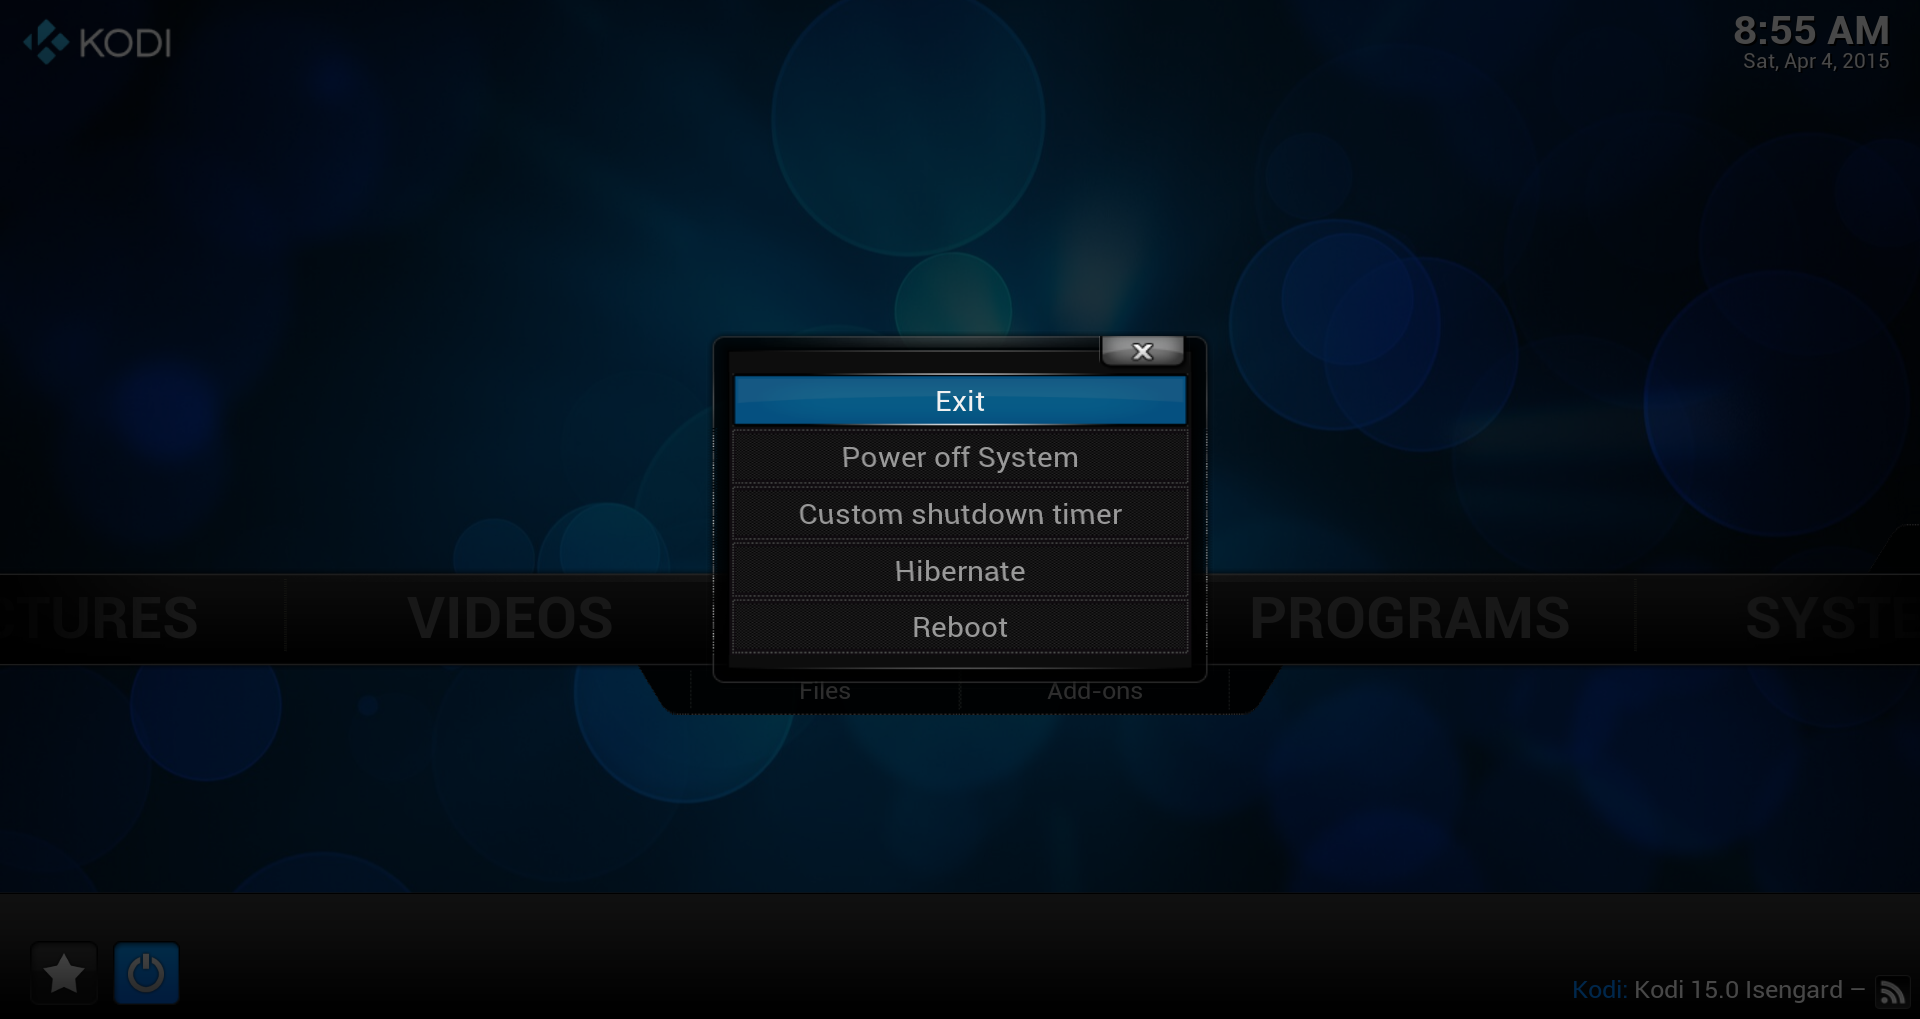
| | <gallery widths=500px heights=313px> |
| === Resolving problematic installs ===
| | File:kodi-exit.png|'''Step 1:''' ''Exit'' Kodi. |
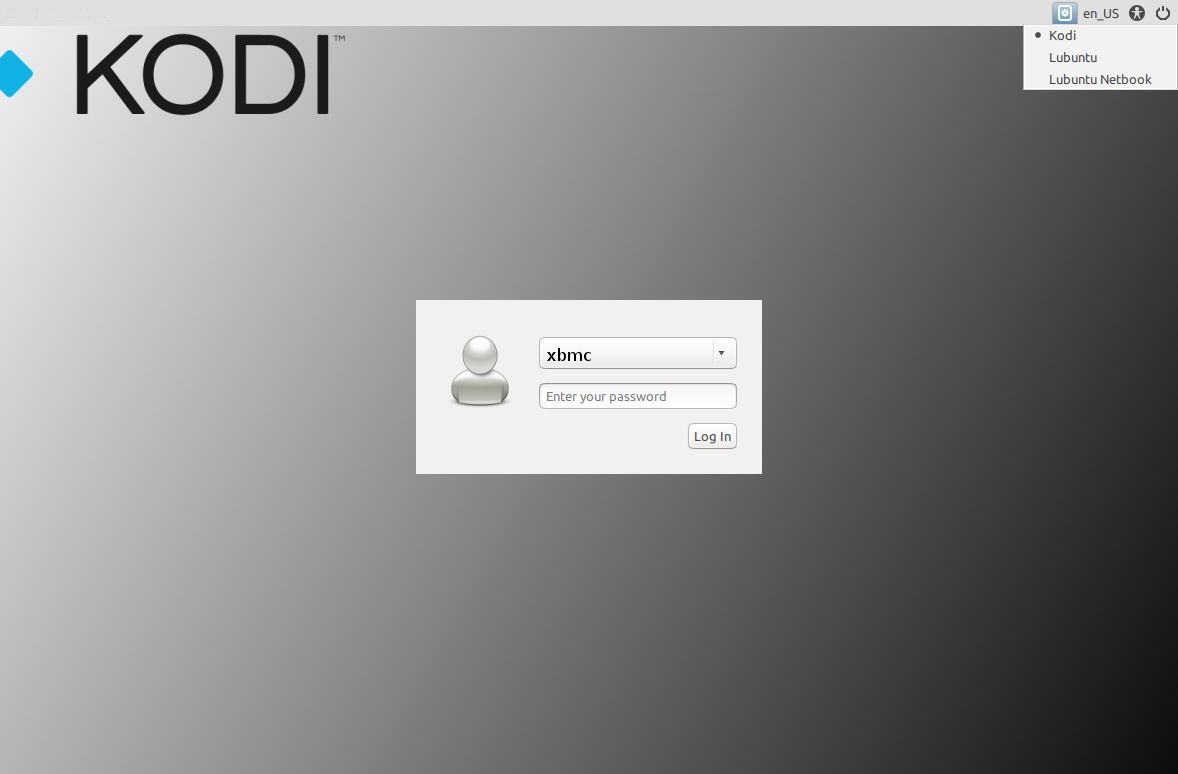
| | File:kodi-session.png|'''Step 2:''' Select ''Lubuntu'' and enter your ''username'' and ''password''. |
| | </gallery> |
|
| |
|
| # Boot your system with the installer thumbdrive and select the "Try Ubuntu" option. This should boot into XBMC.
| | The username may differ from the one you supplied during installation. So please be aware, that "xbmc" (as shown in the screenshot) might not be the username you will see and/or have to use. |
| # Click the Shutdown menu in XBMC (lower-left corner) and select "Exit"
| |
| # You should be presented with a log-in screen. Click "Other..." and enter '''xbmc''' as the login and select '''XBMCbuntu''' from the dropdown menu (below the Login field).
| |
| # Click "Login" and you will be prompted for the Password; just leave it blank.
| |
| # Click "Login" again and the XBMCbuntu desktop should be displayed.
| |
| # On the top-left corner of the desktop should be an icon to install Ubuntu. Double-click the icon and, hopefully, you'll get the installation wizard this time.
| |
|
| |
|
| === Upgrading XBMC via ppa in XBMCbuntu ===
| | {{note|If you last booted directly or switched to desktop and shutdown the HTPC while in desktop, on next reboot you will get the last used session by default.}} |
|
| |
|
| You dont have to necessarily wipe your current install to try a new Version of XBMC, like a nightly version or beta for example, you can just fire up Putty or a shell in Linux/OS X.
| | To return to Kodi, '''logout''', select '''Kodi''' as session in the top-right pulldown menu and enter your ''username'' and ''password'' again. |
|
| |
|
| For up-to-date information on how to upgrade and install and manage Team XBMC ppa's:
| | === Login === |
| | To login to the command line interface press {{keypress|Ctrl|Alt|F1 - F6 }} or connect over [[SSH]] by using usernamne and password supplied during installation. |
|
| |
|
| <big>{{see also|Team_XBMC_PPA}}</big>
| | {{note|For the use of {{keypress|Ctrl|Alt|F1 - F6 }} no username and password is required. You are logged in directly to the command line.}} |
|
| |
|
| {{note| Given the substantial changes that v13 has audio wise, due to redesigned engine, you are recommended to do a fresh install of XBMCbuntu or remove any user configuration files for alsa and or alsa drivers}}
| |
|
| |
|
| ;If you wondering where to type commands
| | === Media center === |
| :''See also:'' [[SSH|Connecting to XBMCbuntu via SSH]]
| | Kodibuntu contains [[Linux|Kodi for Linux]] compiled with the 'standalone' mode, this enabled certain functions that are not available in normal Kodi installations (Windows, Mac Linux), these functions include Power Management, and Network Management. |
|
| |
|
| == XBMCbuntu no audio devices == | | === Using desktop mode === |
| {{note|XBMC V13 will likely not need these changes this are is tagged for removal.}}
| | Chromium is included for web browsing and can be found in the start menu. |
|
| |
|
| For some reason there is a problem with lightdm that affects audio devices detection. A workaround was posted [http://forum.xbmc.org/showthread.php?tid=145451&pid=1322619#pid1322619 '''here'''].
| | In Systems / Package Manager tools - you can install other applications for your specific needs. |
| Modify the /etc/init/lightdm.conf
| |
| <syntaxhighlight lang="bash" enclose="div">sudo nano /etc/init/lightdm.conf</syntaxhighlight>
| |
| ;Input use this configuration:
| |
| <syntaxhighlight lang="xml" enclose="div">
| |
| start on ((filesystem
| |
| and runlevel [!06]
| |
| and started dbus
| |
| and started udev-finish
| |
| and stopped udevtrigger
| |
| and (drm-device-added card0 PRIMARY_DEVICE_FOR_DISPLAY=1
| |
| or stopped udev-fallback-graphics))
| |
| or runlevel PREVLEVEL=S)
| |
| </syntaxhighlight>
| |
|
| |
|
| === Upgrading NVidia drivers in Ubuntu and variants === | | ==Other Uses== |
|
| |
|
| :''see also:'' [[XBMC for Linux specific FAQ#Upgrading NVidia drivers in Ubuntu and variants|Upgrading NVidia drivers in Ubuntu and variants]]
| |
|
| |
|
| === Username and password to the underlying live OS environment === | | ===KodiBuntu VNC Server=== |
| Username and password to the underlying OS environment are not needed by average users of XBMCbuntu, but here they are just in case you want to dig into the (very) advanced possibilities that are available. The default username and password on the live CD are listed below, but during installation, you will be able to change these to your own username and password. We recommend that you write down the username and password you have chosen, and store it away in a safe place;
| |
| Username: '''xbmc'''
| |
| Password: (none)
| |
|
| |
|
| === XBMCbuntu running as Live CD ===
| | https://help.ubuntu.com/community/VNC/Servers |
| * Since a live CD is booted from read-only media, it requires either installation to rewriteable media (i.e. a USB flash drive or hard disk drive) or complete remastering to install additional software or modify the existing files.
| |
|
| |
|
| === XBMCbuntu installed on USB or HDD ===
| | *Install x11vnc |
| :''See also: '''[[HOW-TO:Install XBMCbuntu from a USB thumbdrive|HOW-TO: Install XBMCbuntu from a USB thumbdrive]]'''''
| | *Set password |
| | **x11vnc -storepasswd |
| | *Test connection by running manual start command. |
| | x11vnc -auth guess -forever -loop -noxdamage -repeat -rfbauth /home/USERNAME/.vnc/passwd -rfbport 5900 -shared |
|
| |
|
| * Some computers, particularly older ones, may not have a BIOS that supports USB booting. Many which do support USB booting may still be unable to boot the device in question. In these cases a computer can often be "redirected" to boot from a USB device through use of an [http://www.pendrivelinux.com/2007/11/21/use-a-floppy-to-boot-usb-pendrive-linux/ initial bootable CD or floppy disk] for live USB installs.
| |
|
| |
|
| * In contrast to the live CD, the data contained on the booting device can be changed and additional data stored on the same device. This allows for XBMCbuntu USB/HDD to be used as personal storage, as it allows a user to carry their preferred operating system, applications, and configuration as well as personal files with them, making it easy to share a single system between multiple users.
| | Have x11vnc start automatically via upstart in any environment (<=Utopic) |
| | sudo nano /etc/init/x11vnc.conf |
|
| |
|
| * The absence of moving parts in USB flash devices allows for faster seek time than is possible with hard drives or optical media, meaning all programs will start faster from a USB flash drive than from a local hard disk or XBMCbuntu CD.
| | # description "Start x11vnc at boot" |
| | description "x11vnc" |
| | start on runlevel [2345] |
| | stop on runlevel [^2345] |
| | console log |
| | respawn |
| | respawn limit 20 5 |
| | exec /usr/bin/x11vnc -auth guess -forever -loop -noxdamage -repeat -rfbauth /home/USERNAME/.vnc/passwd -rfbport 5900 -shared |
|
| |
|
| * Due to the additional write cycles that occur on a full-blown installation to a USB flash drive, the life of the USB flash drive may be slightly reduced. This usually does not apply to systems particularly designed for live systems which keep all changes in RAM until the user logs off, and XBMCbuntu developers have done their best to try to prevent this from happening.
| |
|
| |
|
| == XBMC Media Center ==
| |
| XBMCbuntu contains [[XBMC for Linux]] compiled with the 'standalone' mode, this enabled certain functions that are not available in normal XBMC installations (Windows, Mac Linux), these functions include Power Management, and Network Management.
| |
|
| |
|
| == Upgrading XBMCbuntu ==
| |
| To actually update XBMCbuntu, which is a full customised Linux distro, best look at fresh install, unless you are experienced with Linux dist-upgrades. The underlying OS is Lubuntu 14.04LTS.
| |
| It is possible (in order to preserve systems tweaks '''not recommended unless you are experienced user''') to just update XBMC itself by treating it as a normal Linux install and going to: [[XBMCbuntu#Upgrading XBMC via ppa in XBMCbuntu|Upgrading XBMC via ppa in XBMCbuntu]]
| |
|
| |
|
| [[Category:Installation]] | | == See also == |
| [[Category:Linux]] | | * [[Linux]] |
| [[Category:XBMCbuntu|*]]
| | * [[HOW-TO:Install Kodi for Linux]] |
| [[Category:XBMC Manual]] | | * [[JeOS implementations for Kodi]] |

|
THIS PAGE IS OUTDATED:
This page or section has not been updated in a long time, no longer applies, refers to features that have been replaced/removed, and/or may not be reliable.
This page is only kept for historical reasons, or in case someone wants to try updating it.
|
Note: This Wiki page is outdated and Kodibuntu is not supported anymore. Therefore Kodibuntu is not available anymore at the download page
Kodibuntu is a combination Kodi/operating system for use on PCs that are mainly just running Kodi. It is an alternative to installing Windows or a larger (and sometimes more complicated) Linux-based OS.
Hardware requirements
Kodibuntu should work with the general hardware requirements for Linux:
| Click to show hardware requirements -->
|
| CPU
|
x86 or x86-64 processor such as: Intel Pentium 4/ Pentium M, AMD Athlon 64 / Opteron, or newer CPU (that support SSE2, which all CPUs made within the last 10-years does).
- If your GPU/VPU does not support hardware video decoding then you will require a fast modern processor is required to decode some 1080p videos encoded in H.264, VC-1/WMV9, HEVC/H.265 VP9, etc
|
| RAM
|
- Recommended: 1GB or more in a HTPC media player appliance-like computer dedicated for Kodi, and 2GB or more in a computer for multipurpose use.
|
| Graphics
|
Kodi will run on most graphics cards made within the last 10-years or so, though for good hardware video decoding support a little newer graphics cards can be required. This includes most cards from AMD/ATI, Intel, or NVIDIA which support OpenGL 2.0 or later.
AMD/Intel
|
| Video decoding
|
For hardware video decoding, which may be necessary on low-performance CPUs to playback 1080p content, make sure your GPU or VPU supports either VAAPI or VDPAU. For everything but older AMD cards and Nvidia, VAAPI is recommended. On AMD, you might have to start with the environment variable KODI_GL_INTERFACE set to GLX in order to get VDPAU support.
|
| Drive space
|
The Kodi application generally only takes up between 100 to 200 MB of space, depending on how the binary is compiled. Technically speaking, if your hardware supports netbooting, you do not even require a internal storage for either the operating-system or for Kodi.
- Minimum: 4 to 8GB
- Recommended: 16GB or more
- Depending on how big your video library is. Most of the space required for Kodi comes from the images/artwork cache.
|
Note: There´s no 304.xxx driver for Ubuntu 18.04 available anymore from the "Graphic Drivers"-ppa. Users who are using GeForce 6-series cards should either stay on an older Ubuntu version or use newer cards
|
Installing
Kodibuntu comes in an ISO form that can be written to a USB drive or burned to an optical disc.
Download the current stable Kodibuntu image from: http://kodi.tv/download/
The Complete installation guide can be found here: Kodi Linux - The Complete Guide
Note:
- Kodibuntu has only one iso image file for all x86 computers, regardless of GPU.
- Currently, only a 64-bit version is available, but this should cover the vast majority of users.
- A pre release 32bit exists in mirrors with unstable ppa and RC candidate Kodi, which can be upgraded to stable kodi
- There will be no separate Kodibuntu release for Kodi 15.x as it's based on the same OS. To get Kodi 15.x on Kodibuntu, just upgrade the software as suggested below
Updating
Current Kodibuntu is based on a LTS release (long term release) which is supported for 5 years, this means that it isn't required to upgrade the OS base in order to obtain updated or upgraded application packages.
How to upgrade Kodi
To update Kodi when a new version is released, just do a general system/package or use the following commands in the terminal (or via SFTP):
sudo apt update
sudo apt upgrade --with-new-pkgs
When to upgrade the OS
See Current Ubuntu releases if your current distro is listed under End of life table, you will need to upgrade your OS to a supported release.
Basic use
Desktop mode
Kodibuntu can boot directly into Kodi or it can also boot into a desktop mode for using applications such as a web browser.
In order to enter desktop mode, follow those steps below:
Step 2: Select Lubuntu and enter your username and password.
The username may differ from the one you supplied during installation. So please be aware, that "xbmc" (as shown in the screenshot) might not be the username you will see and/or have to use.
Note: If you last booted directly or switched to desktop and shutdown the HTPC while in desktop, on next reboot you will get the last used session by default.
To return to Kodi, logout, select Kodi as session in the top-right pulldown menu and enter your username and password again.
Login
To login to the command line interface press Ctrl+Alt+F1 - F6 or connect over SSH by using usernamne and password supplied during installation.
Note: For the use of Ctrl+Alt+F1 - F6 no username and password is required. You are logged in directly to the command line.
Media center
Kodibuntu contains Kodi for Linux compiled with the 'standalone' mode, this enabled certain functions that are not available in normal Kodi installations (Windows, Mac Linux), these functions include Power Management, and Network Management.
Using desktop mode
Chromium is included for web browsing and can be found in the start menu.
In Systems / Package Manager tools - you can install other applications for your specific needs.
Other Uses
KodiBuntu VNC Server
https://help.ubuntu.com/community/VNC/Servers
- Install x11vnc
- Set password
- Test connection by running manual start command.
x11vnc -auth guess -forever -loop -noxdamage -repeat -rfbauth /home/USERNAME/.vnc/passwd -rfbport 5900 -shared
Have x11vnc start automatically via upstart in any environment (<=Utopic)
sudo nano /etc/init/x11vnc.conf
# description "Start x11vnc at boot"
description "x11vnc"
start on runlevel [2345]
stop on runlevel [^2345]
console log
respawn
respawn limit 20 5
exec /usr/bin/x11vnc -auth guess -forever -loop -noxdamage -repeat -rfbauth /home/USERNAME/.vnc/passwd -rfbport 5900 -shared
See also