HOW-TO:Install Kodi for Windows: Difference between revisions
No edit summary |
No edit summary |
||
| Line 214: | Line 214: | ||
{{updated| | {{updated|18}} | ||
[[Category:Guides]] | [[Category:Guides]] | ||
Revision as of 06:30, 18 April 2019
Installing Kodi
The installation of Kodi for Windows is performed in the same manner as most other windows applications.
The Download page is located here... http://kodi.tv/download/
A number of download options are available, each detailed as follows:
Release or Stable
The Release version is the most current and stable version of Kodi available for Windows. If you are a general user wanting hassle free installation and operation, the Release version is the one for you.
Nightly
Kodi is in a constant state of upgrade and improvement. The Nightly version is the forward progression of the Release version. The nightly does not include new features. It's purpose is to fix bugs that have been discovered in the official Release version of Kodi.
The nightly is available for download and installation. If you have been affected by a bug that is fixed in the nightly version, then it is safe to use a nightly version.
Development Builds
The development builds, often called “pre-release” builds, are what will eventually lead to the final product of the next version. THESE BUILDS COULD BE UNSTABLE and they may have functions and features missing or broken. They are for users that do not fear bugs or possibly crashes and data loss. The Development Builds are made available with the intention that users are willing to help diagnose and improve the product by testing and providing feedback on any issues that are discovered, which helps bring the release of the next version closer.
Do not treat the Development Build as a Stable Release! There will be bugs, missing features and experimental changes. Complaints made on the forum about missing or broken features will be met with silence at best.
If you want a stable and stress free Kodi experience, then please install the stable build instead. Always backup before using a development build.
Which Install Method
There are a number of methods available to install Kodi. Choose an installation method you understand and are comfortable with.
Installer
This is the most commonly used method and is similar to installing any other MS Windows software.
- On the download page, click Installer (32BIT)
- You will be offered the standard Run, Save, Cancel options.
- Once downloaded, installation will commence automatically if the Run option was selected, or you will need to double click the downloaded file if the Save option was selected. Once installation commences, simply follow the steps as shown on screen. For most users the offered default settings are sufficient, if not, change them accordingly if you are sure you have to.
The following video guide may help you with this install process.
Windows Store
Kodi may be downloaded from the Windows Store as an App. It is still the same Kodi version as the “Installer” version. There are no changes or limitations using this version. The store version brings a few benefits, such as automatic updating.
Selecting this option will take you to the Kodi page at the MS Windows Store. Click the large Kodi icon to commence the install process.
To read more about the introduction of the Windows Store version click here... Windows Store Blog
Chocolatey
If you have Chocolatey installed, you may run the command line installer. For instructions, visit the Kodi Package page at Chocolately.
Portable Mode

If you have a requirement to run a different version of Kodi, or run a basic install for the purpose of fault finding and testing, without removing your current installation, Kodi has the ability to run in portable mode. This is a Windows only feature. It gives the user the flexibility to install multiples of the same version or multiple different versions of Kodi.
Follow these steps to install additional Kodi setups on the same computer.
- Download required version of Kodi and run the Installation
- During the installation process you will be prompted to specify the install location. This must be changed from the default location offered. Install to...
- A removable USB device, or
- Another folder or hard drive on your computer. If installed to another folder or hard drive...
- It must be in a location where standard users have write permission (e.g. not under Program Files) or
- Run the shortcut as admin (even though you're logged in with an admin account). Otherwise Kodi will be unable to start and will display the message "ERROR: Unable to create application. Exiting."
- Once the Install has finished do not run Kodi until the remainder of these steps have been completed.
- Navigate to where you just installed Kodi and look for the file kodi.exe
- Create a shortcut to kodi.exe. Usually by right clicking on the kodi.exe file and selecting Send to then desktop (create shortcut)
- Right click on the newly created shortcut and select Properties. There will be a box called Target:, add the switch -p after kodi.exe i.e. P:\Kodi\kodi.exe -p and save the change (see image)
- Start Kodi. This will then use the Kodi folder itself as the Home folder, which means scripts, plugins, skins and userdata will be located in the portable_data folder within the Kodi folder.
- You will, however, have to be careful when upgrading to make sure that the userdata folder you use is not overwritten.
Note: It is this shortcut that enables Portable Mode. If you create another shortcut and fail to add the -p switch, or start this portable version of Kodi in another manner, then the standard userdata folder will be created which may overwrite your existing installation of Kodi.
Upgrading Kodi
The dedicated team of Kodi volunteers are always working to improve and enhance your Kodi experience. At various times throughout the year, new stable versions of Kodi are released.
Upgrading is a simple task. Following the “How To Install” guide above will allow you to upgrade Kodi to the latest version. Be aware of the following though
- It is not necessary to uninstall the previous version. If you are happy with your current setup, installing “over the top” is ok.
- Make a backup of your %appdata%\Kodi directory. Do not upgrade without backing up first.
- See: Backup
- Ensure your hardware meets the minimum requirements before upgrading.
- See: Hardware_requirement
- If you have a favourite add-on or skin, ensure they have also been upgraded to work in the new version of Kodi. If the upgrade is a decimal upgrade (eg v17 to v17.1) then all skins and add-ons should still be compatible.
- It is currently possible to upgrade from v14 to v17 in one jump
Upgrading XBMC
If you are one of the few people still using a version of XBMC, you must follow the instructions in the above mentioned guide to upgrade to the latest stable release. Be aware of the following
- Ensure your hardware meets the minimum requirements before upgrading.
- See: Hardware_requirement
- If you have a favourite add-on or skin, ensure they have also been upgraded to work in the new version of Kodi.
Older Kodi Versions
Looking for an older version of Kodi? They can be found here... http://mirrors.kodi.tv/releases/win32/old/
Uninstalling Kodi
Kodi is installed in two locations. Which parts of Kodi you uninstall depends on the reason for your requirement. The two locations are as follows:
Program
This is the install location for the core program of Kodi. There should be no user interaction with this folder, same as any other program installed in the Program files folder of your computer.
The Kodi program is installed by default here...
C:\Program Files (x86)\Kodi
To uninstall the data from here, you should run Windows Add or Remove Programs. You will also have the option to remove the \Kodi\userdata folder.
Userdata
The userdata folder (aka %AppData% folder or Kodi Roaming folder) is the location where all subsequent changes are made, like creating libraries, new skins or add-ons etc. This is a different Kodi folder to where the Kodi program is installed. All modifications to Kodi are saved in the Userdata folder.
Be aware that when using the term Userdata we are referencing the Kodi folder located in the \Roaming\ folder. By co-incidence there is a userdata subfolder located within the Kodi folder.
You would use this procedure in the following circumstances..
- You are performing a Fresh Install of Kodi.
- You removed the Kodi program from your system, but failed to tick the option to remove \Kodi\Userdata
- You removed the Kodi program from your system, but the Windows Uninstaller failed to remove the \Kodi\Userdata folder
- You are creating a backup
The location of the \Roaming\Kodi\ folder depends on the installation method used:
If you downloaded Kodi from this site and manually ran the installer, you will find the Kodi folder in here...
C:\Users\Your User Name\AppData\Roaming\
If you downloaded Kodi from the Microsoft Store, you will find the Kodi folder in here...
C:\Users\Your User Name\AppData\Local\Packages\XBMCFoundation.Kodi_4n2hpmxwrvr6p\LocalCache\Roaming\
Data in these locations must be manually removed. Options to remove are as follows...
- If you want to retain the userdata folder for backup purposes, simply rename the Kodi folder to something like Kodi-Old.
- If you have no requirement to keep the Userdata folder, then simply Delete the folder and all its subfolders and files
Once renamed or deleted, Kodi will re-create the Userdata folders on next start of the program.
Complete Uninstall
To completely uninstall Kodi, leaving no remnants behind, you must remove the data from both locations- Program and Userdata.
Windows Defender
Windows Defender SmartScreen is a feature of Windows, Internet Explorer, and Microsoft Edge. It is designed to help protect you from websites Microsoft believes are fraudulent that try to steal your personal information. In Internet Explorer 8 and later, SmartScreen also helps protect you from downloading malicious software. Courtesy Microsoft
SmartScreen works in two ways:
- If the downloaded file has been seen before and is known to be dangerous malware, SmartScreen blocks it.
- If the downloaded file has not been seen before and Windows isn’t sure whether it’s safe, Windows prevents the app from starting and warns you it may be dangerous, but lets you bypass this warning.
If you are one of the many users keen on updating to the latest release as soon as it becomes available, you may encounter a problem with Windows Defender Smartscreen blocking the install process. You should only be affected by the second category mentioned above. To override the warning, follow these steps:

When confronted with the following dialogue box, click on the words More Info
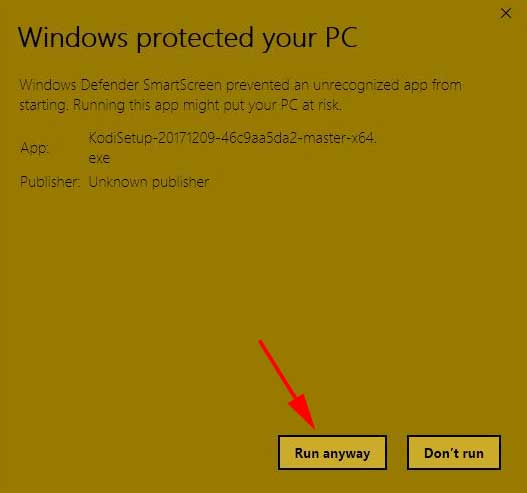
The text will then expand to show the following. Simply click Run anyway.
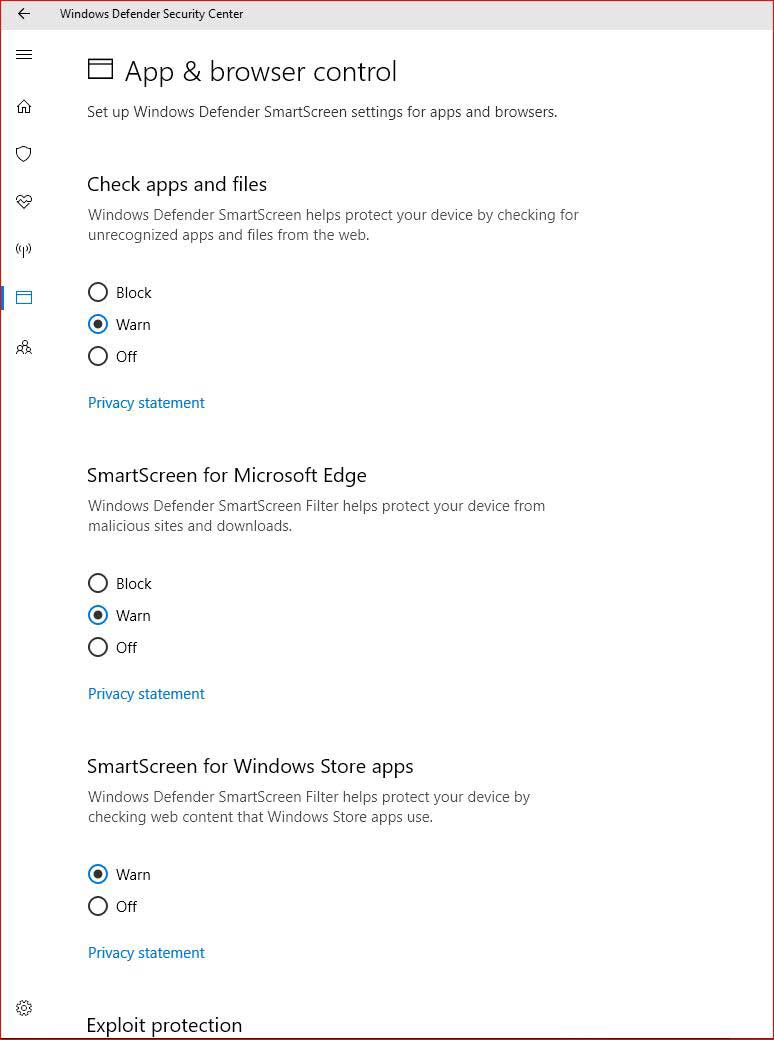
If the previous steps do not work, it may mean that you have your Windows Defender set to Block instead of Warn. To change this in Windows 10, go to settings -> security -> defender -> open defender security settings and change the first setting to Warn as shown in the image.


What Next?

After the installation you can immediately start using Kodi. To start Kodi, find it under the Windows Start button in a Program Group called Kodi. You can also use the desktop icon if you enabled this option during setup.
When starting Kodi for the first time, this screen is displayed.
Now that Kodi is installed and running you will want to add your media to the Library.
- See: First_time_user
| Return to top |
|---|